This topic provides answers to some frequently asked questions about Data Disaster Recovery.
Billing FAQ
How do I fix errors for an abnormal backup schedule?
Description
A backup schedule is abnormal on the Backup Schedules page.

Cause
If your backup schedule is abnormal, at least one task becomes abnormal in the backup schedule. In most cases, the abnormal task may be a full backup task or an incremental backup task. The abnormal task may also be a task of other types.
If an error occurs in a task, Data Disaster Recovery does not directly start the abnormal task. This prevents your business from being affected.
To ensure that your business can run as expected, we recommend that you troubleshoot the error that occurs in your backup schedule at the earliest opportunity. If the error persists after you troubleshoot the error by referring to the solutions provided in this topic, contact technical support in the DingTalk group (ID: 35585947).
Solutions
The following table describes the solutions provided by Data Disaster Recovery to help you fix errors for abnormal tasks in a backup schedule.
Scenario and solution | Precautions |
If you have identified the cause of the error that occurs in an abnormal task and fixed the error, you can restart the abnormal task. For example, if a backup error is caused by the shutdown of the source instance, you can restart the backup task after you start the source instance. |
|
If you have identified the cause of the error that occurs in an abnormal task and fixed the error, you can ignore the error. For example, if a backup error is caused by the shutdown of the source instance or service exceptions, and the source instance is started or services become normal, you can ignore the error. The backup will be performed in the next backup window. | If the error is fixed, the state of the abnormal task changes to Completed after you ignore the error. In this case, if only one abnormal task exists in your backup schedule, the state of the backup schedule changes to Running. If the backup schedule is still abnormal, check whether other abnormal tasks exist in the backup schedule. |
If you cannot determine the cause of the error that occurs in an abnormal task or the solution to the error, you can move the pointer over the exclamation point (!) icon to view the error information. Then, search for the error that you want to fix in the Common errors and troubleshooting for Data Disaster Recovery topic. | If the error is not described in the "Common errors and troubleshooting for Data Disaster Recovery" topic, or your issue persists after you refer to the solutions provided in the topic, contact technical support in the DingTalk group (ID: 35585947). |
Procedure
In the left-side navigation pane, click Backup Schedules. On the Backup Schedules page, find the abnormal backup schedule and click Rectify in the Status column. You are navigated to the task list page based on the type of the abnormal task in the backup schedule.
If the abnormal task is a full backup task, you are navigated to the Full Data page. If the abnormal task is an incremental backup task, you are navigated to the Incremental Data page.

Select a solution based on the abnormal task and your business requirements.
If you want to restart an abnormal backup task, find the task and click Restart Backup in the Status column.
NoteIf you perform full backup, evaluate the impact of full backup on the source database before you restart the abnormal backup task. We recommend that you restart the abnormal backup task during off-peak hours.

If you want to ignore errors for an abnormal task, find the task and click Ignore Error in the Status column.

If you want to fix errors for an abnormal full backup task, find the task and move the pointer over the exclamation point (!) icon in the Status column to view the error information. Then, click View Exception Fixing Suggestions in the Status column. If you want to fix errors for an abnormal incremental backup task, click View Incremental Exception Fixing Suggestions in the upper part of the Incremental Data page. You are navigated to the Common errors and troubleshooting for Data Disaster Recovery topic. Search for the error that you want to fix in the "Common Errors and Troubleshooting for Data Disaster Recovery" topic and try to fix the error based on the solutions provided in the topic.
NoteIf the error that you want to fix is not described in the "Common errors and troubleshooting for Data Disaster Recovery" topic, the error may be caused by an abnormal task of other types. In this case, contact technical support in the DingTalk group (ID: 35585947).

How do I activate Data Disaster Recovery?
If you use Data Disaster Recovery for the first time, you must assign the AliyunDBSDefaultRole role to Data Disaster Recovery and activate Object Storage Service (OSS) to allow Data Disaster Recovery to access, query, and manage your databases and back up your databases to OSS in real time. This authorization operation ensures that the backup and restoration features of Data Disaster Recovery run as expected without affecting the performance of your backup schedules.
Step 1: Assign the AliyunServiceRoleForDBS role to Data Disaster Recovery
The AliyunServiceRoleForDBS role is a Resource Access Management (RAM) role that allows Data Disaster Recovery to access other cloud services. Before Data Disaster Recovery accesses Alibaba Cloud databases that you purchase, such as ApsaraDB RDS instances, ApsaraDB for MongoDB instances, Redis instances, and PolarDB clusters, or self-managed databases hosted on Elastic Compute Service (ECS) instances, the AliyunServiceRoleForDBS role must be assigned to Before Data Disaster Recovery. For more information, see Service-linked roles.
If you use Data Disaster Recovery for the first time, you must assign the AliyunServiceRoleForDBS role to Data Disaster Recovery. For more information about the permissions of the role, see the AliyunServiceRoleForDBS section of the topic.
- Log on to the DMS console V5.0.
In the top navigation bar, choose .
NoteIf you use the DMS console in simple mode, move the pointer over the
 icon in the upper-left corner of the DMS console and choose .
 In the dialog box that appears, click Authorize DBS SLR.
NoteIf the Information dialog box does not appear after you log on to the Data Disaster Recovery console, you can skip the subsequent steps and create a backup schedule. For more information, see Manage a backup by using a disaster recovery data source or Create a backup by using a backup schedule list.
Click OK.
The AliyunServiceRoleForDBS role is created for Data Disaster Recovery. You can delete the role based on your business requirements. For more information, see Delete a RAM role.
Step 2: Activate OSS
You are not charged for activating OSS. After you activate OSS, the backup data generated by Data Disaster Recovery can be stored in OSS.
Log on to the DMS console V5.0.
In the top navigation bar, choose .
NoteIf you use the DMS console in simple mode, move the pointer over the
icon in the upper-left corner of the DMS console and choose . In the dialog box that appears, click Activate OSS Now.
In the dialog box that appears, click Activate Now.
On the OSS page, read and agree to the service agreement by selecting the check box and click Activate Now.
Data Disaster Recovery is activated.
AliyunServiceRoleForDBS
Role name: AliyunServiceRoleForDBS
Policy attached to the role: AliyunServiceRolePolicyForDBS
Permissions:
{
  "Version": "1",
  "Statement": [
    {
      "Action": [
        "rds:DescribeDBInstanceNetInfo",
        "rds:DescribeDBInstanceNetInfoForChannel",
        "rds:DescribeTasks",
        "rds:DescribeDBInstances",
        "rds:DescribeFilesForSQLServer",
        "rds:DescribeImportsForSQLServer",
        "rds:DescribeSlowLogRecords",
        "rds:DescribeBinlogFiles",
        "rds:DescribeSQLLogRecords",
        "rds:DescribeParameters",
        "rds:DescribeParameterTemplates",
        "rds:DescribeDBInstanceAttribute",
        "rds:DescribeDatabases",
        "rds:DescribeAccounts",
        "rds:DescribeSecurityIPList",
        "rds:DescribeSecurityIps",
        "rds:DescribeDBInstanceIPArray",
        "rds:DescribeDBInstanceIPArrayList",
        "rds:DescribeDBInstanceSSL",
        "rds:DescribeDBInstanceTDE",
        "rds:CreateDBInstance",
        "rds:CreateAccount",
        "rds:CreateDatabase",
        "rds:ModifySecurityIps",
        "rds:GrantAccountPrivilege",
        "rds:CreateMigrateTask",
        "rds:CreateOnlineDatabaseTask",
        "rds:DescribeMigrateTasks",
        "rds:DescribeOssDownloads",
        "rds:CreateBackup",
        "rds:DescribeBackups",
        "rds:DescribeBackupPolicy",
        "rds:ModifyBackupPolicy",
        "rds:DescribeBackupTasks",
        "rds:DescribeBinlogFiles"
      ],
      "Resource": "*",
      "Effect": "Allow"
    },
    {
      "Action": [
        "ecs:DescribeInstance",
        "ecs:DescribeInstances",
        "ecs:DescribeVpcs",
        "ecs:DescribeSecurityGroups",
        "ecs:DescribeSecurityGroupAttribute",
        "ecs:AuthorizeSecurityGroup",
        "ecs:JoinSecurityGroup",
        "ecs:RevokerSecurityGroup"
      ],
      "Resource": "*",
      "Effect": "Allow"
    },
    {
      "Action": [
        "kms:ListKeys"
      ],
      "Resource": "*",
      "Effect": "Allow"
    },
    {
      "Action": [
        "cms:PutEventRule",
        "cms:PutEventTargets",
        "cms:ListEventRules",
        "cms:ListEventTargetsByRule",
        "cms:DeleteEventRule",
        "cms:DeleteEventTargets"
      ],
      "Resource": "*",
      "Effect": "Allow"
    },
    {
      "Action": [
        "polardb:DescribeDBClusterIPArrayList",
        "polardb:DescribeDBClusterNetInfo",
        "polardb:DescribeDBClusters",
        "polardb:ModifySecurityIps",
        "polardb:DescribeDBClusterEndpoints",
        "polardb:DescribeDBClusterAccessWhitelist",
        "polardb:ModifyDBClusterAccessWhitelist"
      ],
      "Resource": "*",
      "Effect": "Allow"
    },
    {
      "Action": [
        "dds:DescribeDBInstanceAttribute",
        "dds:DescribeReplicaSetRole",
        "dds:DescribeSecurityIps",
        "dds:DescribeDBInstances",
        "dds:ModifySecurityIps"
      ],
      "Resource": "*",
      "Effect": "Allow"
    },
    {
      "Action": [
        "kvstore:DescribeSecurityIps",
        "kvstore:DescribeInstances",
        "kvstore:DescribeAccounts",
        "kvstore:DescribeDBInstanceNetInfo",
        "kvstore:CreateAccount",
        "kvstore:ModifySecurityIps",
        "kvstore:DescribeInstanceAttribute",
        "kvstore:AllocateInstancePrivateConnection",
        "kvstore:DescribeLogicInstanceTopology"
      ],
      "Resource": "*",
      "Effect": "Allow"
    },
    {
      "Action": [
        "drds:DescribeDrdsDB",
        "drds:DescribeDrdsDBs",
        "drds:DescribeDrdsDbInstance",
        "drds:DescribeDrdsDbInstances",
        "drds:DescribeDrdsDBIpWhiteList",
        "drds:DescribeDrdsInstances",
        "drds:ModifyDrdsIpWhiteList",
        "drds:CreateDrdsDB",
        "drds:DescribeTable",
        "drds:DescribeTables",
        "drds:ModifyRdsReadWeight",
        "drds:ChangeAccountPassword",
        "drds:CreateDrdsInstance",
        "drds:CreateInstanceAccount",
        "drds:CreateInstanceInternetAddress",
        "drds:DescribeInstanceAccounts"
      ],
      "Resource": "*",
      "Effect": "Allow"
    },
    {
      "Action": [
        "vpc:DescribeVpcs"
      ],
      "Resource": "*",
      "Effect": "Allow"
    },
    {
       "Action": [
         "bssapi:QueryResourcePackageInstances"
      ],
       "Resource": "*",
       "Effect": "Allow"
    },
    {
      "Action": "hdm:AddHDMInstance",
      "Resource": "*",
      "Effect": "Allow"
    },
    {
      "Action": "ram:DeleteServiceLinkedRole",
      "Resource": "*",
      "Effect": "Allow",
      "Condition": {
          "StringEquals": {
              "ram:ServiceName": "dbs.aliyuncs.com"
          }
        }
    }
  ]
}
Required permissions for different types of database accounts
How do I ensure the consistency of restored data?
How do I manage the lifecycle rules of backup sets?
What is the backup data size?
How do I view the backup data volume?
Click Manage in the Actions column of the backup schedule.
In the Billing Information section of the schedule details page, view the backup data volume. The following table describes the parameters in this section.

Field
Description
Instance Type
Data Disaster Recovery provides various backup schedule types, including serverless, micro, small, medium, large, and xlarge. For more information, see Select a backup schedule type.
Billing Method
Data Disaster Recovery supports the pay-as-you-go and subscription billing methods. For more information, see Pricing.
Free Quota of Data Volume
The free quota for data backup, unit price, and backup and restoration performance vary based on the backup schedule type. The backup and restoration performance is measured by the amount of time required for backup and restoration. For more information, see Pricing.
NoteYou can upgrade a backup schedule to increase the free quota for data backup. For more information, see Upgrade a backup schedule and Select a backup schedule type.
Billed Data Volume of This Month
You are charged for the amount of data that exceeds the free quota. A backup schedule type with higher specifications offers higher backup and restoration performance at a lower unit price.
Full Data Volume Backed Up This Month
The backup data volume of full backup tasks in the current month.
Incremental Data Volume Backed Up This Month
The backup data volume of incremental backup tasks in the current month.
Statistical Period
The backup data volume is calculated every calendar month.
Created At
The point in time when the backup schedule was created.
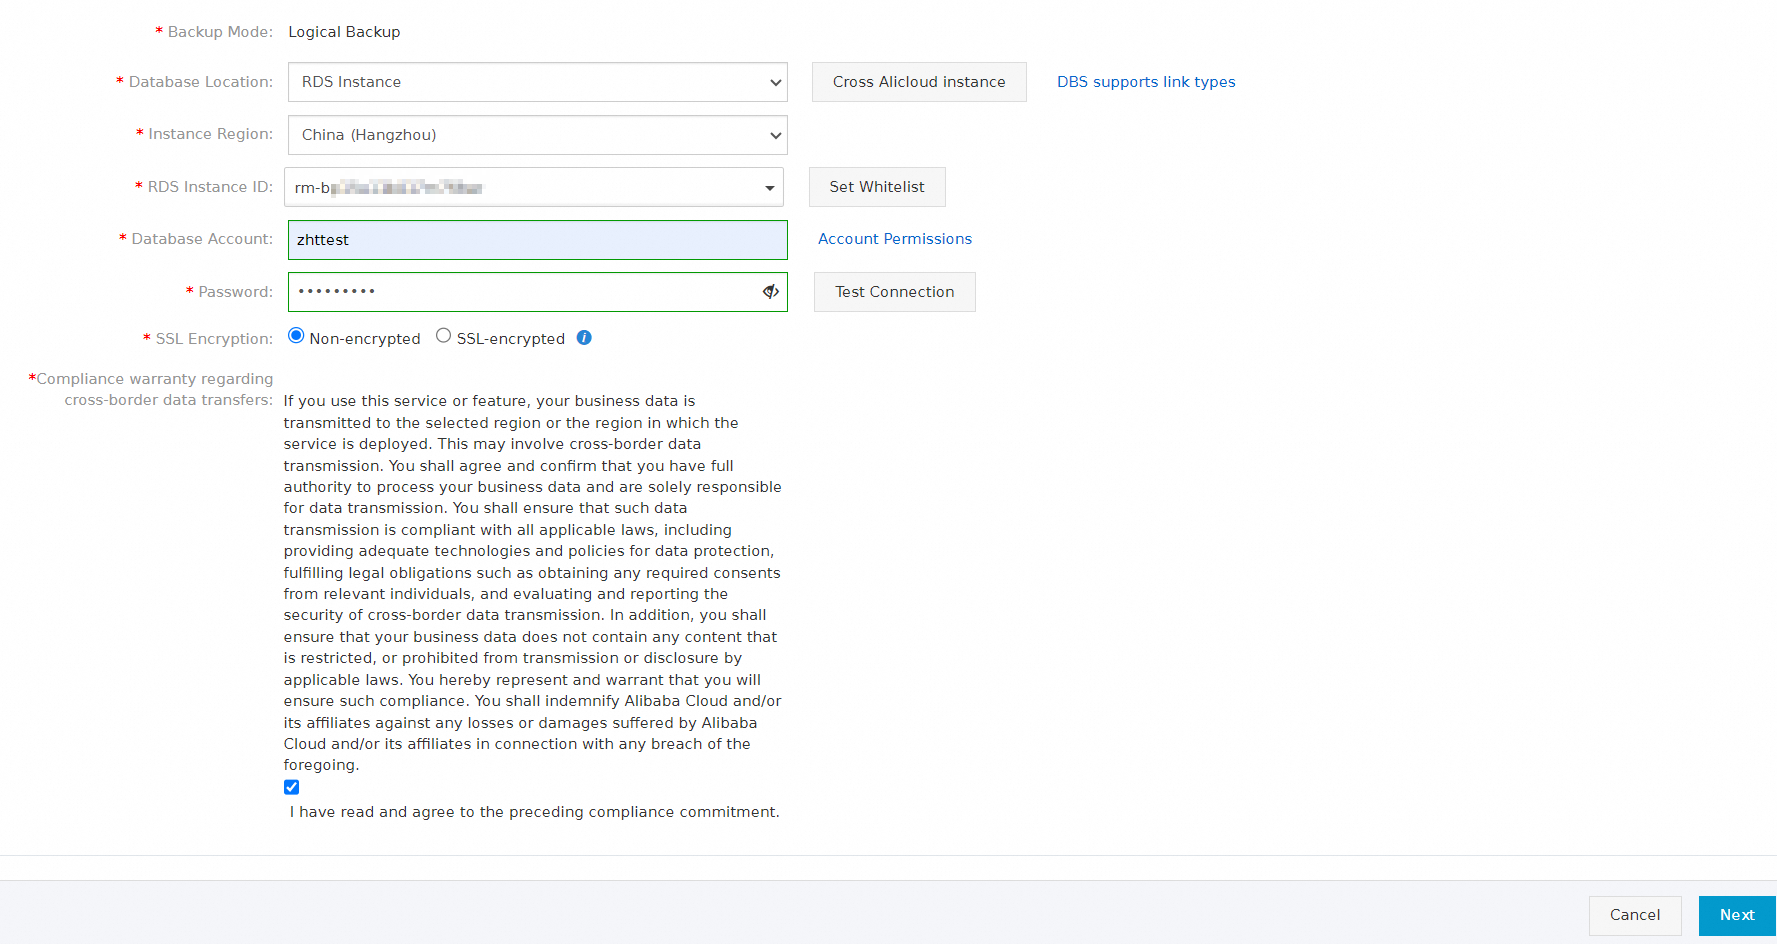
How do I modify the backup source database?
Scenarios
The original backup source database is migrated to another environment or is no longer in use. You want to change the backup source database to another database.
After testing is complete, you want to change the backup source database used in the testing to a production database.
The account and password that are configured to connect to the backup source database are improper, and the database account does not have sufficient permissions. You want to change the database account and password of the backup source database.
The tables of the backup source database change. You want to change the backup objects.
Procedure
Change database account and password or backup objects
Prerequisites
The backup schedule uses the logical backup method.
The database account of the backup source has the permissions to back up and restore data. For more information, see Account permissions.
Procedure
Find the backup schedule that you want to manage and click Manage in the Actions column. The Configure Task page appears.
In the Basic Information section, click Edit Backup Source. For more information about how to configure the backup source for different databases, see Configure a backup schedule and restore data.

Configure the information about the new backup source. After the backup source passes the connection test, click Next.
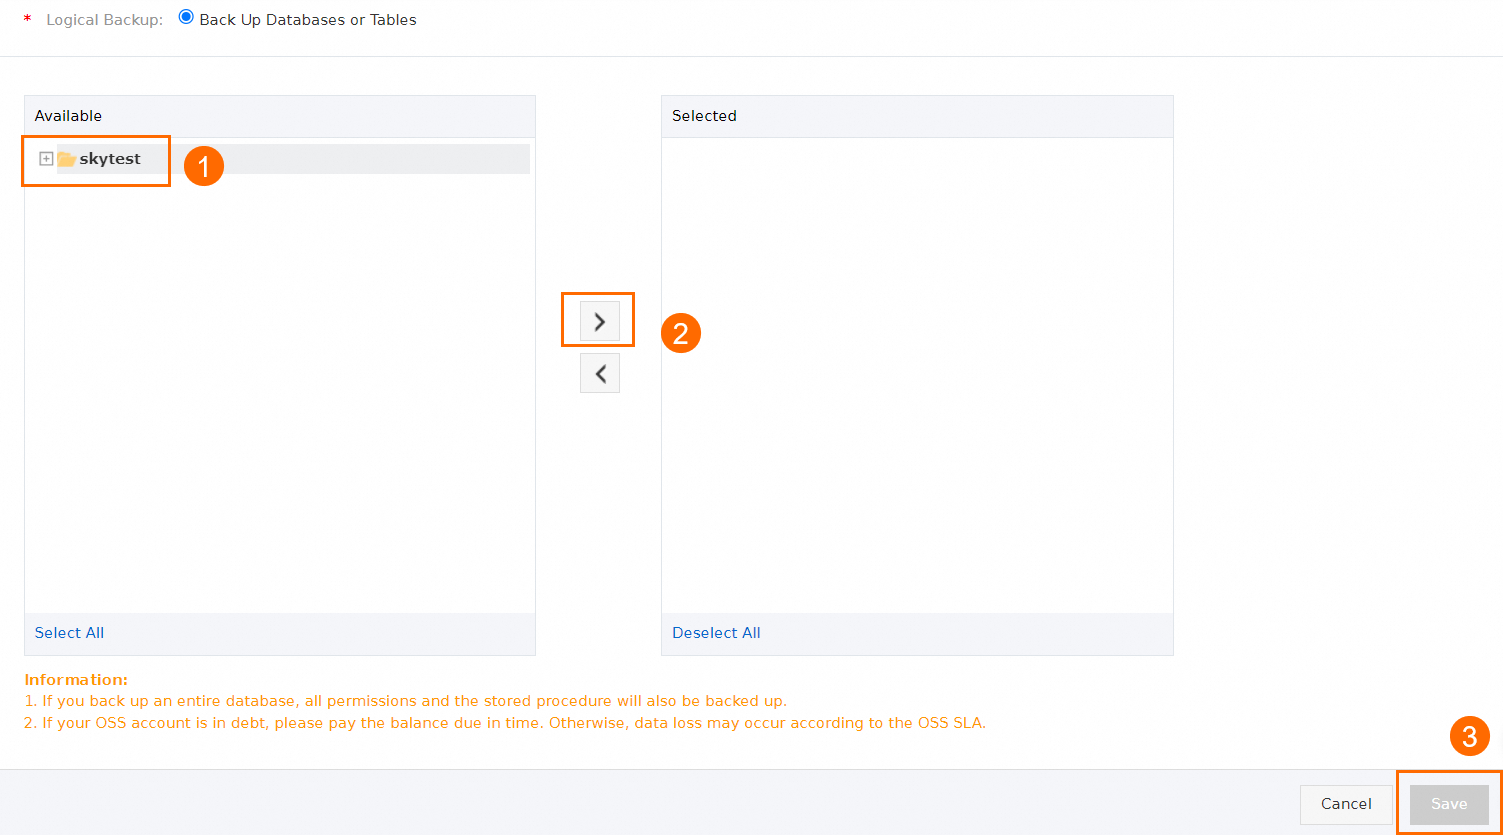
Configure the database objects to be backed up and click Save.
To add a new source database, select the database in the Available section and click the
 icon.
icon. To delete a selected database, select the database in the Selected section and click the
 icon.
icon.

After the precheck is passed, click Start Task. The new backup source is configured.
NoteIf an existing incremental backup task is running based on the backup schedule, the incremental backup task is ended after you click Start Task. The system schedules and starts a new incremental backup task by using the new account and password.
If no full backup task is running based on the backup schedule, the system immediately starts a full backup task after you click Start Task. To minimize the impact on the backup source database, we recommend that you modify the backup configurations during off-peak hours.
If an existing full backup task is running based on the backup schedule, the configurations of the backup task are not updated after you click Start Task. The system performs a full backup based on the latest configurations only when a new full backup task is scheduled or started the next time.
Change only backup objects
Find the backup schedule that you want to manage and click Manage in the Actions column. The Configure Task page appears.
In the Basic Information section, click Edit Backup Objects.

Modify the backup objects and click Save.
To add a new source database, select the database in the Available section and click the
icon. To delete a selected database, select the database in the Selected section and click the
icon.
In the Start Full Data Backup message, click OK or Close.
If you click OK, a full backup task starts in about one minute to back up the objects that are specified in the backup schedule. To minimize the impact on the backup source database, we recommend that you perform this operation during off-peak hours.
If you click Close, the modified configurations are saved, but the system does not immediately perform a full backup. The system performs a full backup based on the latest configurations only when a new full backup task is scheduled the next time.
What is the backup schedule generated by enabling the cross-region backup feature for an RDS instance?
What is the impact of backup on databases?
How do I configure the binlog_format variable of a MySQL database to be backed up?
How do I back up a read-only RDS instance?
Prerequisites
A backup schedule is purchased. For more information, see Create a backup schedule.
NoteWhen you purchase a backup schedule, set the Data Source Type parameter to MySQL and the Backup Method parameter to Logical Backup.
A read-only ApsaraDB RDS for MySQL instance is created. For more information, see Create a read-only ApsaraDB RDS for MySQL instance.
Method 1: Configure a backup schedule for a read-only ApsaraDB RDS for MySQL instance by using its public endpoint
The public endpoint of the read-only instance is obtained. For more information, see View and manage instance endpoints and ports.
The CIDR blocks of the Data Disaster Recovery server are added to the whitelist of the read-only instance. For more information, see Configure an IP address whitelist.
NoteWhen you configure a backup schedule, you can set the Database Location parameter to User-Created Database with Public IP Address <IP Address:Port Number> and click Set Whitelist to obtain the CIDR blocks of the Data Disaster Recovery server.

Method 2: Configure a backup schedule for a read-only ApsaraDB RDS for MySQL instance by using its internal endpoint
The internal endpoint of the read-only instance is obtained. A real-time internal IP address is obtained by running the ping command on your local device.
 Important
The internal IP address that you obtain may change in some scenarios. If the new internal IP address of the read-only instance differs from the internal IP address that is configured in the backup schedule, the backup fails. For more information, see What is the impact of backup on databases?
The CIDR blocks of the Data Disaster Recovery server are added to the whitelist of the read-only instance. For more information, see Configure an IP address whitelist.
NoteWhen you configure a backup schedule, you can set the Database Location parameter to RDS Instance and click Set Whitelist to obtain the CIDR blocks of the Data Disaster Recovery server.

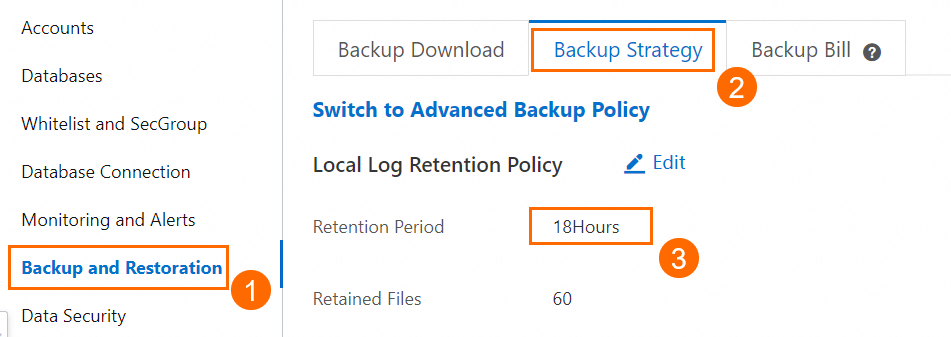
Precautions
If you perform a backup over the public endpoint, the binary logs may be delayed. We recommend that you set the Retention Period parameter to a relatively large value on the Backup and Restoration page of the read-only ApsaraDB RDS for MySQL instance. This parameter indicates the retention period of local logs. Default value: 18. Unit: hours.
If you use the internal endpoint to configure a backup schedule and you clone the read-only instance, migrate the instance to another zone, or change the VPC or vSwitch of the instance, the real-time internal IP address that you obtain may change. In this case, the instance fails to be connected, and the backup fails.
To resolve this issue, you can obtain a new real-time internal IP address and reconfigure a backup schedule. For more information, see the Prerequisites section of this topic and How do I modify the backup source?
Procedure
When you configure a backup schedule for a read-only ApsaraDB RDS for MySQL instance, you can set the Database Location parameter to User-Created Database with Public IP Address <IP Address:Port Number> or Express Connect DB/VPN Gateway/Intelligent Gateway.
Method 1: Configure a backup schedule for a read-only ApsaraDB RDS for MySQL instance by using its public endpoint
On the Backup Schedules page, find the ID of the backup schedule that you want to configure and click Configure Backup Schedule in the Actions column.

In the Configure Backup Source and Destination step of the Configure Backup Schedule wizard, configure the backup source and destination. Then, click Next in the lower-right corner of the page.
NoteSet the Database Location parameter to User-Created Database with Public IP Address <IP Address:Port Number>.
Set the Address parameter to the public endpoint of the read-only ApsaraDB RDS for MySQL instance. For more information, see View and manage instance endpoints and ports.
For more information about how to configure other parameters, see Manage a backup schedule.
In the Edit Backup Objects step, find the database or table that you want to back up and add it to the Selected section. Then, click Next.
NoteIf you selected Logical Backup when you purchased a backup schedule, Data Disaster Recovery allows you to specify the databases and tables to be backed up during full backups. You can back up a single table, a single database, multiple databases, or an entire database instance for some types of databases during full backups. Data Disaster Recovery supports incremental backups only for some types of databases. By default, all the incremental data is backed up during incremental backups.
You can click Select All in the lower-left corner of the Available section to back up the entire database. The database objects that can be backed up and the backup granularity vary based on the database type. For more information, see Supported database types and features.
By default, a backup schedule cannot be used to back up a database that is created after the backup schedule is configured. To back up the database, you can add the database to the backup schedule on the Edit Backup Objects page of the backup schedule. For more information, see Modify backup objects.
If you selected Physical Backup when you purchased a backup schedule, you must back up an entire database instance.
In the Configure Backup Time step, configure the parameters that are described in the following table and click Next.
Parameter
Description
Full-scale Backup Frequency
The frequency of the backup schedule. Valid values: Periodic Backup and Single Backup.
NoteIn scenarios in which incremental data needs to be restored, we recommend that you select Periodic Backup and perform a full backup at least once a week. Otherwise, a large number of binary logs must be replayed during restoration. This process is prone to errors and may result in a prolonged recovery time objective (RTO).
Full Data Backup Recurrence
This parameter is required if you set the Full-scale Backup Frequency parameter to Periodic Backup. You can select the days of the week on which Data Disaster Recovery runs the backup schedule. Select at least one day of the week.
Start At
This parameter is required if you set the Full-scale Backup Frequency parameter to Periodic Backup. We recommend that you set a point in time within off-peak hours. Example: 01:00.
NoteIf a previous full data backup is not complete at the start time of the next backup, Data Disaster Recovery skips the next backup.
Incremental Backup
Specifies whether to enable incremental backup. If you enable incremental backup, make sure that the binary logging feature is enabled for the database that you want to back up.
NoteThis parameter is displayed only when you set the Full-scale Backup Frequency parameter to Periodic Backup.
By default, the binary logging feature is enabled for an ApsaraDB RDS for MySQL instance. If you use a self-managed database, you must manually enable the binary logging feature.
Maximum Concurrent Threads for Full Data Backup
The maximum number of concurrent threads that are available for a full backup. You can configure this parameter to adjust the backup speed. For example, you can reduce the number of backup threads to minimize impacts on the database.
Backup network speed limit
The limit on the network bandwidth. Unit: MB/s. You can set the limit based on your business requirements. The default value 0 indicates that the network bandwidth is unlimited.
NoteThis parameter is displayed only when you configure a backup schedule for a MySQL database.
In the Edit Lifecycle step, configure the lifecycle for full backup data in the Configure Full Data Backup Lifecycle section.
NoteIf you set the Incremental Backup parameter to Enable, you must configure the lifecycle for incremental backup data.
After the configurations are complete, click Precheck in the lower-right corner of the page.
If the Precheck Passed message appears, click Start Task.
NoteIf the state of the backup schedule changes to Running, the backup schedule takes effect.
If an exception or error occurs when you start the backup schedule, troubleshoot the exception or error at the earliest opportunity. For more information, see How do I fix errors for an abnormal backup schedule? If your issue persists after you use the solution that is provided in the preceding topic, contact technical support in the DingTalk group (ID: 35585947).
Method 2: Configure a backup schedule for a read-only ApsaraDB RDS for MySQL instance by using its internal endpoint
On the Backup Schedules page, find the ID of the backup schedule that you want to configure and click Configure Backup Schedule in the Actions column.
In the Configure Backup Source and Destination step of the Configure Backup Schedule wizard, configure the backup source and destination. Then, click Next in the lower-right corner of the page.
 Note
NoteSet the Database Location parameter to Express Connect DB/VPN Gateway/Intelligent Gateway.
Set the Peer VPC parameter to the VPC in which the read-only ApsaraDB RDS for MySQL instance is deployed.
Set the Address parameter to the internal IP address that you obtain. For more information, see the Prerequisites section of this topic.
Set the Port Number parameter to the port number of the read-only ApsaraDB RDS for MySQL instance.
For more information about how to configure other parameters, see Manage a backup schedule.
In the Edit Backup Objects step, find the database or table that you want to back up and add it to the Selected section. Then, click Next.
NoteIf you selected Logical Backup when you purchased a backup schedule, Data Disaster Recovery allows you to specify the databases and tables to be backed up during full backups. You can back up a single table, a single database, multiple databases, or an entire database instance for some types of databases during full backups. Data Disaster Recovery supports incremental backups only for some types of databases. By default, all the incremental data is backed up during incremental backups.
You can click Select All in the lower-left corner of the Available section to back up the entire database. The database objects that can be backed up and the backup granularity vary based on the database type. For more information, see Supported database types and features.
By default, a backup schedule cannot be used to back up a database that is created after the backup schedule is configured. To back up the database, you can add the database to the backup schedule on the Edit Backup Objects page of the backup schedule. For more information, see Modify backup objects.
If you selected Physical Backup when you purchased a backup schedule, you must back up an entire database instance.
In the Configure Backup Time step, configure the parameters that are described in the following table and click Next.
Parameter
Description
Full-scale Backup Frequency
The frequency of the backup schedule. Valid values: Periodic Backup and Single Backup.
NoteIn scenarios in which incremental data needs to be restored, we recommend that you select Periodic Backup and perform a full backup at least once a week. Otherwise, a large number of binary logs must be replayed during restoration. This process is prone to errors and may result in a prolonged recovery time objective (RTO).
Full Data Backup Recurrence
This parameter is required if you set the Full-scale Backup Frequency parameter to Periodic Backup. You can select the days of the week on which Data Disaster Recovery runs the backup schedule. Select at least one day of the week.
Start At
This parameter is required if you set the Full-scale Backup Frequency parameter to Periodic Backup. We recommend that you set a point in time within off-peak hours. Example: 01:00.
NoteIf a previous full data backup is not complete at the start time of the next backup, Data Disaster Recovery skips the next backup.
Incremental Backup
Specifies whether to enable incremental backup. If you enable incremental backup, make sure that the binary logging feature is enabled for the database that you want to back up.
NoteThis parameter is displayed only when you set the Full-scale Backup Frequency parameter to Periodic Backup.
By default, the binary logging feature is enabled for an ApsaraDB RDS for MySQL instance. If you use a self-managed database, you must manually enable the binary logging feature.
Maximum Concurrent Threads for Full Data Backup
The maximum number of concurrent threads that are available for a full backup. You can configure this parameter to adjust the backup speed. For example, you can reduce the number of backup threads to minimize impacts on the database.
Backup network speed limit
The limit on the network bandwidth. Unit: MB/s. You can set the limit based on your business requirements. The default value 0 indicates that the network bandwidth is unlimited.
NoteThis parameter is displayed only when you configure a backup schedule for a MySQL database.
In the Edit Lifecycle step, configure the lifecycle for full backup data in the Configure Full Data Backup Lifecycle section.
NoteIf you set the Incremental Backup parameter to Enable, you must configure the lifecycle for incremental backup data.
After the configurations are complete, click Precheck in the lower-right corner of the page.
If the Precheck Passed message appears, click Start Task.
NoteIf the state of the backup schedule changes to Running, the backup schedule takes effect.
If an exception or error occurs when you start the backup schedule, troubleshoot the exception or error at the earliest opportunity. For more information, see How do I fix errors for an abnormal backup schedule? If your issue persists after you use the solution that is provided in the preceding topic, contact technical support in the DingTalk group (ID: 35585947).
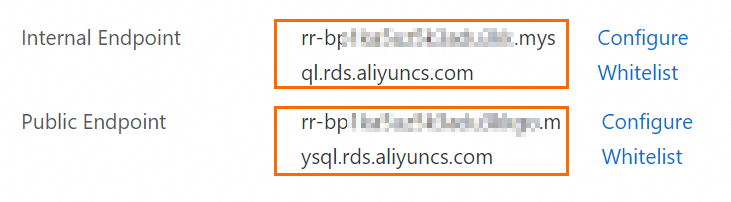
How do I obtain the internal and public endpoints of a read-only ApsaraDB RDS for MySQL instance?
Go to the Instances page. In the top navigation bar, select the region in which the RDS instance resides. Then, find the RDS instance and click the ID of the instance.
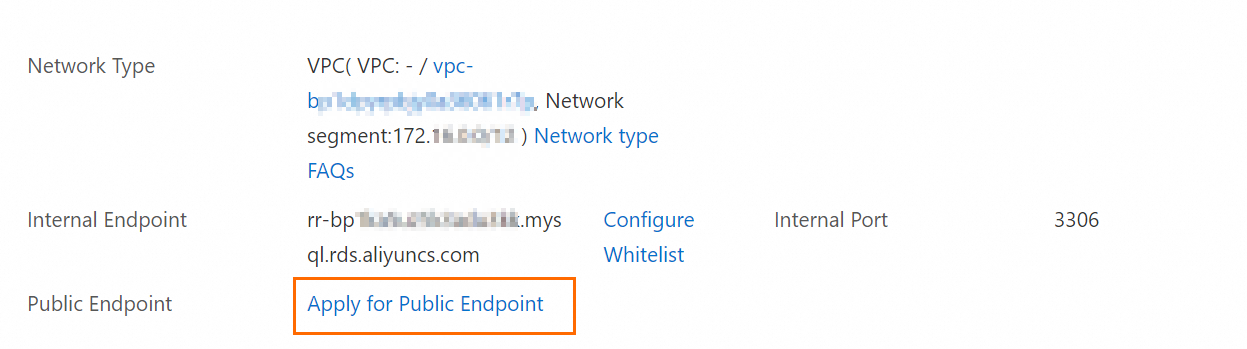
On the Basic Information page, click View Details next to the Network Type parameter to obtain the internal and public endpoints of the read-only ApsaraDB RDS for MySQL instance.
 Note
NoteIf you have not applied for a public endpoint for the read-only instance, click to apply for a public endpoint. After the public endpoint is applied for, you can obtain the public endpoint.
FAQ
Q: What are the possible causes and solutions if the source instance fails to be connected when I configure a backup schedule for the instance by using its internal endpoint?
A: Possible cause: The internal IP address obtained in Method 2 is a real-time internal IP address. If you clone the source read-only instance, migrate the instance to another zone, or change the VPC or vSwitch of the instance, the real-time internal IP address may change. In this case, the source instance fails to be connected, and the backup fails.
Solution: You can use the internal endpoint of the read-only instance and run the ping command on your local device to obtain a new real-time internal IP address. Then, modify the backup source database and save the configurations.
Q: Can Data Disaster Recovery back up full data and incremental data of a read-only instance?
A: Yes.
What are the differences between Data Disaster Recovery and RDS backup?
What is the value of dump backup provided by Data Disaster Recovery?
How do I view the backup files that are stored in OSS?
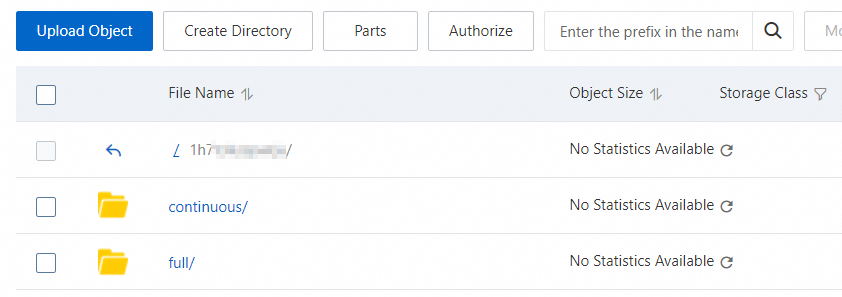
Data Disaster Recovery allows you to back up database instances to an OSS bucket that you create. When you back up data to your OSS bucket, Data Disaster Recovery automatically creates backup folders in the OSS bucket. You do not need to manually create the folders. A backup file is named in the following format: <Backup schedule ID>/<Backup type>/<Full or incremental backup task ID>/<Specific data>.
On the Backup Schedules page, find the backup schedule that you want to manage and click Manage in the Actions column.
On the Configure Task page, find Destination OSS Bucket and click the bucket name.
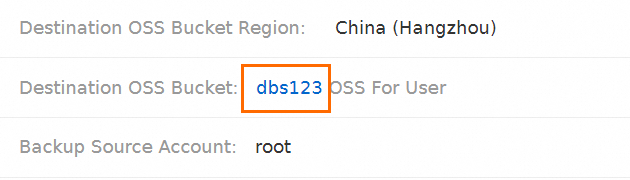
You are navigated to the details page of the destination bucket in the OSS console. The following figure shows the
fullandcontinuousfolders in the destination OSS bucket, which are used to store full backup files and incremental backup files. For more information about OSS, see Get started with OSS.