This topic describes how to view and manage endpoints and ports for your ApsaraDB RDS for MySQL instances in the RDS console.
Basic Edition and High-availability Edition instances
ApsaraDB RDS for MySQL Basic Edition and High-availability Edition instances provide the following two types of endpoints. View or modify them based on your connection scenario as follows:
|
Address Type |
Usage Instructions |
How to view and modify |
|
Instance endpoint |
The instance endpoint includes an internal endpoint and a public endpoint:
|
See the following sections to view and modify internal and public endpoints and ports. |
|
Database proxy endpoint |
If you enable database proxy for your instance (Basic Edition does not support this feature; High-availability Edition supports it), use the database proxy endpoint to connect to the instance. This maximizes read/write splitting performance and reduces the load on the primary instance. |
View internal and public endpoints and ports
Go to the Instances page. In the top navigation bar, select the region in which the RDS instance resides. Then, find the RDS instance and click the ID of the instance.
-
On the Basic Information page, in the Basic Information section, click View Details.
NoteThe public endpoint appears only after you request a public endpoint.

Modify internal and public endpoints and ports
If you previously enabled Secure Sockets Layer (SSL) encryption for internal or public connections, you must first disable SSL before modifying the endpoints. Disabling SSL restarts the instance. Perform this operation during off-peak hours.
Go to the Instances page. In the top navigation bar, select the region in which the RDS instance resides. Then, find the RDS instance and click the ID of the instance.
-
In the navigation pane on the left, click Database Connection.
-
Click Modify Endpoint.
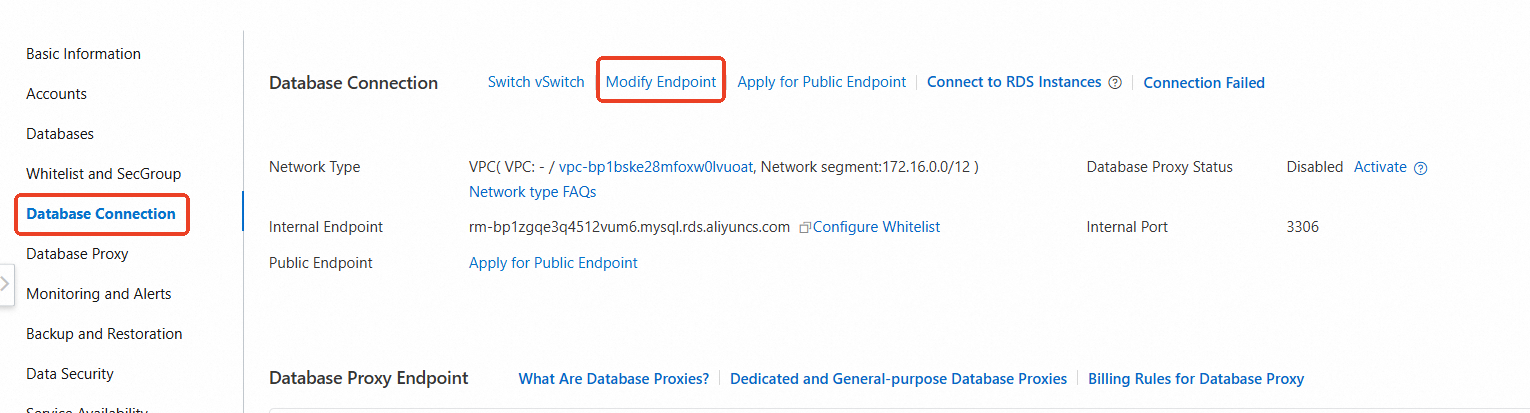
-
In the dialog box that appears, set the endpoint prefix and port number for the internal or public endpoint, then click OK.
NoteThe endpoint prefix must be globally unique. You cannot change it to an existing endpoint.
Cluster Edition instances
ApsaraDB RDS for MySQL Cluster Edition instances provide a cluster read/write endpoint, a cluster read-only endpoint, node direct connection endpoints, and a database proxy endpoint. View or modify them based on your connection scenario:
|
Address Type |
Description |
How to view and modify |
|
Cluster read/write endpoint |
Each instance has only one read/write endpoint, which connects to the primary node in the cluster and supports read and write operations. The cluster read/write endpoint includes an internal endpoint (generated automatically) and a public endpoint (must be requested manually).
|
|
|
Cluster read-only endpoint |
You can create only one read-only endpoint per instance. It connects to secondary nodes in the cluster and supports load balancing. The cluster read-only endpoint includes an internal endpoint (generated automatically when you create the read-only endpoint) and a public endpoint (must be requested manually). The cluster read-only endpoint always maintains the number of secondary nodes you specify to ensure availability:
|
|
|
Node direct connection endpoint |
Connect directly to a specific node. The primary node supports read and write operations. Secondary nodes are read-only. The node direct connection endpoint includes an internal endpoint (generated automatically when you create the direct connection endpoint) and a public endpoint (must be requested manually). |
|
|
Database proxy endpoint |
Cluster Edition instances have General-purpose database proxy enabled by default. You can configure the proxy endpoint as read/write or read-only:
|
Cluster read/write endpoint
The cluster read/write endpoint includes an internal endpoint and a public endpoint. The internal endpoint is generated automatically after instance creation. Request a public endpoint as needed.
Go to the Instances page. In the top navigation bar, select the region in which the RDS instance resides. Then, find the RDS instance and click the ID of the instance.
-
On the Basic Information page, in the section, view or modify the cluster read/write endpoint and request a public endpoint.
-
View the cluster read/write endpoint: Hover your mouse over the read/write connection box and view the endpoint in the pop-up window.
-
Modify the cluster read/write endpoint or request a public endpoint: Click Edit. In the dialog box that appears, you can Change Endpoint, Change VPC, and Apply for a public endpoint.

-
Cluster read-only endpoint
Create, view, and delete a cluster read-only endpoint
-
Creating or deleting a cluster read-only endpoint does not affect the cluster read/write endpoint.
-
When you delete a cluster read-only endpoint, both its internal and public endpoints are released, and all database connections using this endpoint are interrupted.
-
Each Cluster Edition instance can have only one cluster read-only endpoint. Multiple secondary nodes share this endpoint for load balancing.
Go to the Instances page. In the top navigation bar, select the region in which the RDS instance resides. Then, find the RDS instance and click the ID of the instance.
-
On the Basic Information page, in the section, choose:
-
Add address
Click Add Endpoint. In the dialog box that appears, enter or select the internal endpoint prefix, internal endpoint port, VPC, and vSwitch. Add the secondary nodes you want to include, then click OK.
-
Delete Address
In the target read-only connection box, click Delete. In the dialog box that appears, click OK.
-
-
View the cluster read-only endpoint: On the Basic Information page, in the section, hover your mouse over the read-only connection box and view the endpoint in the pop-up dialog box.

Adjust node configuration for the cluster read-only endpoint
-
Add secondary nodes or adjust node weights: Existing database connections are unaffected. New connections (using the cluster read-only endpoint) use the updated node configuration for load balancing.
-
Remove secondary nodes: You must keep at least one secondary node. Connections to the removed node experience a transient disconnection lasting 30 to 120 seconds. Other nodes are unaffected.
-
When adjusting secondary node weights, ensure at least one node has a weight greater than 0.
-
Node configuration changes for the cluster read-only endpoint apply to both internal and public connections.
Go to the Instances page. In the top navigation bar, select the region in which the RDS instance resides. Then, find the RDS instance and click the ID of the instance.
-
On the Basic Information page, in the section, click Edit in the read-only connection box:

-
Add nodes and adjust weights: Select the secondary nodes you want to add to the endpoint and click the
 icon. Adjust node weights, then click OK.
 -
Remove nodes: Select the nodes you want to remove and click the
 icon, then click OK.

-
Node direct connection endpoint
Go to the Instances page. In the top navigation bar, select the region in which the RDS instance resides. Then, find the RDS instance and click the ID of the instance.
-
On the Basic Information page, in the section, create, view, modify, or request a public endpoint for node direct connection endpoints.
-
Create a node endpoint: In the target node area, click Create Node Endpoint, configure internal network information, then click OK.
-
View, modify, or request a public endpoint for a node direct connection endpoint: Click Manage. In the dialog box that appears, you can Change Endpoint, Change VPC, and Apply for a public endpoint.

-
FAQ
Related APIs
|
API |
Description |
|
Creates an endpoint for an ApsaraDB RDS for MySQL Cluster Edition instance. |
|
|
Deletes an endpoint for an ApsaraDB RDS for MySQL Cluster Edition instance. |
|
|
Modifies endpoint information for an ApsaraDB RDS for MySQL Cluster Edition instance. |