Data Studio is an intelligent data lakehouse development platform built on Alibaba Cloud’s decades of big data experience. It supports a wide range of Alibaba Cloud computing services and delivers capabilities for intelligent extract, transform, and load (ETL), data catalog management, and cross-engine workflow orchestration. With personal development environments that support Python development, Notebook analysis, and Git integration, along with a rich plugin ecosystem, Data Studio enables integrated real-time and offline processing, data lakehouse unification, and seamless big data and AI workflows—helping you manage data across the entire “Data+AI” lifecycle.
Introduction to Data Studio
Data Studio is an intelligent data lakehouse development platform that incorporates Alibaba Cloud’s big data construction methodology. It is deeply integrated with dozens of Alibaba Cloud big data and AI computing services, such as MaxCompute, EMR, Hologres, Flink, and PAI, and provides intelligent ETL development services for data warehouses, data lakes, and OpenLake data lakehouse architectures. It supports:
Data lakehouse and multi-engine support
Access data in data lakes (such as OSS) and data warehouses (such as MaxCompute) and perform multi-engine hybrid development through a unified data catalog and a wide range of engine nodes.Flexible workflows and scheduling
Provides a variety of flow control nodes to visually orchestrate cross-engine tasks in workflows. It also offers time-driven scheduling and event-driven triggered scheduling.Open Data+AI development environment
Provides a personal development environment with customizable dependencies and a Notebook that supports mixed SQL and Python programming. Features such as datasets and Git integration help you build an open and flexible AI research and development workstation.Intelligent assistance and AI engineering
The built-in Copilot intelligent assistant supports you throughout the code development process. Professional PAI algorithm nodes and LLM nodes provide native support for end-to-end AI engineering.
Basic concepts of Data Studio
Concept | Term | Core value | Keywords |
Workflow | An organizational and orchestration unit for tasks | Manages dependencies and automates scheduling for complex tasks. It acts as a "container" for development and scheduling. | Visualization, DAG, recurring/triggered, orchestration |
Node | The smallest execution unit in a workflow | Where you write code and implement specific business logic. It is an atomic operation for data processing. | SQL, Python, Shell, data integration |
Custom image | A standardized snapshot of an environment | Ensures that the environment is extensible, consistent, and reproducible. | Environment hardening, standardization, replicability, consistency |
Scheduling | A rule for automatically triggering a task | Automates data production by converting manual tasks into automatically runnable production tasks. | Recurring scheduling, triggered scheduling, dependency, automation |
Data catalog | A unified metadata workbench | Organizes and manages data assets (such as tables) and computing resources (such as functions and resources) in a structured way. | Metadata, table management, data exploration |
Dataset | A logical mapping to external storage | Connects to external unstructured data, such as images and documents. It is a key data bridge for AI development. | OSS/NAS access, data mounting, unstructured |
Notebook | An interactive Data+AI development canvas | Integrates SQL and Python code to accelerate data exploration and algorithm validation. | Interactive, multi-language, visualization, exploratory analysis |
Data Studio process guide
Data Studio provides processes for data warehouse development and AI development. The following sections show two common paths. Explore other paths as needed.
General path: Data warehouse development process for recurring ETL tasks
This process is suitable for building enterprise-level data warehouses to achieve stable and automated batch data processing.
Target audience: Data engineers, ETL developers.
Core objective: Build a stable, standardized, and automatically schedulable enterprise-level data warehouse for batch data processing and report generation.
Key technologies: Data catalog, recurring workflow, SQL node, scheduling configuration.

Step | Phase name | Core operation and purpose | Key path and reference |
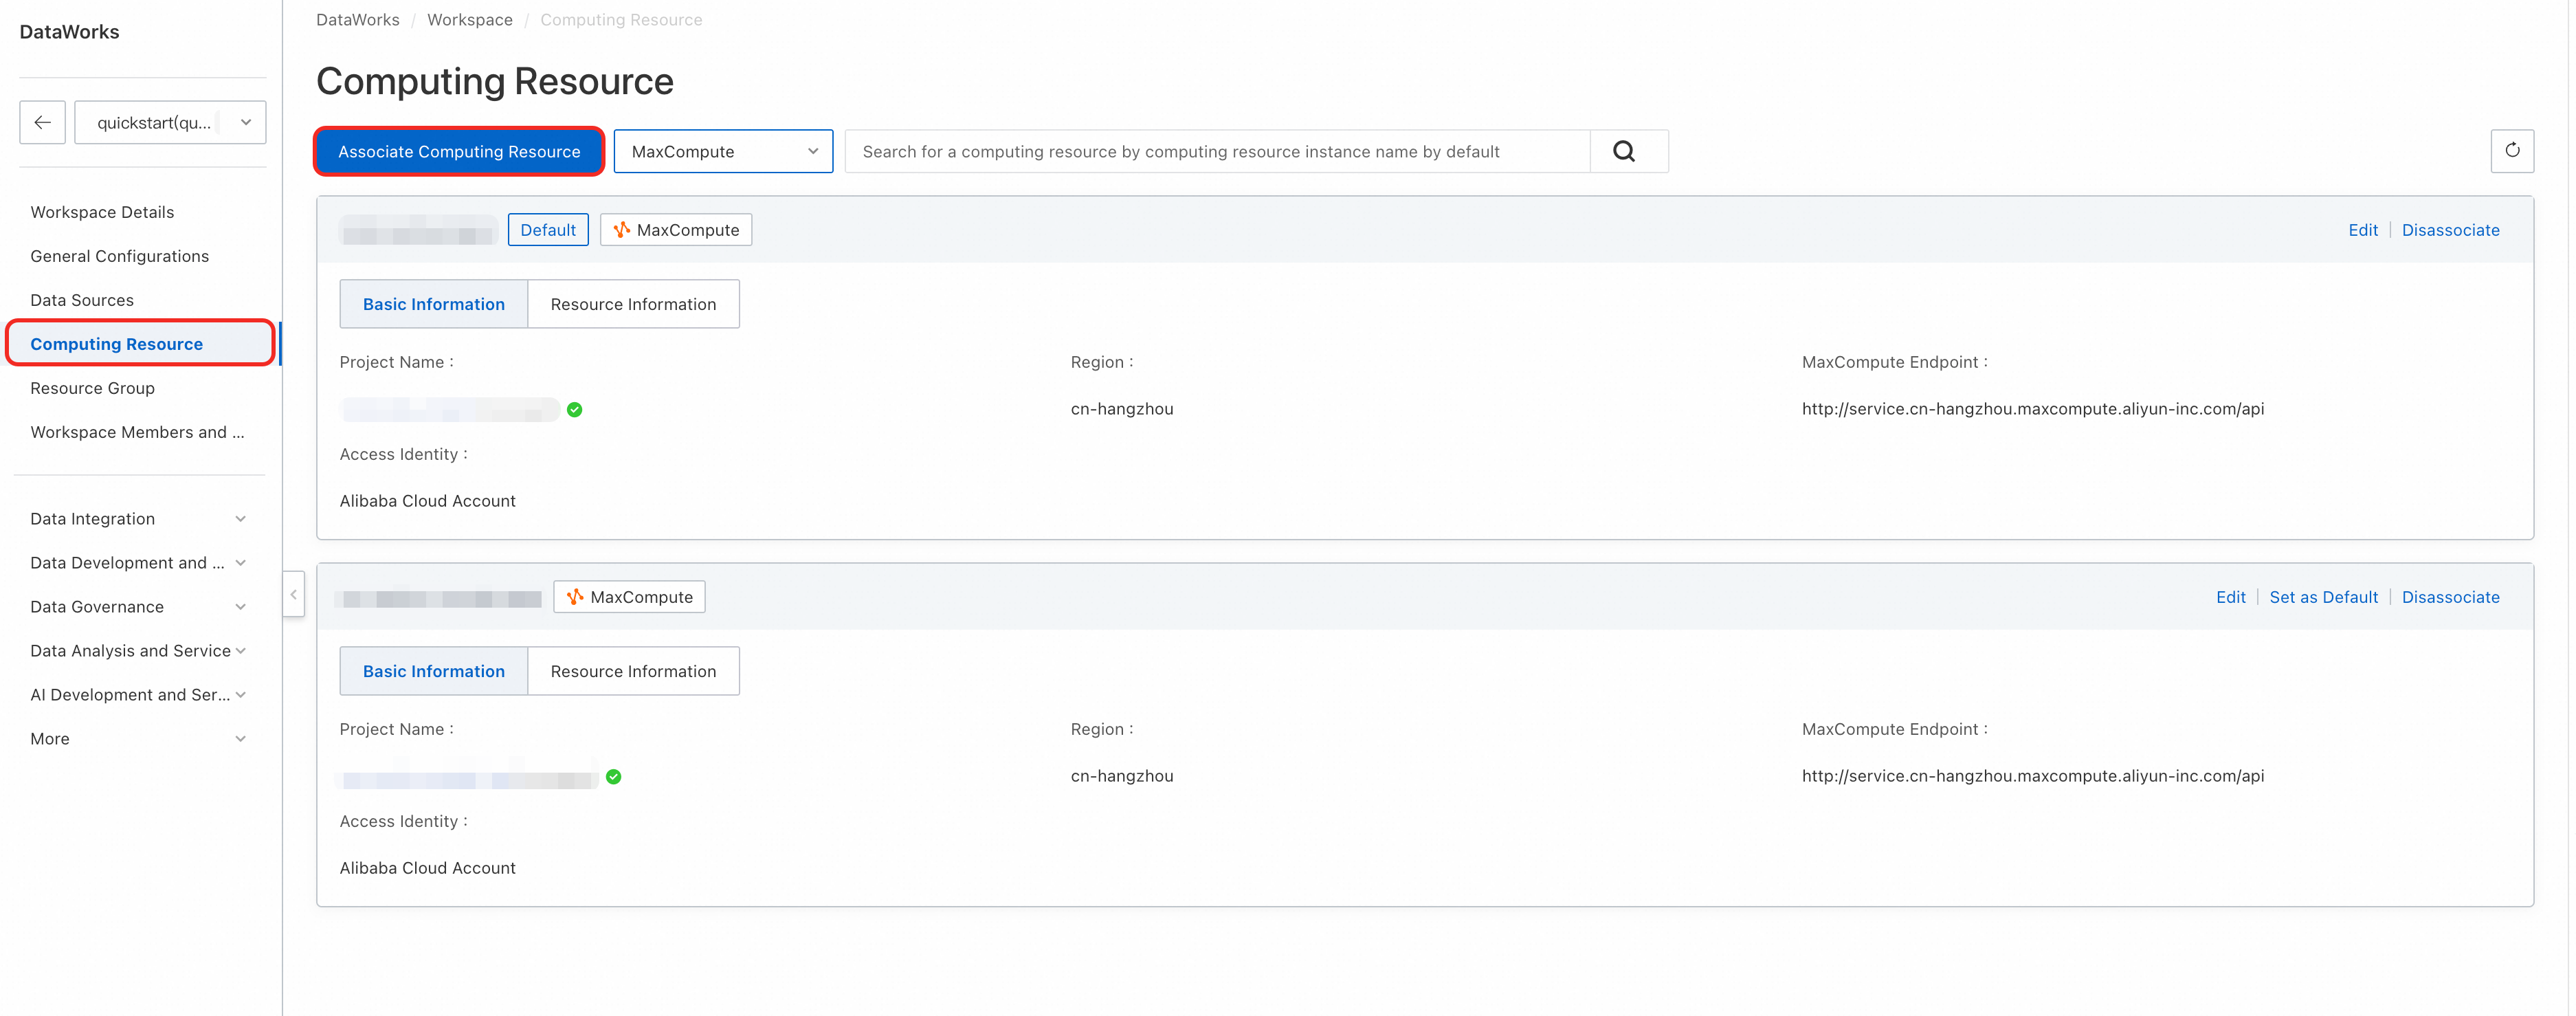
1 | Associate a compute engine | Associate one or more core compute engines, such as MaxCompute, with the workspace to serve as the execution environment for all SQL tasks.
| Console > Workspace Configuration For more information, see Associate a computing resource. |
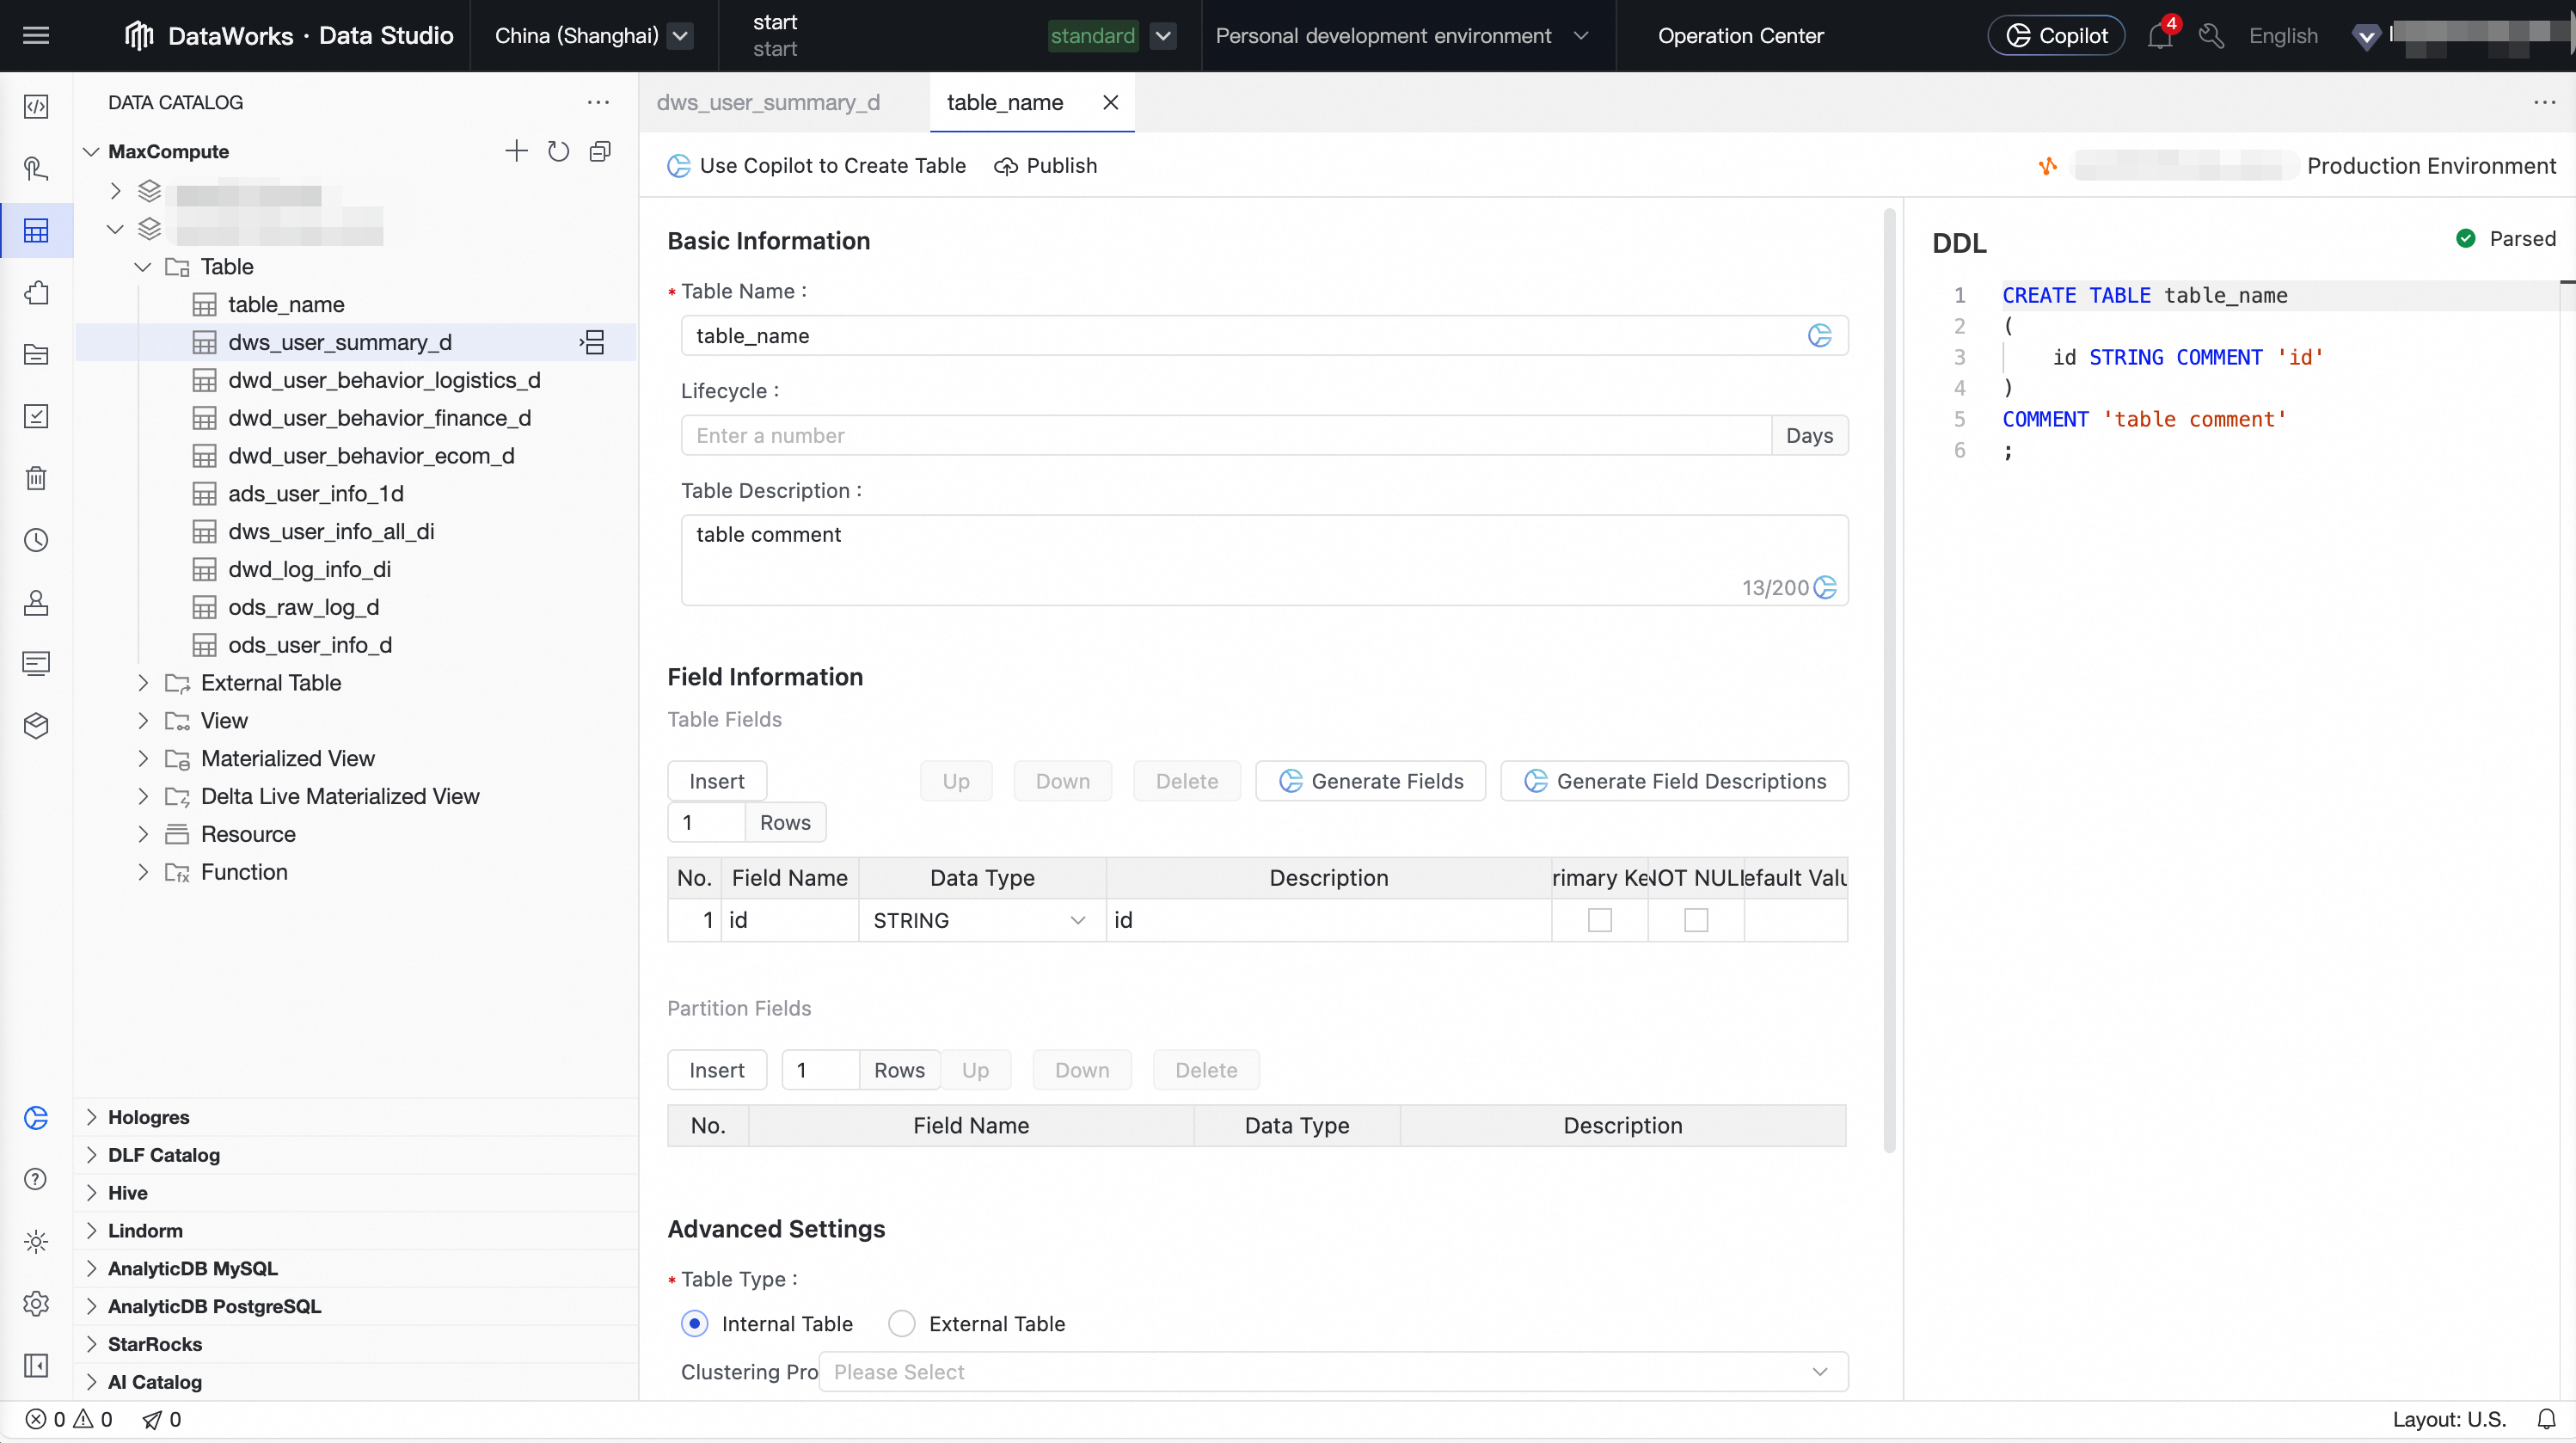
2 | Manage the data catalog | Create or explore the table schemas required for each layer of the data warehouse (such as ODS, DWD, and ADS) in the data catalog. This defines the input and output for data processing. We recommend that you use the data modeling module to build your data warehouse system.
| Data Studio > Data Catalog For more information, see Data Catalog. |
3 | Create a scheduled workflow | Create a scheduled workflow in the workspace directory to serve as a container for organizing and managing related ETL tasks. | Data Studio > Workspace Directory > Periodic Scheduling For more information, see Orchestrate a recurring workflow. |
4 | Develop and debug nodes | Create nodes such as ODPS SQL nodes. Write the core ETL logic (data cleaning, transformation, and aggregation) in the editor and debug the nodes. |
For more information, see Node development. |
5 | Develop with Copilot assistance | Use DataWorks Copilot to generate, correct, rewrite, and convert SQL and Python code. |
|
6 | Orchestrate and schedule nodes | On the DAG canvas of the workflow, define the upstream and downstream dependencies between nodes by dragging and connecting them. Various flow control nodes are supported to enable complex flow orchestration. Configure scheduling properties for the workflow or nodes in the production environment, such as the scheduling cycle, time, and dependencies. Supports large-scale scheduling of tens of millions of tasks per day. |
For more information, see General flow control nodes and Node scheduling configuration. |
7 | Deploy and O&M |
|
|
For a related getting started example, see Advanced: Analyze best-selling product categories.
Advanced path: Big data and AI development process
This process is suitable for AI model development, data science exploration, and building real-time AI applications. It emphasizes environmental flexibility and interactivity. The specific process may vary based on actual needs.
Target audience: AI engineers, data scientists, algorithm engineers.
Core objective: Perform data exploration, model training, and algorithm validation, or build real-time AI applications such as retrieval-augmented generation (RAG) and real-time inference services.
Key technologies: Personal development environment, Notebook, event-triggered workflow, dataset, custom image.

Steps | Stage name | Core operation and purpose | Key path and reference documents |
1 | Create a personal development environment | Create an isolated and customizable cloud container instance to serve as the environment for installing complex Python dependencies and performing professional AI development. | Data Studio > Personal Development Environment For more information, see Personal development environment. |
2 | Create an event-triggered workflow | Create a workflow in the workspace directory that is driven by external events. This provides an orchestration container for real-time AI applications. | Data Studio > Workspace Directory > Event-triggered Workflow For more information, see Event-triggered workflow. |
3 | Create and set a trigger | Configure a trigger in the Operation Center to define which external event, such as an OSS event or a Kafka message event, will start the workflow. |
For more information, see Manage triggers and Design an event-triggered workflow. |
4 | Create a Notebook node | Create the core development unit for writing AI/Python code. Typically, exploration is first done in a Notebook in the personal folder. | Project Folder > Event-triggered Workflow > Notebook Node For more information, see Create a node. |
5 | Create and use a dataset | Register unstructured data (such as images and documents) stored in OSS/NAS as a dataset. Then, mount it to the development environment or task for code access. |
For more information, see Manage Datasets and Use datasets. |
6 | Develop and debug the Notebook/node | Write algorithm logic, explore data, validate models, and iterate quickly in the interactive environment provided by the personal development environment. | Data Studio > Notebook Editor For more information, see Basic Notebook development. |
7 | Install custom dependency packages | In the terminal of the personal development environment or in a Notebook cell, use tools such as | Data Studio > Personal Development Environment > Terminal For more information, see Appendix: Complete your personal development environment. |
8 | Create a custom image | Solidify the personal development environment with all dependencies configured into a standardized image. This ensures that the production environment is identical to the development environment. If you have not installed custom dependency packages, skip this step. |
For more information, see Create a DataWorks image from a personal development environment. |
9 | Configure node scheduling | In the scheduling configuration of the production node, you must specify the custom image created in the previous step as the runtime environment and mount the required datasets. | Data Studio > Notebook Node > Scheduling For more information, see Node scheduling configuration. |
10 | Deploy and O&M |
|
|
Core modules of Data Studio

Core module | Main capabilities |
Workflow orchestration | Provides a visual DAG canvas that lets you easily build and manage complex task projects by dragging and dropping. It supports recurring workflow orchestration, event-triggered workflows, and manually triggered workflows to meet automation needs in different scenarios. |
Execution environments and modes | Provides flexible and open development environments to improve development efficiency and collaboration.
|
Node development | Supports a wide range of node types and compute engines for flexible data processing and analysis.
For more information, see Computing resource management and Node development. |
Node scheduling | Provides powerful and flexible automated scheduling capabilities to ensure tasks are executed on time and in order.
|
Development resource management | Provides unified management of various assets involved in the data development process.
|
Quality control | Built-in multiple control mechanisms to ensure the standardization of the data production process and the accuracy of the output data.
|
Openness and extensibility | Provides a rich set of open interfaces and extension points for easy integration with external systems and custom development.
|
Data Studio billing
DataWorks charges (costs appear on DataWorks bills)
Resource group fees: Node development and personal developer environments require resource groups. Depending on the resource group type, you incur either Serverless resource group fees or fees for exclusive resource groups for scheduling.
If you use a large model service, you also incur Serverless resource group fees.
Task scheduling fees: If you publish a task to the production environment for scheduled execution, you incur task scheduling fees (when using a Serverless resource group) or fees for exclusive resource groups for scheduling (when using an exclusive resource group).
Data Quality fees: If you configure quality monitoring for a periodic task and an instance is successfully triggered, you incur Data Quality instance fees.
Smart baseline fees: If you configure a smart baseline for a periodic task, you incur smart baseline instance fees for baselines that are in the enabling status.
Alert text message and phone call fees: If you configure alert monitoring for a periodic task and a text message or phone call is successfully triggered, you incur alert text message and phone call fees.
NoteThese costs are associated with the Data Development, Data Quality, and Operation Center modules.
Charges from other services (costs do not appear on DataWorks bills)
When you run a Data Development node task, you may incur compute engine and storage fees, such as OSS storage fees. These fees are not charged by DataWorks.
Get started with Data Studio
Create or enable the new Data Studio
When you create a workspace, select Use Data Studio (New Version). For specific operations, see Create a workspace.
The old version of DataStudio supports migrating data to the new Data Studio by clicking the Upgrade to Data Studio button at the top of the Data Development page and following the on-screen instructions. For more information, see Data Studio upgrade guide.

Go to the new Data Studio
Go to the Workspaces page in the DataWorks console. In the top navigation bar, select a desired region. Find the desired workspace and choose in the Actions column.
FAQ
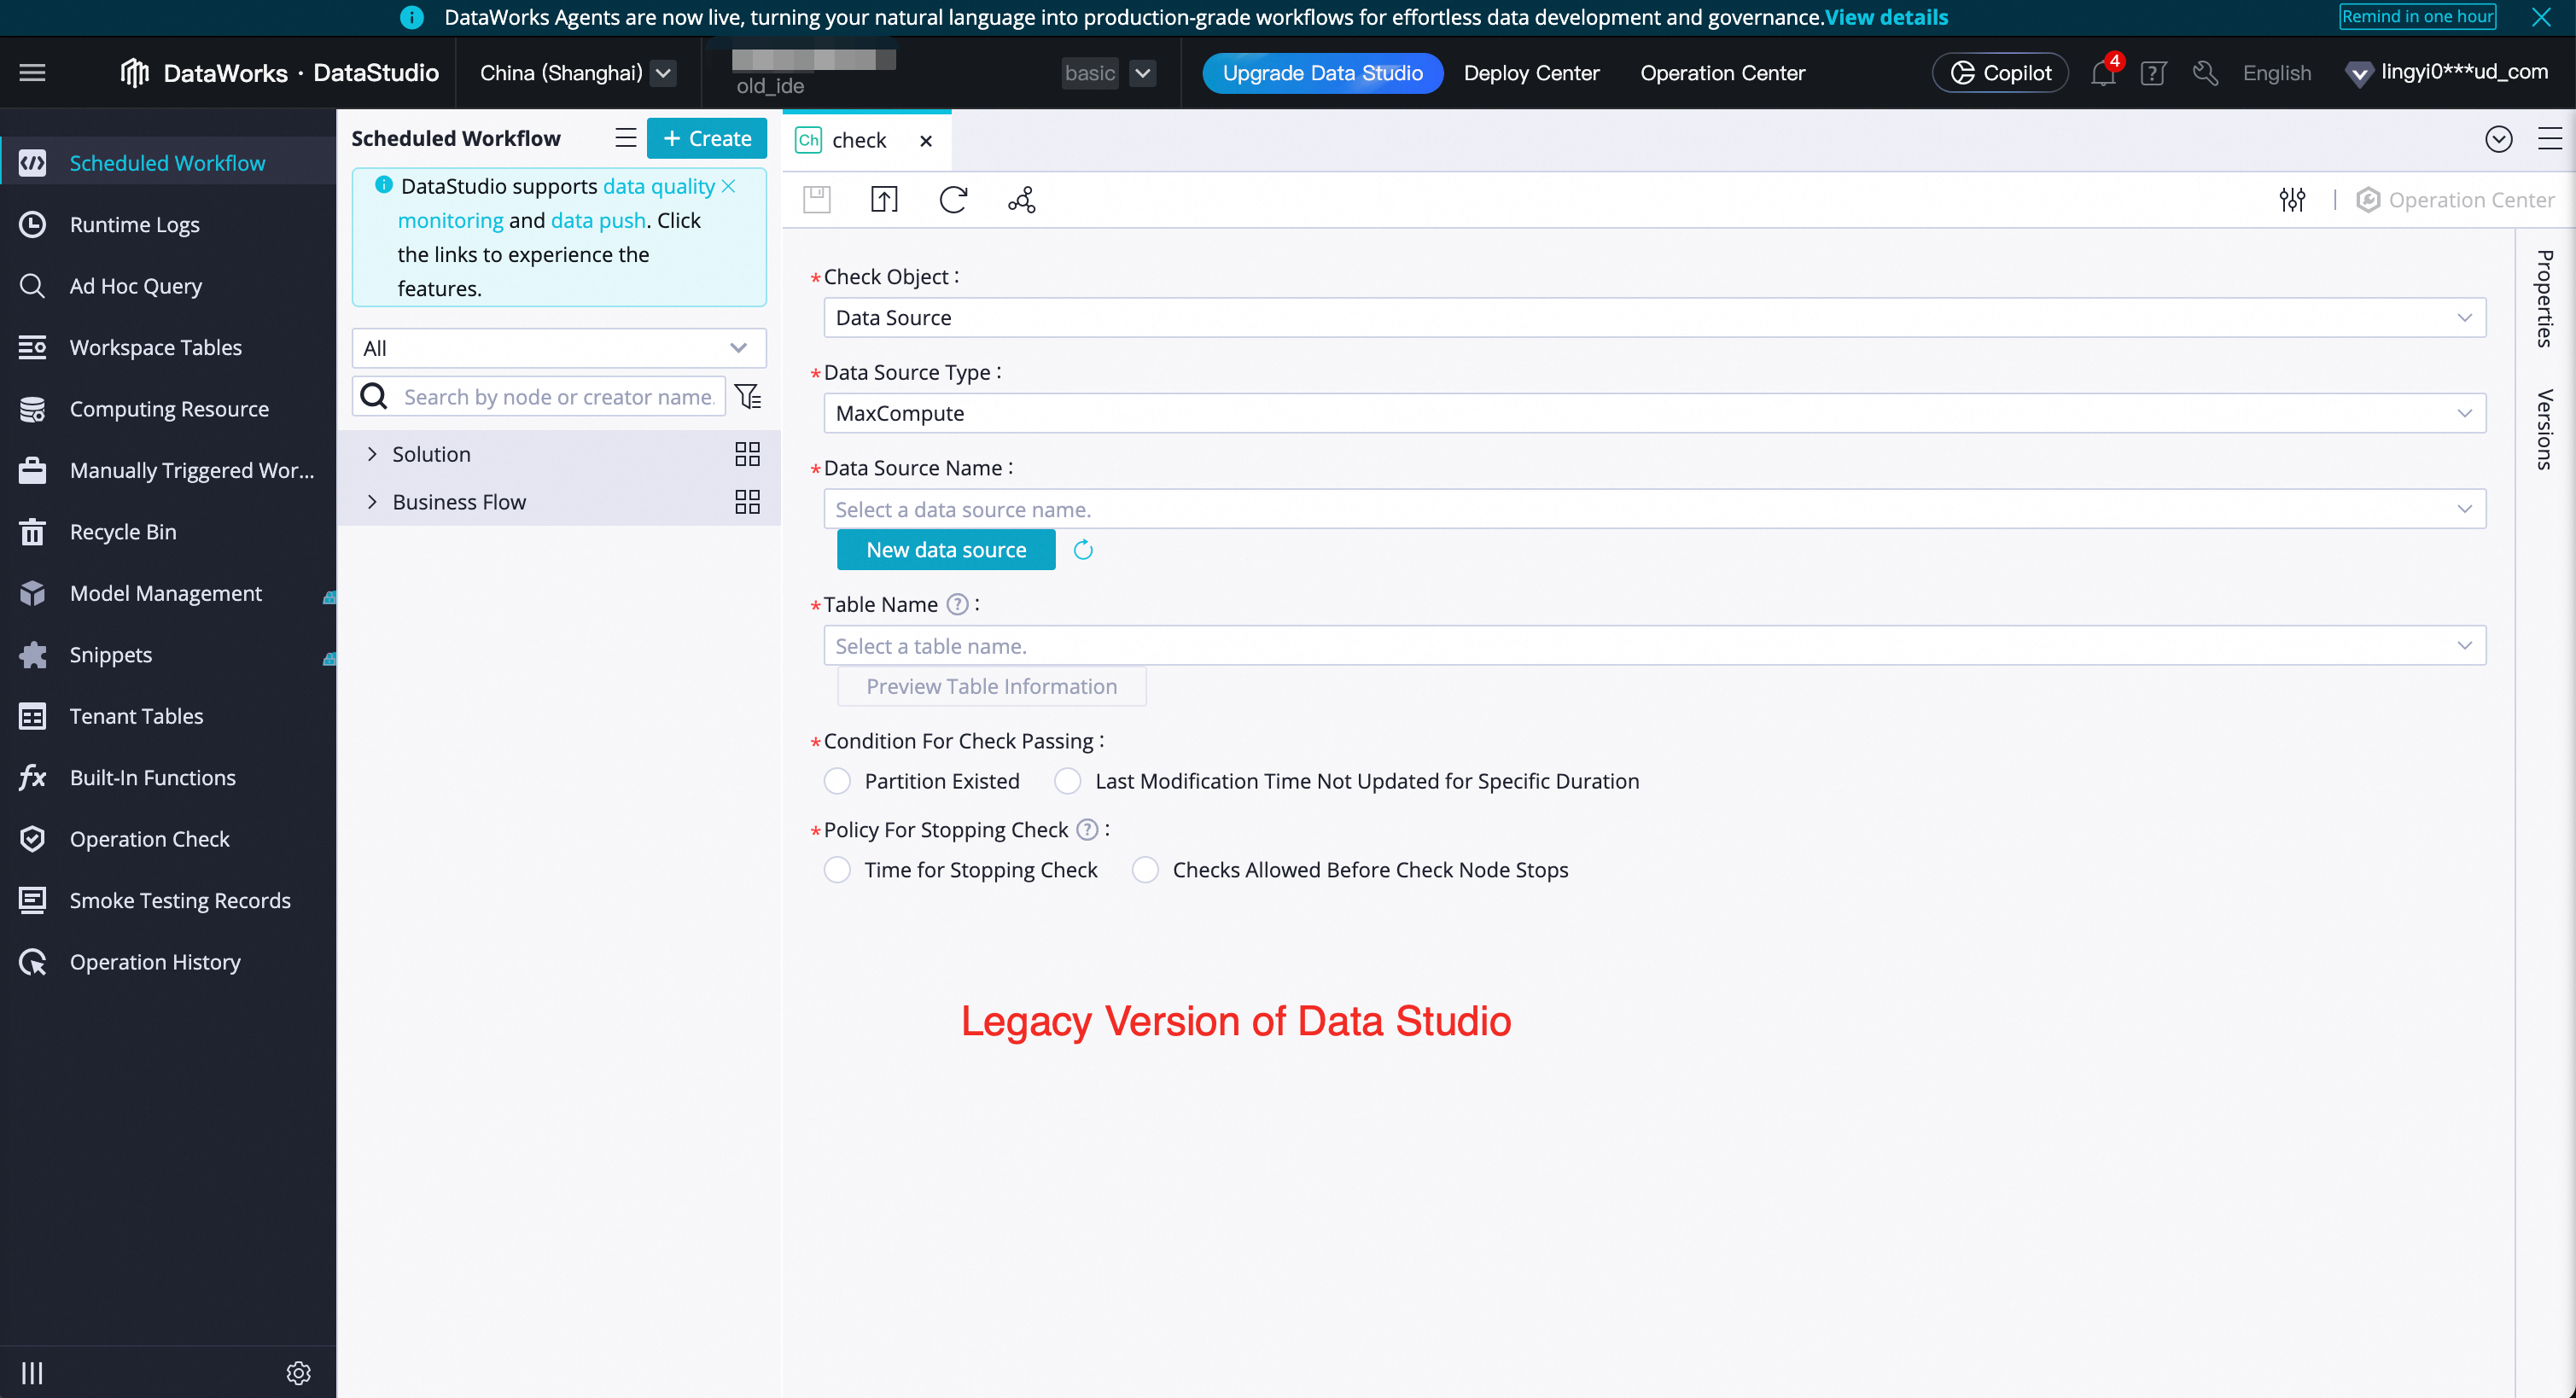
Q: How can I determine whether I'm using the new or old version of Data Studio?
A: The page styles are completely different. The new version looks like the screenshots in this document, while the old version is shown in the figure below.
Q: Can I revert to the old version of Data Studio after upgrading to the new version?
A: The upgrade from the old version to the new version is an irreversible operation. After a successful upgrade, you cannot revert to the old version. Before switching, we recommend that you first create a workspace with the new Data Studio enabled for testing. Ensure that the new version meets your business needs before upgrading. In addition, data in the new and old versions of Data Studio are independent of each other.
Q: Why don't I see the Use Data Studio (New Version) option when I create a workspace?
A: If you do not see this option on the interface, it means that your workspace has already enabled the new Data Studio by default.
ImportantIf you encounter any problems while using the new Data Studio, you can join the exclusive DingTalk group for DataWorks Data Studio upgrade support for assistance.