In Data Studio, you can snapshot a personal development environment as a custom container image to share it across workspaces and scheduled task nodes. This page walks you through creating, publishing, and using a custom image.
Use cases
Consistent runtime for scheduled tasks: Freeze the exact dependency versions in your development environment so scheduled Notebook, Python, or Shell nodes run in the same runtime you tested in.
Team dependency sharing: Create a single canonical image with all required open-source or third-party libraries and bind it to multiple workspaces, eliminating per-user setup.
Persistent image environment: Pair with the persistent image feature to avoid reinstalling dependencies on every task run, reducing startup time and network traffic.
Background
When you develop and test in a personal development environment, you may need third-party dependencies not included in the default runtime. Install and configure those dependencies in your environment, then create a custom image to lock in the state.
Custom images support Notebook, Python, and Shell task types. After an image is created, its task type and other configurations cannot be changed.
Prerequisites
Before you begin, ensure that you have:
A virtual private cloud (VPC) created
A personal development environment instance created and attached to a VPC
Alibaba Cloud Container Registry (ACR) set up with:
An Enterprise instance, a namespace, and an image repository created
VPC access control configured for the ACR instance
Cloud DNS PrivateZone activated. For billing details, see Product billing.
Limitations
Review these constraints before you begin. Discovering them mid-process often requires starting over.
VPC consistency: The VPC attached to your personal development environment instance, the VPC attached to ACR, and the VPC attached to the Serverless resource group used for testing and publishing must all be the same VPC.
Images are immutable: After an image is created, it cannot be modified in Image Management.
Test before publish: Only images that pass the test can be published.
Internet access for dependencies: If your environment needs to download packages from the internet during image creation or testing, configure internet access for the VPC. See Use the SNAT feature of an Internet NAT gateway to access the internet.
Step 1: Access the personal development environment
Go to the Workspaces page in the DataWorks console. In the top navigation bar, select a region. Find the target workspace and choose Shortcuts > Data Studio in the Actions column.
At the top of the Data Studio page, click Personal development environment to select an existing personal development environment instance.
Step 2: Create an image of a personal development environment instance
Before creating the image, enhance your personal development environment by installing the dependencies your tasks need. See Enhance a personal development environment.
After configuring dependencies, click the Personal development environment drop-down list at the top of the page. Select Management Environment to open the instance list panel.
Find the target instance and click Create Image in the Actions column. Configure the following parameters:
Parameter Description Image Name A custom name for the DataWorks image Image Instance The ACR instance to store the image. See Create an Enterprise instance. Namespace The namespace within the ACR instance. See Create a namespace. Image Repository The image repository within the namespace. See Create an image repository. Image Version A custom version string for the image Sync To MaxCompute Default: No. Available for ACR instances of Standard Edition or later. If set to Yes, the image is also built as a MaxCompute image when published. See Create a MaxCompute image from a personal development environment. Task Type The task types that can use this image: Notebook, Python, or Shell Click Confirm to start image creation.
ImportantBefore confirming, verify that the VPC attached to the personal development environment instance and the VPC attached to ACR are the same.
Wait for image creation to complete. The process takes 1 to 5 minutes depending on image size and network conditions.
Step 3: Publish the custom image
Go to the DataWorks console and navigate to Image Management > Custom Images.
Find the newly created image and click Test. Select a Serverless resource group whose VPC matches the VPC configured in ACR.
After the test passes, click Publish to publish the image.
If the test times out because the image cannot download packages from the internet, verify that the VPC attached to the test resource group has internet access. See Use the SNAT feature of an Internet NAT gateway to access the internet.
Step 4: Modify the workspace to which the image belongs
You can change the workspace to which an image belongs.
On the Image Management > Custom Images tab, find the published image.
Click  > Change Workspace in the Actions column to bind the image to a workspace.
Step 5: Use the custom image
After binding the image to a workspace, configure it on individual task nodes. The following steps use a Python node as an example.
In the Workspace Directories pane on the left, click the icon and choose Create Node > General > Python.
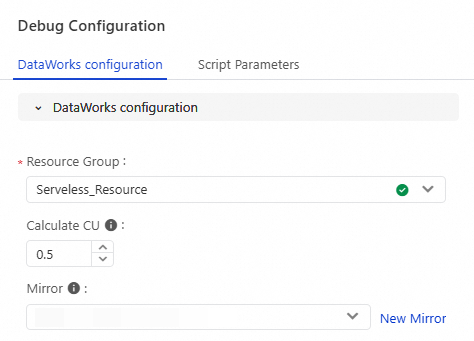
After developing the node, click Run Configuration on the right. Configure the Resource Group and select the custom Image for your Python code.
Click the run icon to test the Python code.
After the test passes, click Scheduling. On the Scheduling Strategy tab, configure the Image for the recurring schedule.
The image set in Scheduling must match the one in Run Configuration. For a Notebook node, configure the image only in Scheduling.
Click Save and then Publish the node.
What's next
Persistent image: Build the custom image as a persistent image so the same environment is reused on every run without redeployment. This ensures a consistent runtime and reduces task runtime, compute costs, and network traffic. See Build a persistent image.
Appendix: Enhance a personal development environment
The default personal development environment may not include all the dependencies your code requires. Install dependencies before creating an image.
Install open-source dependencies
The following example installs the jieba library.
Click the terminal icon in the lower-left corner of the Data Studio page to open the TERMINAL tab.
Run the following command to install the library:
pip install jieba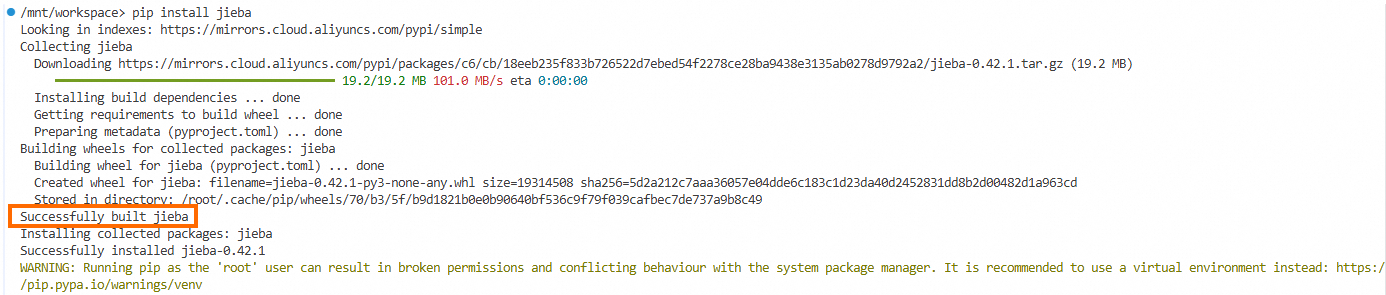
Create a
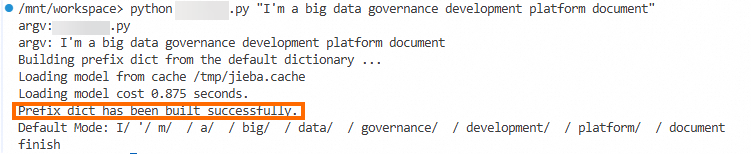
.pyfile in Personal Directory > workspace, add the following code, and save it:import sys import jieba # Get the system input parameter arg for arg in sys.argv: print(f"argv: {arg}") # Call the jieba class to tokenize the input data and print the output seg_list = jieba.cut(sys.argv[1], cut_all=False) print("Default Mode: " + "/ ".join(seg_list)) print('finish')Run the file from the terminal to verify the installation:
python file_name.py "I am the big data governance platform document"A successful run confirms the jieba library is installed in the personal development environment.
Install third-party dependencies
Clone a Python project using Git
This method requires internet access for the VPC. See Configure an Internet NAT gateway.
Click the terminal icon to open the TERMINAL tab.
Navigate to the workspace folder:
cd /mnt/workspaceClone the Python project:
# Replace the URL with your own repository URL.
git clone https://github.com/example/Example-Python.git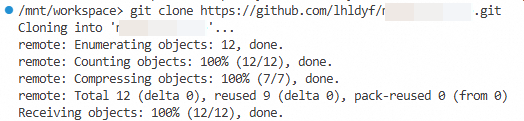
Install the cloned project:
cd Example-Python
pip install .
Upload a Python project from your computer
Upload the Python project to Personal Directory > workspace, then navigate to the project folder in the terminal:
cd /mnt/workspace/"Python_code_folder"Install the project:
pip install .
Upload a Python program from your computer
Upload the compressed Python program package to Personal Directory > workspace, then decompress it and find the Python compile path:
cat 'decompressed_python_project_name' /bin/pipCreate the compile path:
# Replace with the Python compile path you found above.
mkdir -p 'The Python compile path that you found'
Move the decompressed folder to the compile path:
mv 'decompressed_python_project_name' /'python_compile_path_found'Replace the default Python package with your program:
for src in idle3 pydoc3 python3 python3-config pip3; do \
    dst="$(echo "$src" | tr -d 3)"; \
    [ -s "/usr/local/bin/$src" ]; \
    [ ! -e "/usr/local/bin/$dst" ]; \
    mv /usr/local/bin/$dst /usr/local/bin/${dst}_bak
    ln -svT "your_python_compilation_path/bin/$src" "/usr/local/bin/$dst"; \
done
After installation, run the dependency in the personal development environment to verify it works before creating the image.