Check items enforce governance controls before you deploy files, primarily by verifying compliance with your standards. Before you deploy data, you can use check items to inspect for violations of data development constraints. If the system detects a violation, it blocks the deployment, allowing you to resolve the issue and proceed with your data development workflow. This topic describes how to view and configure check items.
Introduction
Data Asset Governance automatically generates an initial list of check items. You can enable or disable each check item as needed. If the default check items do not meet your requirements, you can register a custom extension as a new check item.
Data Asset Governance uses check items and governance items to detect issues in the data development process. Their validation timing and content differ depending on the stage where they take effect.
-
Check items: Provide pre-deployment governance by intercepting tasks that violate defined rules and blocking their deployment process.
-
Governance items: Perform post-deployment analysis to detect issues that require optimization and improve data health.
DataWorks workspaces are available in standard mode and basic mode. The task development process differs slightly between the two modes. For more information, see Workspace mode differences.

This topic describes how to perform the following operations on check items:
Permissions
-
To register check items or manage their status (enabled or disabled), you must have one of the following permissions:
-
An Alibaba Cloud account
-
A workspace member with the
AliyunDataWorksFullAccesspermission -
A workspace administrator
-
A workspace member with the tenant-level data governance administrator permission
-
A workspace-level data governance administrator
-
-
A regular user can only view the list of check items in their DataWorks workspace.
Go to the configuration page
-
Log on to the DataWorks console. In the target region, click in the left-side navigation pane. Click Go to Data Asset Governance.
-
In the left-side navigation pane, choose to go to the Configure Check Item page.
Register a check item (optional)
If the default check items provided by Data Asset Governance do not meet your requirements, you can click Register Check Item to register a check item by using a custom extension. For more information about how to create an extension, see Create an extension. After the registration is complete, you must enable the check item in the check item list for it to take effect.
Enable a check item
After a check item is enabled, Data Asset Governance performs compliance checks on operations such as task deployment. Tasks that violate the defined rules are intercepted, and their deployment process is blocked. You can enable target check items for specific workspaces as needed.
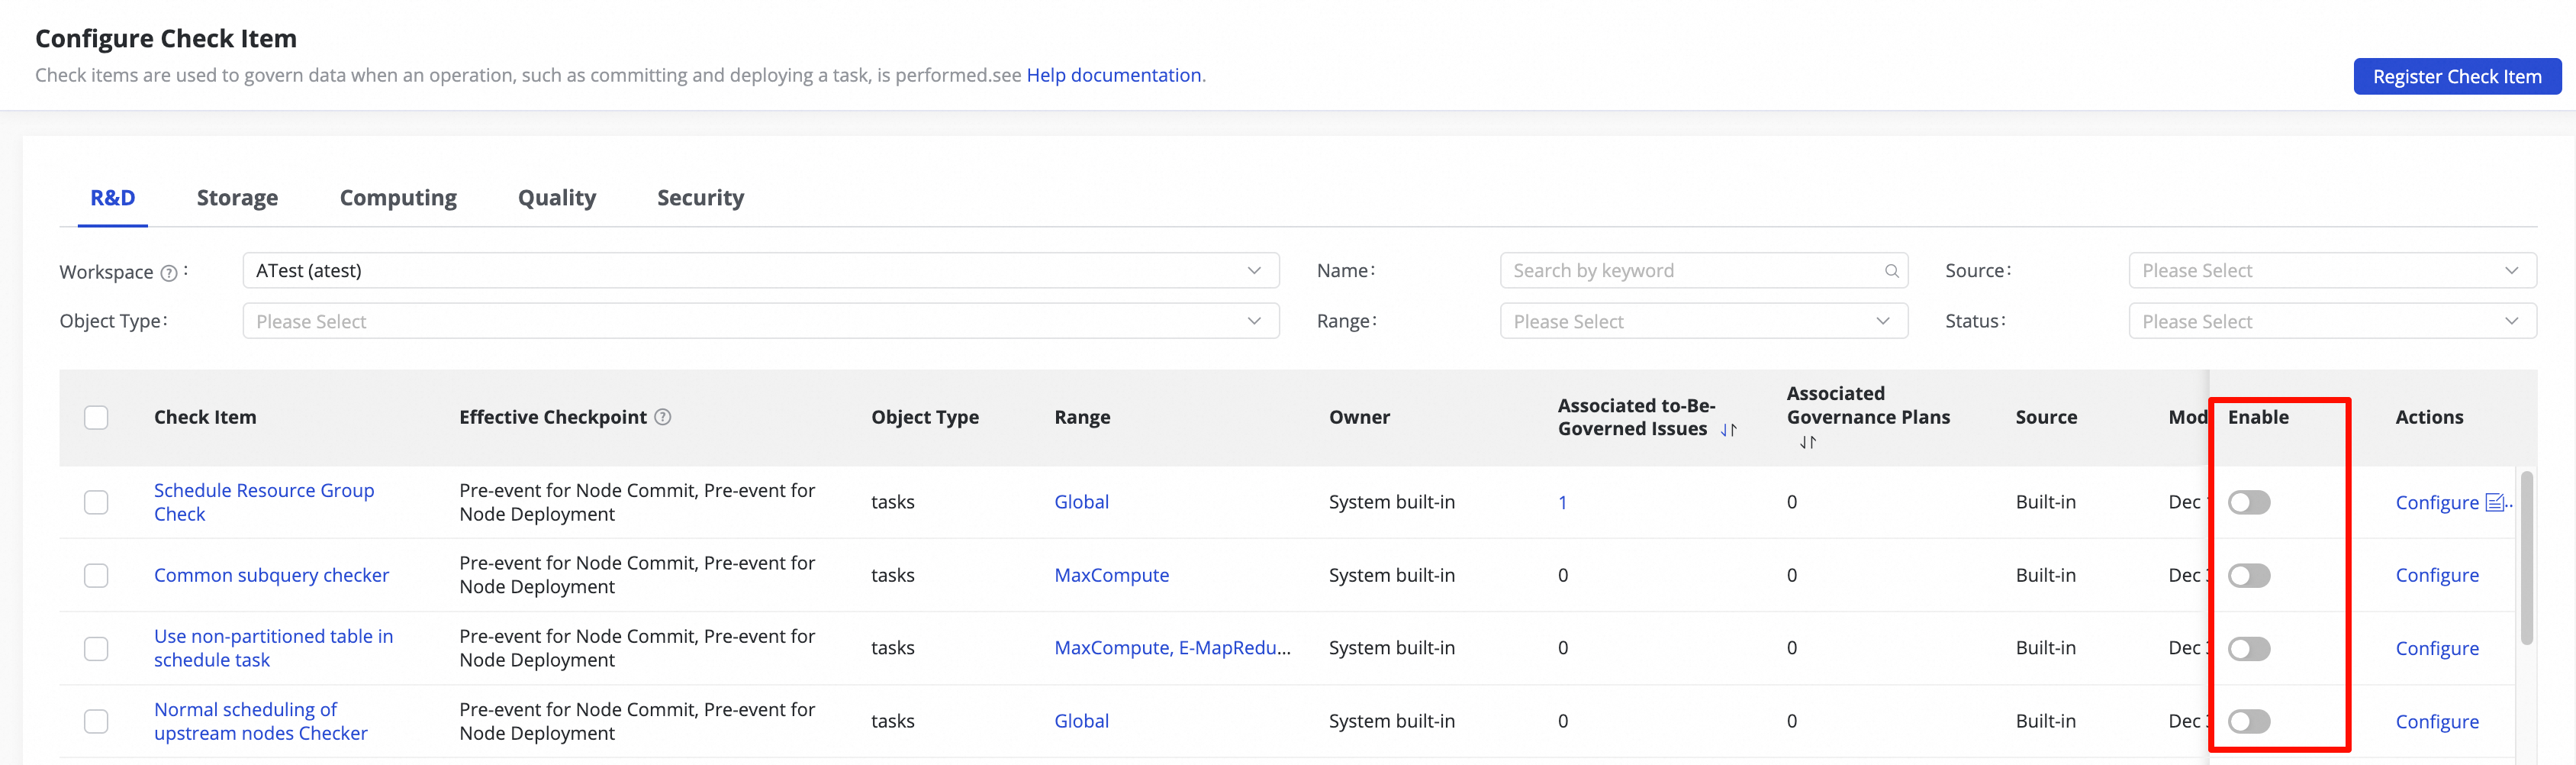
The scope of a check item is at the workspace level. After you disable a check item, it takes effect only for the currently selected workspace.
Configure a check item
On the Configure Check Item page, you can view the check item information for a specific workspace under the current account from different dimensions such as development, storage, computing, quality, and security, and configure the effective status and related parameters of check items.
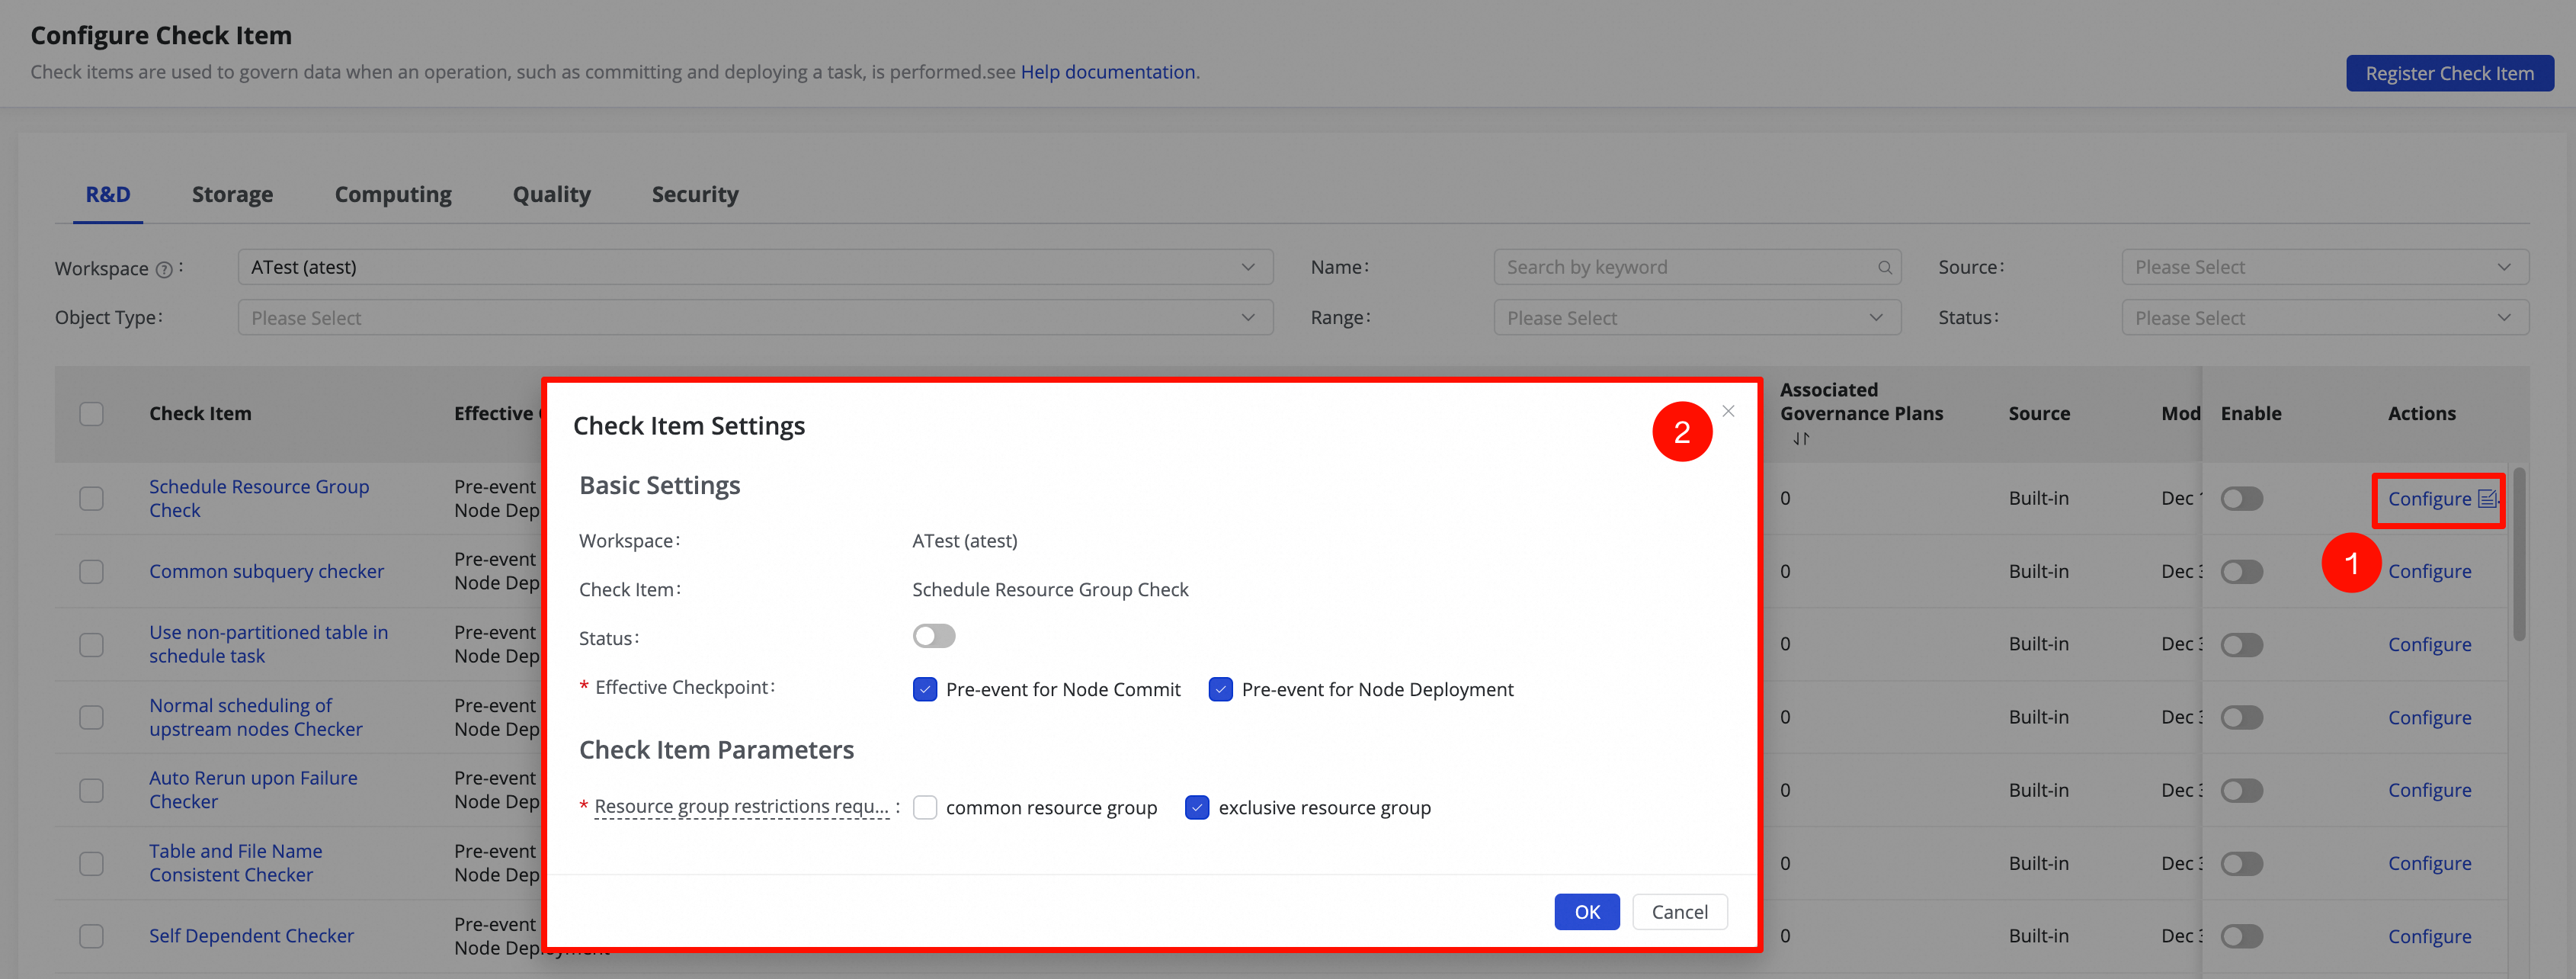
The following describes the main configuration options:
-
Set effective check phases: You can configure whether to perform checks before code execution, deployment, or other phases. If a check fails, the subsequent process of the corresponding event is blocked.
-
Set check item parameters: You can configure parameters such as access restrictions and maximum running cost for check items. The configurable parameters vary depending on the check item. Refer to the actual settings for details.
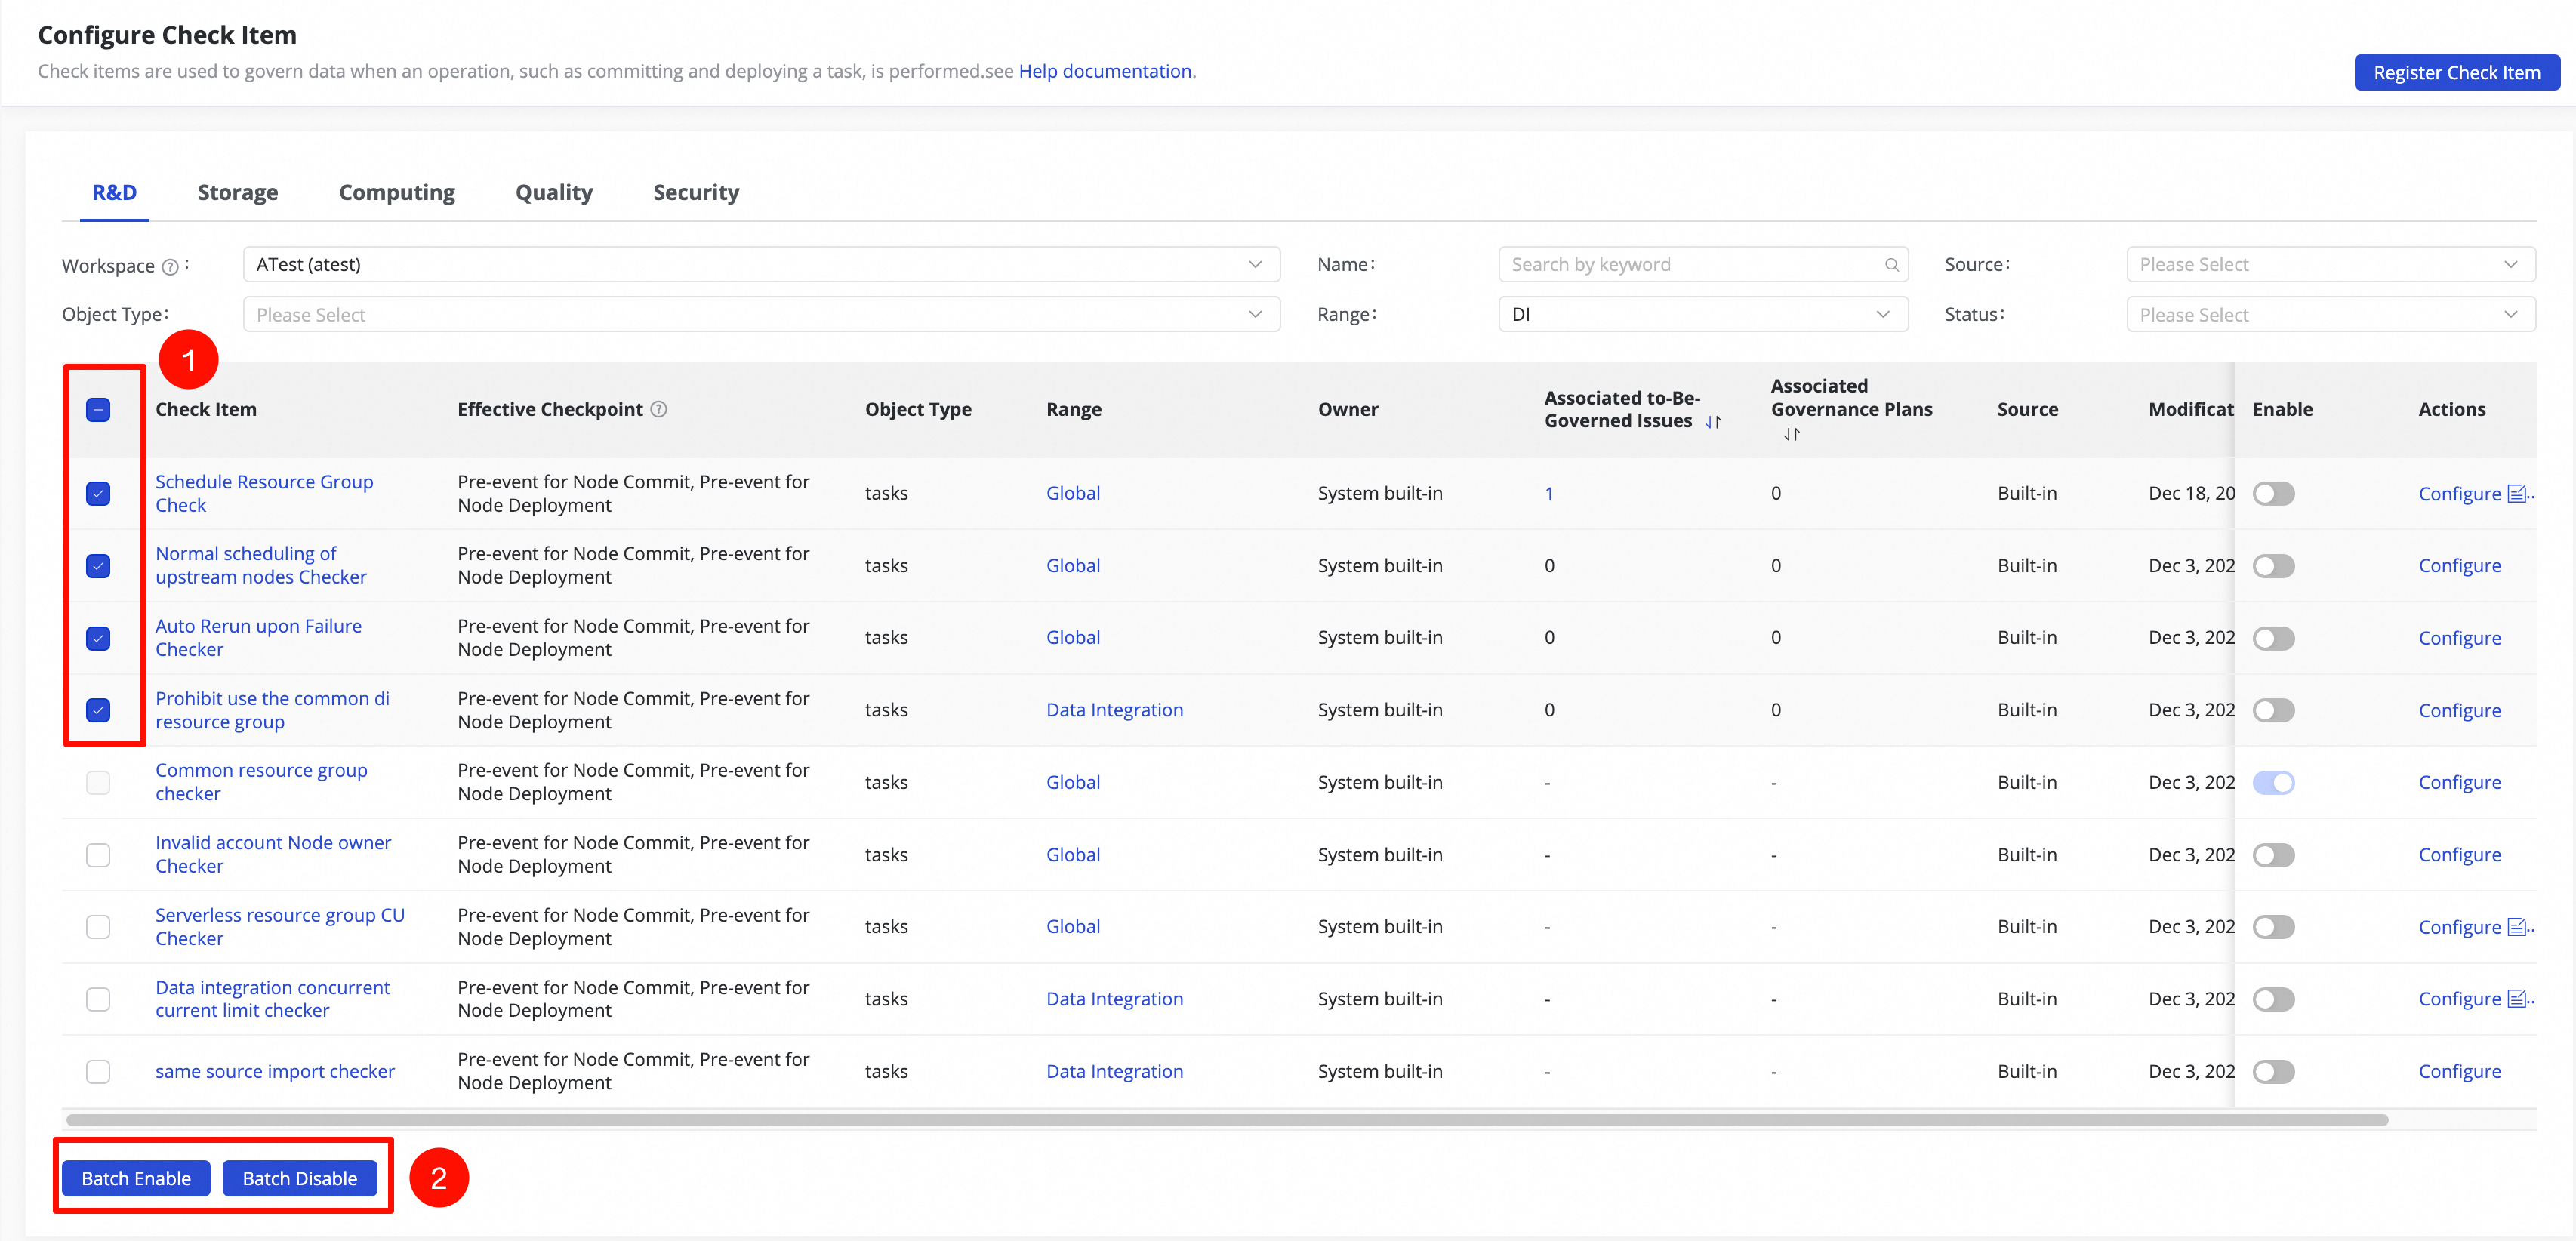
Perform batch operations on check items
To enable or disable multiple check items at a time, on the check item configuration page:
Select the check boxes of the target check items, and then click Batch Enable or Batch Stop at the bottom of the page. The system performs the corresponding operation on all selected check items.
Example of a triggered check item
After a check item is enabled, the system automatically performs rule validation for the check item at the Effective Check Phase that you configured. The validation is strictly performed based on the rules defined in the check item. After the operation is complete, you can click the View Details link on the task result page to view detailed information such as whether the check passed. If the check fails, a blocking issue event is generated that affects the normal execution of the process, and subsequent processes are blocked.
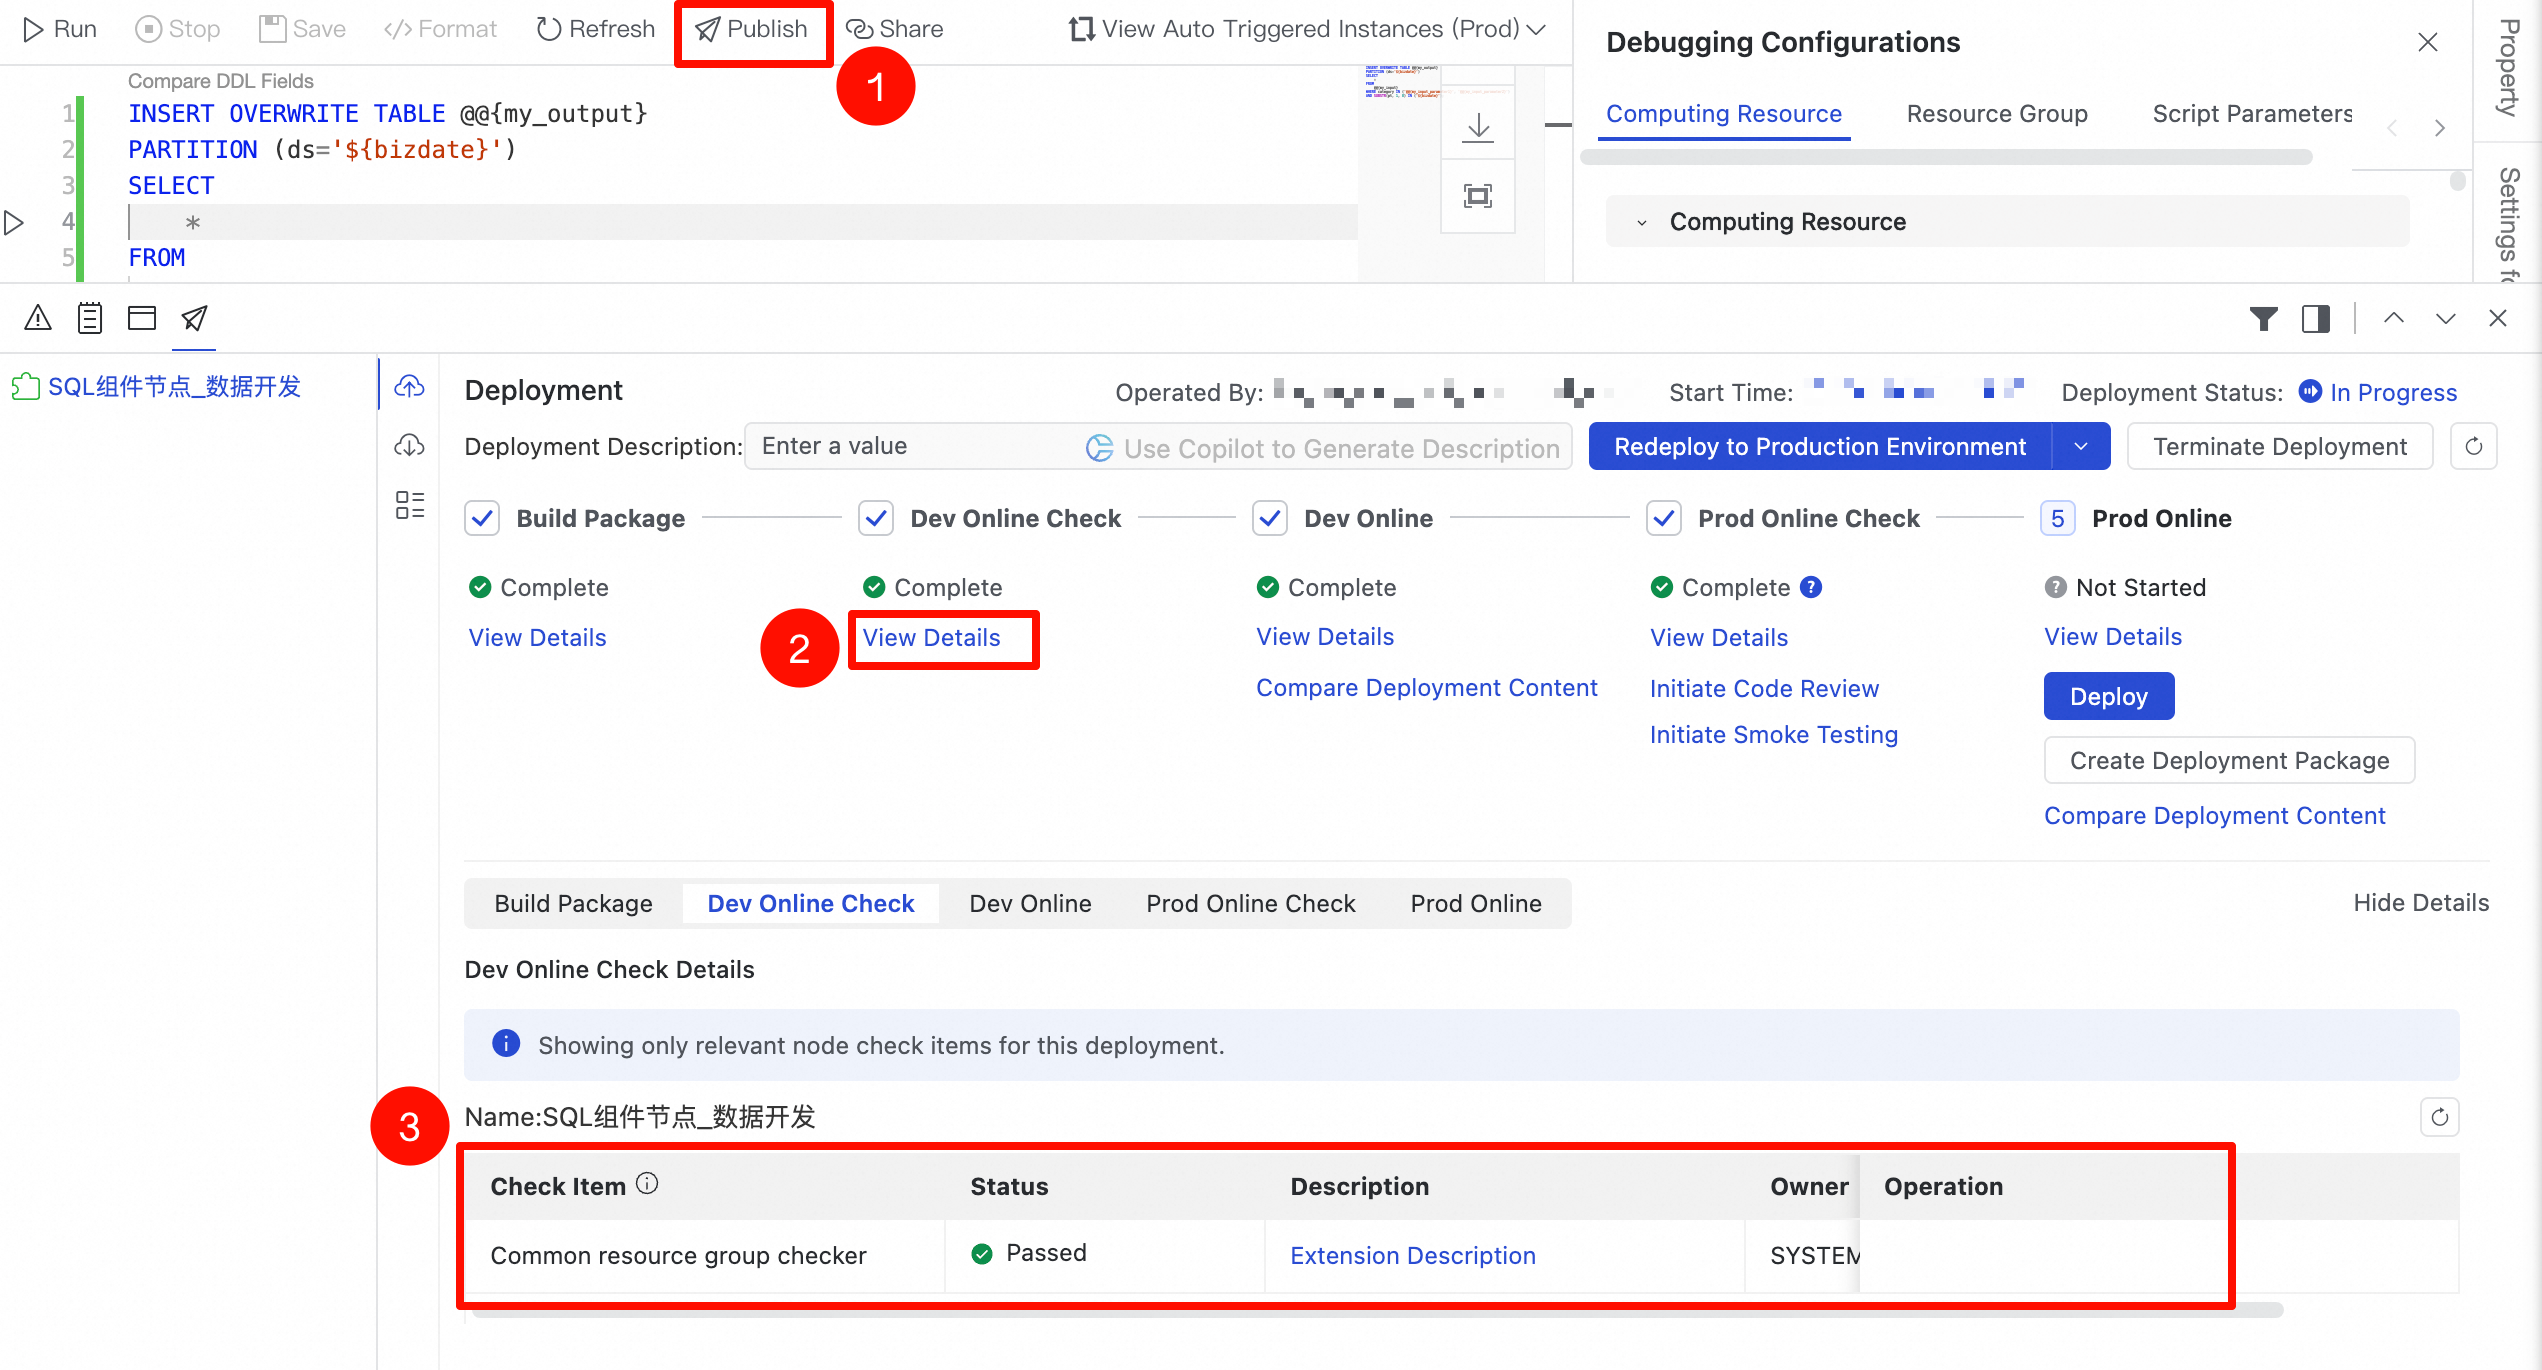
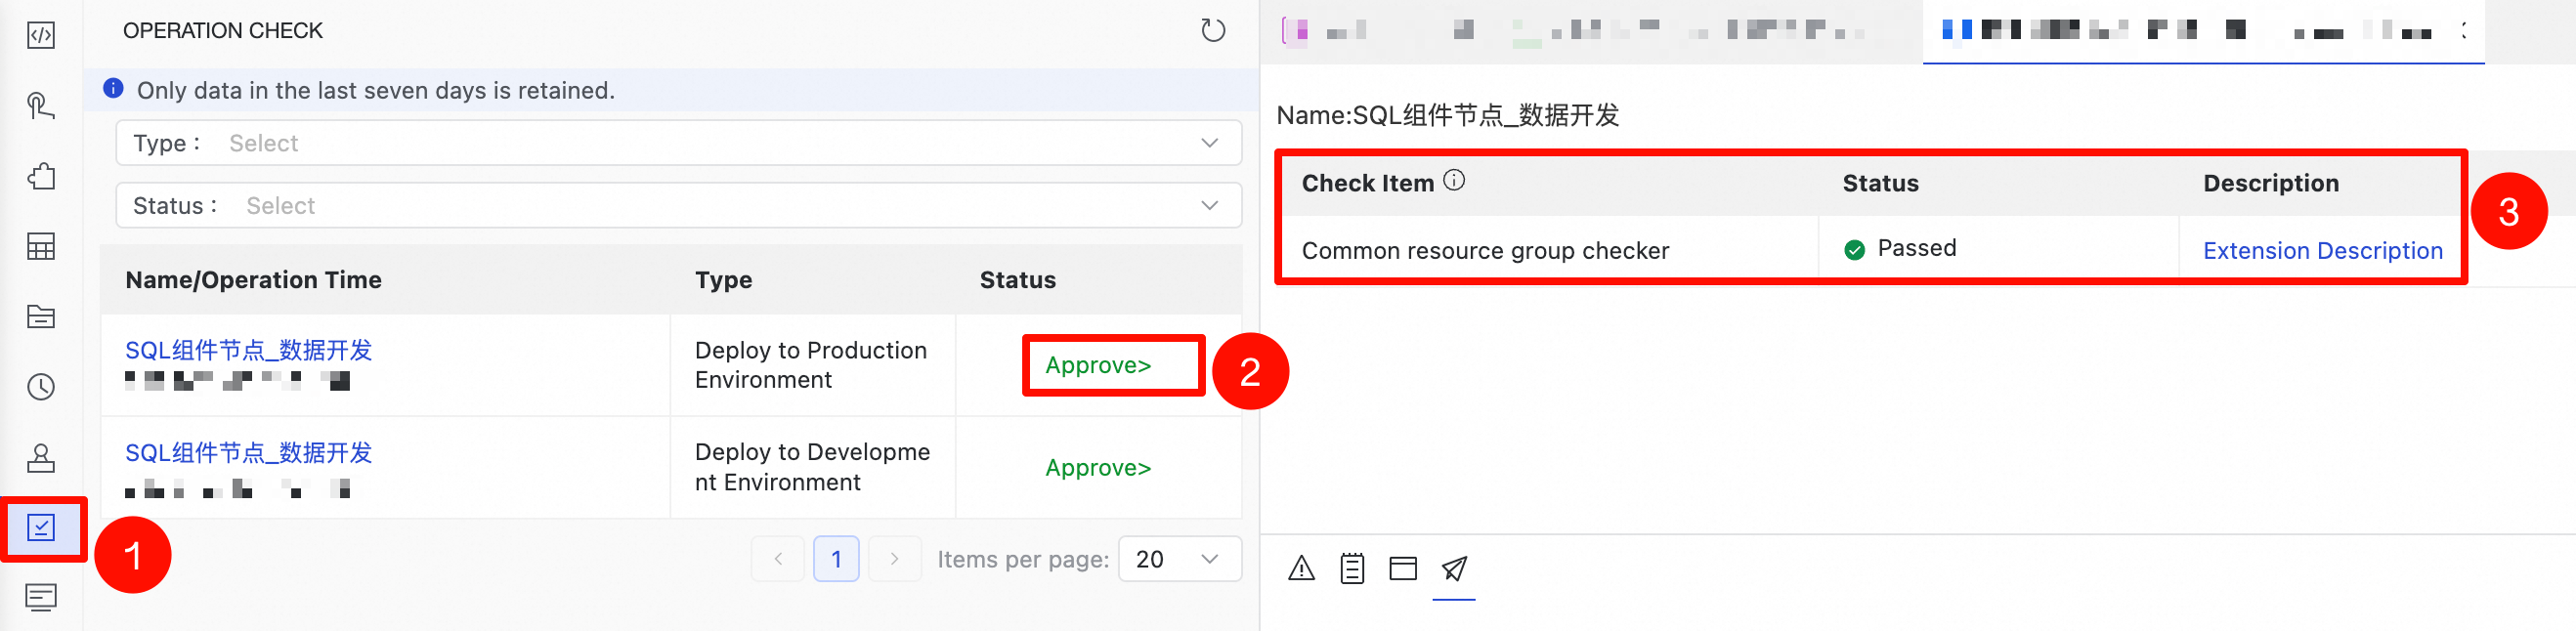
In addition, you can click "Operation Check" to view the check event records triggered by deployment operations in the last 7 days, including the check item name, check status (passed/failed), and operation time. This feature helps you evaluate the actual interception effectiveness and applicability of check items, and continuously improve data development standards to enhance deployment quality and process reliability.
-
The interface shown in this example is the new version of Data Studio. To use it, select Use Data Studio (New Version) when you create a workspace. For more information, see Create a workspace.
-
The procedure in legacy Data Studio is similar to the one shown in this example.