Unlike a scheduled workflow that runs on a predefined schedule (such as 1:00 AM daily), a triggered workflow is an on-demand, event-driven data processing model. It runs when triggered in real time by an external signal—such as a file upload, message arrival, API call, or manual click—and provides high real-time responsiveness and flexibility.
Feature | Scheduled workflow | Triggered workflow |
Trigger mechanism | Fixed schedule (cron expression) | External signal (event, API, or manual) |
Execution model | Scheduled and predictable | Reactive and on-demand |
Use cases | T+1 batch data warehousing and scheduled reporting | Processing files upon arrival, integrating with business systems, and manual data patching |
Key advantages | Stability and predictable execution | Real-time responsiveness and flexibility |
Supported trigger methods
A triggered workflow supports the following three trigger methods. Choose one based on your business scenario.
Trigger method | Initiator | Core scenarios | Key points |
Event trigger | External event source (such as OSS or ApsaraMQ for Kafka) | Event-driven ETL: Process files upon arrival or trigger real-time computation from messages. | You must create a trigger and associate it with the workflow. It only takes effect in the production environment. |
Manual trigger | User (developer or operator) | Ad-hoc tasks: Perform one-time data processing or analysis. | Can be run manually in both development and production environments. It is the recommended alternative to manual business processes. |
API trigger | External system (via OpenAPI) | System integration: Trigger data processing through callbacks from business systems such as CRM or ERP. | Requires calling an OpenAPI with the necessary permissions. |
Quick start: Create a manually triggered workflow
This section shows you how to create and manually run a simple triggered workflow.
Step 1: Create a triggered workflow
Go to the Workspaces page in the DataWorks console. In the top navigation bar, select a desired region. Find the desired workspace and choose in the Actions column.
In the left-side navigation pane, click
 . Next to Business Flow, click
  > Create Workflow to open the Create Workflow page.
On the Create Workflow page, set Scheduling Type to Triggered Scheduling, enter a workflow Name, and click OK.
Step 2: Orchestrate the workflow and develop a node
In the toolbar, click + Add Node to open the node list. From the node type list on the left, drag a Shell node to the canvas and enter a name to create it.
Double-click the Shell node to open the code editor and enter the following code:
echo "Hello, Trigger Workflow! Current time is ${bizdate}"Click Save in the toolbar.
Step 3: Debug in the development environment
Return to the workflow canvas and click the
 icon in the top toolbar.
In the dialog box that appears, enter the Current run value for the workflow (for example, if the current date is 20260310,
bizdateshould be replaced with20260309).In the run log at the bottom, you can view the node's execution status and the output of the
echocommand.
Step 4: Publish and run in production
On the workflow canvas, click the Publish
 button and follow the prompts to publish the workflow.
After the workflow is published, go to Operation Center > Manually Triggered Node O&M > Manual Task> Triggered Workflow.
Find the workflow that you published and click Run in the Actions column.
In the dialog box that appears, click Run again to trigger an instance of the workflow in the production environment. You can view the details of this run on the Manual Instance page.
You have now mastered the basics of using triggered workflows. Next, we explore their more powerful event-driven capabilities.
Advanced use case: Create an event-triggered workflow
Scenario 1: Process new files in OSS
Objective: When a new CSV file is uploaded to a specified directory in OSS, automatically trigger a workflow that prints the file path.
Step 1: Create an OSS trigger
Go to Operation Center > Tenant Schedule Setting > Trigger Management.
Click Create Trigger and configure the following parameters:
NoteFor detailed parameter descriptions, see OSS trigger.
Trigger name: Enter a custom name, such as
oss_new_file_trigger.Applicable workspace: Select the target workspace where the workflow is located.
Trigger event type: Select
Object Storage Service (OSS).Trigger event: Select
oss:ObjectCreated:PutObjector another upload event.Bucket name: Select your OSS bucket.
File name: Specify the file path and format to monitor. Wildcards are supported. For example, to monitor the
input/directory for all.csvfiles, enterinput/*.csv.Role configuration: The first time you use this feature, you must complete a one-click authorization. Select the generated role named
DataWorks-EventBridge-OSS-MNS-Role-*************.The
*************represents a randomly generated 13-digit ID that ensures the role name is unique.
Click OK to create the trigger.
Step 2: Create and associate the workflow
Follow the steps in Quick start: Create a manually triggered workflow to create a triggered workflow named
process_oss_file_workflow.On the right side of the workflow canvas, in the Properties panel, select Scheduling Policy.
From the Trigger drop-down list, select the
oss_new_file_triggerthat you just created.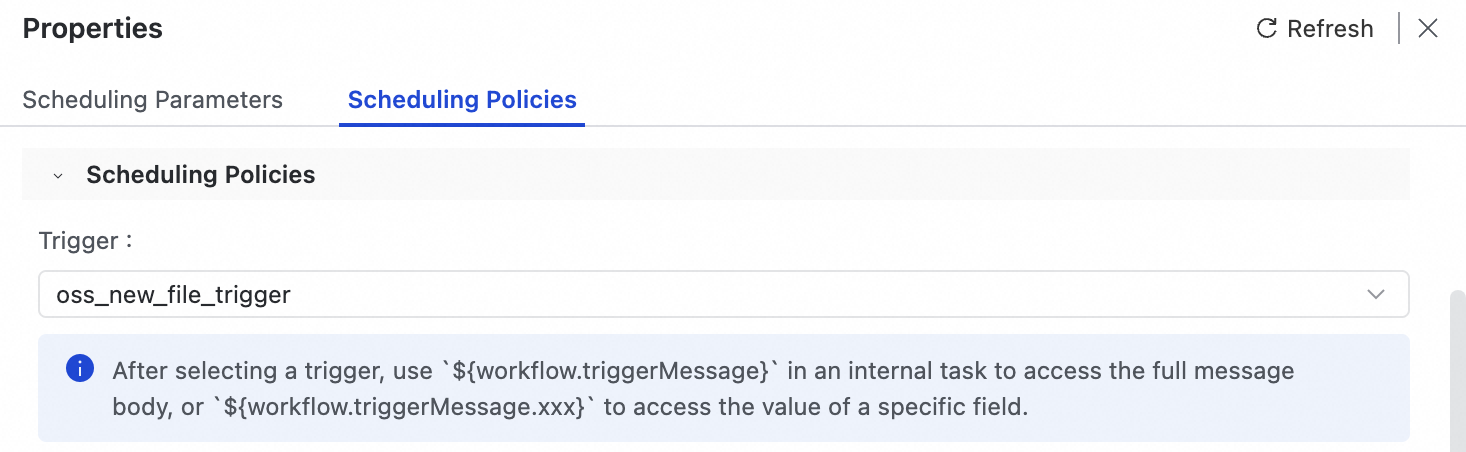
Step 3: Develop node and parse event parameters
In the toolbar, click + Add Node to open the node list. From the node type list on the left, drag a Shell node to the canvas and enter a name to create it.
Double-click the node and enter the following code to get and print the file path from the trigger event.
# When a workflow is triggered, event information is passed via the built-in variable workflow.triggerMessage. # You can use ${workflow.triggerMessage.data.oss.object.key} to get the full path of the uploaded file. echo "========= Start Processing OSS File =========" message="${workflow.triggerMessage}" echo "Raw Value: ${message}" # Extract the file path from the event message. FILE_PATH="${workflow.triggerMessage.data.oss.object.key}" echo "A new file has arrived: ${FILE_PATH}" # Add your specific processing logic here. echo "========= Finish Processing OSS File ========="Note${workflow.triggerMessage} retrieves the full event message body in JSON format. You can find the specific OSS message format in EventBridge by navigating to Event Buses >
DATAWORKS_TRIGGER_FOR_BUCKET_<OSS_Bucket_Name>> Event Tracking > Event Details.
Step 4: Debug and publish
Debug:
Return to the workflow canvas and click the Run
button.In the Trigger Message Body input box, paste a simulated OSS event in JSON format. You can copy an example message from the trigger configuration page and modify the value of the
keyfield. The following is a minimal example:{ "data": { "oss":{ "object": { "key": "input/test_file_20260310.csv" } } } }Click Run and check the logs to confirm that
input/test_file_20260310.csvis printed successfully.
Publish: After successful debugging, click the Publish button to deploy the workflow to the production environment. Event-driven triggering is active only in the production environment.
Step 5: Verify in production
Using the OSS console or a client, upload a CSV file to the bucket and path that you configured in the trigger, such as the
input/directory.Go to
https://eventbridge.console.alibabacloud.com/<regionId>/event-bus/DATAWORKS_TRIGGER_FOR_BUCKET_<OssBucketName>/event-tracingto query the list of recent trigger events. You can also click Event Details for a specific event to view its trigger message, which is the value of workflow.triggerMessage.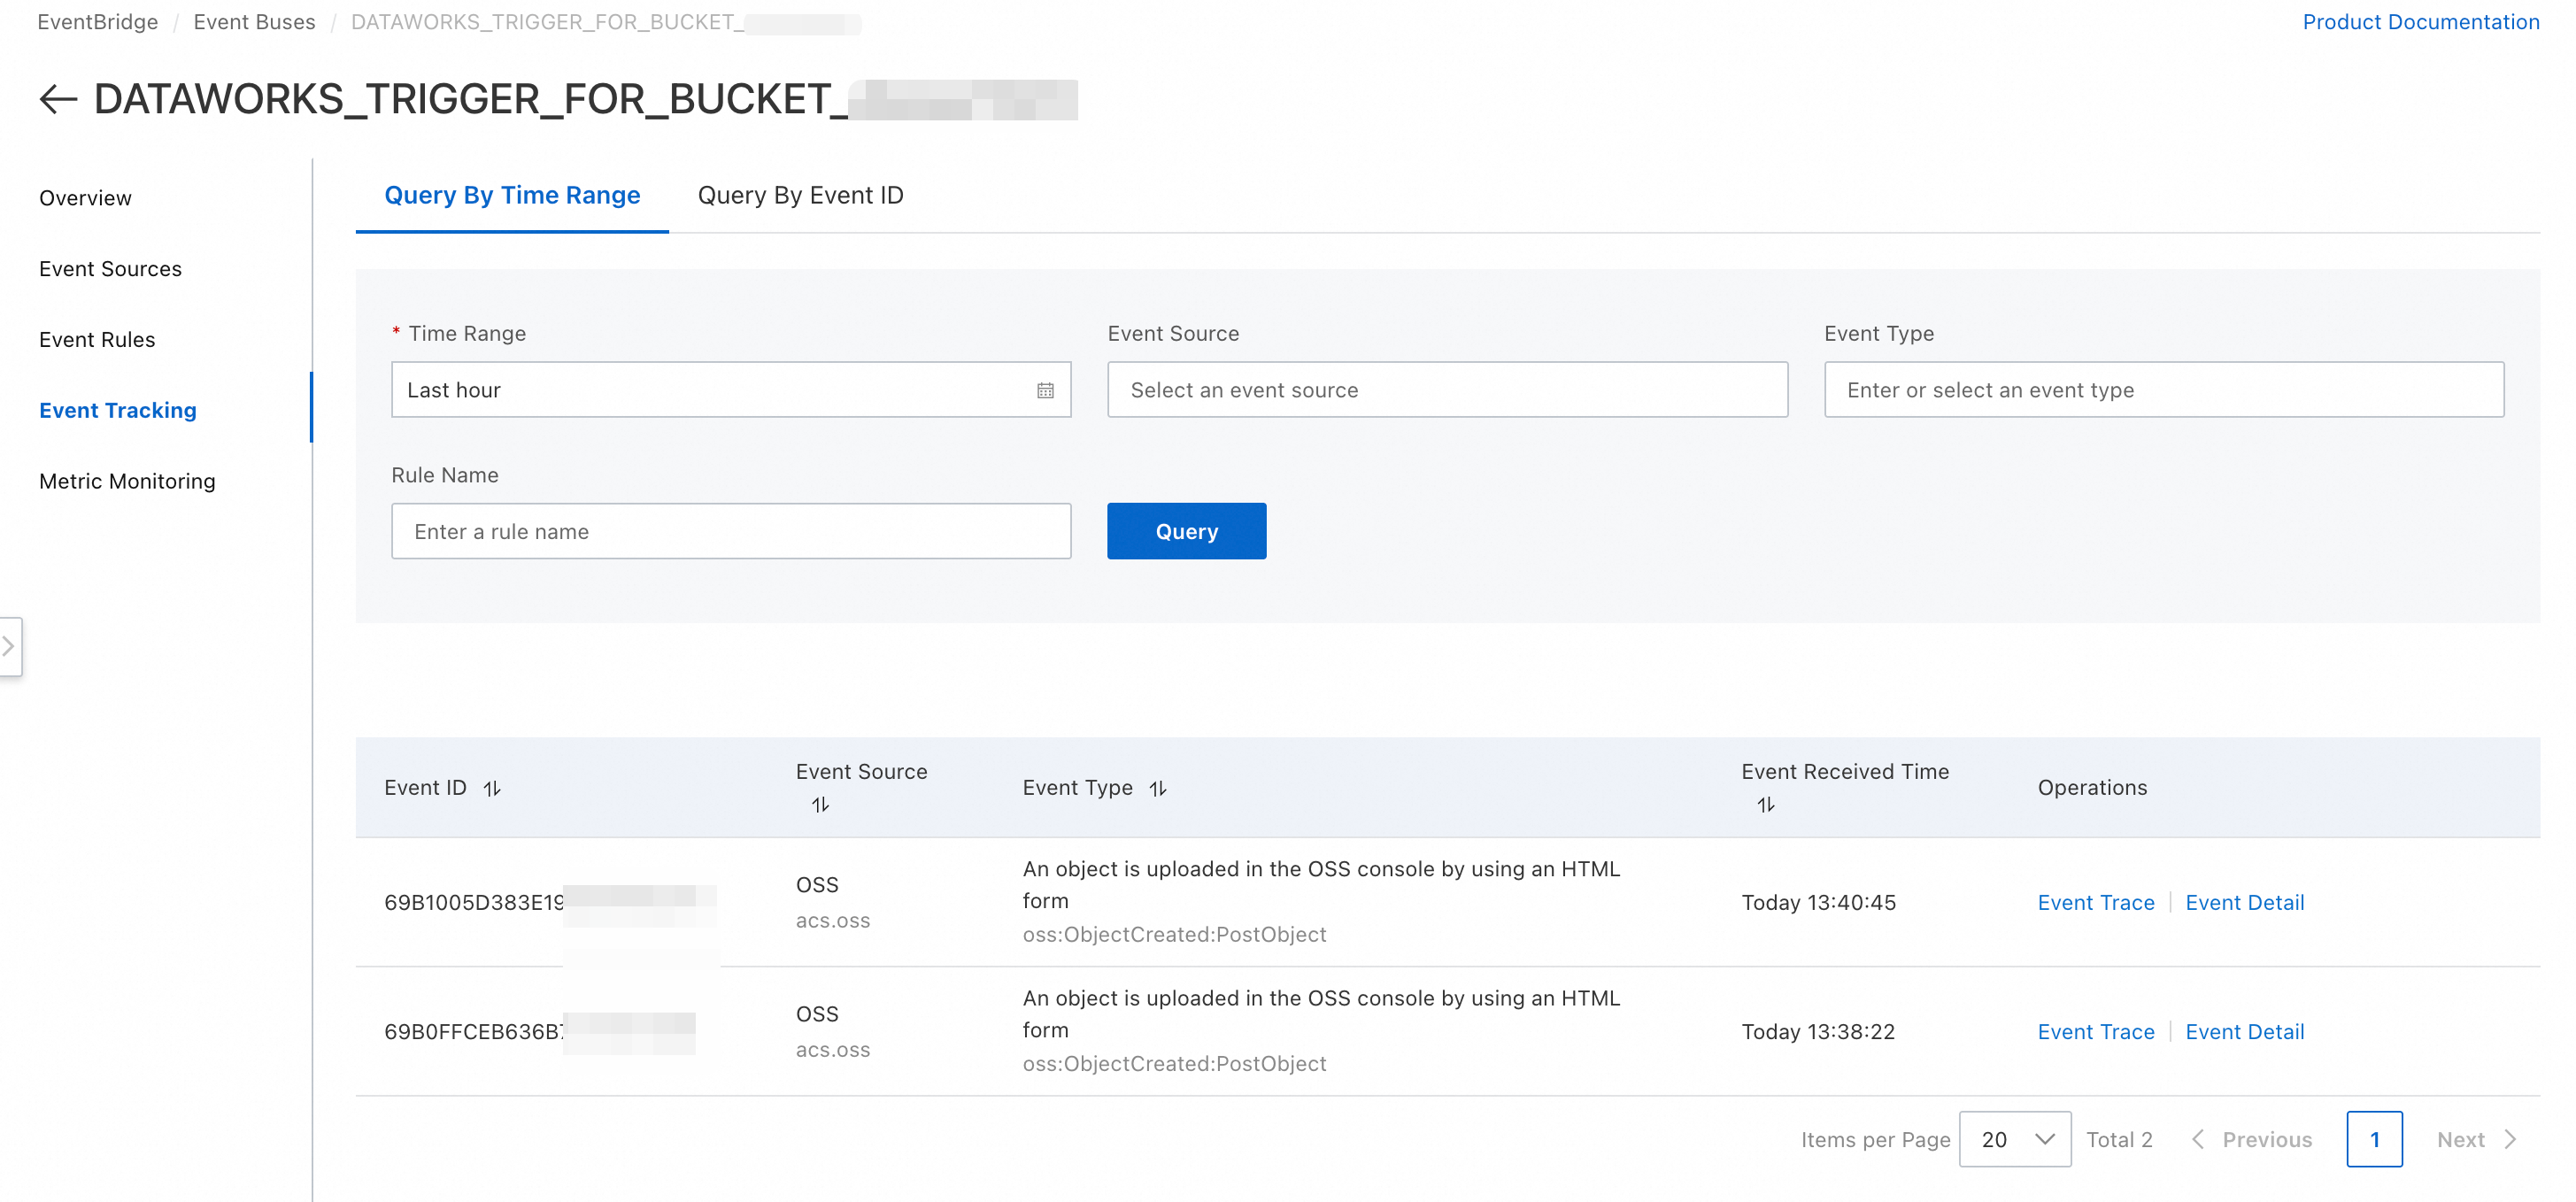
In DataWorks, go to Operation Center > Manually Triggered Node O&M > Manual Task > Triggered Workflow. The published
process_oss_file_workflowappears in the list.
After a moment, a new workflow instance is automatically triggered and run. You can view it in DataWorks at Operation Center > Manually Triggered Node O&M > Manual Instance. Click the instance to view its logs and confirm that the file path was processed correctly.
Best practice: Idempotency design
OSS events may be delivered more than once due to factors like network fluctuations. To prevent duplicate data processing, we recommend implementing idempotency in your business logic. A common approach is to check a record table—such as a MaxCompute table—before processing a file. Use the file's ETag or unique path as an identifier, and skip the file if it has already been processed.
Scenario 2: Process ApsaraMQ for Kafka messages
Objective: Monitor a Kafka topic for user behavior logs. When a new message arrives, trigger a workflow to parse it and execute different logic based on its content.
Step 1: Create a Kafka trigger
Go to Operation Center > Tenant Schedule Setting > Trigger Management and click Create Trigger.
Configure the following parameters:
Trigger name:
kafka_user_action_trigger.Trigger event type: Select ApsaraMQ for Kafka.
Kafka instance and Topic: Select the instance and topic that you want to monitor.
ConsumerGroupId: We recommend that you select Quick Create. The system automatically generates a consumer group ID to avoid conflicts with other applications.
Key (Optional): You can specify a message key. Only messages with a key that exactly matches will trigger the workflow.
Click OK.
Step 2: Create and associate the workflow
Follow the steps in Quick start: Create a manually triggered workflow to create a triggered workflow named
handle_user_action_workflow.On the right side of the workflow canvas, in the Properties panel, select Scheduling Policy.
From the Trigger drop-down list, select the
kafka_user_action_triggerthat you just created.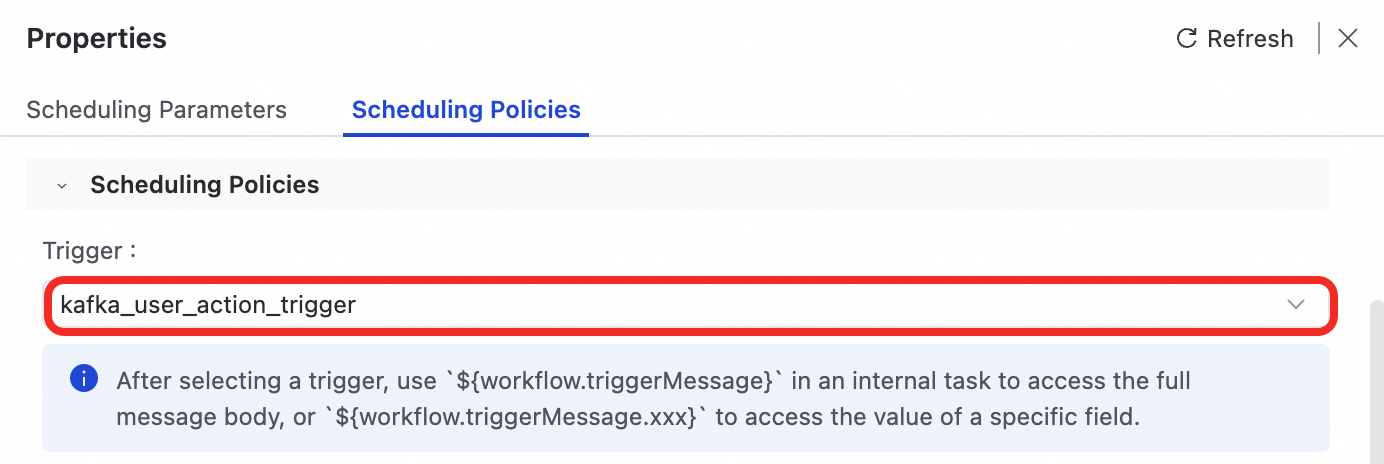
(Important) Because messages may arrive at a high frequency, we recommend that you configure the maximum parallel instances. For example, set the value to
100to prevent message spikes from overwhelming scheduling resources.
Step 3: Develop node and parse nested JSON
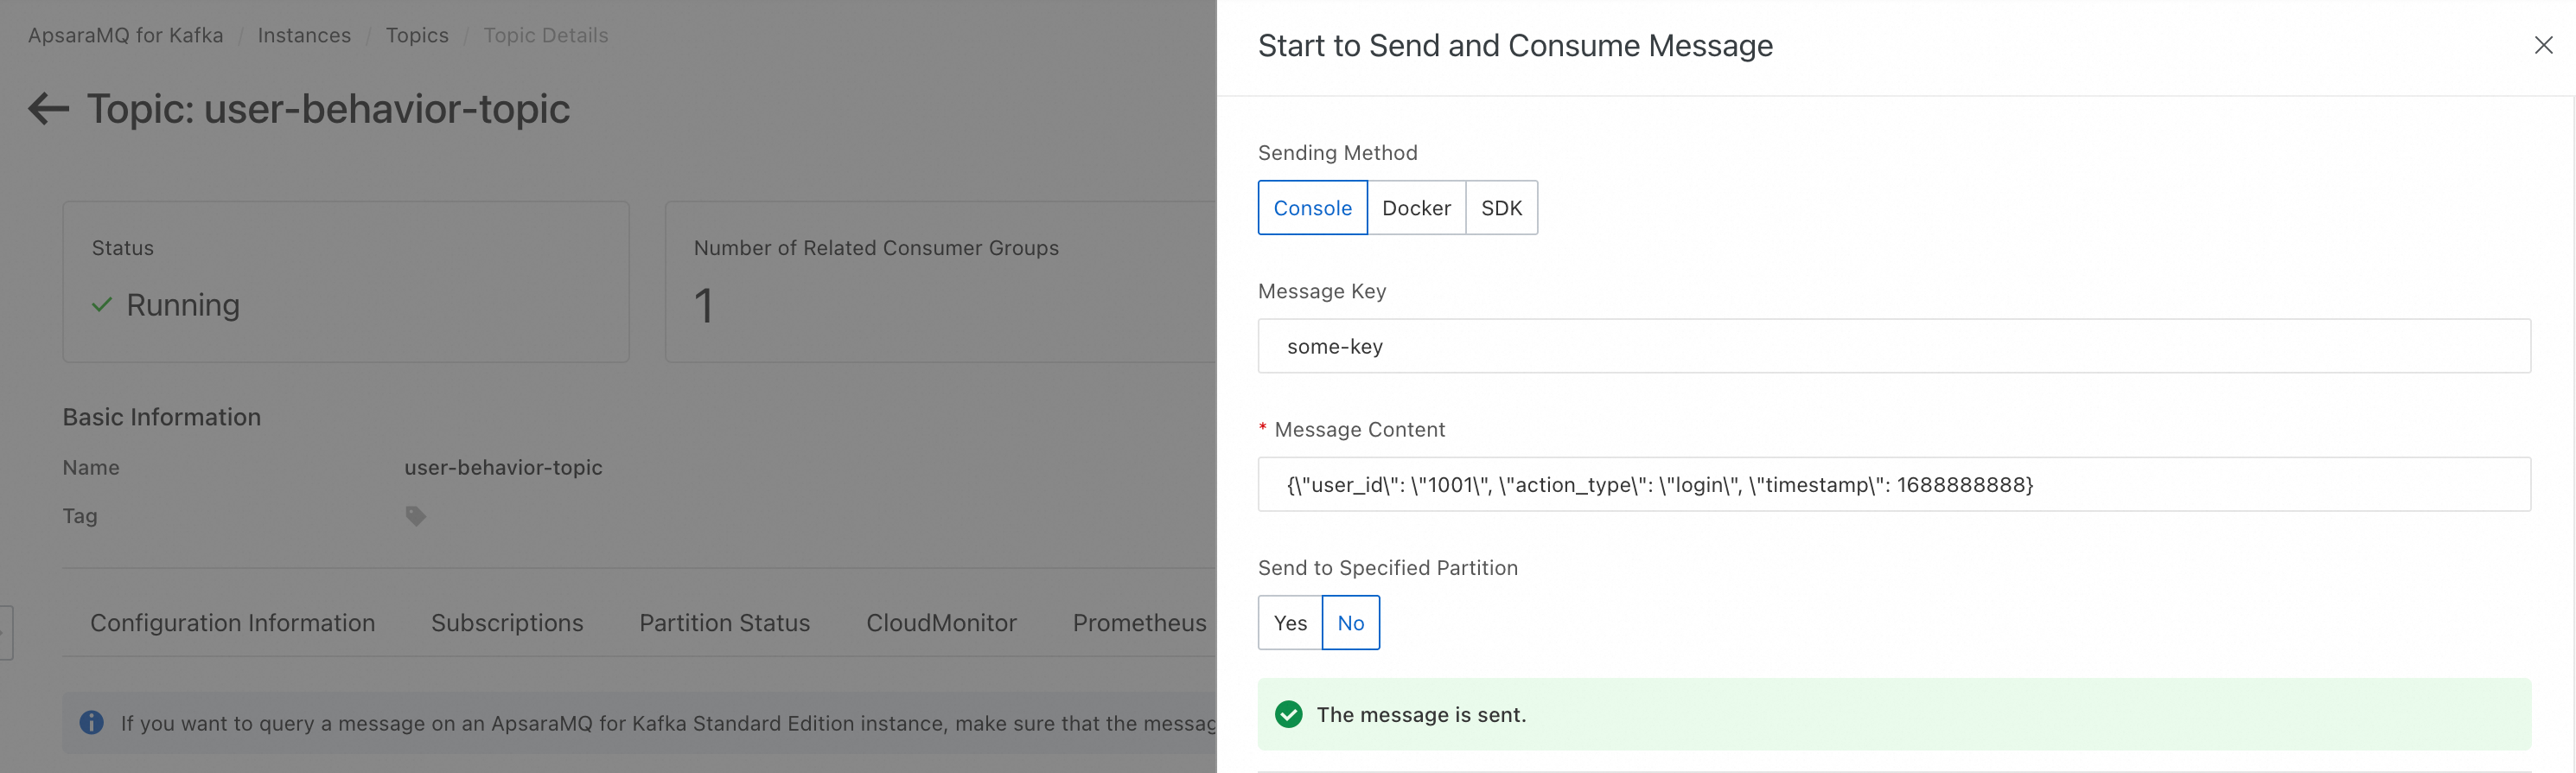
Assume that the value field of a Kafka message is a JSON string with the following format: {"user_id": "1001", "action_type": "login", "timestamp": 1688888888}.
In the toolbar, click + Add Node to open the node list. From the node type list on the left, drag a Python node to the canvas.
Enter the following code to parse the message. Because the
valuefield is a string, you must perform a second JSON parse in your code.import json # 1. Get the 'value' field from the Kafka message, which is a JSON-encoded string, via a built-in variable. message_value_str = '${workflow.triggerMessage.value}' print(f'Received raw message value string: {message_value_str}') try: # 2. Parse the string into a Python dictionary. message_data = json.loads(message_value_str) user_id = message_data.get("user_id") action_type = message_data.get("action_type") print(f"Successfully parsed message. User ID: {user_id}, Action: {action_type}") # 3. Execute different business logic based on the action_type. if action_type == 'login': # o.run_sql(f"INSERT OVERWRITE TABLE user_login_record PARTITION(ds='{bizdate}') VALUES ('{user_id}');") print("Processing login action...") elif action_type == 'purchase': print("Processing purchase action...") else: print("Unknown action type.") except json.JSONDecodeError as e: print(f"Error decoding JSON: {e}") # Add exception handling logic, such as writing the error message to a dedicated log table. raise e # Re-raise the exception to mark the node as failed, which helps with troubleshooting.
Step 4: Debug and publish
Debug:
Return to the workflow canvas and click the Run
button.In the Trigger Message Body input box, paste a simulated Kafka event. Note that the
valuefield is an escaped JSON string.{ "topic": "user-behavior-topic", "key": "some-key", "value": "{\"user_id\": \"1001\", \"action_type\": \"login\", \"timestamp\": 1688888888}" }Run and check the logs to confirm that the Python node correctly parses the
user_idandaction_typevalues.
Publish: After successful debugging, publish the workflow to the production environment.
Step 5: Verify in production
Send a message with the correct format to your configured Kafka Topic.
In DataWorks, go to Operation Center > Manually Triggered Node O&M > Manual Task > Triggered Workflow. The published
handle_user_action_workflowappears in the list.
In Operation Center > Manually Triggered Node O&M > Manual Instance > Triggered Workflow Instance, observe whether a new workflow instance has been triggered and check its run log.

Best practice: Concurrency and ordering
Concurrency control: Always set a reasonable maximum for parallel instances to handle message spikes.
Order guarantee: DataWorks scheduling does not guarantee strict message processing order. If you need to ensure that messages for the same user or partition are executed in order, you must implement a distributed lock in your business code (for example, by using Redis or MaxCompute). Alternatively, you can delegate the processing logic to a computing engine that guarantees ordered consumption by partition, such as Flink.
Core design and configuration
Workflow orchestration
Orchestrating a triggered workflow is similar to orchestrating a scheduled workflow. For more information, see Node and workflow orchestration.
Scheduling parameters
In the Properties panel on the right side of the workflow canvas, you can set global parameters for the workflow. All nodes within it can reference these parameters.
Reference syntax: In node code, reference a workflow parameter by using the
${workflow.parameter_name}format.Parameter priority: Parameters in DataWorks have a hierarchical override relationship. The order of precedence is: node parameters > workflow parameters.
For more information about parameters, see Parameter design and flow.
Scheduling policy
When multiple workflows trigger simultaneously and cause a resource bottleneck, use priority and priority weighting policies to manage resource scheduling and ensure that the most important tasks are executed first.
Ensure core business continuity: Set a higher priority for critical business workflows so they always run before non-critical workflows.
Reduce critical path runtime: Within a single workflow instance, you can use a priority weighting policy to influence the execution order of nodes. For example, using the downward weighting policy, nodes on the critical path with more upstream dependencies gain a higher dynamic weight. This prioritizes their execution, which shortens the entire workflow runtime.
Parameter
Description
Priority
Defines the absolute priority level of a workflow instance in the scheduling queue. Available levels are 1, 3, 5, 7, and 8, where a higher number indicates a higher priority. High-priority tasks or workflows are always allocated scheduling resources before low-priority ones.
Priority weighting policy
Defines how the weights of individual nodes (tasks) are dynamically calculated within the same priority level. Nodes with higher weights are given execution priority.
No weighting: All nodes have a fixed baseline weight.
Downward weighting: The weight of a node is dynamically adjusted. The more upstream nodes it depends on, the higher its weight. This strategy helps prioritize the execution of nodes on the critical path in a directed acyclic graph (DAG). The weight is calculated as follows:
Initial weight + Sum of the priorities of all its upstream nodes.
Maximum parallel instances
Controls the maximum number of instances of this workflow that can run at the same time for concurrency control and resource protection. When this limit is reached, newly triggered instances enter a waiting state. You can set this to Unlimited or a custom value up to 100,000.
NoteIf the specified limit exceeds the maximum capacity of the resource group, the actual concurrency is determined by the physical limit of the resource group.
The DataWorks priority system follows a hierarchical override rule: runtime specification > node-level configuration > workflow-level configuration.
Workflow-level configuration (baseline): Configured in the workflow's Scheduling Policy panel, this serves as the default setting for all nodes.
Node-level configuration (override): You can override the workflow-level setting for a specific node by setting a higher priority in its Properties > Scheduling Policy panel.
Runtime specification (temporary): When manually triggering a run in Operation Center, you can specify a priority by using the Override Priority at Runtime switch. This configuration has the highest precedence and applies only to the current run, without modifying any permanent settings.
O&M and management
Instance monitoring: On the Manual Instance page (located in Operation Center > Manually Triggered Node O&M), you can view, rerun, terminate, and check the logs for all triggered or manually run instances.
Clone a workflow: In Business Flow, right-click a workflow and select Clone to quickly copy it into a new workflow that includes all nodes and dependencies. For more information, see Clone a workflow for scheduled workflows.
Version management: In the Version panel on the right side of the workflow canvas, you can view, compare, and revert to historical versions of the workflow. For more information, see Version management for scheduled workflows.
Limits and notes
Effective environment: The event-driven triggering mechanism takes effect only after the workflow is published to the production environment (Operation Center).
Node count: A single workflow supports a maximum of 400 nodes. We recommend keeping the count under 100 to simplify maintenance.
Concurrency limit: The maximum number of parallel instances is 100,000, but the actual concurrent capacity is limited by the specifications of the scheduling resource group you have purchased.
Node-level scheduling: When configuring scheduling at the node level, only priority can be configured. The priority weighting policy is not supported.
Unsupported node types: EMR Spark Streaming, Flink SQL Streaming, Flink JAR Streaming, Flink Python Streaming, and dependency check nodes are not supported in triggered workflows. They can only be developed and run as independent nodes.