

Use Marketplace Image to Deploy a WordPress Website on Alibaba Cloud
Overview
This solution uses a WordPress website image on Alibaba Cloud Marketplace to deploy a WordPress website on ECS quickly.
This solution divides the deployment into several phases, with each phase adopting a typical architecture for specific business needs.
Reference Architecture


Steps
Deploy Resources
Note: Use the correct
Image ID of the WordPress image on the corresponding region.
Deploy the WordPress Website
Phase 0: "All-In-One" Structure for Entry-Level Deployment.
This phase is for entry level deployment at a low cost but does not feature high availability for web apps or databases.
This phase is for entry level deployment at a low cost but does not feature high availability for web apps or databases.
Visit the following URL in a web browser to initialize WordPress.
http://ECS_EIP
Note: Replace
ECS_EIP with the Elastic IP address of the ECS instance.
Phase 1: WordPress ECS Server + Standalone RDS MySQL in Basic Edition
In this phase, the database is decoupled from the web app server. This structure is more stable for both web apps and databases but still does not offer high availability feature for either one.
In this phase, the database is decoupled from the web app server. This structure is more stable for both web apps and databases but still does not offer high availability feature for either one.
1. Log on to ECS via SSH.
The default account name and password of the ECS instance are:
Account name: root
Password: Aliyun-test
The default account name and password of the ECS instance are:
Account name: root
Password: Aliyun-test
2. Run the following command to edit the WordPress configuration file and set the RDS MySQL URL, database and account information.
vim /data/wwwroot/wordpress/wp-config.php
3. Visit the following URL in a web browser to initialize WordPress.
http://ECS_EIP
Note: Replace
ECS_EIP with the Elastic IP address of the ECS instance that you obtained previously.
Phase 2-1: SLB + WordPress ECS Servers (Auto Scaling) + Cloud Native PolarDB MySQL
In this phase, you can set up SLB and an auto-scaling group for multiple ECS servers with the WordPress web app. You can also use the cloud-native database PolarDB for high availability and scalability.
In this phase, you can set up SLB and an auto-scaling group for multiple ECS servers with the WordPress web app. You can also use the cloud-native database PolarDB for high availability and scalability.
1. Log on to ECS via SSH.
2. Run the following command to edit the WordPress configuration file to set the PolarDB MySQL URL, and database and account information.
vim /data/wwwroot/wordpress/wp-config.php
3. Visit the following URL in a Web browser to initialize WordPress.
http://ECS_EIP
Note: Replace
ECS_EIP with the Elastic IP address of the ECS instance that you obtained previously.
4. After you have successfully installed and configured WordPress, you can follow the instructions in this guide for auto scaling configurations.
Phase 2-2: SLB + WordPress ECS Servers (Auto Scaling) + Multi-AZ Redis Cache + High Availability Edition of RDS MySQL
In this phase, you can set up SLB and auto scaling groups for multiple ECS servers with the WordPress web app. You can use RDS with the cross-availability-zone feature for high availability, and use Redis as a data cache to improve web app performance.
1. Logon to ECS via SSH.
2. Run the following command to edit the WordPress configuration file to set the PolarDB MySQL URL, and database and account information.
3. Visit the following URL in a Web browser to initialize WordPress.
Note: Replace
2. Run the following command to edit the WordPress configuration file to set the PolarDB MySQL URL, and database and account information.
vim /data/wwwroot/wordpress/wp-config.php3. Visit the following URL in a Web browser to initialize WordPress.
http://ECS_EIPNote: Replace
ECS_EIP with the Elastic IP address of the ECS instance that you obtained previously.
4. Run the following commands in sequence to download the Redis object cache plugin and unzip the plugin package:
5. Run the following commands in sequence to copy the redis-cache folder to
6. Run the following command to complete the setting.
Note: Make sure this Redis setting block is the first settings block of the wp-config.php file
7. Run the following command to copy the object-cache configuration file to
8. Log on to WordPress to enable Redis object cache. Then you can visit the WordPress website via SLB EIP.
9 Follow the instructions in the guide for auto-scaling configurations to set up auto-scaling.
wget https://downloads.wordpress.org/plugin/redis-cache.2.0.18.zip
 unzip redis-cache.2.0.18.zip
5. Run the following commands in sequence to copy the redis-cache folder to
/data/wwwroot/wordpress/wp-content/plugins/ and configure WordPress to access ApsaraDB for Redis:cp -rf redis-cache /data/wwwroot/wordpress/wp-content/plugins/
vim /data/wwwroot/wordpress/wp-config.php6. Run the following command to complete the setting.
// Redis settings
 define( 'WP_REDIS_HOST', '' );
 define( 'WP_REDIS_CLIENT', 'predis' );
 define( 'WP_REDIS_PORT', '6379' );
 define( 'WP_REDIS_DATABASE', '0');
 define( 'WP_REDIS_PASSWORD', 'wordpress:N1cetest' );
Note: Make sure this Redis setting block is the first settings block of the wp-config.php file
7. Run the following command to copy the object-cache configuration file to
/data/wwwroot/wordpress/wp-content/.cp /data/wwwroot/wordpress/wp-content/plugins/redis-cache/includes/object-cache.php /data/wwwroot/wordpress/wp-content/8. Log on to WordPress to enable Redis object cache. Then you can visit the WordPress website via SLB EIP.
http://SLB_EIP/9 Follow the instructions in the guide for auto-scaling configurations to set up auto-scaling.
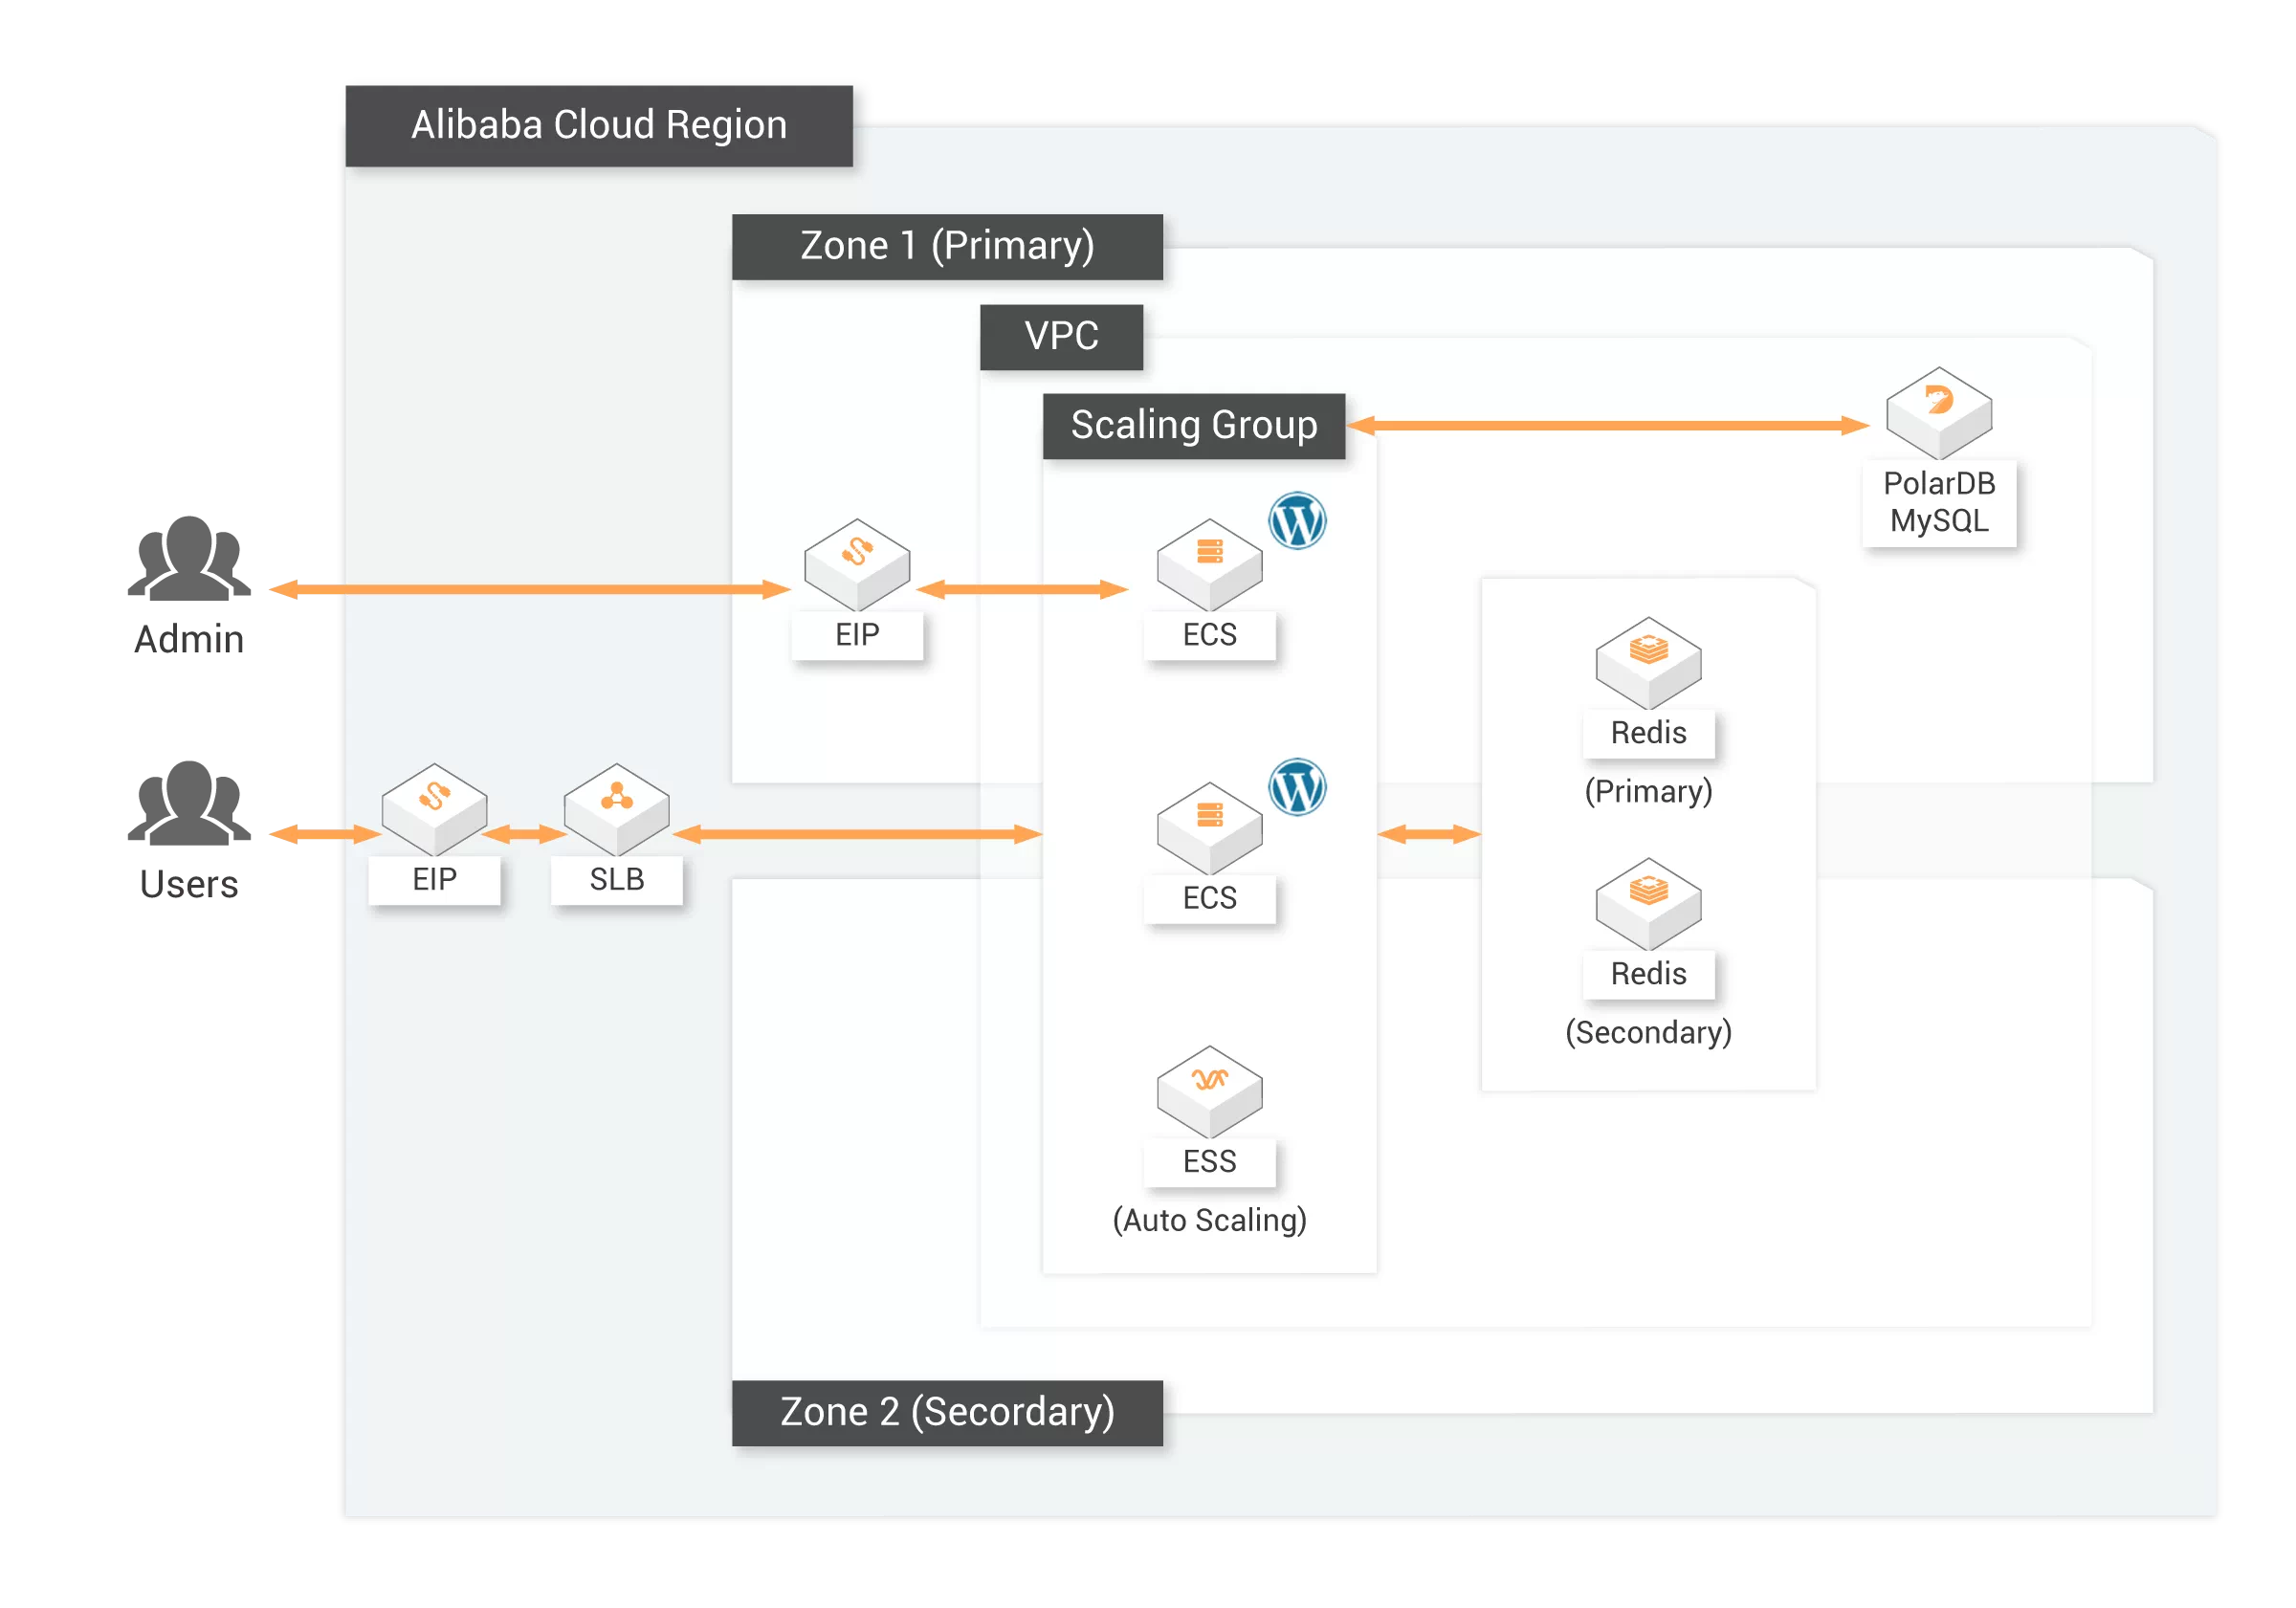
Phase 2-3: SLB + WordPress ECS Servers (Auto Scaling) + Multi-AZ Redis Cache + Cloud Native PolarDB MySQL
In this phase, you can setup SLB and an auto scaling group for multiple ECS servers with WordPress web app. You can also use the cloud-native database PolarDB for high availability and scalability, and Redis as data cache to improve web app performance. The cross availability zone feature also ensures high availability.
1. Logon to ECS via SSH.
2. Run the following command to edit the WordPress configuration file to set the PolarDB MySQL URL, and database and account information.
vim /data/wwwroot/wordpress/wp-config.php
3. Visit the following URL in a Web browser to initialize WordPress.
http://ECS_EIP
Note: Replace
ECS_EIP with the Elastic IP address of the ECS instance that you obtained previously.
4. After you have successfully installed and configured WordPress, you can follow the instructions in the guidef or auto-scaling configurations and guide for Redis caching configurations to set up auto-scaling and Redis caching.
Quick Start
Reach Alibaba Cloud experts for support
Contact Us
