

Use Kafka and Canal to Set Up Data Synchronization between Redis and MySQL
Overview
Canal pretends to be a secondary MySQL instance by simulating the interactive protocol of it, and sends the dump protocol to the primary MySQL instance. The primary MySQL instance receives the dump request and starts to push the binary log to the secondary MySQL instance (for example, Canal). Then Canal parses binary log objects (originally byte streams) and sends them to storage destinations, such as MySQL, Kafka, and Elasticsearch.
Reference Architecture
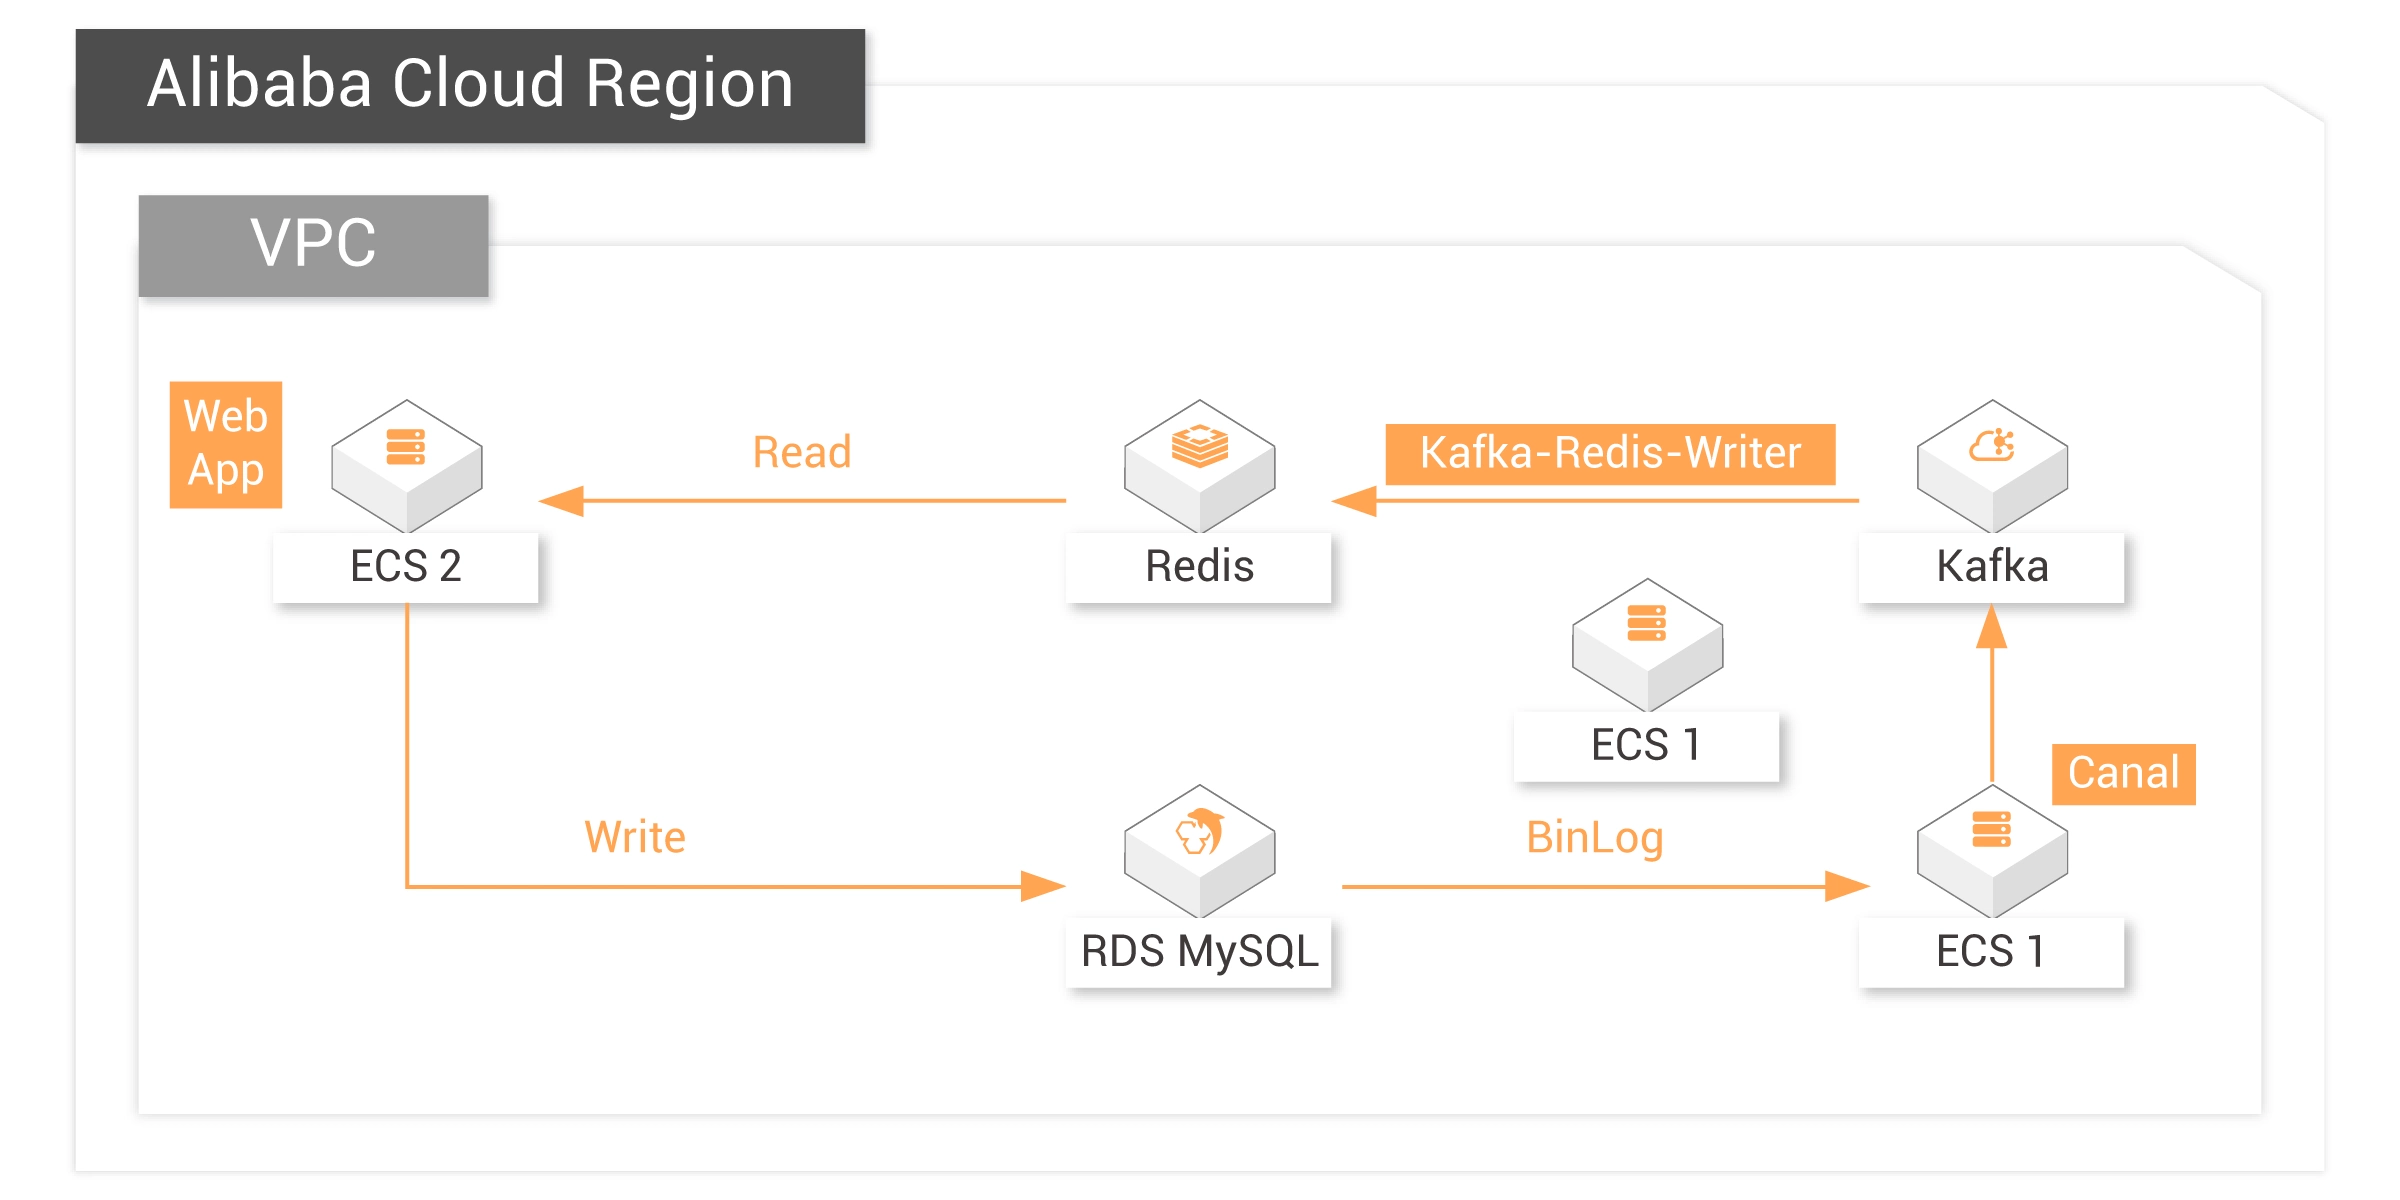
The following architecture diagram demonstrates how to achieve data synchronization between Redis and MySQL using Kafka and Canal. In the scenario demonstrated by this diagram:
MySQL, Kafka, and Redis are created using Terraform.
Canal is deployed on ECS.


Steps
Follow the instructions in Chapter 4 of the Deployment Guide to create resources and set up the environment via Terraform:
1. Install Terraform
2. Use this main.tf file in Terraform to create resources such as VPC, Vswitch, and security group.
3. Install MySQL client
4. Install Redis client
5. Install JDK
6. Prepare Kafka environment
7. Prepare RDS environment
Install Canal and Set Up Data Synchronization
1. Run the following command to download the canal installation package:
cd && wget https://labex-ali-data.oss-us-west-1.aliyuncs.com/canal/canal.deployer-1.1.5.tar.gz
2. Run the following command to create a canal directory and download the canal installation package to this directory:
mkdir canal tar -zxvf canal.deployer-1.1.5.tar.gz -C canal
3. Run the following command to view the files in the canal directory:
cd canal && ls
4. Run the command
Note: Replace YOUR-KAFKA-ADDR with your own Kafka connection address.
vim conf/canal.properties and modify relevant configuration: Note: Replace YOUR-KAFKA-ADDR with your own Kafka connection address.
5. Run the command
Note: Replace YOUR-RDS-ADDR with your RDS connection address.
vim conf/example/instance.properties to modify the relevant configuration:Note: Replace YOUR-RDS-ADDR with your RDS connection address.
6. Run the following command to start the canal service:
bin/startup.sh
7. Go to the Alibaba Cloud Kafka console and verify that the topic on Kafka has started receiving messages, which indicates that Canal is synchronizing RDS log data to Kafka.
8. Run the following command to download a sample jar package, which will be responsible for synchronizing the data in Kafka to Redis:
cd && wget https://labex-ali-data.oss-us-west-1.aliyuncs.com/canal/canal-0.0.1-SNAPSHOT.jar
9. Run the following command to start the synchronization process.
Note: Replace YOUR-KAFKA-ADDR and YOUR-REDIS-ADDR with your Kafka and Redis connection addresses:
You can see the data is being synchronized, and the output messages are consumed from Kafka.
Note: Replace YOUR-KAFKA-ADDR and YOUR-REDIS-ADDR with your Kafka and Redis connection addresses:
java -cp canal-0.0.1-SNAPSHOT.jar canal.SyncKafkaRedis YOUR-KAFKA-ADDR topic1 group1 YOUR-REDIS-ADDR Aliyun-testYou can see the data is being synchronized, and the output messages are consumed from Kafka.
Test Data Synchronization
Create two new ECS command line interfaces. The one that is executing the synchronization process is called command line 1. The newly created ones are called command line 2 and command line 3, respectively.
1. Insert data into the user table of RDS database.
Enter the following command to insert data into the user table:
Enter the following command to insert data into the user table:
insert into user values("19832", "name1", "ddsdfdfd", "addr1", "17138141002", "nickname1"); insert into user values("20122", "name2", "xdfdsafd", "addr2", "13877686321", "nickname2");
2. Update the data in RDS
On command line 2, enter the following command to update the data with id = "19832":
On command line 3, enter the following command. You can see the data has been updated:
On command line 2, enter the following command to update the data with id = "19832":
update user set username = "nanzhao" where id = "19832";On command line 3, enter the following command. You can see the data has been updated:
get 19832
3. Delete the data in RDS
On command line 2, enter the following command to delete the data with id = "19832":
On command line 3, enter the following command. You can see the Redis Key no longer exists, which indicates successful synchronization:
On command line 2, enter the following command to delete the data with id = "19832":
delete from user where id = "19832";On command line 3, enter the following command. You can see the Redis Key no longer exists, which indicates successful synchronization:
get 19832
Render the Redis data on Web App
1. Install the Apache Environment
Remotely log in to the "labex2" instance.
The default account name and password of the ECS instance are listed below:
Account name: root
Password: Aliyun-test
Run the following command to install apache2:
Remotely log in to the "labex2" instance.
The default account name and password of the ECS instance are listed below:
Account name: root
Password: Aliyun-test
Run the following command to install apache2:
apt update && apt install -y apache2 python3-pip
2. Run the following command to install the Redis dependency of Python:
pip3 install redis
3. Run the following command to create a folder:
mkdir /var/www/python
4. Run the following command to disable the event module and enable the prefork module:
a2dismod mpm_event
 a2enmod mpm_prefork cgi
5. Run the command
vim /etc/apache2/sites-enabled/000-default.conf to open the Apache configuration file. Replace all the content in the file with the code in Secction 7.1 of the Deployment Guide. Save the settings and exit.
6. Run the command
Note: Replace YOUR-REDIS-PUBLIC-DOMAIN with the address of your Redis instance.
vim /var/www/python/showRedis.py to create a new file. Copy the code in Section 7.1 of the Deployment Guide and paste it to the file. Save the settings and exit.Note: Replace YOUR-REDIS-PUBLIC-DOMAIN with the address of your Redis instance.
7. Run the following command to grant the file execution permission:
chmod 755 /var/www/python/showRedis.py
8. Run the following command to restart Apache and let the preceding configurations take effect:
service apache2 restart
9. Replace the IP address with your ECS public network address, and then access it from a web browser. The data in Redis will be displayed on this webpage after the next step.
10. Repeat the operations of inserting, updating, and deleting data in MySQL in "Test Data Synchronization" and then refresh the browser to see the data in Redis.
Reach Alibaba Cloud experts for support
Contact Us
