This topic describes how to purchase a PolarDB cluster on the Custom Purchase page in the PolarDB console.
-
You can upgrade an existing ApsaraDB RDS for MySQL instance to a PolarDB for MySQL cluster. After the upgrade, the PolarDB cluster retains the accounts, databases, IP address whitelists, and necessary parameters from the source RDS instance. For detailed steps, see Upgrade an ApsaraDB RDS for MySQL instance to PolarDB for MySQL.
-
If you have an existing PolarDB for MySQL cluster, you can perform an upgrade migration from the original PolarDB for MySQL to a new PolarDB for MySQL cluster. The upgraded cluster includes the account information, database information, IP address whitelist, and necessary parameters of the source cluster. For the detailed procedure, see Major version upgrade.
Prerequisites
You have an Alibaba Cloud account. For more information, see Sign up for and log on to an Alibaba Cloud account.
Procedure
-
Go to the PolarDB cluster purchase page.
-
Configure the basic settings for your cluster. The following table describes the parameters.
Parameter
Description
Billing Method
Subscription: An upfront payment model. When you create a cluster, you select resources with defined specifications and pay for them in advance. The longer the subscription period, the larger the discount. This method is suitable for businesses with stable, long-term needs.
Pay-as-you-go: A pay-as-you-go model. When you create a cluster, you select resources with defined specifications. You do not need to pay in advance. You are billed for the resources that you use. This method is suitable for businesses with flexible needs.
Serverless: A pay-as-you-go model. When you create a cluster, you do not need to select resources with defined specifications or pay in advance. PolarDB clusters can dynamically scale resources based on workload changes. This method is suitable for businesses with fluctuating, uncertain, or unpredictable workloads.
Note-
For a detailed comparison of billing methods, see Billing methods.
-
Rules for changing the billing method: You can change a cluster's billing method between subscription and pay-as-you-go. The serverless billing method cannot be changed.
Region
A region is the geographical area where a data center is located. Regions are typically named after the city where the data center resides.
Note-
Select a region that is geographically close to your users to reduce network latency. You cannot change the region after purchase.
-
We recommend creating the PolarDB cluster in the same region as the connecting ECS instance. Otherwise, they cannot communicate over the internal network (private network) and can communicate only over the Internet (public network). This prevents the cluster from delivering optimal performance.
Creation Method
PolarDB supports multiple creation methods. By default, Create Primary Cluster is selected, which creates a new PolarDB cluster. The following list describes the other options:
-
Create Secondary Cluster: Creates a secondary cluster for a Global Database Network (GDN). You can add a secondary cluster only after you create a GDN.
-
Upgrade/Migrate from PolarDB: Suitable for major version upgrades between different kernel versions or different product series. This method first copies the full data from the source PolarDB cluster and then synchronizes incremental data. For more information, see Major version upgrade.
-
Migrate from RDS: Migrates an RDS instance to a PolarDB cluster. During the migration, the system automatically synchronizes the accounts, databases, IP whitelists, and necessary parameters from the source RDS instance. You can also retain the original database endpoint to simplify the migration and ensure a smooth business transition. For more information, see One-click upgrade from ApsaraDB RDS for MySQL to PolarDB for MySQL.
NoteThe list of available RDS instances excludes read-only instances and instances that contain non-InnoDB engines.
-
Clone From RDS: Clones a PolarDB cluster that has the same data as the selected RDS instance. This creation method does not synchronize incremental data from the RDS instance to the PolarDB cluster. For more information, see One-click clone from ApsaraDB RDS for MySQL to PolarDB for MySQL.
NoteThe list of available RDS instances excludes read-only instances and instances that contain non-InnoDB engines.
-
Restore From Recycle Bin: Restores a deleted PolarDB cluster from a backup set retained in the cluster recycle bin.
NoteIf the original PolarDB cluster had X-Engine enabled and contains corresponding databases and tables, you must select InnoDB & X-Engine for Storage Engine. Otherwise, the new PolarDB cluster cannot access the data in X-Engine.
Database Engine
Select a MySQL-compatible version.
-
MySQL 8.0.2: Fully compatible with community MySQL 8.0.18 and earlier versions.
-
MySQL 8.0.1: Fully compatible with community MySQL 8.0.13 and earlier versions.
-
MySQL 5.7: Fully compatible with MySQL 5.7.
-
MySQL 5.6: Fully compatible with MySQL 5.6.
NoteFeatures vary by kernel version. For more information, see Feature comparison among versions 5.6, 5.7, and 8.0.
Database Edition
Valid values: Enterprise Edition and Standard Edition.
NoteFeatures vary by product edition. For more information, see Comparison between Enterprise Edition and Standard Edition.
Edition
Enterprise Edition supports two series: Cluster and Multi-master Cluster (Limitless). This parameter is not available for Standard Edition.
NoteThe two series have different architectures and use cases. For more information, see Product series of Enterprise Edition.
Specification Edition
You can select Dedicated or General-purpose.
-
Dedicated: Each cluster uses dedicated compute resources, such as CPU, and does not share them with other clusters on the same server. This ensures more stable and reliable performance.
-
General-purpose: Different clusters on the same server share idle compute resources, such as CPU. Reusing compute resources provides economies of scale and higher cost-effectiveness.
For a detailed comparison of the two specification types, see Select between general-purpose and dedicated specifications.
CPU Architecture
Valid values: X86 or ARM.
X86: The X86 architecture uses Intel processors and high-performance networks to deliver enhanced overall performance and stability. It provides the high stability and computing performance required by enterprise applications.
ARM: The ARM architecture uses Alibaba Cloud's self-developed Yitian 710 processors and 25 GE high-speed intelligent network interface controllers (NICs) to provide powerful computing capabilities. It also uses high-performance networks to meet the cost, security, and stability requirements of cloud-based businesses for government and Internet enterprises.
NoteX86 is the only supported CPU architecture for Enterprise Edition.
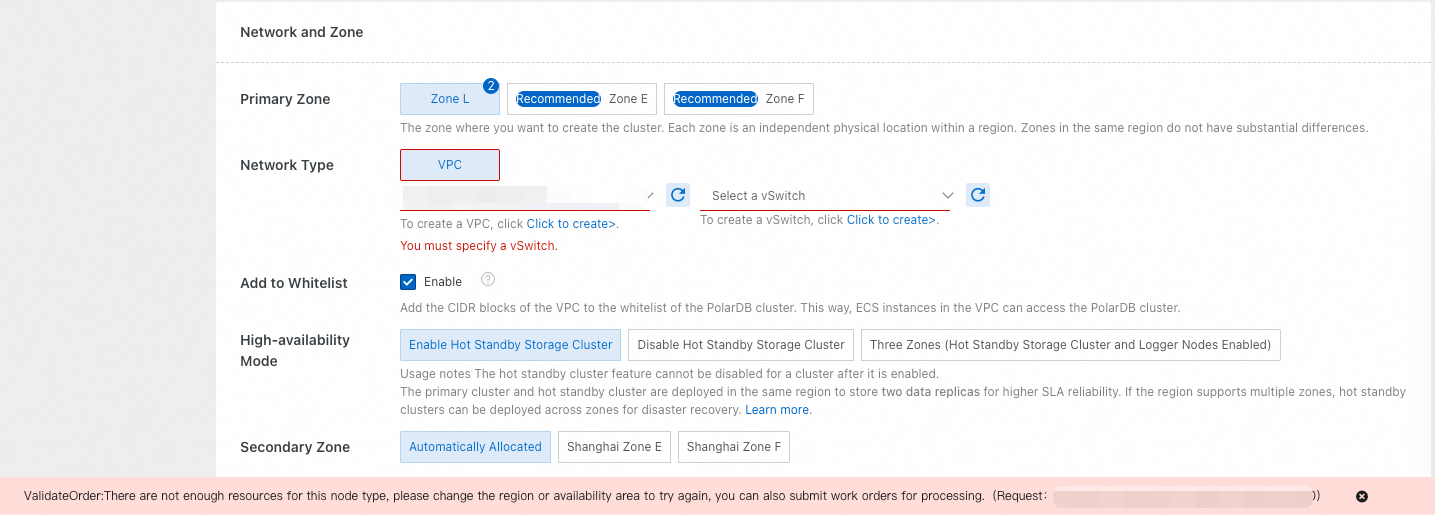
Primary Zone
A zone is a physical area within a region that has independent power and network resources. There is no significant difference between zones. You can create the PolarDB cluster and the ECS instance in the same zone or in different zones.
Network Type
The value is fixed to VPC.
We recommend selecting the same VPC as the connecting ECS instance. Otherwise, they cannot communicate over the internal network (private network) and can only communicate over the Internet (public network). This configuration prevents the cluster from delivering optimal performance.
-
If you have a suitable VPC, select it. For example, if you have an ECS instance in a VPC that fits your plan, select that VPC.
-
If you do not have a suitable VPC, you can use the default VPC and vSwitch.
NoteIf the defaults are unsuitable, you can create a VPC and a vSwitch.
Add to whitelist
We recommend that you Enable this option. This adds the CIDR block of your selected VPC to the whitelist of the PolarDB cluster. This allows ECS instances in the same VPC to directly access the PolarDB cluster, so you do not need to manually configure the whitelist after the cluster is created.
HA Mode
PolarDB provides multiple high availability modes. After you enable the hot standby storage cluster feature for a PolarDB cluster, a hot standby storage cluster is created in the secondary zone of the region in which the PolarDB cluster resides or in a different data center in the same zone. The hot standby storage cluster has independent storage resources. Whether the hot standby storage cluster has independent compute resources varies based on the high availability mode. When the PolarDB cluster in the primary zone fails, the hot standby storage cluster immediately takes over and handles read and write operations and storage tasks.
NoteFor more information about the hot standby storage cluster and related solutions, see High availability modes (hot standby clusters).
Rules for changing high availability modes:
You cannot directly change the high availability mode of a cluster from Double Zones (Hot Standby Storage Cluster Enabled) or Double Zones (Hot Standby Storage and Compute Clusters Enabled) to Single Zone (Hot Standby Storage Cluster Disabled).
For such change of the high availability mode, we recommend that you purchase a new cluster and select the Single Zone (Hot Standby Storage Cluster Disabled) high availability mode for the cluster. Then, migrate the existing cluster to the new cluster by using Data Transmission Service (DTS). For information about how to migrate an existing cluster to a new cluster, see Migrate data between PolarDB for MySQL clusters.
You can select the Three Zones high availability mode only when you purchase a new cluster. You cannot change the high availability mode of a cluster from Three Zones to other high availability modes and vice versa.
You can manually change the high availability mode of a cluster from Single Zone (Hot Standby Storage Cluster Disabled) to a different high availability mode. For more information, see High availability modes (hot standby clusters).
Resource scaling range for serverless cluster
You can set the resource scaling range for a Serverless cluster only when the billing method is Serverless:
-
Minimum Read-only Nodes: The minimum number of read-only nodes. Valid values: 0 to 15.
-
Maximum Read-only Nodes: The maximum number of read-only nodes. Valid values: 0 to 15.
Note-
The number of read-only nodes automatically scales up or down within the specified range based on the workload. For more information about the scaling policy, see Auto scaling.
-
To ensure high availability for your serverless cluster, we recommend setting Minimum Read-only Nodes to 1.
-
Minimum PCUs per Node: The minimum number of PCUs for each node in the cluster. Valid values: 0.25 to 31 PCUs.
-
Maximum PCUs per Node: The maximum number of PCUs for each node in the cluster. Valid values: 1 to 32 PCUs.
Note-
Serverless uses PCUs as the unit for per-second billing and resource scaling. One PCU is equivalent to approximately 1 vCPU core and 2 GB of memory. The PCUs of a node dynamically scale within the specified range, with a minimum scaling step of 0.5 PCU.
-
Example: If you set Minimum PCUs per Node to 2 and Maximum PCUs per Node to 16, the default specification for each node in the serverless cluster is 2 PCUs (about 2 vCPU cores and 4 GB of memory). When the system detects an increase in workload, it automatically scales up the PCUs of the primary node or read-only nodes. However, the number of PCUs cannot exceed 16.
Current specification
Select a specification based on your CPU, memory, maximum storage, and IOPS requirements.
NoteCompute node specifications vary by Database Edition. For more information, see Compute node specifications of Enterprise Edition and Compute node specifications of Standard Edition.
Enable Serverless
You can enable the serverless feature for a fixed-specification cluster when you create the PolarDB cluster.
When enabled, the cluster can dynamically scale resources beyond the fixed node specifications based on the workload. However, this incurs scale-up fees.
NoteThe default serverless configuration sets the maximum elastic resources per node to 8, the minimum to 0, the maximum number of read-only nodes to 1, and the minimum to 0. You can adjust these configuration parameters on the cluster details page at any time.
Nodes
By default, a cluster has two nodes (one read/write node and one read-only node). You can configure the number of nodes based on your business requirements.
Note-
You can configure multiple read/write nodes only for the Multi-master Cluster (Limitless) Edition series of Enterprise Edition clusters. Other series support only one read/write node.
-
The single-node product series has been discontinued. However, you can purchase a single-node PolarDB cluster by setting the number of Read-only Node to 0.
-
If you set the number of read-only nodes to 1 or more during cluster purchase, you cannot change this number to 0 later. If you need to change the number of read-only nodes in an existing cluster to 0, we recommend that you purchase a new cluster and migrate data from the original cluster to the new one by using a migration tool such as DTS or the major version upgrade feature.
-
Node description:
-
Primary Node: Also known as the primary node, it handles write operations and some read operations. It uses an active-active failover mechanism with read-only nodes to provide high availability for the database.
-
Read-only Node: This node handles read operations to offload the primary node, providing high availability and scalability. You can dynamically adjust the number of read-only nodes after the cluster is created based on your business needs.
-
Read-only IMCI Node: A functional node for the In-Memory Columnar Index (IMCI) feature. IMCI uses columnar storage technology to accelerate online analytical processing (OLAP) queries, which enables a PolarDB for MySQL cluster to perform both real-time transaction processing and real-time data analytics. After you add a read-only columnar node, you must also configure a routing scheme for row-based and column-based queries and add columnar indexes to your business tables. OLAP query requests will then be automatically routed to either read-only row-store nodes or read-only columnar nodes, rather than to the primary node.
-
PolarProxy specification
Valid values: Standard Enterprise Edition and Dedicated Enterprise Edition. This parameter depends on the specification type: Standard Enterprise Edition for General-purpose clusters and Dedicated Enterprise Edition for Dedicated clusters.
You can configure the PolarProxy specification separately, with options ranging from 4 to 16 vCPUs. We recommend that you use automatic matching.
NoteThis parameter can be configured only for Standard Edition clusters.
Storage Type
PolarDB supports ESSD, PSL4, and PSL5 storage types. ESSD is available only for Standard Edition clusters.
-
Enhanced SSD (ESSD) is a high-performance cloud disk from Alibaba Cloud. It uses a distributed block storage architecture with 25GE networking and RDMA technology to provide high IOPS and low single-path latency. ESSDs are categorized as follows:
-
ESSD PL0: An ESSD at performance level 0 (PL0).
-
ESSD PL1: Compared with a PL0 ESSD, a PL1 ESSD offers five times the IOPS and about twice the throughput.
-
ESSD PL2: Compared with a PL1 ESSD, a PL2 ESSD offers about twice the IOPS and throughput.
-
ESSD PL3: Compared with a PL2 ESSD, a PL3 ESSD offers up to 10 times the IOPS and five times the throughput. It is suitable for business scenarios with extremely high concurrent I/O performance requirements and extremely stable read/write latency.
-
ESSD AutoPL: Compared with PL0, PL1, PL2, and PL3 ESSDs, an AutoPL ESSD decouples IOPS from capacity, allowing for flexible configuration and on-demand adjustments, which reduces the total cost of ownership (TCO).
Important-
For more information about ESSD performance, see ESSDs.
-
When an ESSD is full, it becomes locked and read-only.
-
To prevent business disruptions, you can automatically scale up the storage space of an ESSD.
-
-
-
PSL4 and PSL5 are storage types provided by PolarDB for different business scenarios. The following table describes their differences.
Storage type
Features
Use cases
PSL5 (PolarStore Level 5)
A storage type supported in historical versions of PolarDB. It is the default storage type for PolarDB clusters purchased before June 7, 2022. It provides high performance, reliability, and availability.
Business scenarios that have high requirements for performance and reliability and use databases as their core systems, such as finance, e-commerce, government affairs, and large- and medium-sized Internet businesses.
PSL4 (PolarStore Level 4)
A new storage type for PolarDB that uses Alibaba's self-developed Smart-SSD (hardware-compressed disk) technology. Data is compressed and decompressed at the physical SSD level, which lowers storage costs while keeping the performance impact under control.
Application scenarios that require cost reduction and high cost-effectiveness.
NoteSome product series support storage class upgrades, which means that PSL4 storage can be upgraded to PSL5 storage.
Downgrading the storage class is not supported. You cannot downgrade PSL5 storage to PSL4 storage.
To switch from PSL5 storage to PSL4 storage, you can purchase a new cluster and migrate the data from the original cluster to the new cluster using a migration tool such as DTS or the major version upgrade feature.
Storage engine
Valid values: InnoDB and InnoDB & X-Engine.
NoteInnoDB & X-Engine: A hybrid engine deployment that combines InnoDB and X-Engine. If you select this option, you can set the proportion of storage for X-Engine. For more information, see X-Engine.
Storage Billing Method
Valid values: Pay-by-capacity (Pay-as-you-go) and Subscription.
-
Pay-by-capacity (Pay-as-you-go): You are not required to specify a storage capacity at purchase. Storage space scales automatically with your data, and you are billed for the actual space used.
-
Subscription: You must prepay for a specific amount of storage space.
NoteThis parameter is available only when the cluster billing method is subscription.
Storage Capacity
Specify the amount of storage space to purchase.
NoteThis parameter is required only in the following cases:
-
The storage type is ESSD.
-
The cluster billing method is subscription, and the Storage Billing Method is Subscription.
-
(Optional) Configure the advanced options.
Parameter
Description
Cluster Name
Set a name for the cluster. You can customize the cluster name based on your business requirements. If you do not specify a name, the system automatically generates one. You can modify the cluster name at any time after the cluster is created. The cluster name must meet the following requirements:
-
It cannot start with
http://orhttps://. -
It must be 2 to 256 characters in length.
Resource Group
Select a target resource group from the list of created resource groups.
NoteA Resource Group is a container for managing related resources under a single Alibaba Cloud account. A resource can belong to only one Resource Group. For more information, see Resource groups and permissions.
Parameter Template
Set the parameter template for the cluster. You can select a system-provided template or a custom template.
NoteThe parameter template drop-down list displays all custom and system-default parameter templates in the current region.
Time Zone
Set the time zone for the cluster. The default is UTC+08:00.
Table name case sensitivity
Specify whether table names in the cluster are case-sensitive. By default, they are not.
Note-
If your on-premises database is case-sensitive, we recommend that you select Case-sensitive to maintain consistency and facilitate data migration.
-
You cannot change this setting after the cluster is created. Select this option with caution.
On cluster deletion/release
Set the backup retention policy for cluster deletion or release.
-
Retain Last Backup (Automatic Backup Before Release) (Default): When the cluster is deleted or released, the last backup is retained in the cluster recycle bin, and you will be charged for it.
-
Retain All Backups: When the cluster is deleted or released, all of its backups are retained in the cluster recycle bin, and you will be charged for them.
-
Delete All Backups (Cannot Be Restored): When the cluster is deleted or released, it is permanently deleted. The data is not retained and cannot be recovered. No fees are charged.
Enable TDE
You can enable transparent data encryption (TDE) when you create the cluster.
Note-
Once enabled, TDE cannot be disabled.
-
TDE relies on Key Management Service (KMS). After you enable TDE, you must configure a service role and authorize PolarDB to access KMS.
-
After TDE is enabled, PolarDB encrypts the cluster data files. This process is transparent to applications but can reduce performance by 5% to 10%.
-
-
On the right side of the page, confirm the quantity and review the cluster configuration before purchasing.
Parameter
Description
Quantity
Select the number of clusters to purchase.
Note-
You can create up to 50 clusters at a time, which is suitable for scenarios such as batch server deployments for games.
-
Your Alibaba Cloud account can have a maximum of 50 clusters.
Subscription Duration
Select the subscription duration for the cluster.
NoteThis parameter is available only when the billing method is subscription. This option is not available for pay-as-you-go clusters.
Auto-renewal
Specify whether to enable auto-renewal. To avoid business interruptions caused by subscription expiration, we recommend that you enable auto-renewal.
Note-
This parameter is available only when the billing method is subscription. This option is not available for pay-as-you-go clusters.
-
In addition to configuring this setting at purchase, you can also configure auto-renewal later in Billing Management.
After configuring the parameters, review the cluster settings and total fee, and read the terms of service. Then, click Buy Now.
-
-
The cluster will be ready in 10 to 15 minutes. You can then view it on the Clusters page in the PolarDB console.
Note-
If a node's status is Creating, the cluster is still being provisioned and is unavailable. The cluster is ready for use when its status changes to Running.
-
Ensure you have selected the correct region in the top-left corner of the page to view your new cluster.
-
Next steps
FAQ
When you create a cluster, you might receive the following error after selecting an availability zone and node specification: Insufficient resources for the selected node specification in this availability zone. Please select a different availability zone. This error means the selected availability zone has insufficient resources. Select a different availability zone to resolve this error and prevent this issue from recurring when you modify the configuration.
Related API
In addition to using the console, you can create clusters by calling the API operations listed below.
|
API |
Description |
|
Creates a PolarDB cluster. |
|
|
Describes PolarDB clusters. |
|
|
Describes the detailed attributes of a specified PolarDB cluster. |
|
|
Describes the auto-renewal status of a subscription PolarDB cluster. |
|
|
Configures the auto-renewal settings for a subscription PolarDB cluster. |