DataWorks allows you to view information and perform operations on pages such as Overview, Workspaces, and Resource Groups in the DataWorks console.
Background information
If you log on to the DataWorks console as a RAM user, you may not be able to view specific features in the DataWorks console, or an error may be reported when you use a feature in the DataWorks console. In this case, you must check whether the RAM user that you used to log on is granted the required permissions. For more information, see Permission control by fine-grained RAM policies.
You can view different information and perform different operations on the following pages in the DataWorks console.
| Page name | Description |
|---|---|
| Overview | On the Overview page, you can view the workspaces that are recently used by the current logon account and configure the workspaces. You can also view product updates and news on the Overview page. |
| Workspaces | On the Workspaces page, you can view all workspaces in the current logon account and perform different operations on the workspaces. You can also create a workspace on the Workspace page and refresh the workspace list. |
| Resource Groups | On the Resource Groups page, you can view and manage all exclusive resource groups and shared resource groups in the current logon account. |
| Alerts | On the Alert Resource page, you can view the alert resources in the current logon account in a specified region. You can also specify the maximum number of alert notifications that can be sent by text message or phone call per day. |
| Open Platform | On the Open Platform page, you can use the OpenAPI module, OpenEvent module, and Extensions module to integrate your applications with DataWorks. |
| Compute Engines | On the MaxCompute page, Graph Compute page, or Hologres page, you can view the list of compute engine instances that are created in the current logon account. |
| Lake and Warehouse Integration (Data Lakehouse) | On the Lake and Warehouse Integration (Data Lakehouse) page, you can build a data management platform that integrates data lakes and data warehouses. |
Overview
Log on to the DataWorks console. On the Overview page, you can view the workspaces that are frequently used, the regions in which DataWorks is activated, and other shortcuts.
Workspaces
| Operation | Description | References |
|---|---|---|
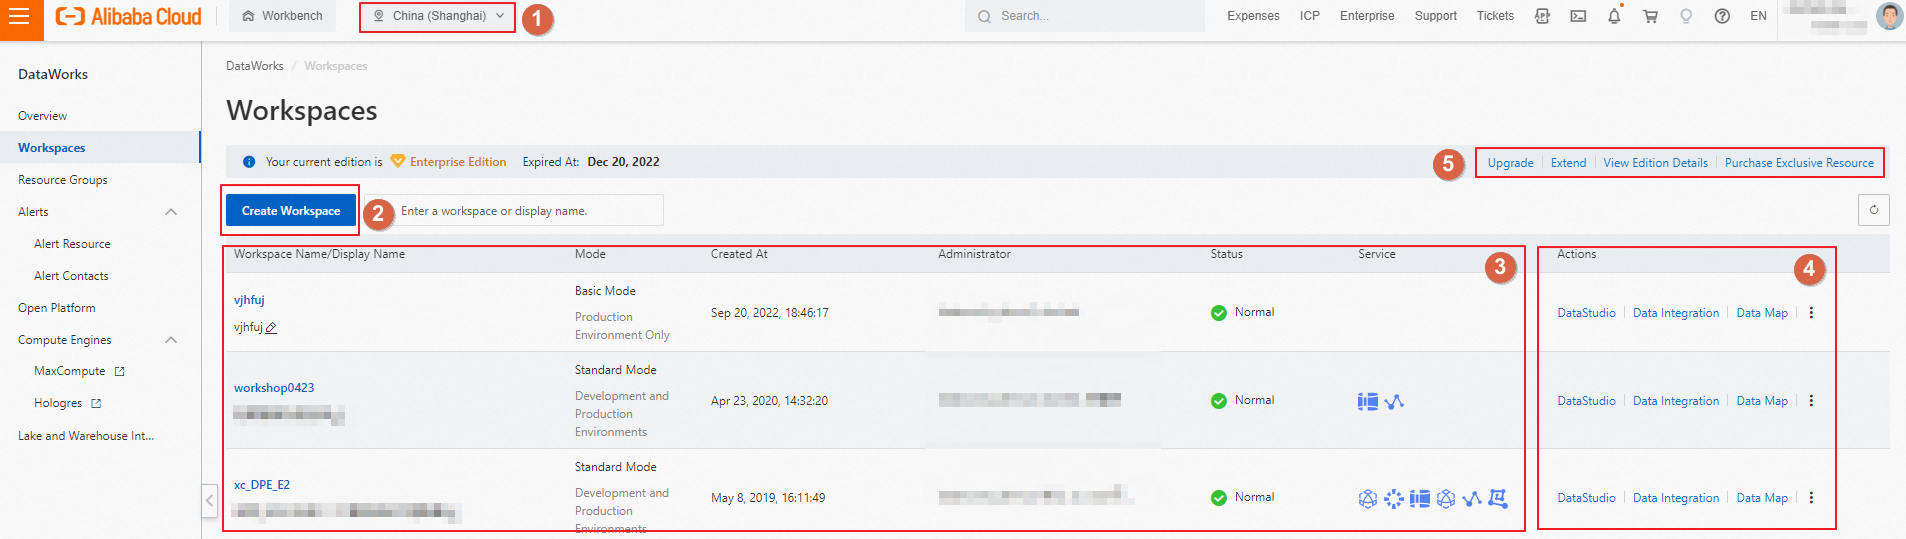
| Select a region | In the area marked with 1 in the preceding figure, you can select the desired region and view the Workspaces page for this region. | - |
| Create a workspace | In the area marked with 2 in the preceding figure, you can click the button to create a workspace. | Create a workspace. |
| View basic information about a workspace | In the area marked with 3 in the preceding figure, you can view basic information
about a workspace, such as the workspace mode and workspace administrator.
|
|
| Perform operations related to a workspace | In the area marked with 4 in the preceding figure, you can click one of the items
that are displayed to access the related service or perform operations related to
a workspace.
|
|
| Upgrade the edition of DataWorks |
In the area marked with 5 in the preceding figure, the edition upgrade feature is
provided.
|
For more information about the differences between DataWorks editions, see Differences among DataWorks editions. |
| Purchase exclusive resources | In the area marked with 5 in the preceding figure, you can click Purchase Exclusive Resource to purchase exclusive resources. After the exclusive resources are purchased, you
cannot directly see an exclusive resource group. You must click Create Resource Group for Scheduling or Create Resource Group for Data Integration on the Resource Groups page to create an exclusive resource group for scheduling
or an exclusive resource group for Data Integration based on the purchased exclusive
resources.
Note
|
|
Resource Groups
In the left-side navigation pane, click Resource Groups. In the top navigation bar, select the region in which the resource groups reside. On the Resource Groups page, you can create and manage resource groups.
| Operation | Description | References |
|---|---|---|
| Create an exclusive resource group | You can create the following types of exclusive resource groups:
|
|
| View basic information about an exclusive resource group | You can view basic information about an exclusive resource group, such as the status,
expiration time, and resource usage of the resource group.
|
|
| Perform basic operations on an exclusive resource group | You can view the detailed information about an exclusive resource group and perform
operations on an exclusive resource group.
Note
|
Alerts
In the left-side navigation pane, click Alerts and specify the maximum number of alert notifications that can be sent by text message or phone call per day on the Alert Resource page. Then, view and specify information about an alert contact on the Alert Contacts page.
| Item | Description | References |
|---|---|---|
| Alert Resource | On the Alert Resource page, you can view the usage of alert resources in the Alert
Resource Usage Today and Alert Resource Usage in This Month sections. You can specify
the maximum number of alert notifications that can be sent by using each notification
method per day.
Important
|
- |
| Alert Contacts | On the Alert Contacts page, you can specify a RAM user or a RAM role as an alert contact
and customize the contact information. You can also synchronize the contact information
that is configured for RAM users with one click.
Note The configured mobile phone number or email address takes effect only after it is
activated.
|
Configure and view alert contacts |
Open Platform
In the left-side navigation pane, click Open Platform. DataWorks Open Platform provides the OpenAPI module, OpenEvent module, and Extensions module. You can use the modules to integrate your applications with DataWorks and subscribe to event messages. These modules facilitate process management for data processing, data governance, and data O&M, and allow you to identify important changes in DataWorks and respond to the changes at the earliest opportunity.
| Module | Description | References |
|---|---|---|
| OpenAPI | The OpenAPI module displays the number of API calls that are made and information about the API operations that are called. You can call DataWorks API operations to use different features of DataWorks and integrate your applications with DataWorks. | OpenAPI |
| OpenEvent | The OpenEvent module is an open capability provided by DataWorks. The OpenEvent module allows you to subscribe to event messages. This way, you can receive notifications about various change events in DataWorks and respond to the events based on your configurations at the earliest opportunity. | OpenEvent |
| Extensions | DataWorks allows you to use the Extensions module to register programs as DataWorks extensions. You can use the Extensions module together with the message subscription feature provided by the OpenEvent module to manage extension point events and processes. You can also customize configurations based on your business requirements. | Extensions |
Compute Engines
In the left-side navigation pane, click Compute Engines. Then, click MaxCompute, Graph Compute, or Hologres to view the list of compute engines that you activated on different pages and perform the related O&M operations on the compute engines.
| Item | Description | References |
|---|---|---|
| MaxCompute | Click MaxCompute to go to the MaxCompute page to manage the MaxCompute projects. | Use MaxCompute Management |
| Graph Compute | Click Graph Compute to go to the Graph Compute page to manage the Graph Compute instances. | Compute engine list |
| Hologres | Click Hologres to go to the Hologres console to manage Hologres instances. | Compute engine list |
Lake and Warehouse Integration (Data Lakehouse)
The lakehouse solution is implemented by integrating MaxCompute with a Hadoop cluster or integrating MaxCompute with Data Lake Formation (DLF) and Object Storage Service (OSS). The lakehouse solution enables you to build a data management platform that integrates data lakes and data warehouses. The lakehouse solution integrates the flexibility and broad ecosystem compatibility of data lakes with the enterprise-class deployment capabilities of data warehouses. For more information, see Lakehouse of MaxCompute.