By Ahmad Arib, Alibaba Cloud Tech Share Author. Tech Share is Alibaba Cloud's incentive program to encourage the sharing of technical knowledge and best practices within the cloud community.
Fast.ai is a free and open source library on top of Pytorch for building fast and highly accurate machine learning and deep learning model based on a modern best practice that used in academic and business. Fast.ai library is a software product from the fast.ai organization (with dot), founded by Jeremy Howard and Rachel Thomas. In this article, I will explain how to install Fast.ai library on Alibaba Cloud Elastic GPU Service (ECS) with Ubuntu 16.04.
Deep learning, especially, requires a lot of matrix multiplications. As it turns out, this operation can be run exceptionally well on a Graphical Processing Unit (GPU) as compared with a Central Processing Unit (CPU). Before the boom of deep learning, GPU is mainly used for gaming and other graphics rendering activity. Nowadays, it's used heavily for deep learning model training and inference. However, not all GPU is suitable for this task; deep learning practitioners typically use NVIDIA GPU because NVIDIA's CUDA library and GPU card are well optimized for deep learning.
Having a GPU itself will not make you ready to solve deep learning problem though, as you need to set up a machine with a GPU and suitable Operating System, with all its dependency. For now, deep learning practitioners mostly use Ubuntu for handling their experiments. Setting up a local GPU machine box, together with all its dependency, driver, and software installation require time and knowledge in hardware design. Instead, a more efficient approach is to rent GPU instances through a cloud provider, such as Alibaba Cloud.
Alibaba Cloud GPU instances helps you to save on the costs for experimentation of GPUs, as you are charged based only on your actual usage. You also need not worry about hardware configurations and software installation because these configurations already taken care of by Alibaba Cloud.
Fast.ai provides the following features:
1. Built-in CUDA library, you need to take care of NVIDIA driver installation, how to check NVIDIA driver working well is by type the following command: nvidia-smi.
2. Easy installation via conda or pip.
3. Out-of-the-box support for computer vision, natural language processing, tabular data, and collaborative filtering models.
In the following sections, we will explain how to install Fast.ai library on Alibaba Cloud Elastic GPU Service with Ubuntu 16.04, and run it on our Jupyter Notebook.
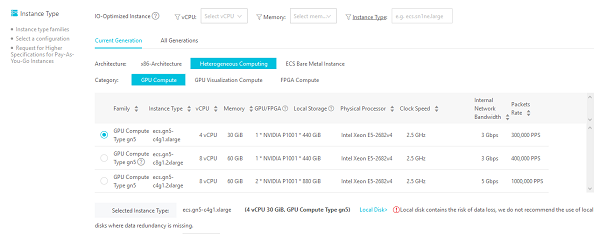
To purchase an Alibaba Cloud Elastic GPU Service instance, you will need to first log in to your Alibaba Cloud ECS Console. Create a new ECS instance, choosing Ubuntu 16.04 as the operating system with at least 10GB RAM GPU NVIDIA. Make sure you choose NVIDIA GPU card, not AMD, like the following screenshot below. Some location does not offer GPU instance, choose closes location to your place that has GPU instance, or just the cheapest one.

After choosing the instance type, select Ubuntu 16.04 64 bit for the OS, and don't forget to check the option Auto-install GPU driver and choose the latest driver. This option automatically installs CUDA and GPU driver by the time instance created.

Then connect to your ECS instance and log in as the root user.
The best way to work with the fast.ai library or any other library that uses Python is via Anaconda, where we could create its environment and not messing up with other things that we did in the machine.
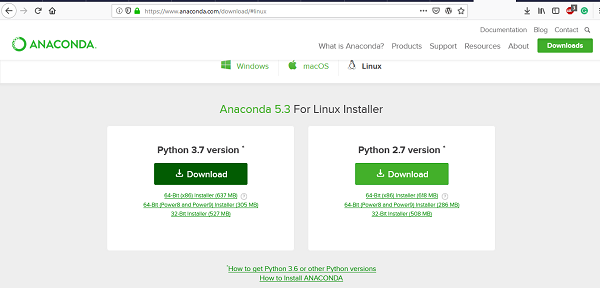
First, you need to download Anaconda for Linux from this URL: https://www.anaconda.com/download/#linux
Take a look at the Download button for Python 3.7, and right-click and copy link.

Now you paste the link on terminal to download it with the following command:
curl –o https://repo.anaconda.com/archive/Anaconda3-5.3.0-Linux-x86_64.shAfter download complete, it's optional to verify data integrity with cryptographic hash verification through the SHA-256 checksum, type this following command:
sha256-sum Anaconda3-5.3.0-Linux-x86_64.shThe output hash you should check in Anaconda page for the appropriate Anaconda version. If the hash output same, then it's verified.
You could install Anaconda right away after download complete with this following command:
bash Anaconda3-5.3.0-Linux-x86_64.shOutput:
Welcome to Anaconda3 5.3.0 (by Continuum Analytics, Inc.)

In order to continue the installation process, please review the license
agreement.
Please, press ENTER to continue
Press Enter to continue the installation process, and keep pressing Enter to read the license information. You need to approve the license as the Output below state:
Output:
Do you approve the license terms? [yes|no]Type yes to approve and begin Anaconda installation.
Now you will need to choose location to install Anaconda. If the default installation location is sufficient, just press Enter, or you could specify other location to install Anaconda.
Output:
Anaconda3 will now be installed into this location:
/root/anaconda3

  - Press ENTER to confirm the location
  - Press CTRL-C to abort the installation
  - Or specify a different location below

[/root/anaconda3] >>>
Now the installation process has begun. The process may take some time because Anaconda is packing up hundreds of Python packages. Some of these packages you will use through your learning day of machine learning and deep learning.
When installation process complete, you receive output like below:
Output:
...
installation finished.
Do you wish the installer to prepend the Anaconda3 install location
to PATH in your /root/.bashrc ? [yes|no]
[no] >>>
Type yes for this step so you could use conda command later on.
Output:
Prepending PATH=/root/anaconda3/bin to PATH in /home/sammy/.bashrc
A backup will be made to: /root/.bashrc-anaconda3.bak
...
To activate Anaconda, you need to source bashrc file with this following command:
source ~/.bashrcAfter this step, you can verify Anaconda installation via this following command:
conda listThis command will list all the Python package that installed by Anaconda.
Now you need to create a virtual environment to work with the fast.ai library, in this example, we create virtual env called fast.ai, type this command:
conda create --name fast.ai python=3This command output will list all the package it will install, type y to agree.
When the process complete, source activate the environment to start work inside it with this following command:
source activate fast.aiOutput:
(fast.ai) root@ubuntu:~$When you're done working with fast.ai environment, close it with this following command:
source deactivateFast.ai library is available in https://github.com/fastai The installation process is simple and straightforward. They offer both a GPU and CPU version, but because we interested in doing deep learning, we will install the GPU version of fast.ai.
First, type the following command to install Pytorch software. Fast.ai is a software library that runs on Pytorch software, so to install fast.ai, we need to install Pytorch first. Don't forget to activate the fast.ai environment.
source activate fast.ai
conda install -c pytorch pytorch-nightly cuda92
This will give an output list of sotware that conda will install in fast.ai environment. Type y to agree.
After that type this following command to install torch vision software.
conda install -c fast.ai torchvision-nightlyGiven the output of software list, Type y to agree.
Finally to install fast.ai type this following command:
conda install -c fast.ai fast.aiGiven the output of software list, Type y to agree.
At this stage, you have successfully installed fast.ai and are ready to do some deep learning experiment.
The best way to test fast.ai installation is with working on the out-of-the-box example for computer vision, natural language processing, tabular data, and collaborative filtering models.
For this time lets, we will be using an example for computer vision.
Type the following command to copy example data for fast.ai:
git clone https://github.com/fast.ai/fast.ai/tree/master/examplesNow the folder located in ~/examples
Run the following command:
jupyter notebook –-ip=0.0.0.0 –allow-rootDoing so will output a running Jupyter Notebook, with token for first time access like this:
http://(your-ip-address)/tree?token=f79ec772e0e53d30a221ecb18d447761e0f5a9d223c20175Open another terminal and type following command:
ssh –L localhost:8888:localhost:8888 root@(your-ip-address)Type your password and click Enter.
Now open your web browser and paste the token above to the URL address bar.
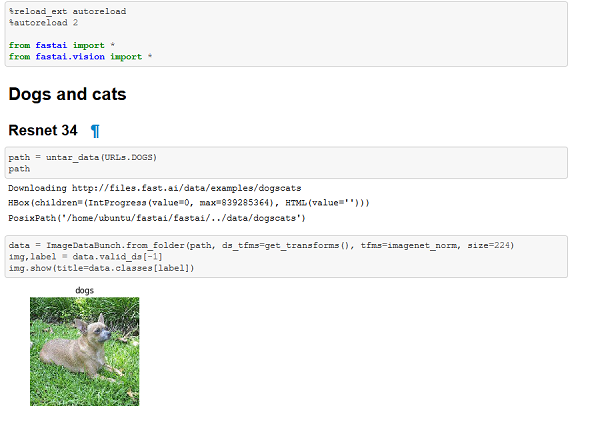
http://localhost:8888/tree?token=f79ec772e0e53d30a221ecb18d447761e0f5a9d223c22017This command open Jupyter Notebook in your URL, after that open the folder ~/examples and click dogs_cats.ipyb, you will see Jupyter Notebook like below:

To try the fast.ai library, just run through all commands by entering Shift + Enter. You'll be able to see how it does the deep learning processing. To learn more, visit http://docs.fast.ai/ to find all materials regarding this software.
In-depth Interpretation of DAMO Academy's Top 10 Technology Trends for 2019

2,605 posts | 747 followers
FollowAlibaba Clouder - October 30, 2018
Alibaba Clouder - June 15, 2019
Alibaba Clouder - October 14, 2019
Alex - December 26, 2018
JDP - June 18, 2021
Alibaba Cloud Native Community - April 2, 2024

2,605 posts | 747 followers
Follow GPU(Elastic GPU Service)
Powerful parallel computing capabilities based on GPU technology.
Learn More Platform For AI
A platform that provides enterprise-level data modeling services based on machine learning algorithms to quickly meet your needs for data-driven operations.
Learn More Quick BI
A new generation of business Intelligence services on the cloud
Learn MoreMore Posts by Alibaba Clouder