By Che Yang (Biran), Senior Technical Expert at Alibaba
In 2016, AlphaGo and TensorFlow brought the technological revolution of artificial intelligence (AI) from academia to industry. AI is boosted by cloud computing and computing power.
After years of development, AI has been applied to many scenarios, such as intelligent customer service, machine translation, and image search. Machine learning and AI have a long history. The popularity of cloud computing and the corresponding massive increase in computing power make it possible to apply AI in the industry.
Since 2016, the Kubernetes community has received many requests from different channels asking to run TensorFlow and other machine learning frameworks in Kubernetes clusters. To meet these requests, we have to solve challenges such as the management of jobs and other offline tasks, the heterogeneous devices required for machine learning, and support for NVIDIA graphics processing units (GPUs).
We can use Kubernetes to manage GPUs to drive down costs and improve efficiency. GPUs are more costly than CPUs. An off-premises CPU costs less than RMB 1 per hour, whereas an off-premises GPU costs RMB 10 to 30 per hour, making it necessary to improve the GPU utilization.
We can use Kubernetes to manage GPUs and other heterogeneous resources to achieve the following:
Deployment can be accelerated by minimizing the time spent on environment preparation. The deployment process can be solidified and reused through container image technology. Many machine learning frameworks provide container images. We can use container images to improve GPU utilization.
GPU utilization can be improved through time-division multiplexing. Kubernetes is required to centrally schedule GPUs in large quantities so that users can apply for resources as needed and release resources immediately after use. This ensures flexible use of the GPU pool.
The device isolation capability provided by Docker is required to prevent interference among the processes of different applications that run on the same device. This ensures high efficiency, cost-effectiveness, and system stability.
Kubernetes is suitable for running GPU applications and is also a container scheduling platform, with containers as the scheduling units. Before learning how to use Kubernetes, let's learn how to run GPU applications in a container environment.
Running GPU applications in a container environment is not complicated. This is done in two steps:
You can prepare a GPU container image through either of the following methods:
Select an official GPU image from Docker Hub or Alibaba Cloud Container Registry. Standard images are available for popular machine learning frameworks, such as TensorFlow, Caffe, and PyTorch. Official GPU images are easy to use, secure, and reliable.
When official images do not meet your needs, for example, when you have made custom changes to the TensorFlow framework, you need to compile a custom TensorFlow image. We recommend that you create a custom image based on the official image of NVIDIA.
The following code is written in TensorFlow. It creates a custom GPU image based on the CUDA image.
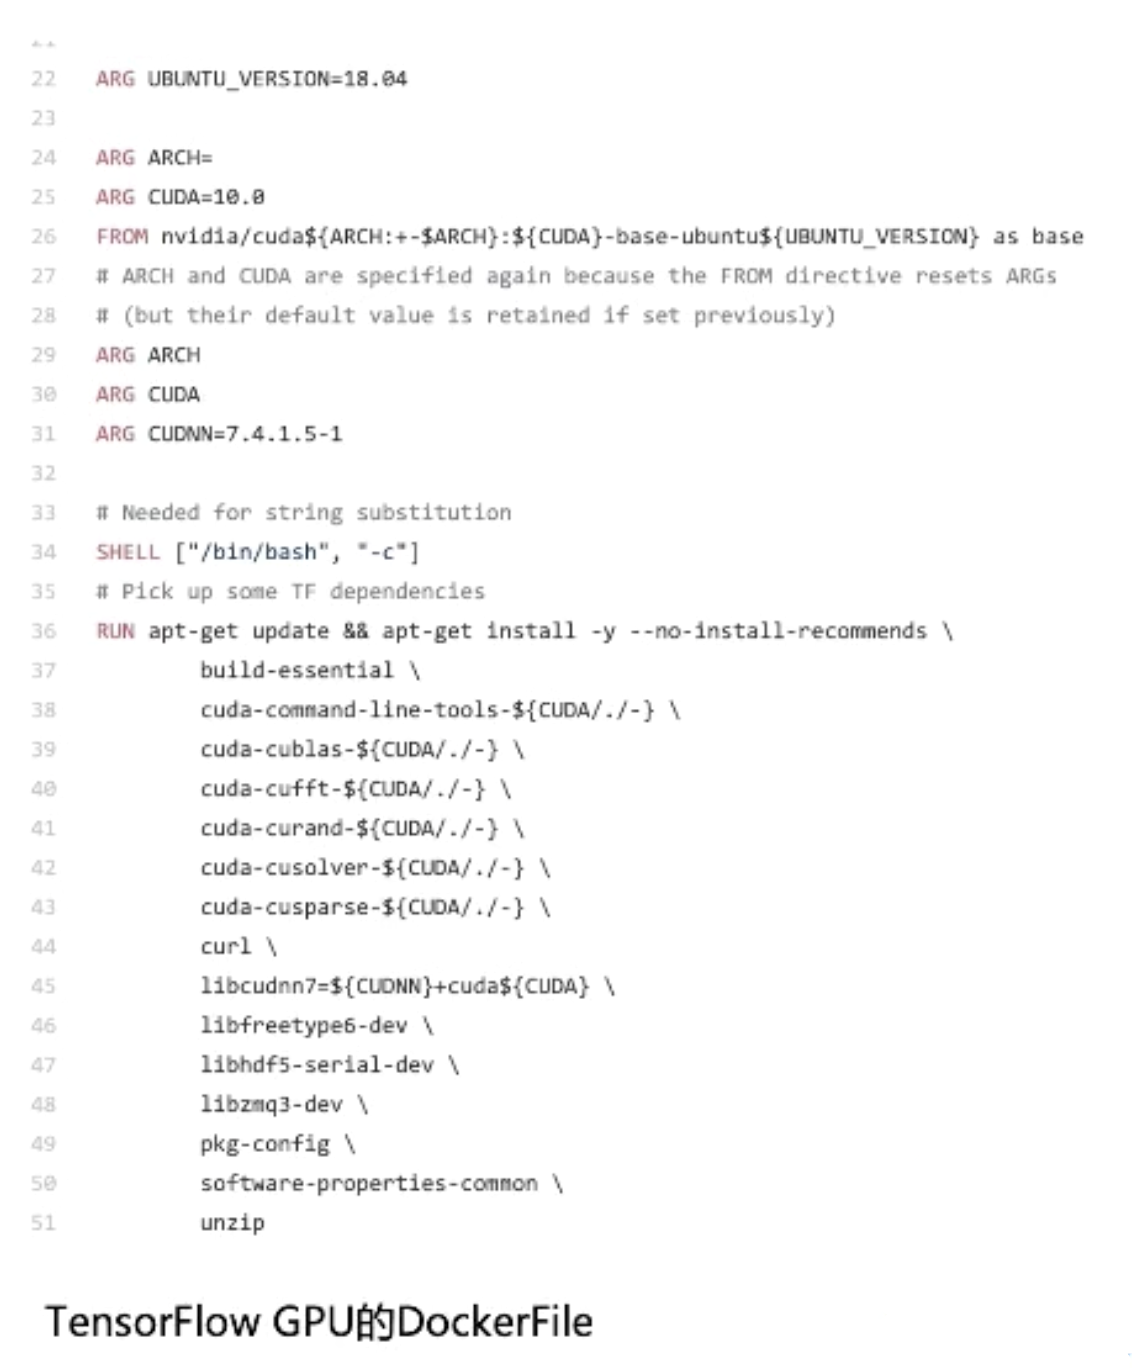
Before building a GPU container image, we need to learn how to install a GPU application on a host.
As shown in the left part of the following figure, the NVIDIA hardware driver is first installed at the underlying layer. The CUDA tool library is installed at the upper layer. Machine learning frameworks such as PyTorch and TensorFlow are installed at the uppermost layer.
The CUDA tool library is closely coupled with applications. When an application version is changed, the related CUDA version may be updated as well. The NVIDIA driver is relatively stable.
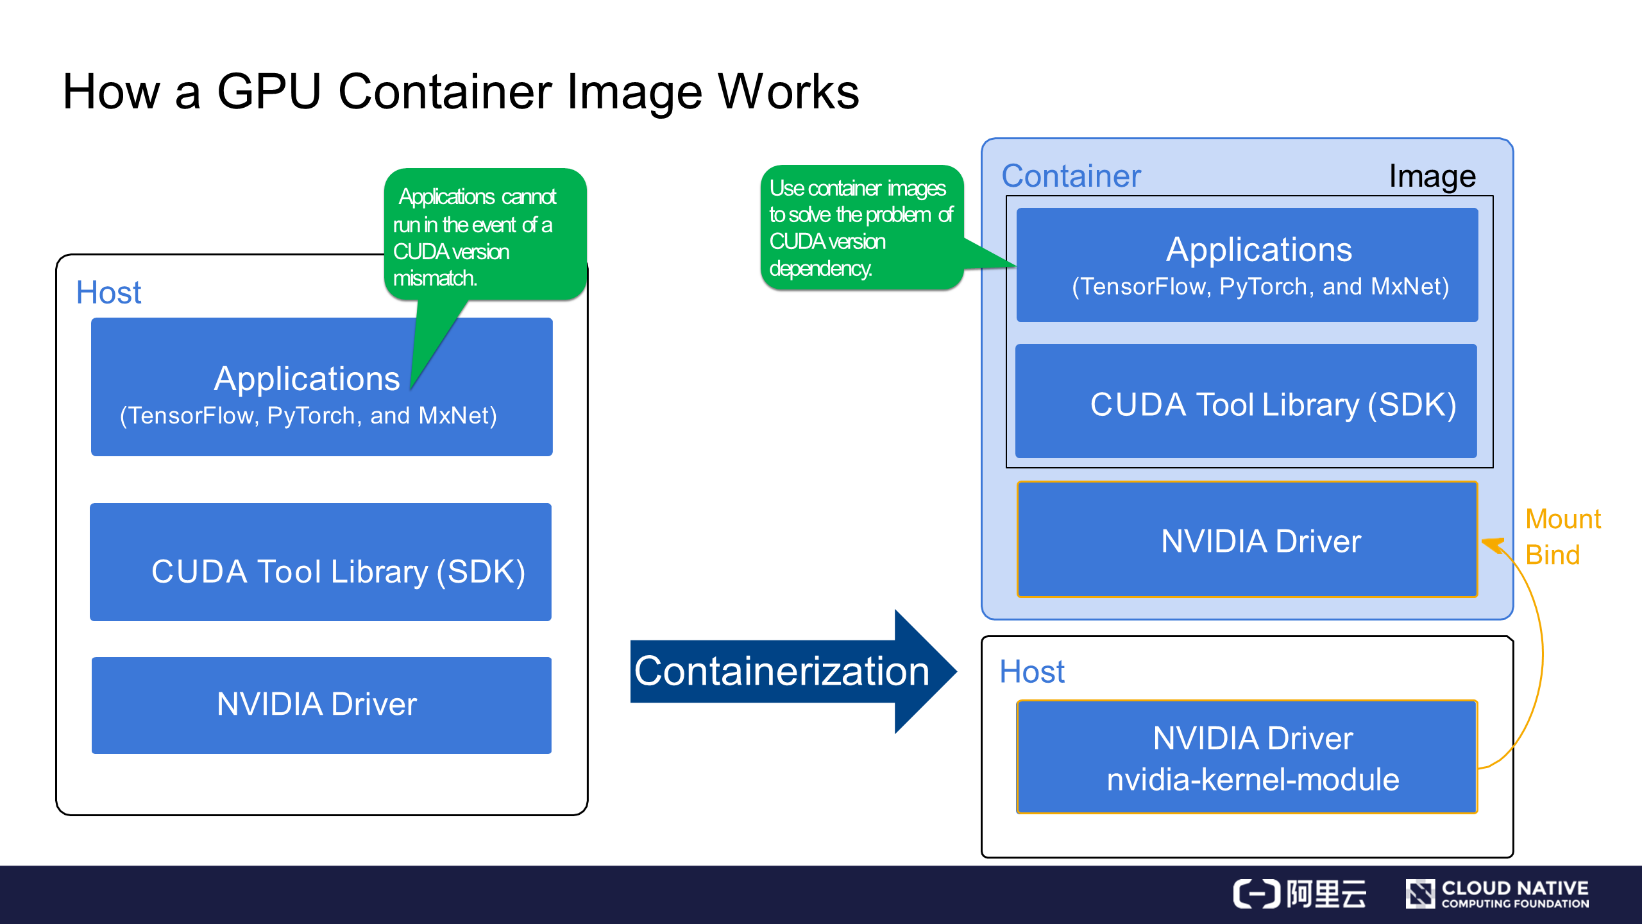
The right part of the preceding figure shows the NVIDIA GPU container solution, in which the NVIDIA driver is installed on the host and the software located above the CUDA tool library is implemented by container images. The link in the NVIDIA driver is mapped to containers through Mount Bind.
After you install a new NVIDIA driver, you can run different versions of CUDA images on the same node.
Now, we will see how a GPU container works. The following figure shows an example in which we use Docker to run a GPU container.
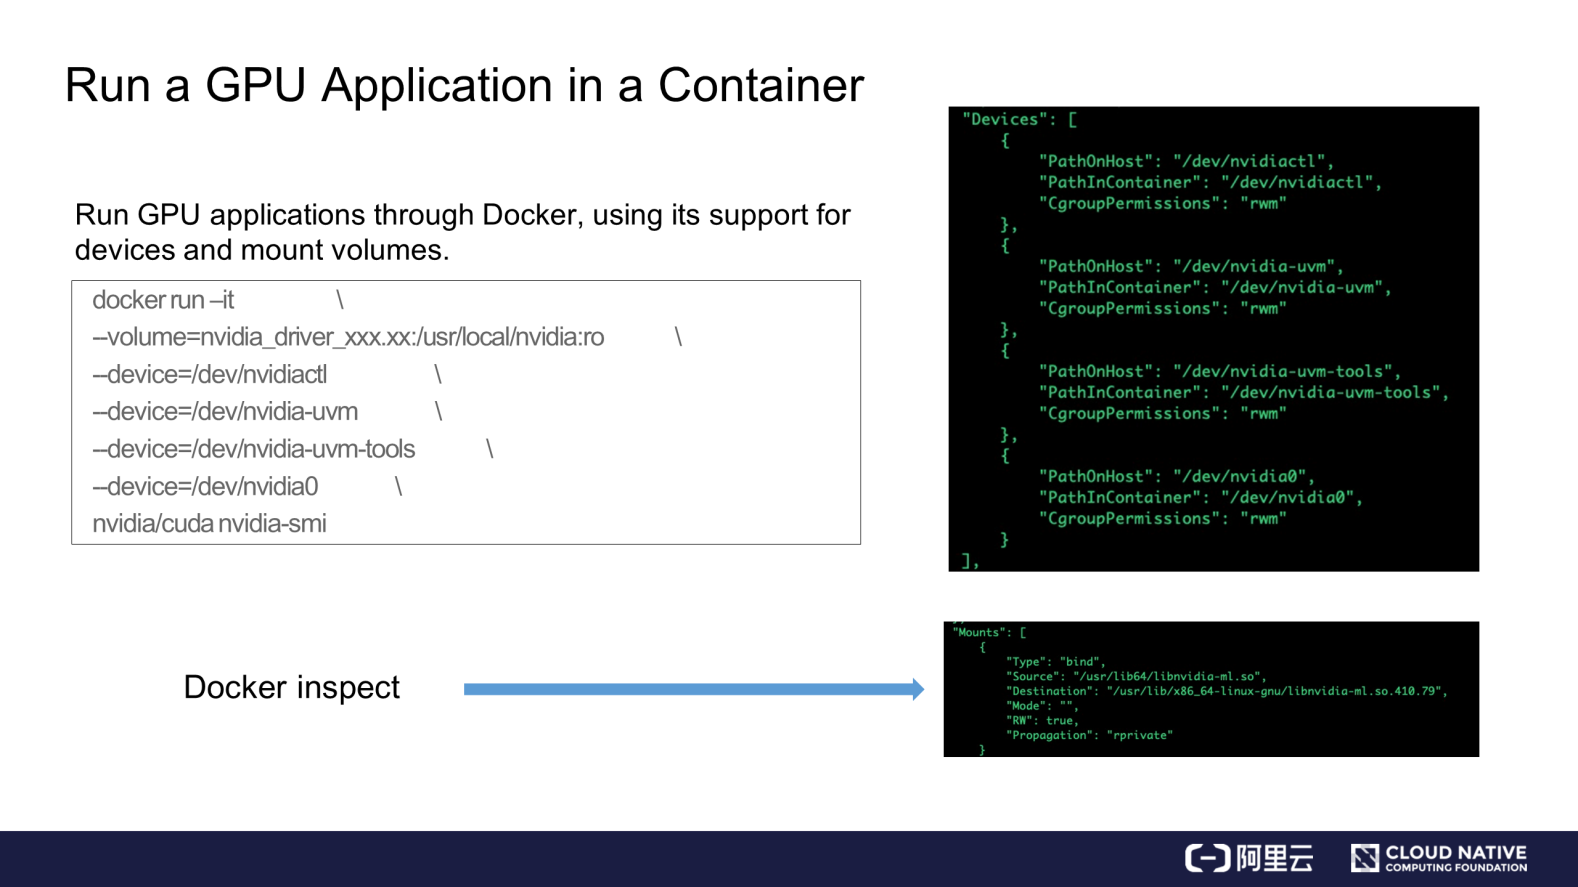
You need to map the host device and the NVIDIA driver library to the GPU container at runtime. This is different from the case of a common container.
The right part of the preceding figure shows the GPU configuration of the GPU container after startup. The upper-right part of the preceding figure shows the device mapping result, and the lower-right part shows the changes that occur after the drive library is mapped to the container in Bind mode.
NVIDIA Docker is typically used to run GPU containers and automates the processes of device mapping and drive library mapping. Device mounting is simple, but the drive library on which GPU applications depend is complex.
Different drive libraries are used depending on the specific scenarios, such as deep learning and video processing. To use drive libraries, you must have an understanding of NVIDIA, and especially of NVIDIA containers.
Configure the GPU capability for a Kubernetes node as follows. Here, we use a CentOS node as an example.
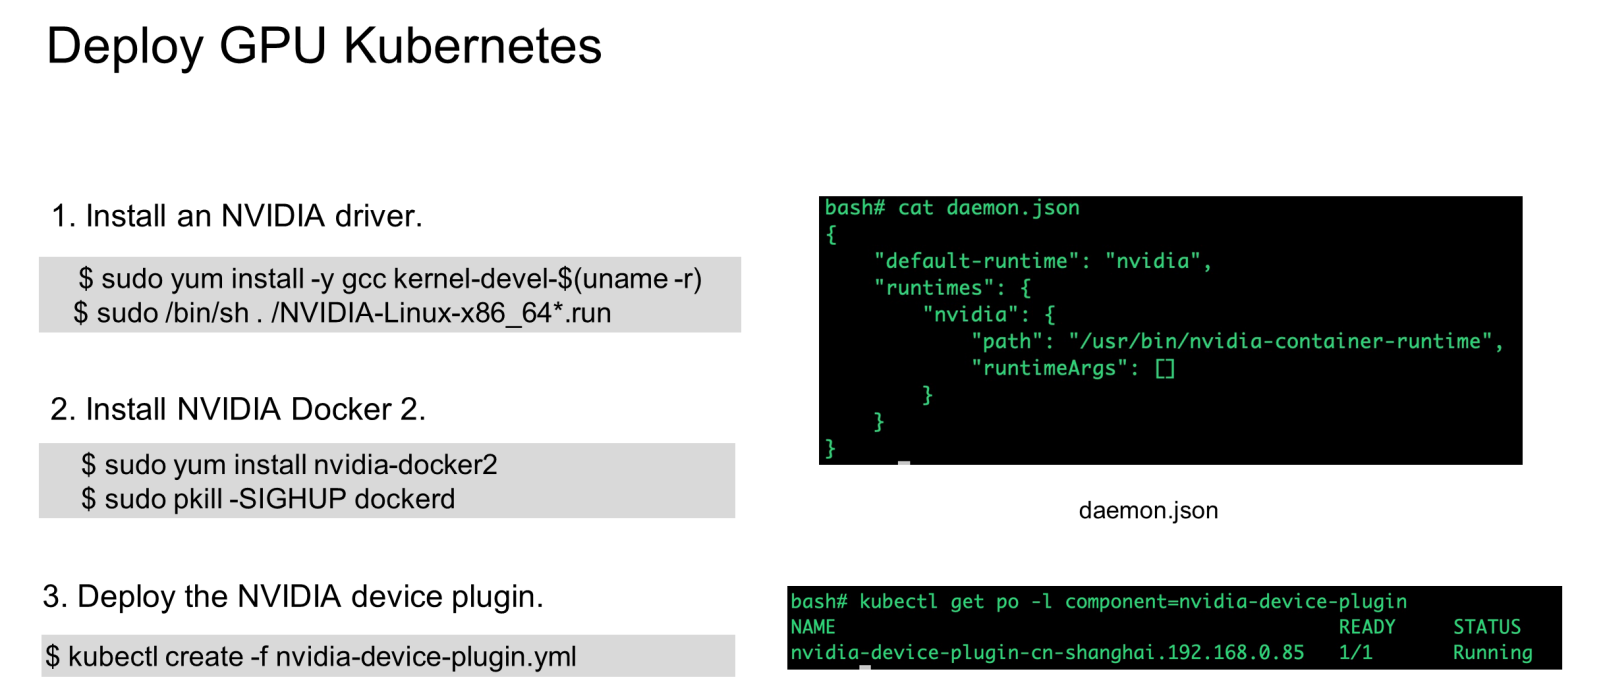
As shown in the preceding figure, we must:
NVIDIA drivers require kernel compilation. You must install the GNU Compiler Collection (GCC) and the kernel source code before installing an NVIDIA driver.
Reload Docker after NVIDIA Docker 2 is installed. The default startup engine in Docker's daemon.json is replaced by NVIDIA. Run the "docker info" command to check whether NVIDIA runC is used during runtime.
Download the deployment declaration file of the device plugin from NVIDIA's git repo and run the "kubectl create" command to deploy the plugin.
Here the device plugin is deployed through deamonset. When a Kubernetes node fails to schedule GPU applications, you need to check modules such as the device plugin. For example, you can view the device plugin logs to check whether the default runC of Docker is set to NVIDIA runC and whether the NVIDIA driver has been installed.
After the GPU node is deployed, view GPU information in the node status information, including:
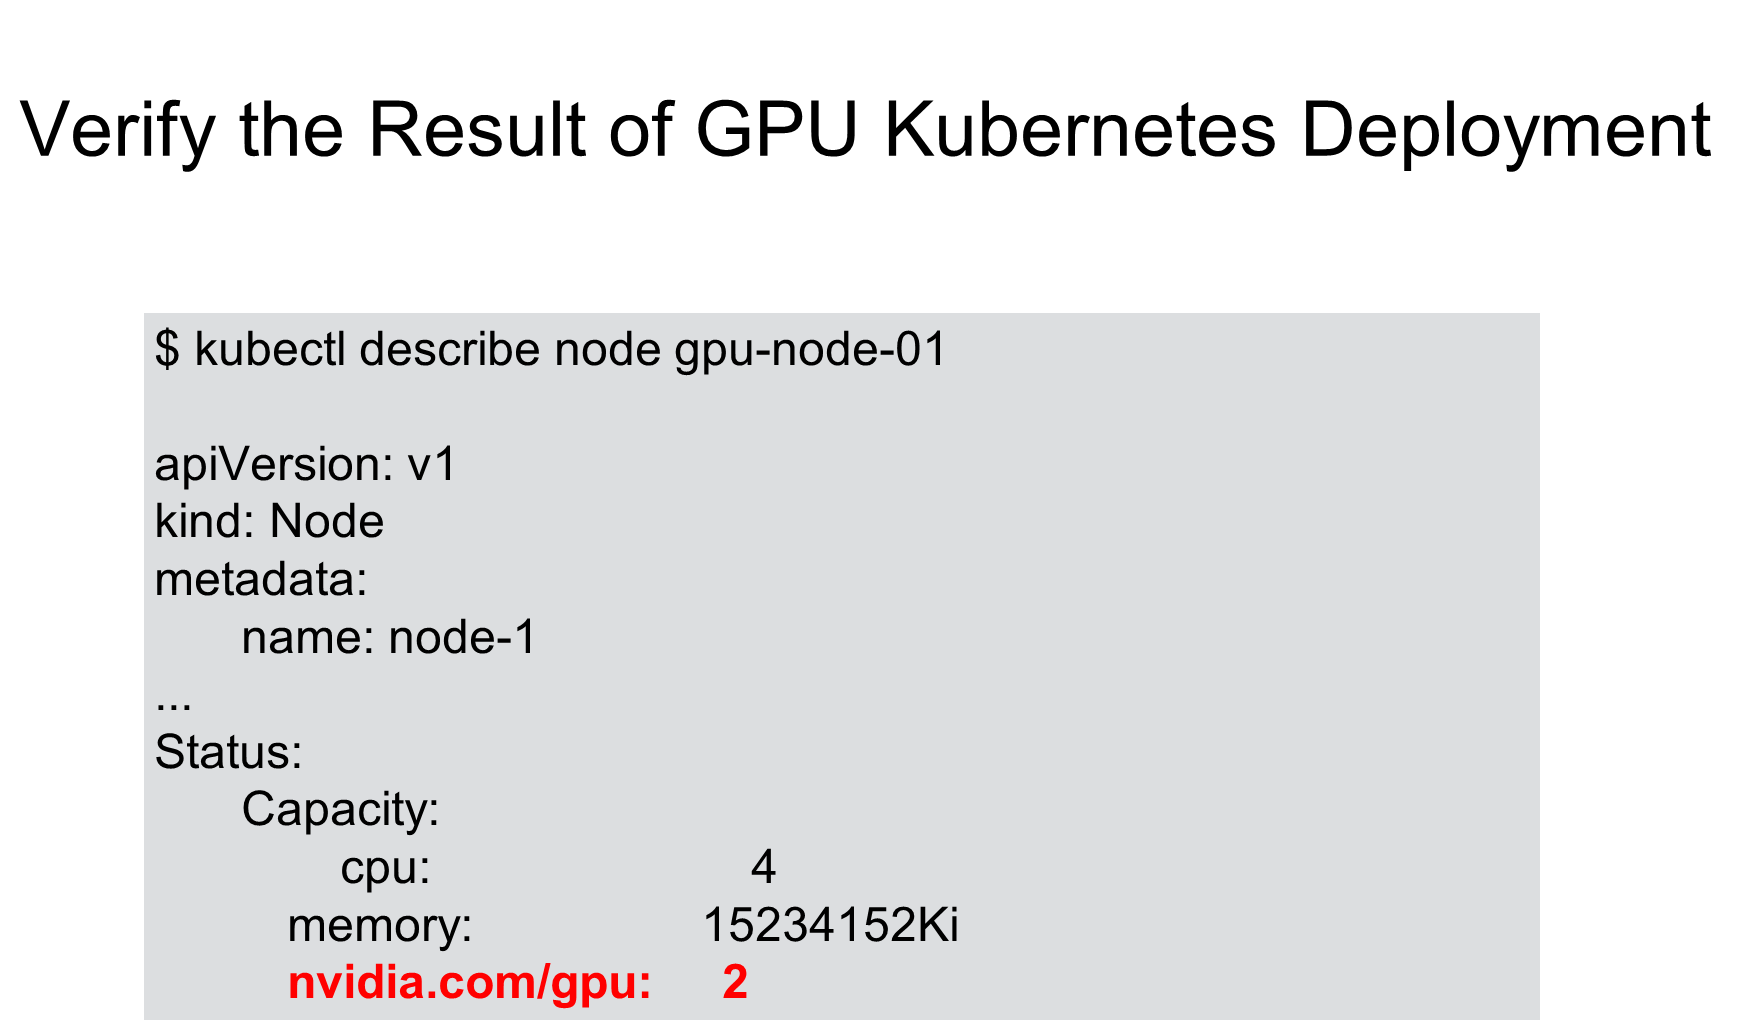
It is easy to use GPU containers in Kubernetes.
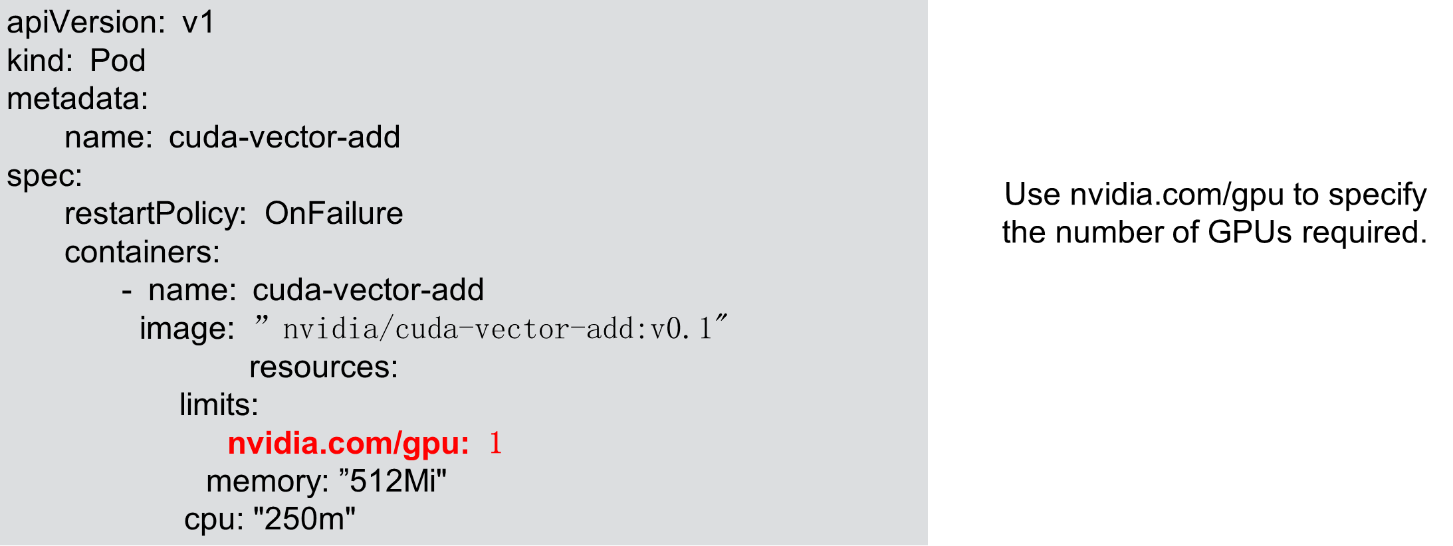
Set nvidia.com/gpu to the number of required GPUs under the limit field in the pod resource configuration. It is set to 1 in the following figure. Then, run the "kubectl create" command to deploy the target pod.
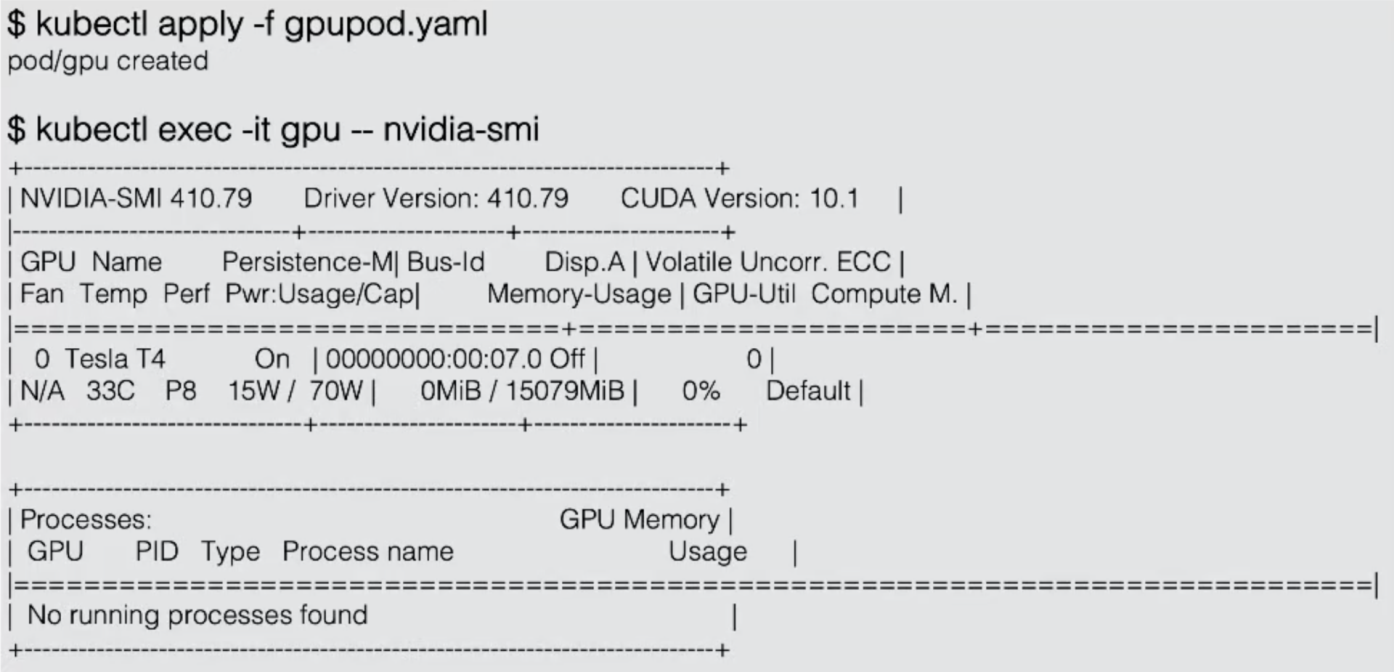
After the deployment is complete, log on to the container and run the "nvidia-smi" command to check the result. You can see that a T4 GPU is used by the container. One of the two GPUs is in use in the container. The other GPU is transparent to the container and is inaccessible due to the GPU isolation feature.
Kubernetes manages GPU resources through plugin extension, which is implemented by two independent internal mechanisms.
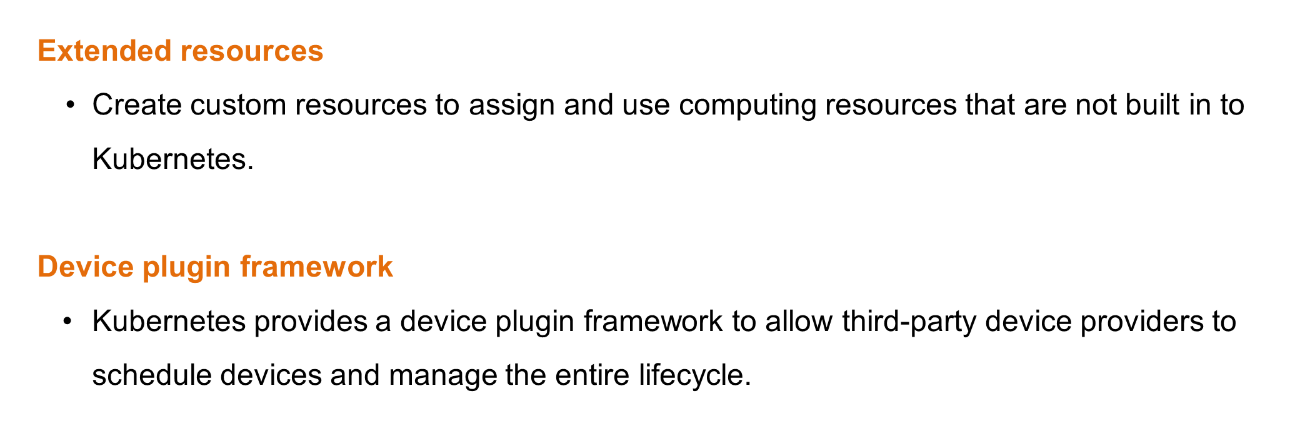
Extended resources are a type of node-level APIs and are used independently of the device plugin. To report extended resources, use the PATCH API to update the status field of a node object. The PATCH operation is performed by using a simple curl command. This allows the Kubernetes scheduler to record the GPU type of the node, which uses one GPU.
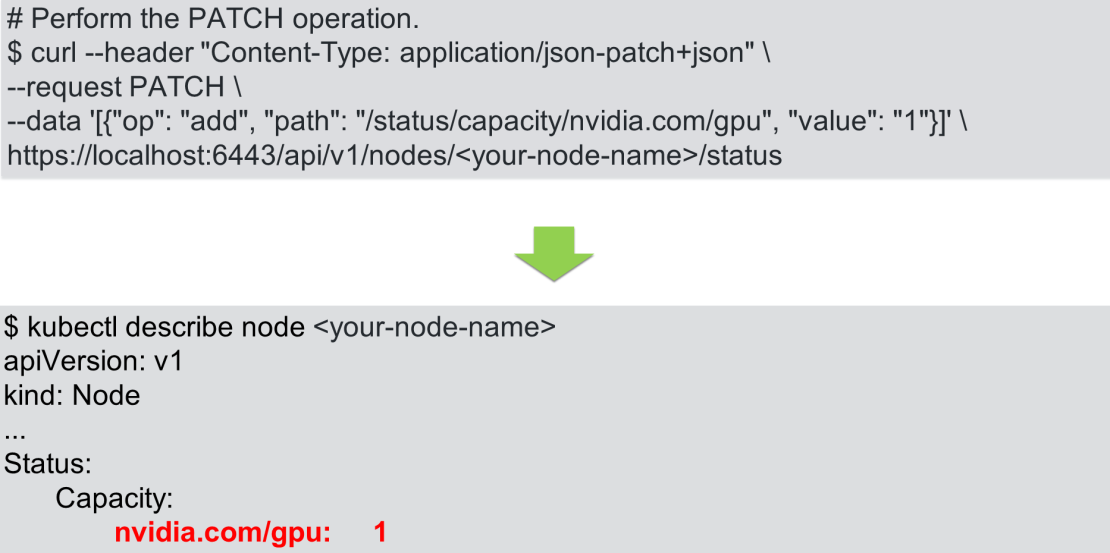
The PATCH operation is not required if you use a device plugin. You only need to implement the device plugin programming model so that the device plugin performs the PATCH operation when extended resources are reported.
The workflow of the device plugin is divided into two parts:

The device plugin is easy to develop. Two event methods are involved.
Each hardware device is managed by the related device plugin, which is connected as a client to the device plugin manager of the kubelet through gRPC and reports to the kubelet the UNIX socket API version and device name to which it listens.
The following figure shows the process by which a device plugin reports resources. The process is divided into four steps. The first three steps occur on the node, and the fourth step is the interaction between the kubelet and the API server.
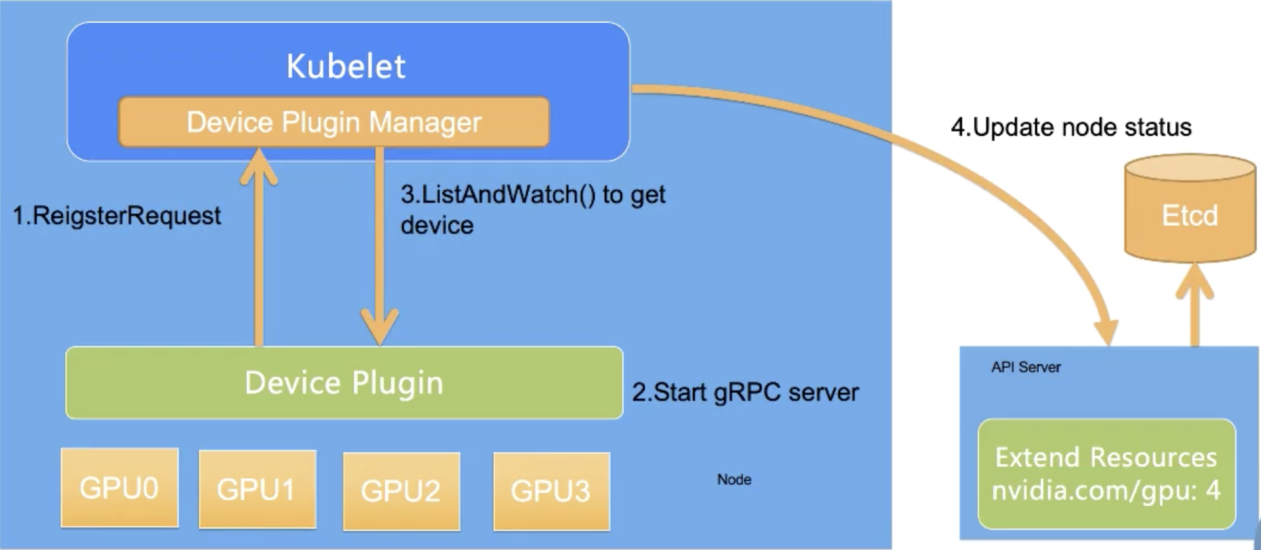
The kubelet reports only the GPU quantity to the Kubernetes API server. The device plugin manager of the kubelet stores the GPU ID list and assigns the GPU IDs to devices. The Kubernetes global scheduler does not see the GPU ID list, only the GPU quantity.
As a result, when a device plugin is used, the Kubernetes global scheduler implements scheduling based only on the GPU quantity. Two GPUs on the same node exchange data more effectively through NVLINK communication than PCIe communication. In this case, the device plugin does not support scheduling based on GPU affinity.
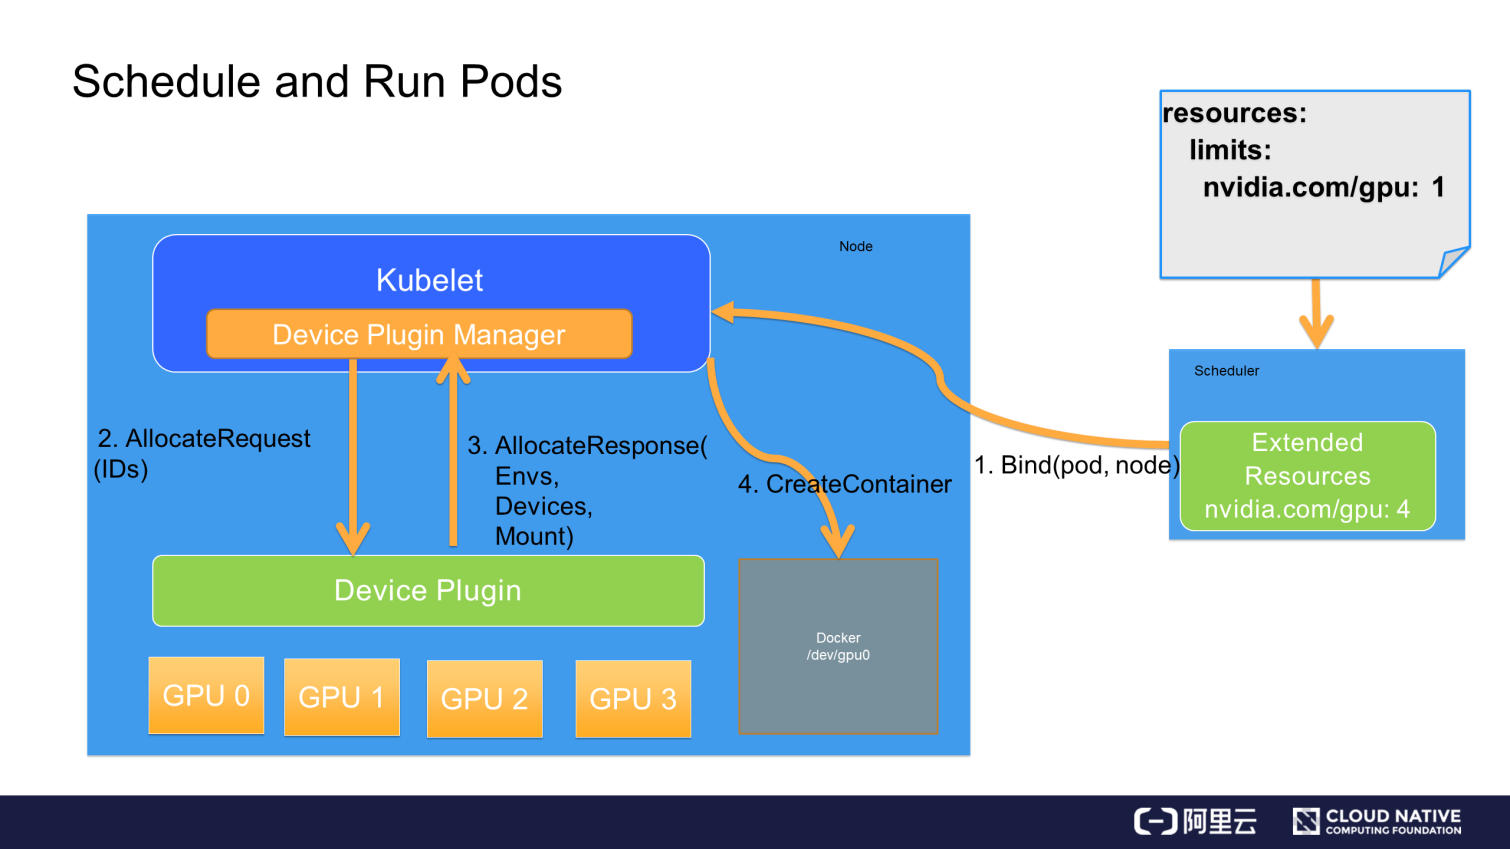
When a pod wants to use a GPU, it declares the GPU resource and required quantity in Resource.limits, such as nvidia.com/gpu: 1. Kubernetes finds the node that meets the required GPU quantity, subtracts the number of GPUs on the node by 1, and binds the pod and the node.
After the binding is complete, the node-matched kubelet creates a container. When the kubelet finds that the resource specified in the pod's container request is a GPU, it enables the internal device plugin manager to select an available GPU from the GPU ID list and assigns the GPU to the container.
The kubelet sends an Allocate request to the device plugin. The request includes the device ID list that contains the GPU to be assigned to the container.
After receiving the Allocate request, the device plugin finds the device path, driver directory, and environment variables related to the device ID, and returns the information to the kubelet through an Allocate response.
The kubelet assigns a GPU to the container based on the received device path and driver directory. Then, Docker creates a container as instructed by the kubelet. The created container includes a GPU. Finally, the required driver directory is mounted. This completes the process of assigning a GPU to a pod in Kubernetes.
In this article, we learned how to use GPUs in Docker and Kubernetes.
In this final section, we will evaluate device plugins.
Device plugins are not designed with full consideration of the actual scenarios in academic circles and industry. GPU resources are scheduled only by the kubelet.
The global scheduler is essential for GPU resource scheduling. However, the Kubernetes scheduler implements scheduling only based on the GPU quantity. Device plugins cannot schedule heterogeneous devices based on factors other than the GPU quantity, such as a pod that runs two NVLINK-enabled GPUs.
Device plugins do not support global scheduling based on the status of devices in a cluster.
Device plugins do not support the extensible parameters that are added by the Allocate and ListAndWatch APIs. In addition, device plugins cannot schedule the resources of complex devices through API extension.
Therefore, device plugins are only applicable to a limited number of scenarios. This explains why NVIDIA and other vendors have implemented fork-based solutions based on Kubernetes upstream code.
Learn more about Alibaba Cloud Kubernetes product at https://www.alibabacloud.com/product/kubernetes
Getting Started with Kubernetes | Scheduling Process and Scheduler Algorithms
Getting Started with Kubernetes | Storage Architecture and Plug-ins

634 posts | 55 followers
FollowAlibaba Clouder - June 21, 2018
Alibaba Developer - June 16, 2020
Alibaba Developer - May 8, 2019
Alibaba Container Service - June 12, 2019
Alibaba Cloud Native Community - November 3, 2025
Alibaba Cloud Native Community - March 11, 2025

634 posts | 55 followers
Follow Platform For AI
A platform that provides enterprise-level data modeling services based on machine learning algorithms to quickly meet your needs for data-driven operations.
Learn More Epidemic Prediction Solution
This technology can be used to predict the spread of COVID-19 and help decision makers evaluate the impact of various prevention and control measures on the development of the epidemic.
Learn More Offline Visual Intelligence Software Packages
Offline SDKs for visual production, such as image segmentation, video segmentation, and character recognition, based on deep learning technologies developed by Alibaba Cloud.
Learn More ACK One
Provides a control plane to allow users to manage Kubernetes clusters that run based on different infrastructure resources
Learn MoreMore Posts by Alibaba Cloud Native Community