By Xiheng, Senior Technical Expert at Alibaba Cloud
The network architecture is a complex component of Kubernetes. The Kubernetes network model poses requirements for specific network functions. The industry has developed many network solutions for specific environments and requirements. A container network interface (CNI) allows you to easily configure a container network when creating or destroying a container. This article describes how classic network plug-ins work and how to use CNI plug-ins.
A CNI is a standard network implementation interface in Kubernetes. Kubelet calls different network plug-ins through CNIs to implement different network configuration methods. A series of CNIs are implemented by plug-ins such as Calico, Flannel, Terway, Weave Net, and Contiv.
Kubernetes determines which CNI to use based on the CNI configuration file.
The CNI usage instructions are as follows:
(1) Configure the CNI configuration file (/etc/cni/net.d/xxnet.conf) on each node, where xxnet.conf indicates the name of a network configuration file.
(2) Install the binary plug-in in the CNI configuration file.
(3) After a pod is created on a node, Kubelet runs the CNI plug-in installed in the previous two steps based on the CNI configuration file.
(4) This completes the pod network configuration.
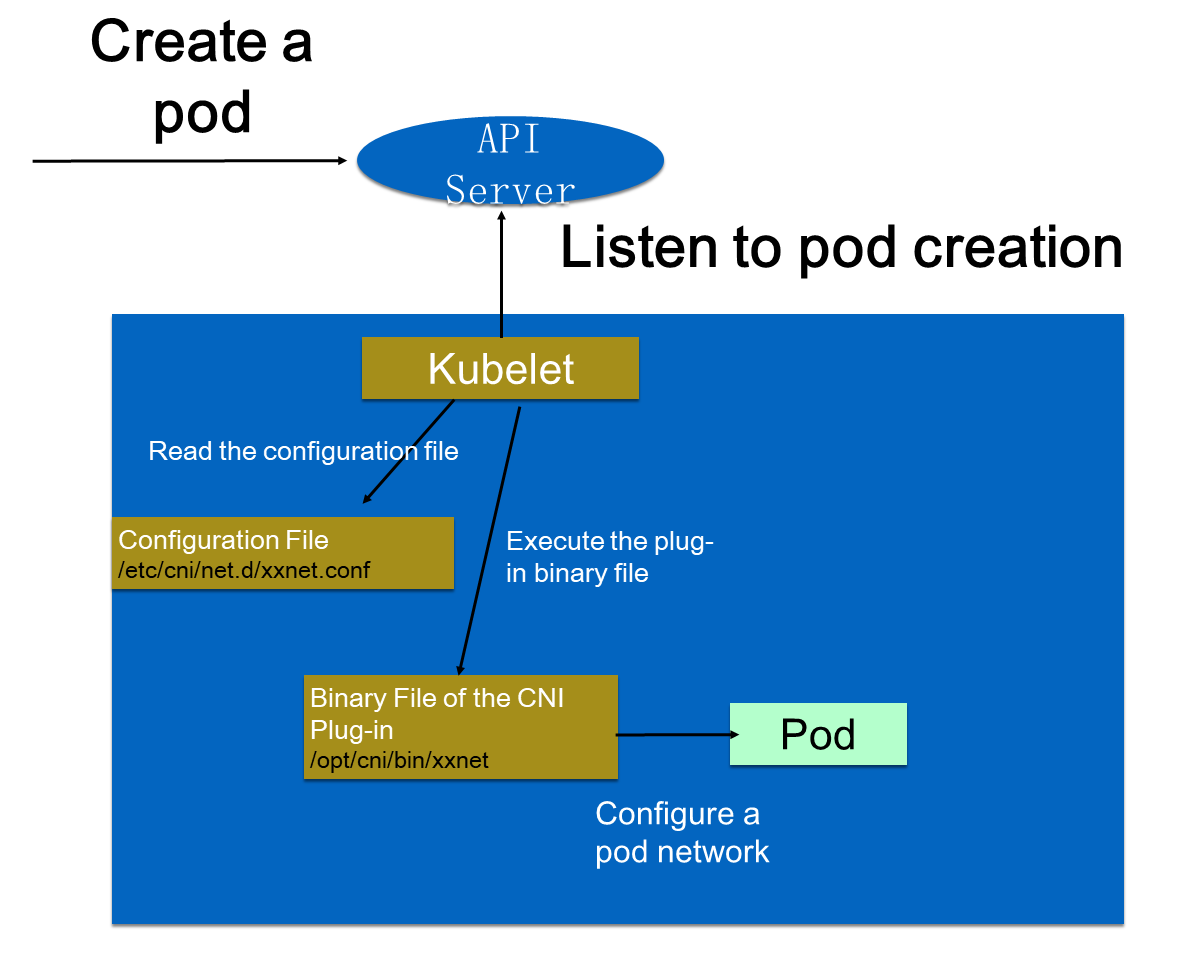
The following figure shows the detailed process.

When a pod is created in a cluster, the API server writes the pod configuration to the cluster. Some control components (such as the scheduler) of the API server are scheduled to a specific node. After listening to the creation of this pod, Kubelet performs some creation actions locally. When a network is created, Kubelet reads the configuration file in the configuration directory. The configuration file declares the plug-in to use. Kubelet executes the binary file of the CNI plug-in. The CNI plug-in enters the pod's network space to configure a pod network. After a pod network is configured, a pod is created by Kubelet and goes online.
The preceding process seems complicated and involves multiple steps, such as configuring the CNI configuration file and installing the binary plug-in.
However, many CNI plug-ins can be installed in one click and are easy to use. The following figure shows how to use the Flannel plug-in. Flannel automatically installs the configuration and binary file on each node by using a Deploying template of kubectl apply Flannel.

Then, all CNI plug-ins required by the cluster are installed.
Many CNI plug-ins provide a one-click installation script. You do not need to concern yourself with the internal configuration of Kubernetes or how the APIs are called.
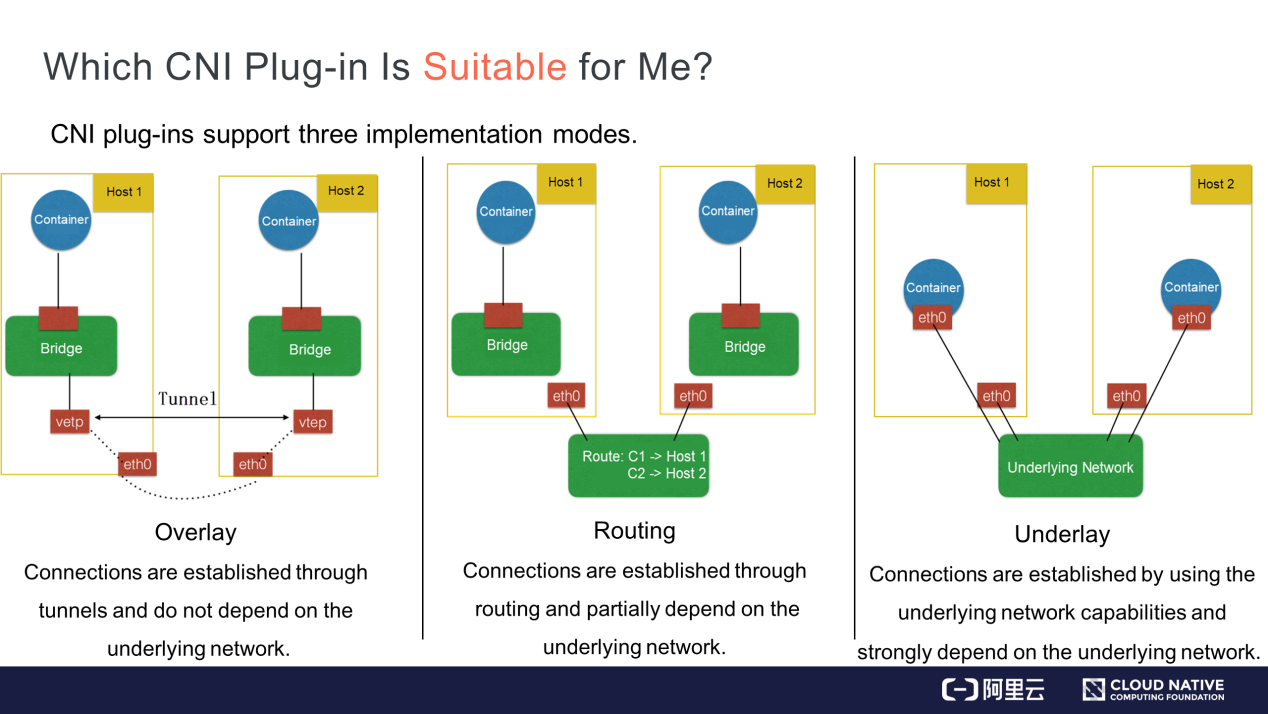
The community provides many CNI plug-ins, such as Calico, Flannel, and Terway. Before selecting an appropriate CNI plug-in in a production environment, let's have a look at the different CNI implementation modes.
Select an implementation mode based on a specific scenario, and then select an appropriate CNI plug-in.
CNI plug-ins are divided into three implementation modes: Overlay, Routing, and Underlay.

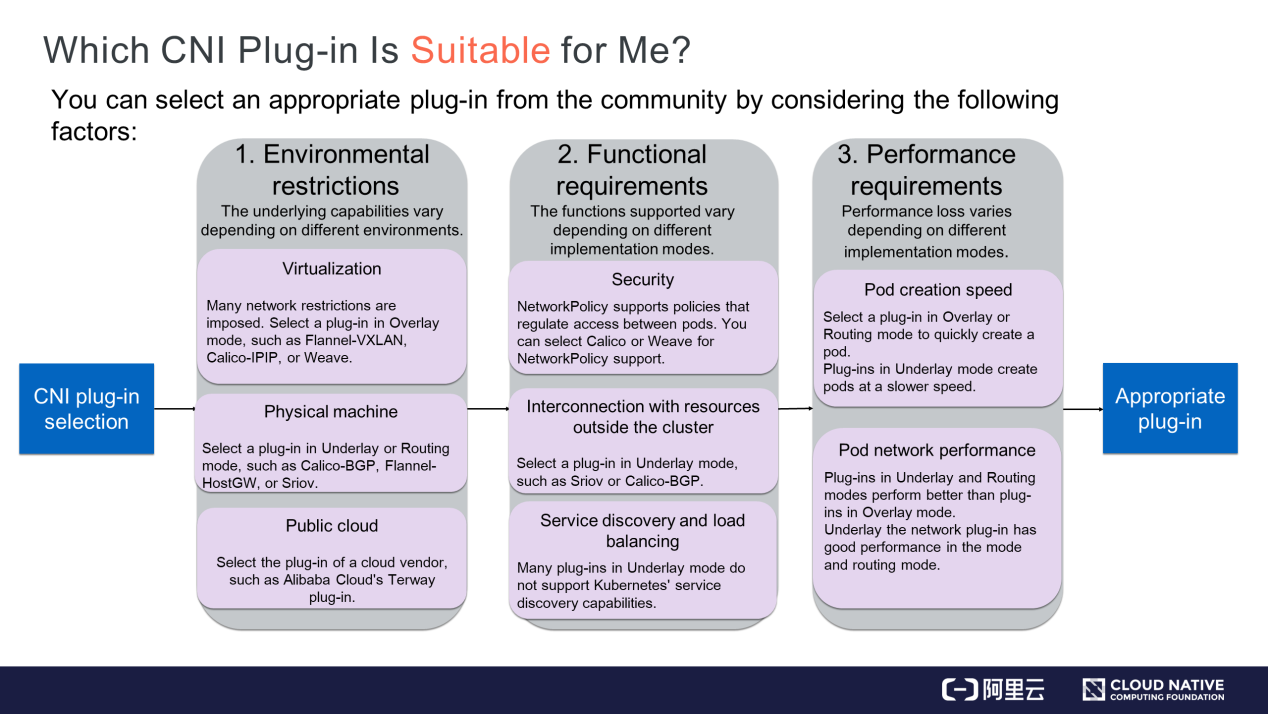
Select an implementation mode based on your environment and needs. Then, select an appropriate CNI plug-in in this mode. How do we determine the implementation mode of each CNI plug-in available in the community? How do we select an appropriate CNI plug-in? These questions can be answered by considering the following aspects:

Different environments provide different underlying capabilities.
After considering the environmental restrictions, you may have an idea of which plug-ins can be used and which ones cannot. Then, consider your functional requirements.
Kubernetes supports NetworkPolicy, allowing you to configure rules to support policies such as whether to allow inter-pod access. Not every CNI plug-in supports NetworkPolicy declaration. If you require NetworkPolicy support, you can select Calico or Weave.
Applications deployed on virtual machines (VMs) or physical machines cannot be migrated all at once to a containerized environment. Therefore, it is necessary to configure IP address interconnection between VMs or physical machines and containers by interconnecting them or deploying them at the same layer. You can select a plug-in in Underlay mode. For example, the Sriov plug-in allows pods and legacy VMs or physical machines to run at the same layer. You can also use the Calico-BGP plug-in. Though containers are in a different CIDR block from the legacy VMs or physical machines, you can use Calico-BGP to advertise BGP routes to original routers, allowing the interconnection of VMs and containers.
Service discovery and load balancing are services of Kubernetes. Not all CNI plug-ins provide these two capabilities. For many plug-ins in Underlay mode, the NIC of a pod is the Underlay hardware or is virtualized and inserted into a container through hardware. Therefore, the NIC traffic cannot be routed to the namespace where the host is located. As a result, you cannot apply the rules that the kube-proxy configures on the host.
In this case, the plug-in cannot access the service discovery capabilities of Kubernetes. If you require service discovery and load balancing, select a plug-in in Underlay mode that supports these two capabilities.
Consideration of functional requirements will narrow your plug-in choices. If you still have three or four plug-ins to choose from, you can consider performance requirements.
Pod performance can be measured in terms of pod creation speed and pod network performance.
For example, when you need to scale out 1,000 pods during a business peak, you can use a CNI plug-in to create and configure 1,000 network resources. You can select a plug-in in Overlay or Routing mode to create pods quickly. The plug-in implements virtualization on machines, so you only need to call kernel interfaces to create pods. If you select a plug-in in Underlay mode, you need to create underlying network resources, which slow down the pod creation process. Therefore, we recommend that you select a plug-in in Overlay or Routing mode when you need to quickly scale out pods or create many pods.
The network performance of pods is measured by metrics such as inter-pod network forwarding, network bandwidth, and pulse per second (PPS) latency. A plug-in in Overlay mode will provide lower performance than plug-ins in Underlay and Routing modes because the former implements virtualization on nodes and encapsulates packets. This encapsulation causes packet header loss and CPU consumption. Therefore, do not select a plug-in in Overlay mode if you require high network performance in scenarios such as machine learning and big data. We recommend that you select a CNI plug-in in Underlay or Routing mode.
You can select an appropriate network plug-in by considering the preceding three requirements.
The plug-ins provided by the community may not meet your specific requirements. For example, only the VXLAN plug-in in Overlay mode can be used in Alibaba Cloud. This plug-in provides relatively poor performance and cannot meet some business requirements of Alibaba Cloud. In response, Alibaba Cloud developed the Terway plug-in.
You can develop a CNI plug-in if none of the plug-ins in the community are suitable for your environment.
A CNI plug-in is implemented as follows:
(1) A binary CNI plug-in is used to configure the NIC and IP address of a pod. This is equivalent to connecting a network cable to the pod, which has an IP address and NIC.
(2) A daemon process is used to manage the network connections between pods. This step connects pods to the network and enables them to communicate with each other.
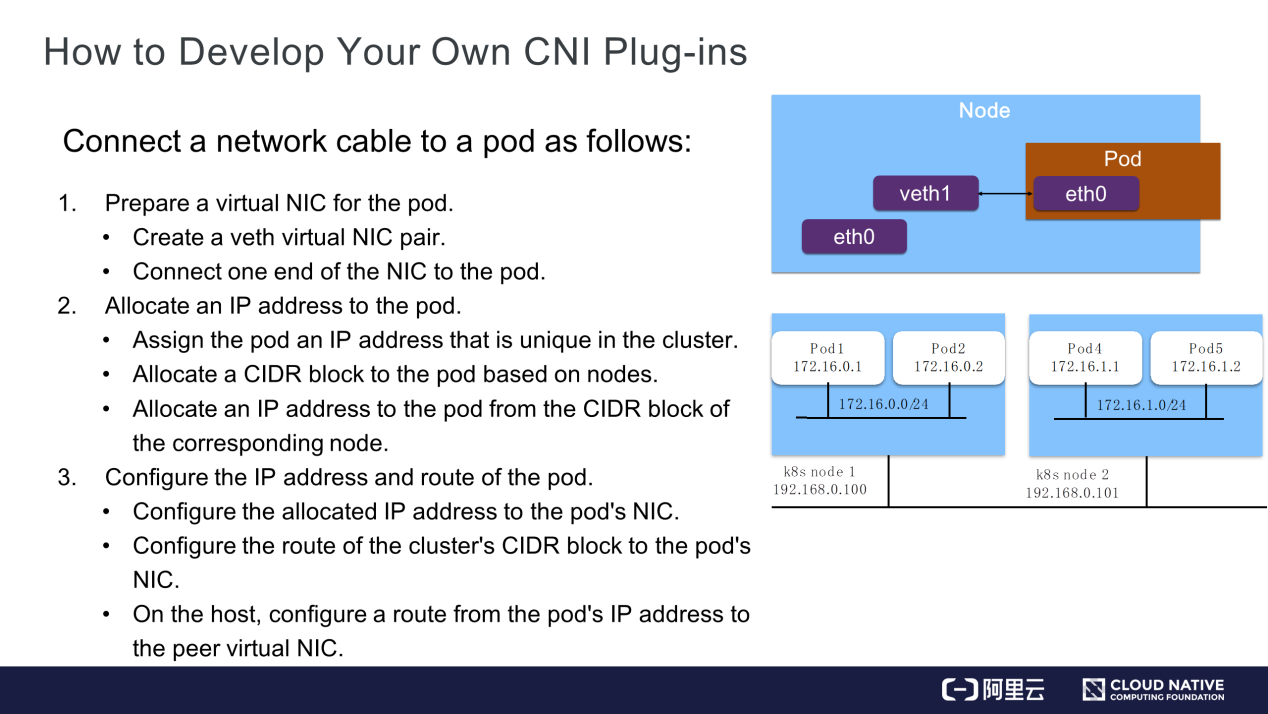
A network cable can be connected to a pod as follows:

Prepare an NIC for the Pod
You can connect one end of a veth virtual NIC to the pod's network space and the other end of the NIC to the host's network space. In this way, the namespaces of the pod and host are connected.
Allocate an IP Address to the Pod
Ensure that the IP address allocated to the pod is unique in the cluster.
When creating a cluster, we specify a CIDR block for each pod and allocate a CIDR block based on each node. As shown on the right in the preceding figure, the 172.16 CIDR block is created. We allocate a CIDR block suffixed with /24 by node. This avoids conflicts between the IP addresses on nodes. Each pod is allocated an IP address from the CIDR block of a specific node in sequence. For example, pod 1 is allocated 172.16.0.1, and pod 2 is allocated 172.16.0.2. This ensures that each node is in a different CIDR block and allocates a unique IP address to each pod.
In this way, each pod has a unique IP address in the cluster.
Configure the IP Address and Route of the Pod
After connecting a network cable to the pod, you can allocate an IP address and route table to the pod. Next, you can enable communication between pods by configuring each pod's IP address to be accessible in the cluster.
Pods can be interconnected in the CNI daemon process as follows:
Then, the daemon process configures network connection in two steps:
Let's summarize what we have learned in this article.
(1) How to select an appropriate CNI plug-in when building a Kubernetes cluster in your environment.
(2) How to develop a CNI plug-in when the CNI plug-ins available in the community cannot meet your requirements.
Getting Started with Kubernetes | Access Control: A Security Measure in Kubernetes

481 posts | 48 followers
FollowAlibaba Cloud Community - July 15, 2022
AlibabaCloud_Network - September 14, 2018
Alibaba Clouder - July 14, 2020
Alibaba Developer - June 23, 2020
Alibaba Developer - June 30, 2020
Alibaba Developer - June 19, 2020

481 posts | 48 followers
Follow Container Service for Kubernetes
Alibaba Cloud Container Service for Kubernetes is a fully managed cloud container management service that supports native Kubernetes and integrates with other Alibaba Cloud products.
Learn More ACK One
Provides a control plane to allow users to manage Kubernetes clusters that run based on different infrastructure resources
Learn More Networking Overview
Connect your business globally with our stable network anytime anywhere.
Learn More Container Registry
A secure image hosting platform providing containerized image lifecycle management
Learn MoreMore Posts by Alibaba Cloud Native Community