By Daonong, Senior Technical Expert at Alibaba Cloud
This article explores the Kubernetes basic network model. This article is divided into the following parts: (1) A review of container network development history and analysis of the origins of the Kubernetes network model; (2) An exploration of the Flannel HostGW implementation, which demonstrates how a packet is converted when being routed from a container to a host(3) An introduction to the mechanisms and usage of services that are closely related to networks and a description of how services work with a simple example.

The container network originated from the Docker network. Docker uses a relatively simple network model that consists of an internal bridge and an internally reserved IP address. With this design, the container network is virtualized and decoupled from the external network, so it does not occupy the host's IP address or resources. The container network can access external services by subjecting a node IP address to source network address translation (SNAT). A container can provide services externally through destination network address translation (DNAT). Specifically, a port is enabled on the node to direct traffic to the container's processes through iptable or by other means.
In this model, the external network cannot differentiate the container network and its traffic from the host network and its traffic. For example, to achieve high availability between two containers with the IP addresses 172.16.1.1 and 172.16.1.2, you need to allocate them to a group to provide services externally. However, this operation is difficult because the two containers appear to be the same from the outside and their IP addresses are derived from the host ports.
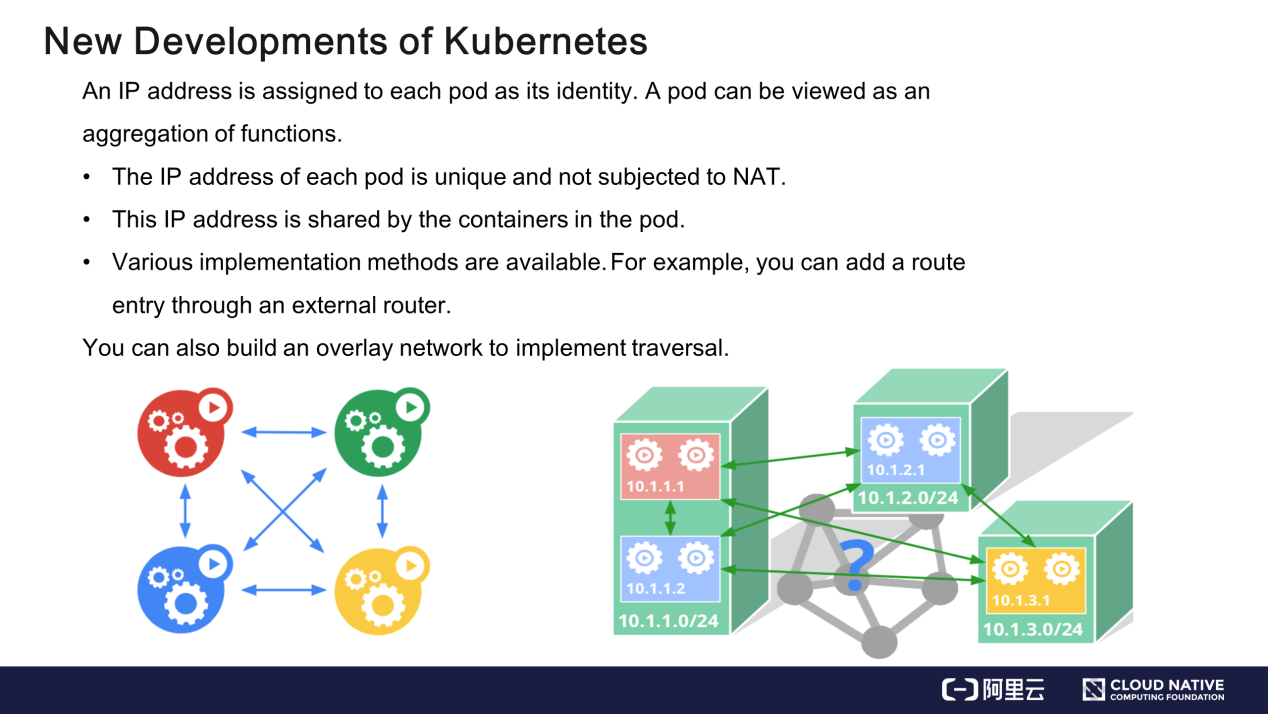
To solve this problem, Kubernetes assigns an identity (or ID) to each pod, which is an aggregation of functions. This ID is an IP address in the Transmission Control Protocol (TCP) stack.
Each pod has a specific IP address. How this IP address is derived is irrelevant to the external network. Access to this pod IP address is equivalent to access to the pod services. The IP address is not converted during the access process. For example, assume an access request with the source IP address 10.1.1.1 is sent to the pod with the IP address 10.1.2.1, which is the host IP address rather than the source IP address. This is not allowed. The pod shares the IP address 10.1.2.1 internally so that containers with function aggregation can be deployed in atomicity mode.
How do we deploy containers? Kubernetes does not impose limits on model implementation. Traffic can be directed by controlling external routers through the underlay network. To implement decoupling, you can superpose a network above the underlying network by using the overlay network. The goal is to meet the model requirements.
How are packets transmitted in a container network?
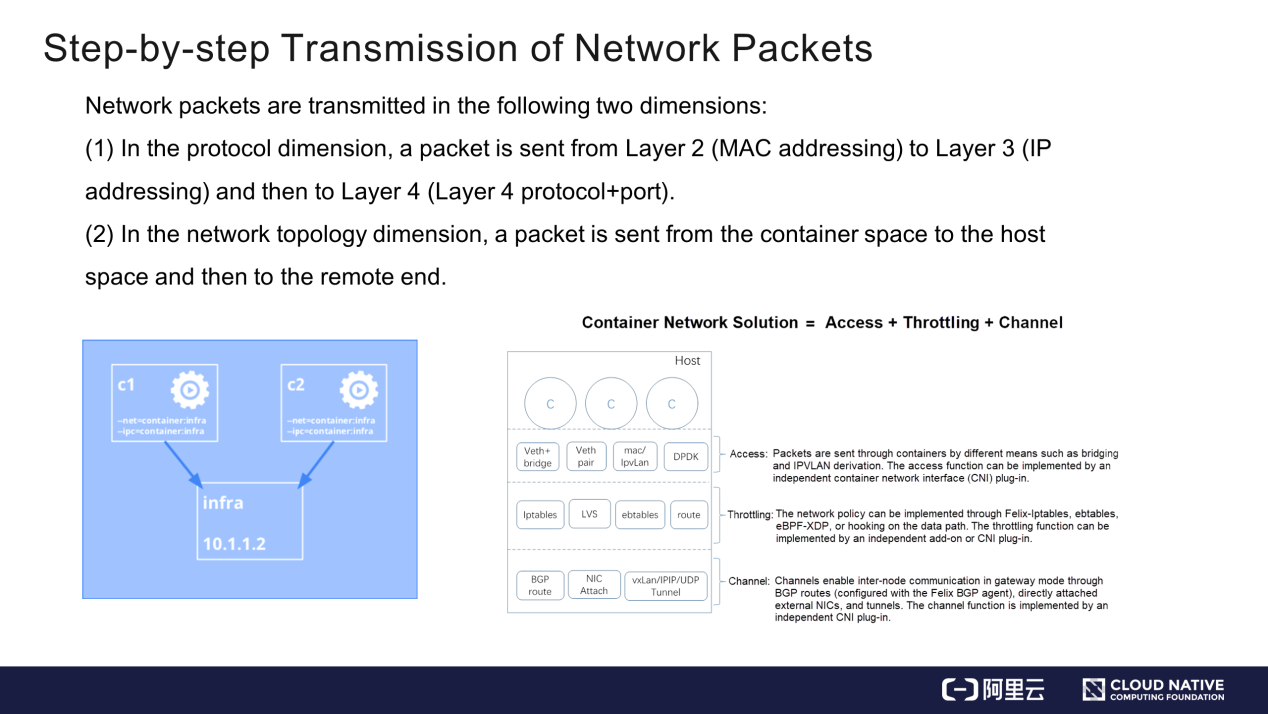
This question can be answered by considering the following two aspects:
The first aspect is protocol.
The protocol concept is the same as the TCP stack concept, which consists of Layer 2, Layer 3, and Layer 4 from bottom to top. A packet is sent in the right-to-left direction. Application data is encapsulated in a packet, which is sent to Layer 4 of the TCP or User Datagram Protocol (UDP) and then to lower layers. An IP header and MAC header are added to the packet before it is sent out. The packet is received in the reverse order of sending. The MAC header and IP header are removed from the packet in-sequence. The Rx port locates the process that needs to receive the packet based on the protocol ID.
The second aspect is network topology.
A container sends a packet in two steps: (1) Send the packet from the container space (c1) to the host space (infra); (2) Forward the packet from the host space to the remote end.
As I see it, a container network implements the packet sending process in three parts:
In Flannel HostGW, each node occupies an exclusive CIDR block, each subnet is bound to a node, and a gateway is configured locally or on the internal port of the cni0 bridge. Flannel HostGW enables easy management but does not support cross-node pod migration. You cannot migrate an IP address or a CIDR block to another node if it has already been occupied by a node.
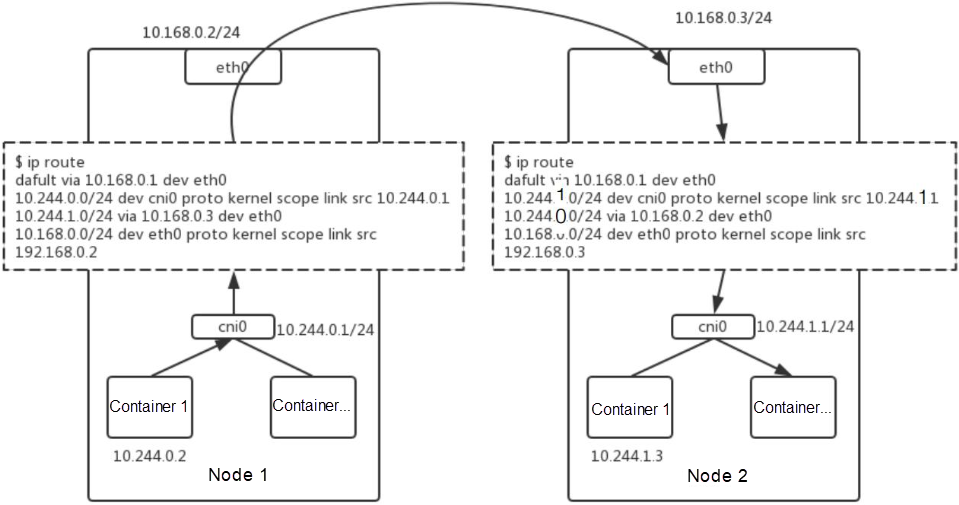
The preceding figure shows the route table setting of Flannel HostGW, which is described as follows.
The following describes how a packet is transmitted.
For example, assume that a container with the IP address 10.244.0.2 wants to send a packet to 10.244.1.3. To do this, the container creates a TCP or UDP packet locally and specifies the peer IP address, the source MAC address (which is the MAC address of the local Ethernet), and the peer MAC address. A default route is configured locally and uses the IP address of cni0 as its default gateway address. The peer MAC address is the MAC address of this gateway. In this way, the packet can be sent to the bridge. The packet is converted at the MAC layer if the CIDR block is located on the bridge.
The IP address in this example does not belong to the local CIDR block, so the bridge sends the packet to the host's protocol stack for processing. The protocol stack identifies the peer MAC address and uses 10.168.0.3 as its gateway. The MAC address 10.168.0.3 is obtained through Address Resolution Protocol (ARP) snooping. After encapsulation at each layer of the protocol stack, the packet is sent from the local host's eth0 interface to the peer host's eth0 interface. The MAC address of the peer host's NIC is specified as Dst-MAC, which is shown on the right of the figure.
There is an implicit restriction. The specified MAC address (Dst-MAC) must be reachable at the peer end. However, it becomes unreachable when the two hosts are not connected at Layer 2 and some gateways and complex routes exist between the two hosts. In this case, Flannel HostGW is not applicable. When the packet reaches the peer MAC address, the peer host finds that the packet's destination MAC address is the same as the peer MAC address, but the packet's destination IP address is not the peer IP address. Then, the peer host forwards the packet to the protocol stack and the packet is routed all over again. The packet destined for 10.244.1.0/24 must be sent to the 10.244.1.1 gateway, so it reaches the cni0 bridge. The peer host finds the MAC address mapped to 10.244.1.3 and sends the packet to its container through bridging.
As you can see, the packet transmission process occurs at Layer 2 and Layer 3. The packet is sent from Layer 2 before being routed. The transmission process is simple. If the packet is routed through a VXLAN tunnel, replace the direct route with the peer tunnel number.
A service in Kubernetes implements load balancing at the client side.
The conversion from a virtual IP address (VIP) to a real server IP address (RIP) is done at the client side, without decision making by NGINX or an elastic load balancer (ELB).
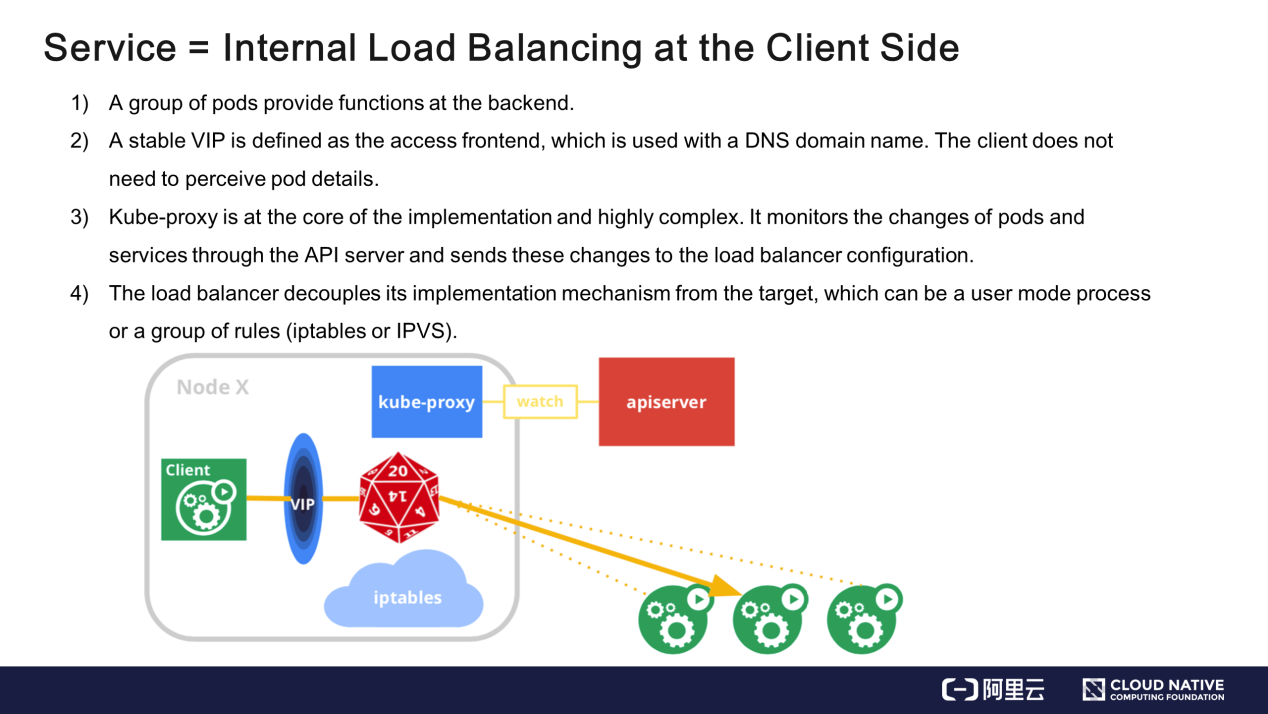
The implementation: A group of pods provides functions at the backend, and a virtual IP is defined as an access portal at the frontend. The virtual IP address is mapped to a DNS domain name. When accessing through this domain name, the client obtains the virtual IP address and converts it to a real IP address. The Kubernetes network proxy (kube-proxy) is at the core of the implementation and highly complex. kube-proxy monitors changes of pods and services through the API server, such as added services and pods, and sends these changes to local rules or user-mode processes.
This section describes how to develop a service for the Linux Virtual Server (LVS). The LVS provides a kernel mechanism for load balancing. The LVS works at Layer 4 and provides better performance than iptable.
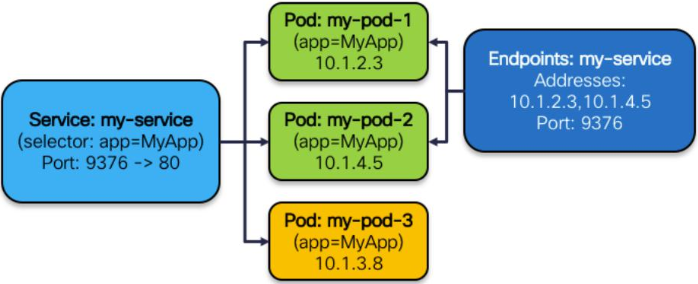
For example, the kube-proxy obtains a service's configuration, as shown in the following figure. This service has a cluster IP address mapped to port 9376, which sends feedback to port 80 of a container. Three functional pods exist, with the IP addresses 10.1.2.3, 10.1.14.5, and 10.1.3.8.
The service implements the following steps:
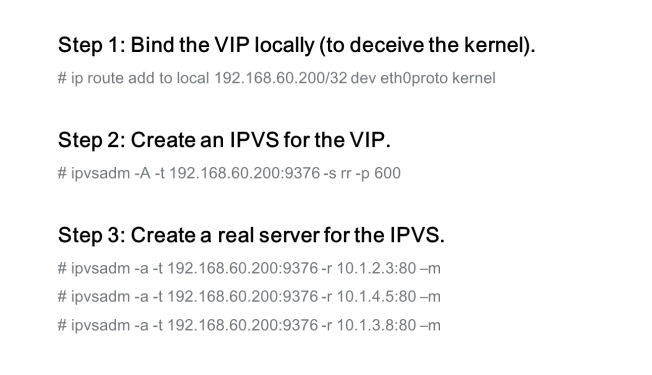
The service tells the kernel that it has the VIP because the LVS works at Layer 4 and does not concern IP forwarding. The service forwards traffic to the TCP or UDP layer only when the service believes that the VIP is its' own. In Step 1, the service sets the VIP to the kernel to indicate that the service has the VIP. To set the VIP to the kernel, you can add "local" to "ip route" or add the VIP through a dummy device.
This step indicates that load balancing must be implemented for the VIP. The following parameters include the distribution policy. The IP address of the IPVS is the cluster IP address.
This real server is the service provisioning backend. For example, you can configure the IP addresses of the three pods shown in the preceding figure to the IPVS, ensuring one-to-one mapping between pods and IP addresses. kube-proxy works in a similar way. kube-proxy also monitors pod changes. For example, when the number of pods changes to five, the number of rules becomes five. When a pod dies or is killed, the number of rules decreases by one. When the service is revoked, all the rules are deleted. These are the management tasks of kube-proxy.
Services are divided into the following four types:
A cluster has an internal VIP bound to the group pods of many services. ClusterIP is the default service type. Services of this type can only be used within nodes or the cluster.
Services of the NodePort type are only intended for external calls by clusters. These services can be deployed on the static ports of nodes, with one-to-one mapping between services and port numbers. This allows users outside the cluster to call the services by specifying <NodeIP>:<NodePort>.
LoadBalancer is an extension interface for cloud vendors. Cloud vendors like Alibaba Cloud and Amazon have mature load balancing mechanisms, which may be implemented by a large cluster. Cloud vendors can extend these mechanisms through the LoadBalancer interface. The LoadBalancer interface automatically creates NodePort and ClusterIP, to which cloud vendors can directly attach load balancers. Alternatively, cloud vendors can attach the RIPs of pods to the ELB backend.
This service type depends on external devices rather than internal mechanisms. For example, you can implement load balancing externally by mapping each service to a domain name.
Here is an example. The preceding figure shows a flexible, scalable, and production-ready system that combines multiple types of services such as ClusterIP and NodePort, as well as ELBs of cloud vendors.
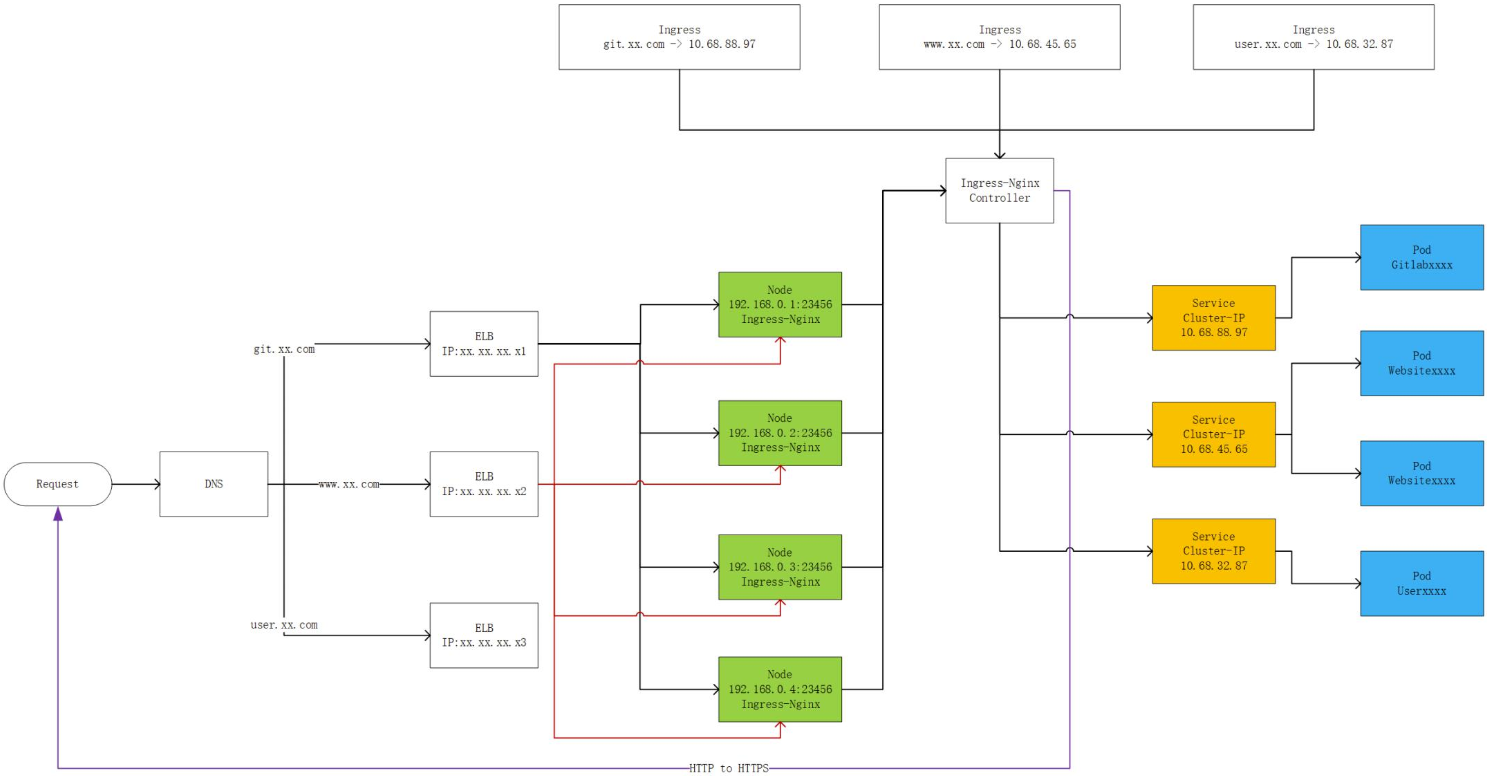
ClusterIP is used to implement the service portals of functional pods. If three types of pods exist, three service cluster IP addresses are used as the service portals of these pods. Service portals are implemented at the client end, and control is implemented at the server end as follows:
Ingress pods are started, organized, and exposed to the IP address of a NodePort service. Ingress is a new type of service in Kubernetes. Ingress pods are essentially a bunch of homogeneous pods. This completes the tasks in Kubernetes.
An access request destined for the pod with port 23456 is routed to the ingress service, which has a controller that manages the service IP address and ingress backend behind it. Then, the request is forwarded to the ClusterIP service and then the functional pod. If you connect to a cloud vendor's ELB, you can configure the ELB to listen to port 23456 of each cluster node. A service that exists on port 23456 is considered to be an ingress instance in the running state.
Traffic is parsed based on an external domain name and is directed to the ELB. The ELB implements load balancing and routes the traffic to the ingress in NodePort mode. Finally, the ingress routes the traffic to the appropriate pod at the backend in ClusterIP mode. This system is functionally diverse and robust. Each link of the system is free from a single point of failure (SPOF) and implements management and feedback.
Let's summarize what we have learned in this article.
Getting Started with Kubernetes | Operator and Operator Framework

634 posts | 55 followers
FollowAlibaba Developer - April 7, 2020
Alibaba Developer - March 31, 2020
Alibaba Clouder - February 14, 2020
Alibaba Developer - April 7, 2020
Alibaba Developer - June 16, 2020
Alibaba Developer - June 22, 2020

634 posts | 55 followers
Follow Container Service for Kubernetes
Alibaba Cloud Container Service for Kubernetes is a fully managed cloud container management service that supports native Kubernetes and integrates with other Alibaba Cloud products.
Learn More ACK One
Provides a control plane to allow users to manage Kubernetes clusters that run based on different infrastructure resources
Learn More Cloud-Native Applications Management Solution
Accelerate and secure the development, deployment, and management of containerized applications cost-effectively.
Learn More Accelerated Global Networking Solution for Distance Learning
Alibaba Cloud offers an accelerated global networking solution that makes distance learning just the same as in-class teaching.
Learn MoreMore Posts by Alibaba Cloud Native Community