By Huolang, from Alibaba Cloud Storage
General DBAudit is a lightweight, low-cost database security solution provided by Log Service. Log Service offers out-of-the-box audit reports and alert configuration.
As cloud-native technology becomes more mature, more applications are deployed in the cloud-native environment. The dynamic and flexible cloud-native environment poses difficulties for packet capture tools. This article introduces how to deploy this lightweight, low-cost audit solution in the Kubernetes environment.
It is well known that the container is a kind of virtualization environment of an operating system. Essentially, it is one or a set of processes isolating from other parts of the system. It is implemented using two core features: Cgroup and Namespace. Cgroup controls resources, and Namespace isolates access.
Each container can have its own separate namespace that has CPU, PID, file systems, network, memory, and other resources. The namespace of all kinds of resources can make applications in the container operate independently.
Network namespace can realize network isolation of the container. A view of a complete network protocol stack can be seen in the namespace of the container. It contains network device interfaces, protocol stacks, etc. Docker containers mainly use Linux veth pair and bridge to realize the communication between containers and hosts and between containers.
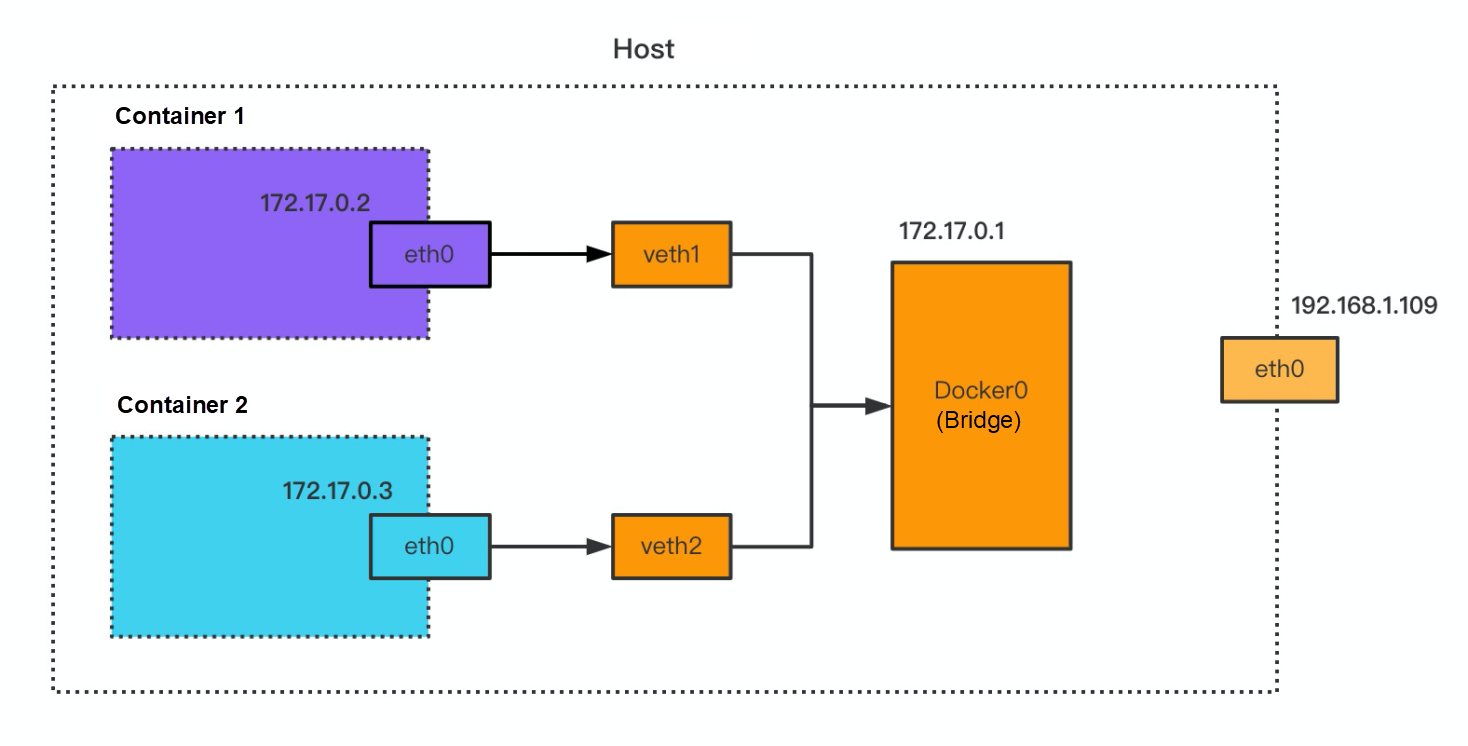
As shown in the following figure, the host has two containers, and each container has a network device named eth0. In the container, eth0 communicates with the host by the corresponding veth pair, and veth1 and veth2 are mounted to the bridge Docker0 with an IP address. The network device is eth0 in the container environment. The network devices are veth1, veth2, docker0, and eth0 in the Host environment.
The network packet of applications uses the veth pair in the container environment to achieve ingress and egress. Therefore, it can use the two ends of veth pair, capturing a network packet of containers: one end is eth0 within the container, and the other end is veth1 within the host.

The network architecture is more complex in the Kubernetes environment. Container Network Interface (CNI) is used in the continuous container management system and network plug-ins as a standard general interface. Kubernetes needs to deal with communications among different containers and cross-host communications. There are some container network solutions based on CNI, such as Flannel, Calico, Weave, and Terway.
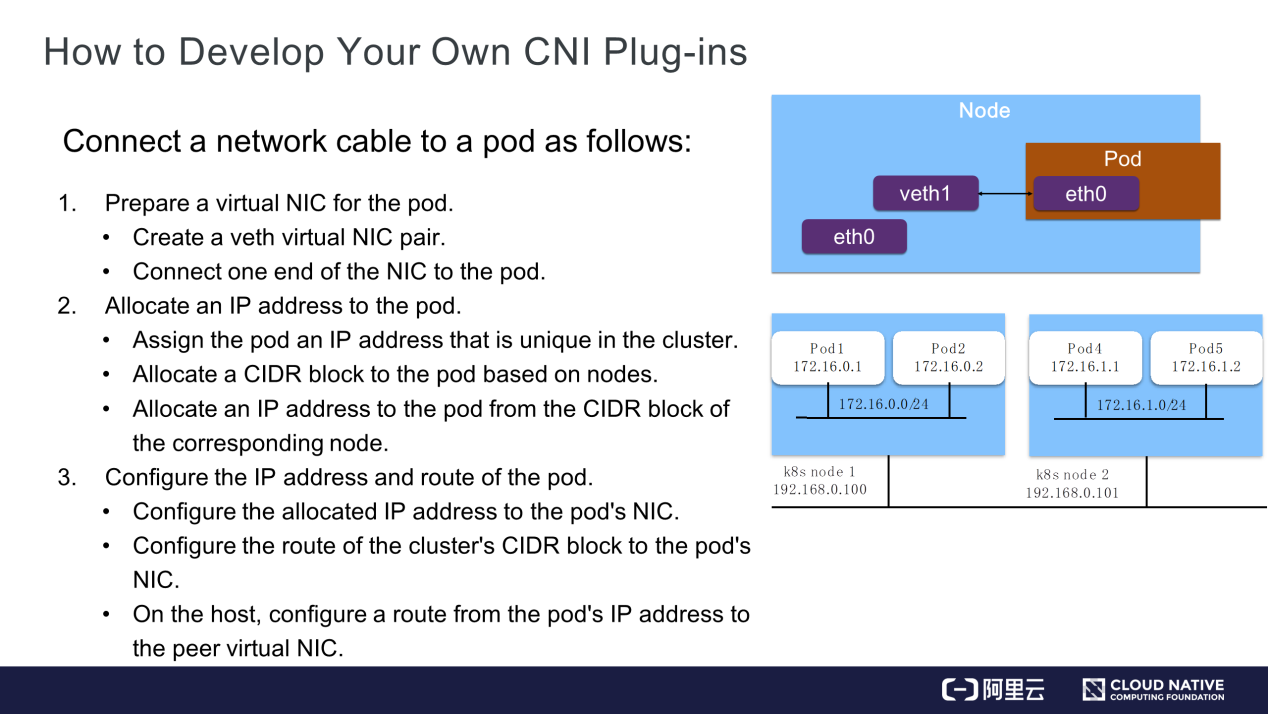
The development process of a typical CNI plug-in is listed below:

The picture is from this Article by Xiheng.
Similar to container networks, CNI plug-ins of Kubernetes also need to expose the other end of the veth pair on the host. As a result, eth0 traffic in the pod can exchange with the outside world through veth1. However, eth0 in the container network is in the namespace of a container. A pod has multiple containers that share the same network namespace in the Kubernetes environment. Therefore, on the host, packet capture can be realized on the network traffic within the pod through the end-to-end veth1 of containers.
General DBAudit of Log Service collects databases through the network traffic capture. Please refer to General DBAudit for the specific use method. In the Kubernetes environment, considering requirements in different scenarios, this article takes the Packetbeat subcontract program as an example to provide several cloud-native methods to deploy the packet capture program.
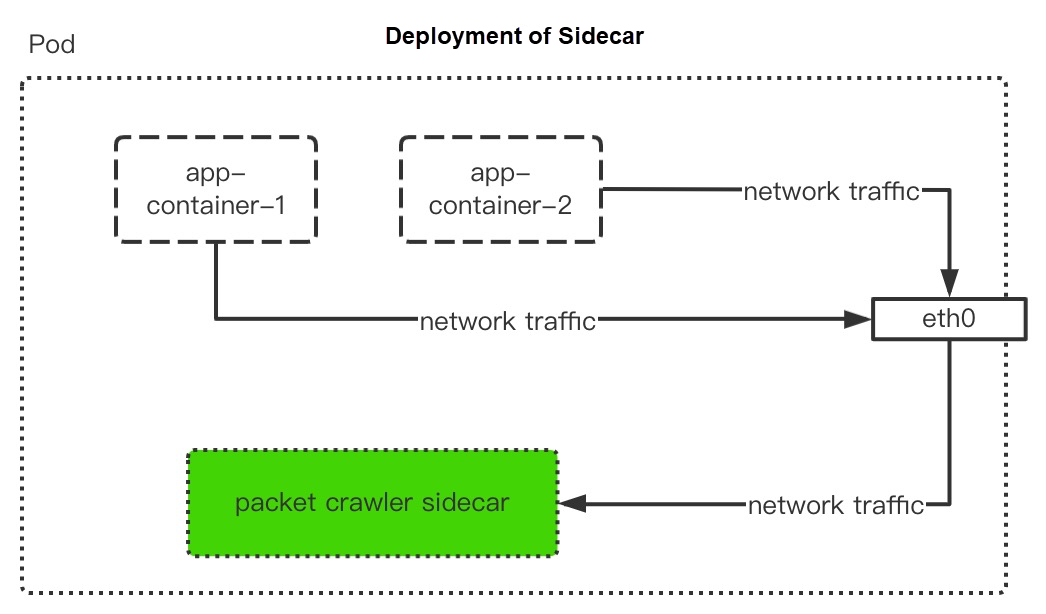
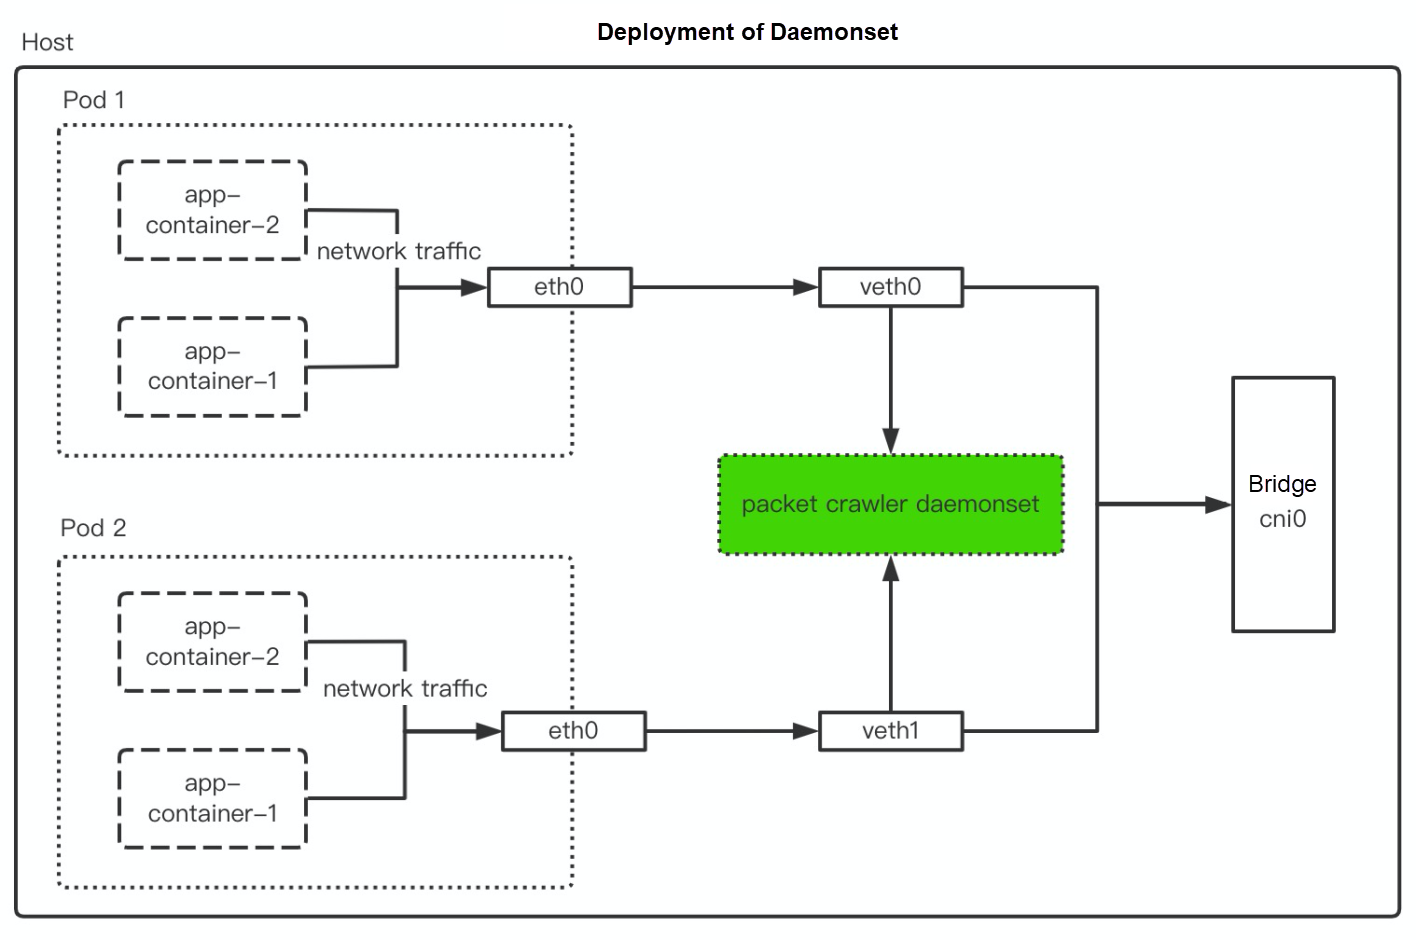
According to the network in Kubernetes scenarios mentioned above, there are two ways to realize the packet capture of pods:
The foregoing two methods also correspond to two kinds of deployment methods in the Kubernetes environment:


According to the data above, the packet capture program can be deployed by the method of Sidecar or Daemonset. The packet capture program can choose Packetbeat that may be converted to various types of output. At this time, you can upload the captured traffic data through Kafka to Logstore of Log Service. Please refer to Use the Kafka Protocol to Upload Logs for the specific configuration.
Next, the article will introduce how to deploy Sidecar and Daemonset. Both are used for the deployment of the packet capture program. You can select one of them according to business requirements. The deployment of both depends on the configuration of ConfigMap, which includes the following process:
Edit packetbeat.yml
packetbeat.interfaces.device: any
# Set `enabled: false` or comment out all options to disable flows reporting.
packetbeat.flows:
  timeout: 30s
  period: 10s
packetbeat.protocols:
- type: mysql
  ports: [3306,3307]
output.kafka:
  hosts: ["{project}.{region}.log.aliyuncs.com:10012"]
  username: "{project}"
  password: "{ak}#{sk}"
  ssl.certificate_authorities:
  topic: 'general-db-logstore'
  partition.round_robin:
    reachable_only: false
  required_acks: 1
  compression: gzip
max_message_bytes: 1000000kubectl create configmap packetbeat-config --from-file=packetbeat.yml=packetbeat.ymlConfigure a packetbeat-daemonset.yaml file
apiVersion: apps/v1
kind: DaemonSet
metadata:
  name: packetbeat-daemonset
  namespace: default
spec:
  selector:
    matchLabels:
      app: packetbeat-daemonset
  template:
    metadata:
      name: packetbeat-daemonset
      labels:
         app: packetbeat-daemonset
    spec:
      restartPolicy: Always
      hostNetwork: true
      containers:
      - name: packetbeat
        image: docker.elastic.co/beats/packetbeat:8.1.0
        resources:
          limits:
            cpu: 500m
            memory: 200Mi
          requests:
            cpu: 100m
            memory: 200Mi
        command: ["/bin/sh", "-c"]
        args: ["/usr/share/packetbeat/packetbeat --strict.perms=false -c /etc/packetbeat/config/packetbeat.yml"]
        securityContext:
          capabilities:
            add:
            - NET_ADMIN
        volumeMounts:
        - name: packetbeat-config
          mountPath: /etc/packetbeat/config
      terminationGracePeriodSeconds: 30
      volumes:
      - name: packetbeat-config
        configMap:
          name: packetbeat-config
          items:
          - key: packetbeat.yml
path: packetbeat.ymlkubectl apply -f packetbeat-daemonset.yaml
Create a packetbeat-sidecar.yaml file
The mysql-test container is a test container. You can modify it based on business containers.
apiVersion: apps/v1
kind: Deployment
metadata:
  name: packetbeat-sidecar
  namespace: default
spec:
  selector:
    matchLabels:
      app: packetbeat-sidecar
  template:
    metadata:
      name: packetbeat-sidecar
      labels:
         app: packetbeat-sidecar
    spec:
      restartPolicy: Always
      containers:
      - name: mysql-test
        image: imega/mysql-client
        command: ["/bin/sh", "-c"]
        args: ["mysql --host='xxx' --user=xxx --password='xxx' --database=mysql --execute='show tables;'; sleep 6000"]
      - name: packetbeat-sidecar
        image: docker.elastic.co/beats/packetbeat:8.1.0
        command: ["/bin/sh", "-c"]
        args: ["/usr/share/packetbeat/packetbeat --strict.perms=false -c /etc/packetbeat/config/packetbeat.yml"]
        securityContext:
          capabilities:
            add:
            - NET_ADMIN
        volumeMounts:
        - name: packetbeat-config
          mountPath: /etc/packetbeat/config

      volumes:
      - name: packetbeat-config
        configMap:
          name: packetbeat-config
          items:
          - key: packetbeat.yml
path: packetbeat.ymlkubectl apply -f packetbeat-sidecar.yaml
1,303 posts | 461 followers
FollowAlibaba Cloud Native - November 6, 2024
Alibaba Container Service - February 19, 2025
Alibaba Cloud Native - September 4, 2024
Alibaba Developer - June 30, 2020
Alibaba Cloud Community - November 25, 2021
Alibaba Developer - June 21, 2021

1,303 posts | 461 followers
Follow ACK One
Provides a control plane to allow users to manage Kubernetes clusters that run based on different infrastructure resources
Learn More Message Queue for Apache Kafka
A fully-managed Apache Kafka service to help you quickly build data pipelines for your big data analytics.
Learn More Simple Log Service
An all-in-one service for log-type data
Learn More Container Service for Kubernetes
Alibaba Cloud Container Service for Kubernetes is a fully managed cloud container management service that supports native Kubernetes and integrates with other Alibaba Cloud products.
Learn MoreMore Posts by Alibaba Cloud Community