Create and manage MaxCompute tables directly in the DataWorks console using the DataStudio codeless UI or DDL statements, without switching to the MaxCompute client.
Prerequisites
Before you begin, make sure you have:
Key constraints
Fields cannot be deleted after table creation. Plan your schema carefully before committing a table.
To change the physical properties of an existing MaxCompute table (column definitions, partitioning), execute MaxCompute SQL statements directly. For details, see Table operations.
When you access MaxCompute tables from DataWorks as a RAM (Resource Access Management) user, permission errors may occur in some scenarios. For details, see Manage permissions on data in a MaxCompute compute engine instance.
Metadata sync latency
After you create, update, or remove a table in DataWorks, the change may not appear immediately in the UI. To force a refresh, use the manual synchronization tool in Data Map. For details, see Manual synchronization tool.
Go to the DataStudio page
Log on to the DataWorks console. In the top navigation bar, select the region. In the left-side navigation pane, choose Data Development and O\&M > Data Development. Select the workspace from the drop-down list and click Go to Data Development.
Create a MaxCompute table
DataStudio supports two entry points and two configuration methods for creating tables.
Choose an entry point
| Entry point | When to use |
|---|---|
| Workspace Tables pane | General table creation and management outside a specific workflow |
| Workflow in DataStudio | Creating tables scoped to a specific business workflow |
Workspace Tables pane
In the left-side navigation pane of the DataStudio page, click Workspace Tables. In the pane, click the ![]() icon to create a table.
icon to create a table.
If the Workspace Tables module is not visible, add it first. For details, see Adjust the displayed DataStudio modules.
Workflow
Right-click the workflow name and choose Create Table > MaxCompute > Table. Configure the required fields in the dialog box and click Create.
If no workflow exists, create one first. For details, see Create a workflow.
Choose a configuration method
| Method | Best for |
|---|---|
| DDL statement | Developers who prefer to define the schema in SQL |
| Codeless UI | Users who prefer a guided, form-based experience |
DDL statement
Click the ![]() icon on the table configuration tab and run a standard MaxCompute table creation statement. DataWorks parses the DDL and fills in the table configuration fields automatically.
icon on the table configuration tab and run a standard MaxCompute table creation statement. DataWorks parses the DDL and fills in the table configuration fields automatically.
The table name is set before you open the configuration tab. Changing the name inside the DDL statement causes an error. DDL statements define physical properties only — configure business-related properties (display name, theme, level, category) separately on the configuration tab after the table is created.
For DDL syntax, see Table operations.
Codeless UI
Configure the table using the three sections on the table configuration tab.
Step 1: General section 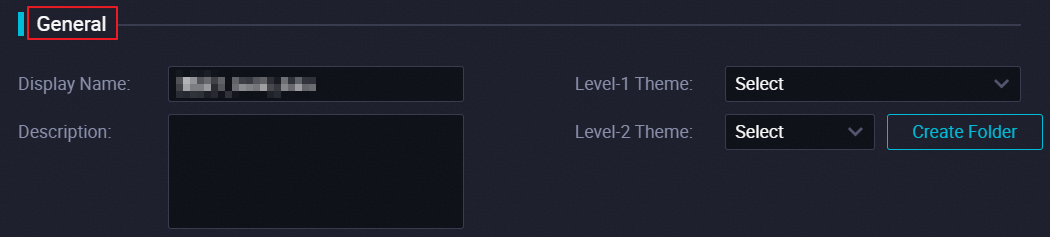
| Parameter | Description | Required |
|---|---|---|
| Display name | The display name of the table. | No |
| Theme | The level-1 and level-2 folders used to organize the table by business category. Use themes to group related tables so you can find them quickly in the Workspace Tables pane. If no theme exists, create one. For details, see Create or manage folders for tables. | No |
Step 2: Physical model section 
| Parameter | Description | Required |
|---|---|---|
| Level | The data layer the table belongs to. Available layers: operational data store (ODS), dimension (DIM), data warehouse detail (DWD), data warehouse summary (DWS), and application data service (ADS). Custom layers are supported. For details, see Manage settings for tables. | No |
| Category | The business category used to classify tables within a layer. Custom categories are supported. For details, see Manage settings for tables. | No |
| TTL | The time-to-live (TTL) period of the table, equivalent to the MaxCompute lifecycle. For lifecycle concepts, see Lifecycle. For TTL operations, see Lifecycle management operations. | No |
| Partition type | Whether the table is partitioned or non-partitioned. For details, see Partition. | No |
| Table type | Internal table: stores data directly in MaxCompute. Queries run faster because data is local. External table: reads data from external storage without importing it, using less memory. For details, see Table. | No |
Step 3: Schema section 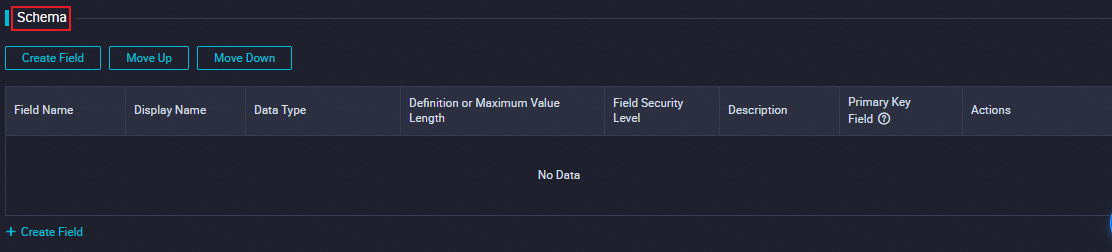
| Parameter | Description | Required |
|---|---|---|
| Data type | The data type of the field. Select only from data types supported by MaxCompute. For details, see Data type editions. | Yes |
| Field security level | The security classification of the field. Required only when label-based access control is enabled in the MaxCompute project. For details, see Label-based access control. | Conditional |
| Primary key field | The business-level primary key. MaxCompute tables do not enforce primary key constraints — this field is used for business management purposes only. | No |
Commit and deploy the table
After defining the schema, commit the table to the development and production environments.
Permissions required:
Basic mode workspace: commit to the production environment only.
Standard mode workspace: only users with the Workspace Administrator or O\&M role can deploy to the production environment. To request role assignment, see Add a RAM user to a workspace as a member and assign roles to the member.
For workspace mode differences, see Differences between workspace modes.
| Operation | Description |
|---|---|
| Commit to development environment | Creates the table in the MaxCompute project associated with DataWorks as a data source in the development environment. After committing, run desc tablename on an ODPS SQL node to verify the schema, or view the table in the linked MaxCompute project. For details, see Bind a MaxCompute computing resource. |
| Load from development environment | Overwrites the current page with table information from the development environment. Requires a prior commit to the development environment. |
| Commit to production environment | Creates the table in the MaxCompute project associated with DataWorks as a data source in the production environment. After committing, run desc projectname.tablename on an ODPS SQL node to verify the schema. For workspaces in basic mode, this is the only commit step needed. |
| Load from production environment | Overwrites the current page with table information from the production environment. Requires a prior commit to the production environment. |
Write data to the table
Three methods are available:
Data synchronization task: sync data from external sources into the table. For details, see Data synchronization task.
ODPS SQL node: write data using INSERT statements in a MaxCompute node. For details, see Develop a task on an ODPS SQL node.
Data upload: import files directly from your local machine. For details, see Data upload.
Export data from the table
After querying data in DataStudio, click Download on the query result page to export to your local machine. The default limit is 10,000 records per download.
Tenant administrators and tenant security administrators can change the download limit on the Data query and analysis control page in Security Center.
To export more than 10,000 records, run Tunnel commands on the MaxCompute client.
Query data in the table
Use an ODPS SQL node or the ad hoc query feature to run SQL statements against the table.
Data access permissions
The following permissions apply to RAM users added to a workspace in standard mode.
Workspaces in basic mode do not support fine-grained permission management or environment isolation. The examples below apply to standard mode workspaces.
| Permission type | Description |
|---|---|
| Development environment | A RAM user assigned a built-in workspace role automatically gets the permissions of the mapped role in the associated MaxCompute project in the development environment. No additional steps are needed for development environment access. However, the RAM user does not have the permissions of the MaxCompute project that is associated with the workspace in the production environment. |
| Production environment | Production environment access is restricted by default. To access MaxCompute tables in the production environment, go to Security Center to request the required permissions. DataWorks provides a default approval workflow and allows administrators to configure custom workflows. |
For a full overview of MaxCompute permission management, see Manage permissions on data in a MaxCompute compute engine instance.
Cross-project data access
MaxCompute supports querying tables across projects by specifying the project name in your SQL statement. The account used to execute the query depends on the environment and how the statement is written.
View the MaxCompute projects added to DataWorks and the accounts configured for each environment on the Computing Resource page in DataStudio. For details, see Preparations before data development: Associate a data source or a cluster with DataStudio.
In a standard mode workspace, tasks in the development environment run under the personal identity of the task executor. Tasks in the production environment run under the scheduling access identity (an Alibaba Cloud account). For details, see Bind a MaxCompute computing resource.
| SQL statement | Execution account in development environment | Execution account in production environment |
|---|---|---|
select col1 from projectname_dev.tablename; | Personal Alibaba Cloud account of the task executor (RAM user's own account, or the Alibaba Cloud account if run directly) | Scheduling access identity |
select col1 from projectname.tablename; | Personal Alibaba Cloud account of the task executor. Due to production data security controls, go to Security Center to request access if needed. | Scheduling access identity |
select col1 from tablename; | If executed in the development project context: personal Alibaba Cloud account of the task executor | If executed in the production project context: scheduling access identity |
View MaxCompute data assets
View all tables in the production environment
In the Tenant Tables pane of the DataStudio page, view all tables in the production environment of your Alibaba Cloud account in the current region.
View table metadata and lineage
Go to Data Map to view the details and metadata of any MaxCompute table. On the table details page, view ancestor and descendant table lineages.
To find all tasks that reference a specific table, use the code search feature.
Manage tables
Single-table operations
To manage an individual table, go to the Workspace Tables pane or the table details page in Data Map:
To view the schema, run
desc tablenameon an ODPS SQL node after committing the table.To modify the TTL, open the table in the Workspace Tables pane and update the TTL field. For details, see Manage tables.
To change physical properties (column definitions, partitioning), execute MaxCompute SQL statements directly. For details, see Table operations.
Bulk operations
Go to the My Data page in Data Map to manage multiple tables you own at the same time:
Delete multiple tables: select the tables and delete them. Due to security control for data in the production environment, you cannot directly run commands to delete tables in the production environment. If you want to delete a table that belongs to another user, you must go to Security Center to request the required permissions.
Transfer ownership: transfer the ownership of multiple tables to another user.
Change TTL: update the TTL period for multiple tables at once.
Manage tables by workflow
Import tables from the Workspace Tables pane into a specific workflow to organize and manage them alongside related business tasks. The following figure shows the steps to add tables from a MaxCompute compute engine to a workflow.
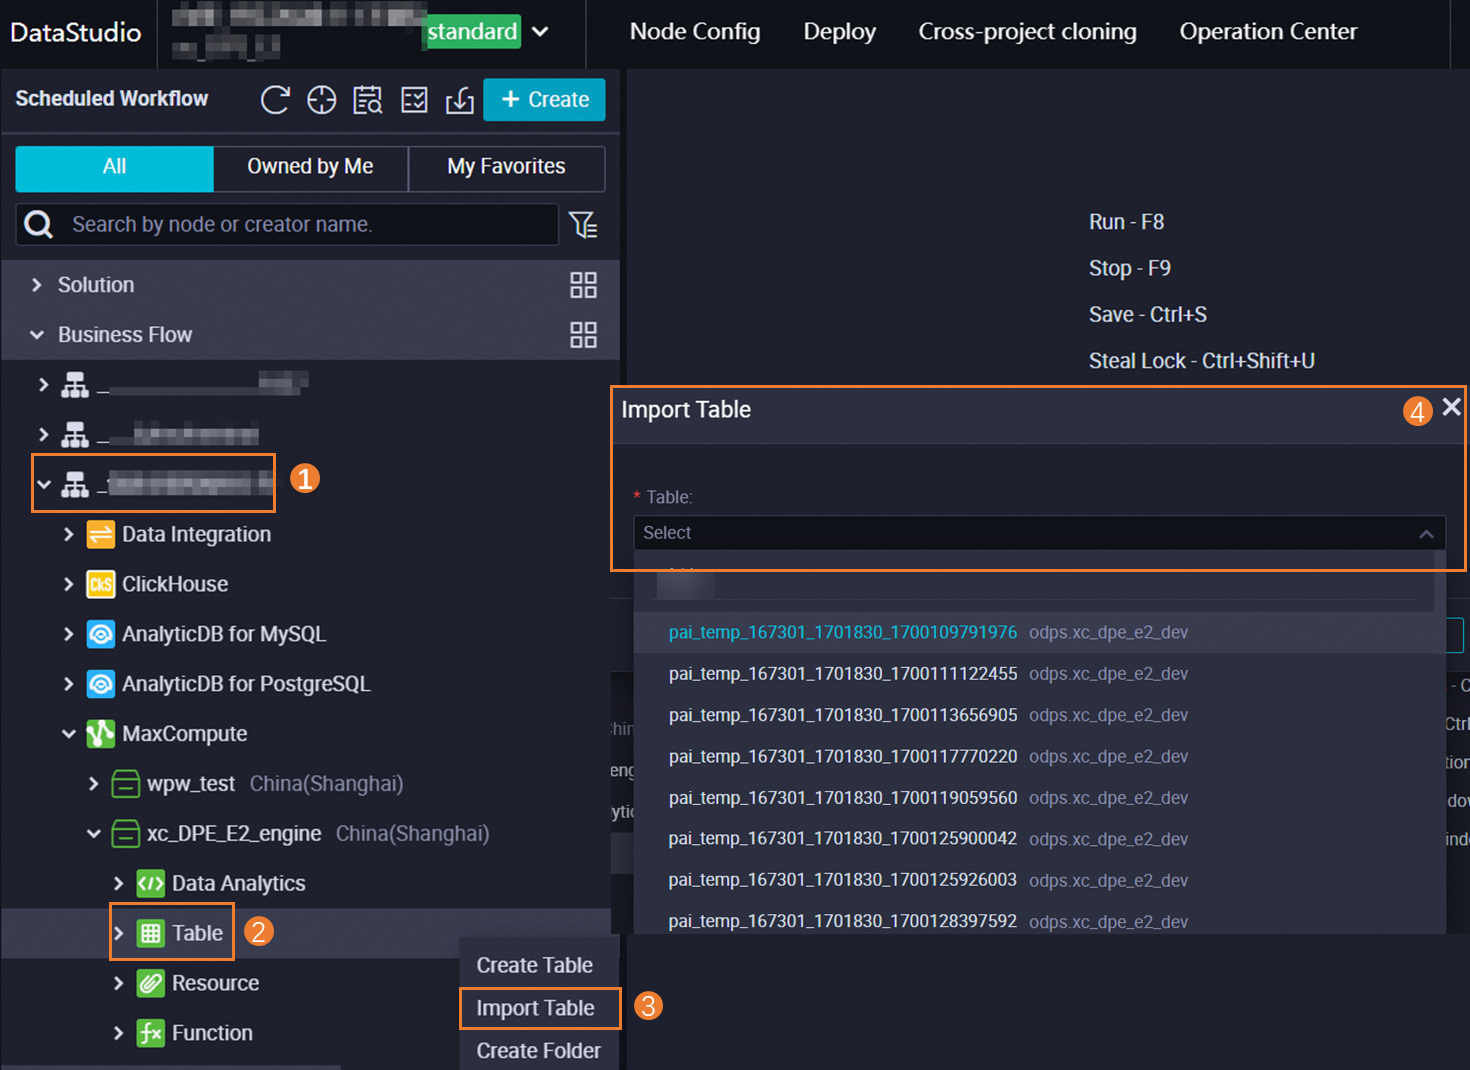
Table relationships within a workflow are tracked as:
Referenced: the table is read using a SELECT statement in the workflow.
Written: data is written to the table using an INSERT OVERWRITE statement in the workflow.