You can build a real-time data warehouse to implement efficient and scalable real-time data processing and analysis based on the powerful real-time data processing capabilities of Realtime Compute for Apache Flink and the capabilities of Hologres, such as binary logging, hybrid row-column storage, and strong resource isolation. This helps you better cope with the increasing data volume and real-time business requirements. This topic describes how to build a real-time data warehouse by using Realtime Compute for Apache Flink and Hologres.
Background information
As digitalization advances, enterprises have an increasingly high demand for data freshness. Users need to process, store, and analyze data in real time across many business scenarios, in addition to the traditional offline data processing scenarios. For traditional offline data warehousing, periodic scheduling is performed to process data at the following data layers: operational data store (ODS), data warehouse detail (DWD), data warehouse service (DWS), and application data service (ADS). However, the methodology system for real-time data warehousing is unclear. The concept of Streaming Warehouse is used to implement an efficient flow of real-time data between data layers. This can resolve issues that are related to data layering in a real-time data warehouse.
Overview
This example shows how to build a real-time data warehouse for an e-commerce platform by using Flink and Hologres. The real-time data warehouse is built to process and cleanse data in real time and query data from external applications. This way, real-time data is layered and reused to support multiple business scenarios, such as data reports and transactional data dashboards, clickstream analytics, user profiling and tagging, and personalized recommendation.
Architecture

The ODS layer: Flink ingests data in real time into the data warehouse.
MySQL has three business tables: orders, orders_pay, and product_catalog. Realtime Compute for Apache Flink ingests data from the tables to Hologres in real time, forming the ODS layer.
The DWD layer: Flink integrates data in related tables in real time.
Flink joins the orders, orders_pay, and product_catalog tables in real time, forming the dwd_orders table at the DWD layer.
The DWS layer: Flink performs real-time computations.
Flink consumes the binary log events of the dwd_orders table and generates the dws_users and dws_shops aggregate tables at the DWS layer.
Hologres responds to queries.
Hologres handles queries on tables at the DWS layer, supporting up to a million records per seconds (RPS).
Hologres conducts OLAP analysis or generates real-time reports based on the dwd_orders table, providing query responses within seconds.
Solution benefits and service capabilities
This solution provides the following benefits:
Efficient update and ad-hoc query: Traditional real-time warehouses struggle with querying, updating, and correcting data at the intermediate layer. Hologres addresses these issues by supporting efficient data updates and corrections and ensuring read-after-write consistency at every layer.
Data reusability: Hologres allows data at every layer to be independently used for external services, enabling efficient reuse of data within a data warehouse.
Streamlined architecture and enhanced efficiency: Flink SQL is used to construct a real-time ETL pipeline, with data at ODS, DWD, and DWS layers centrally stored in Hologres. This approach streamlines the data warehouse architecture and boosts data processing efficiency.
This solution relies on three core capabilities of Hologres:
Capability | Description |
Hologres features binary logging that drives Flink to perform real-time computations and serve as the upstream component in a streaming pipeline. | |
Hologres supports hybrid row-columnar storage. A Hologres table stores both row-oriented data and column-oriented data and ensures strong consistency between them. This feature ensures that tables at the intermediate layer can be used as source tables for Flink and as dimension tables of Flink for lookup joins and point queries based on primary keys. The tables at the intermediate layer can also be queried by other applications, such as online analytical processing (OLAP) apps and online services. | |
Strong resource isolation | If the load on a Hologres instance is high, the performance of the intermediate layer to respond to point queries may be affected. Hologres implements strong resource isolation by configuring read/write splitting for primary and secondary instances (shared storage) or using the architecture of virtual warehouses. This ensures that online services are not affected when Flink pulls binary log data from Hologres. |
Usage notes
You have an exclusive instance of Hologres.
The ApsaraDB RDS for MySQL instance and the Hologres instance must reside in the same virtual private cloud (VPC) as your Realtime Compute for Apache Flink workspace. If they do not reside in the same VPC, you must establish connections between the VPCs or enable Realtime Compute for Apache Flink to access other services over the Internet. For more information, see How do I access other services across VPCs? and How do I access the Internet?
The RAM user or RAM role used to access Flink, Hologres, and MySQL has the required permissions.
Step 1: Make preparations
Create an ApsaraDB RDS for MySQL instance and prepare data
Create an ApsaraDB RDS for MySQL instance.
Your ApsaraDB RDS for MySQL instance, Flink workspace, and Hologres instance must reside in the same VPC.
Create a database named order_dw and a standard account.
Prepare a MySQL CDC data source.
In the upper-right corner of the MySQL instance's details page, click Log On to Database.
In the dialog, enter your account and password and click Login.
Double-click the order_dw database in the left-side navigation pane.
On the SQL Console tab, write DDL statements to create three business tables and insert data into the tables.
CREATE TABLE `orders` (
  order_id bigint not null primary key,
  user_id varchar(50) not null,
  shop_id bigint not null,
  product_id bigint not null,
  buy_fee numeric(20,2) not null,
  create_time timestamp not null,
  update_time timestamp not null default now(),
  state int not null
);


CREATE TABLE `orders_pay` (
  pay_id bigint not null primary key,
  order_id bigint not null,
  pay_platform int not null,
  create_time timestamp not null
);


CREATE TABLE `product_catalog` (
  product_id bigint not null primary key,
  catalog_name varchar(50) not null
);

-- Prepare data.
INSERT INTO product_catalog VALUES(1, 'phone_aaa'),(2, 'phone_bbb'),(3, 'phone_ccc'),(4, 'phone_ddd'),(5, 'phone_eee');

INSERT INTO orders VALUES
(100001, 'user_001', 12345, 1, 5000.05, '2023-02-15 16:40:56', '2023-02-15 18:42:56', 1),
(100002, 'user_002', 12346, 2, 4000.04, '2023-02-15 15:40:56', '2023-02-15 18:42:56', 1),
(100003, 'user_003', 12347, 3, 3000.03, '2023-02-15 14:40:56', '2023-02-15 18:42:56', 1),
(100004, 'user_001', 12347, 4, 2000.02, '2023-02-15 13:40:56', '2023-02-15 18:42:56', 1),
(100005, 'user_002', 12348, 5, 1000.01, '2023-02-15 12:40:56', '2023-02-15 18:42:56', 1),
(100006, 'user_001', 12348, 1, 1000.01, '2023-02-15 11:40:56', '2023-02-15 18:42:56', 1),
(100007, 'user_003', 12347, 4, 2000.02, '2023-02-15 10:40:56', '2023-02-15 18:42:56', 1);

INSERT INTO orders_pay VALUES
(2001, 100001, 1, '2023-02-15 17:40:56'),
(2002, 100002, 1, '2023-02-15 17:40:56'),
(2003, 100003, 0, '2023-02-15 17:40:56'),
(2004, 100004, 0, '2023-02-15 17:40:56'),
(2005, 100005, 0, '2023-02-15 18:40:56'),
(2006, 100006, 0, '2023-02-15 18:40:56'),
(2007, 100007, 0, '2023-02-15 18:40:56');
Click Execute(F8). On the panel that appears, click Execute.
Create a Hologres instance and a virtual warehouse
Create a Hologres exclusive instance.
For Product Type, select Exclusive instance (subscription) or Exclusive instance (pay-as-you-go) as needed.
For Specifications, select Compute Group Type.
For Reserved Computing Resources of Virtual Warehouse, enter 64 to support adding an extra virtual warehouse.
For VPC, choose the VPC of your MySQL instance from the drop-down list.
Log on to your Hologres instance and create a database.
In the left-side navigation pane of the Hologres console, choose Instances.
Click the target Hologres instance name.
In the instance details page, click Connect to Instance.
In the top navigation bar of the HoloWeb console that appears, select Create Database.
For Database Name, enter order_dw.
For Policy, select SPM.
Click OK.
Assign the admin role to your Alibaba Cloud account, RAM user, or role. For more information, see Manage databases.
NoteIf you do not find your RAM user or role in the User drop-down list, add the RAM user as the superuser of the instance on the page.
Binary log expansion is enabled in Hologres V2.0 or later by default.
Create a virtual warehouse named read_warehouse_1 to handle queries.
The initial virtual warehouse init_warehouse is used for data writing.
As the reserved computing resources are automatically assigned to the initial virtual warehouse, you must reduce its computing resources before creating a virtual warehouse instance. Do the following:
In the top navigation bar of the HoloWeb console, click . Confirm the instance name is correct.
Find the initial virtual warehouse init_warehouse and click Modify Configuration in the Actions column.
In the dialog, reduce compute group resources, and click OK.
Click Create Compute Group. Enter read_warehouse_1 in the Compute Group Name field and click OK.
Create a Realtime Compute for Apache Flink workspace and catalogs
Launch your Flink workspace in the same VPC as your ApsaraDB RDS for MySQL and Hologres instances.
Log on to the Realtime Compute for Apache Flink console. Find the target workspace and click Console in the Actions column.
Create a session cluster, which provides an execution environment for creating catalogs and scripts.
Create a Hologres catalog via Flink SQL.
In the left-side navigation pane of Realtime Compute for Apache Flink's development console, choose .
Click New to create a new script, copy the following code to the editor, and replace the placeholder values with your actual ones.
Then, select the code that you want to run, and click Run.
In the lower right corner of the page, you can see the execution environment is the session cluster you created.
CREATE CATALOG dw WITH (
  'type' = 'hologres',
  'endpoint' = '<ENDPOINT>',
  'username' = 'BASIC$flinktest',
  'password' = '${secret_values.holosecrect}',
  'dbname' = 'order_dw@init_warehouse', --Connect to the init_warehouse virtual warehouse.
  'binlog' = 'true', -- Connector options that you specify when creating the Hologres catalog also apply to new tables created in this catalog.
  'sdkMode' = 'jdbc', -- Recommended mode.
  'cdcmode' = 'true',
  'connectionpoolname' = 'the_conn_pool',
  'ignoredelete' = 'true',  -- Enable this option to prevent data retraction when consolidating tables.
  'partial-insert.enabled' = 'true', -- Enable partial updates when table consolidation is involved.
  'mutateType' = 'insertOrUpdate', -- Enable partial updates when table consolidation is involved.
  'table_property.binlog.level' = 'replica', -- Pass in a persistent table property, binary logging enabled in this case, when creating a catalog. This property applies to all tables subsequently created in this catalog.
  'table_property.binlog.ttl' = '259200'
);
Replace the following placeholder values:
Option | Description | Remarks |
endpoint | The endpoint of your Hologres instance. | To obtain the endpoint value, follow these steps:
For more information, see Endpoint. |
username | Enter any of the following:
|
|
password |
|
When creating a catalog, you can define connector options, which automatically apply to tables created within that catalog later on. Additionally, you can specify default properties, such as those with the table_property prefix, for Hologres physical tables. For more information, see Manage Hologres catalogs and the "Connector options in the WITH clause" section of the Hologres topic.
Create a MySQL catalog.
Copy the following code in the SQL editor, replace the placeholder values, select the code that you want to run, and then click Run. In the lower right corner of the page, you can see the execution environment is the session cluster you created.
CREATE CATALOG mysqlcatalog WITH(
  'type' = 'mysql',
  'hostname' = '<hostname>',
  'port' = '<port>',
  'username' = '<username>',
  'password' = '${secret_values.mysql_pw}',
  'default-database' = 'order_dw'
);
Replace the following placeholder values with your actual values:
Option
Description
hostname
The IP address or hostname that is used to access your ApsaraDB RDS for MySQL database. To obtain the internal endpoint, follow these steps:
In the left-side navigation pane of the ApsaraDB RDS console, select Instances.
Click the name of the target instance.
In the Basic Information section of the page that appears, click View Details next to the Network Type field.
In the panel that appears, copy the internal endpoint value.
port
The port number of your ApsaraDB RDS for MySQL database. Default value: 3306.
username
The username that is used to access your ApsaraDB RDS for MySQL database.
password
The password that is used to access your ApsaraDB RDS for MySQL database.
For enhanced security, this example uses the mysql_pw variable in place of a plaintext AccessKey secret. For more information, see Variable management.
Step 2: Build a real-time data warehouse
Build the ODS layer: Ingest data into Hologres in real time with Flink
You can execute the CREATE DATABASE AS (CDAS) that is related to catalogs to easily create the ODS layer. The ODS layer is often not used for OLAP or point queries. Instead, it is used as an event driver for streaming jobs. Therefore, enabling binary logging for this layer is sufficient. Binary logging is one of the core capabilities of Hologres. The Hologres connector can be used to read all records and then consume incremental binary log data.
Create a synchronization job.
In the left-side navigation pane, choose . On the page that appears, create an SQL stream draft named ODS and copy the following code to the SQL editor:
CREATE DATABASE IF NOT EXISTS dw.order_dw -- As the table_property.binlog.level option is specified at the creation of the Hologres catalog, binary logging is enabled for all tables that are created by using the CDAS statement. AS DATABASE mysqlcatalog.order_dw INCLUDING all tables -- You can select the tables in the upstream database that need to be ingested into the data warehouse. /*+ OPTIONS('server-id'='8001-8004') */ ; -- Specify the value range of the server-id parameter for the MySQL CDC instance.NoteIn this example, data is synchronized to the public schema of the order_dw database by default. You can also synchronize data to a specified schema in the destination Hologres database. For more information, see the "Use the Hologres catalog that you created as the catalog of the destination store that is used in the CREATE TABLE AS statement" section of the Manage Hologres catalogs topic. After you specify a schema, the format of the table name changes when you use a catalog. For more information, see the "Use a Hologres catalog" section of the Manage Hologres catalogs topic.
Schema updates of the source table are not reflected in the destination tables until data in the source table is deleted, inserted, or updated.
In the upper-right corner of the SQL editor, click Deploy.
Start the job.
In the left-side navigation pane, choose .
On the Deployments page, find the deployment named
ODSand click Start in the Actions column.In the Start Job panel, select Initial Mode and click Start.
Load data to the virtual warehouse.
Create and load the
order_dw_tg_defaulttable group, which stores data in theorder_dwdatabase, to theread_warehouse_1virtual warehouse. In this way, theread_warehouse_1virtual warehouse handles external queries while theinit_warehousevirtual warehouse is used for data writing.In the top navigation bar of the HoloWeb page, select SQL Editor. After confirming you are using the correct instance and database, execute the following command. For more information, see Create a virtual warehouse instance. After successful execution, you can see the
order_dw_tg_defaulttable group has been loaded to the read_warehouse_1 virtual warehouse.-- Show table groups in the current database. SELECT tablegroup_name FROM hologres.hg_table_group_properties GROUP BY tablegroup_name; -- Load the table group to the virtual warehouse. CALL hg_table_group_load_to_warehouse ('order_dw.order_dw_tg_default', 'read_warehouse_1', 1); -- View whether the table group has been loaded. select * from hologres.hg_warehouse_table_groups;In the upper right corner, switch the virtual warehouse to read_warehouse_1 for query and analysis.

Run the following command in the SQL editor to view the results of synchronization.
--- Query data in the orders table.
SELECT * FROM orders;

--- Query data in the orders_pay table.
SELECT * FROM orders_pay;

--- Query data in the product_catalog table.
SELECT * FROM product_catalog;
Build the DWD layer: Consolidate tables
The capability of updating specific columns supported by the Hologres connector is used to build the DWD layer. You can use the INSERT statements to perform efficient partial updates. High-performance point queries based on column-oriented data storage and hybrid row-columnar data storage of Hologres help you query data of different dimension tables. Hologres uses a strong resource isolation architecture, which prevents interference among write, read, and analytics workloads.
Create a table named dwd_orders at the DWD layer in Hologres by using Flink's Hologres catalog.
In the left-side navigation pane of Realtime Compute for Apache Flink's development console, choose . In the SQL editor, copy the following code, select the code, and then click Run.
-- When data from different sources is written to a single sink table, null values may appear in any column of the table. Therefore, make sure that the fields in the wide table are nullable.
CREATE TABLE dw.order_dw.dwd_orders (
  order_id bigint not null,
  order_user_id string,
  order_shop_id bigint,
  order_product_id bigint,
  order_product_catalog_name string,
  order_fee numeric(20,2),
  order_create_time timestamp,
  order_update_time timestamp,
  order_state int,
  pay_id bigint,
  pay_platform int comment 'platform 0: phone, 1: pc',
  pay_create_time timestamp,
  PRIMARY KEY(order_id) NOT ENFORCED
);

-- You can modify the properties of a Hologres physical table through the Hologres catalog.
ALTER TABLE dw.order_dw.dwd_orders SET (
  'table_property.binlog.ttl' = '604800' -- Change the timeout period of binary log data to one week.
);
Consume binary log data of the orders and orders_pay tables at the ODS layer in real time.
In the left-side navigation pane, choose .
On the page that appears, create an SQL stream draft named DWD and copy the following code to the SQL editor.
BEGIN STATEMENT SET;

INSERT INTO dw.order_dw.dwd_orders
 (
   order_id,
   order_user_id,
   order_shop_id,
   order_product_id,
   order_fee,
   order_create_time,
   order_update_time,
   order_state,
   order_product_catalog_name
 ) SELECT o.*, dim.catalog_name
   FROM dw.order_dw.orders as o
   LEFT JOIN dw.order_dw.product_catalog FOR SYSTEM_TIME AS OF proctime() AS dim
   ON o.product_id = dim.product_id;

INSERT INTO dw.order_dw.dwd_orders
  (pay_id, order_id, pay_platform, pay_create_time)
   SELECT * FROM dw.order_dw.orders_pay;

END;
Click Deploy to create a deployment from the draft.
Go to , and click Start in the Actions column of the deployment.
The above SQL statements join the
orderstable with theproduct_catalogtable and write the final results todwd_orders. This way, data is consolidated and written to thedwd_orderstable in real time.View data of the dwd_orders table.
In the HoloWeb console, connect to the Hologres instance and log on to the destination database. Then, execute the following statement in the SQL editor:
SELECT * FROM dwd_orders;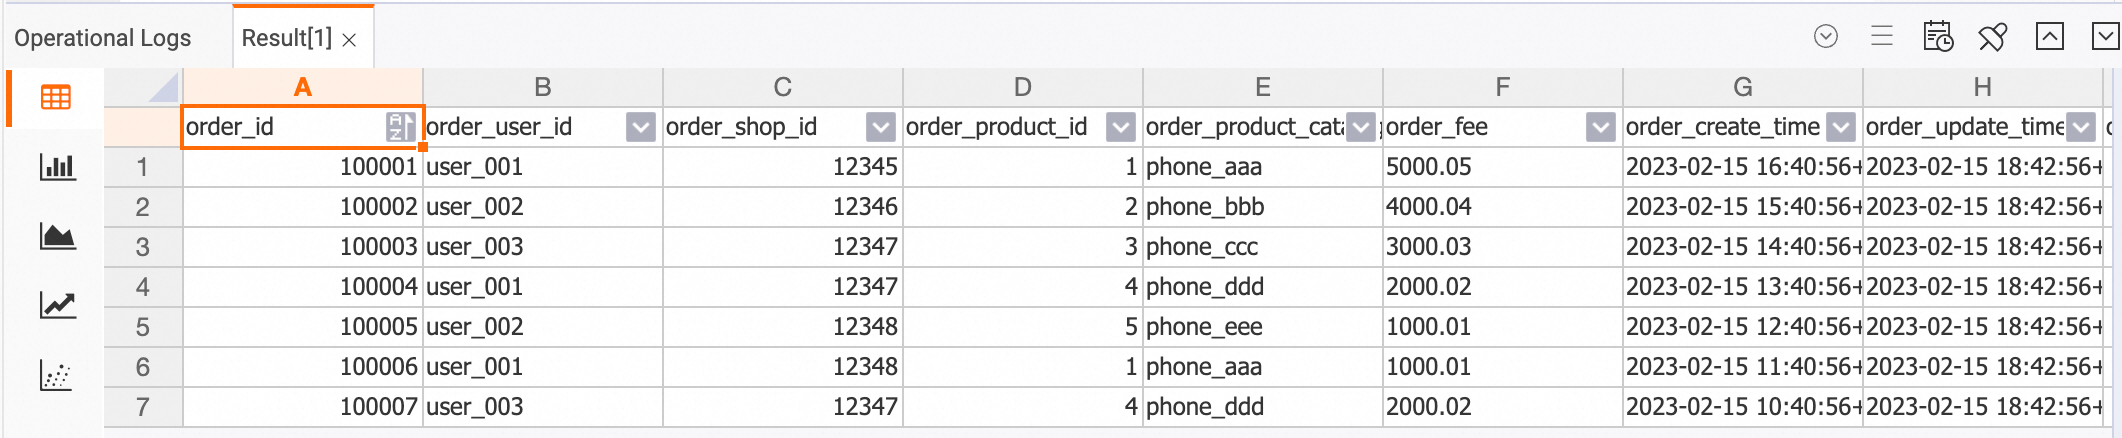
Build the DWS layer: Perform real-time computations
Create aggregate tables named dws_users and dws_shops in Hologres by using the Hologres catalog of Flink.
In the left-side navigation pane, choose .
In the SQL editor, copy the following code, select the code, and then click Run.
-- Create a user-dimension aggregate table.
CREATE TABLE dw.order_dw.dws_users (
  user_id string not null,
  ds string not null,
  paied_buy_fee_sum numeric(20,2) not null comment 'Total amount of payment that is complete on that day',
  primary key(user_id,ds) NOT ENFORCED
);

-- Create a vendor-dimension aggregate table.
CREATE TABLE dw.order_dw.dws_shops (
  shop_id bigint not null,
  ds string not null,
  paied_buy_fee_sum numeric(20,2) not null comment 'Total amount of payment that is complete on that day',
  primary key(shop_id,ds) NOT ENFORCED
);
Consume data in the table
dw.order_dw.dwd_ordersat the DWD layer in real time, perform aggregations with Flink, and then write the results to the tables at the DWS layer in Hologres.In the left-side navigation pane, choose .
On the page that appears, create an SQL stream draft named DWS and copy the following code to the SQL editor.
BEGIN STATEMENT SET;

INSERT INTO dw.order_dw.dws_users
  SELECT
    order_user_id,
    DATE_FORMAT (pay_create_time, 'yyyyMMdd') as ds,
    SUM (order_fee)
    FROM dw.order_dw.dwd_orders c
    WHERE pay_id IS NOT NULL AND order_fee IS NOT NULL -- Both order streaming data and payment streaming data have already been written to the wide table.
    GROUP BY order_user_id, DATE_FORMAT (pay_create_time, 'yyyyMMdd');

INSERT INTO dw.order_dw.dws_shops
  SELECT
    order_shop_id,
    DATE_FORMAT (pay_create_time, 'yyyyMMdd') as ds,
    SUM (order_fee)
   FROM dw.order_dw.dwd_orders c
   WHERE pay_id IS NOT NULL AND order_fee IS NOT NULL -- Both order streaming data and payment streaming data are written to the wide table.
   GROUP BY order_shop_id, DATE_FORMAT (pay_create_time, 'yyyyMMdd');
END;
Click Deploy to create a deployment from the draft.
Go to , and click Start in the Actions column of the deployment.
View the aggregation results at the DWS layer. The results are updated in real time based on the changes to input data.
View the results in the Hologres console.
dws_users table
SELECT * FROM dws_users;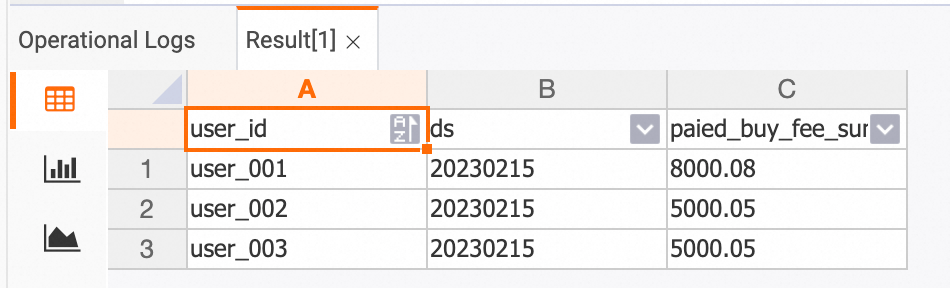
dws_shops table
SELECT * FROM dws_shops;
In the ApsaraDB RDS console, insert data records into the
ordersandorders_paytables in theorder_dwdatabase.INSERT INTO orders VALUES (100008, 'user_003', 12345, 5, 6000.02, '2023-02-15 09:40:56', '2023-02-15 18:42:56', 1); INSERT INTO orders_pay VALUES (2008, 100008, 1, '2023-02-15 19:40:56');In the Hologres console, view the updated data.
dwd_orders table
SELECT * FROM dwd_orders;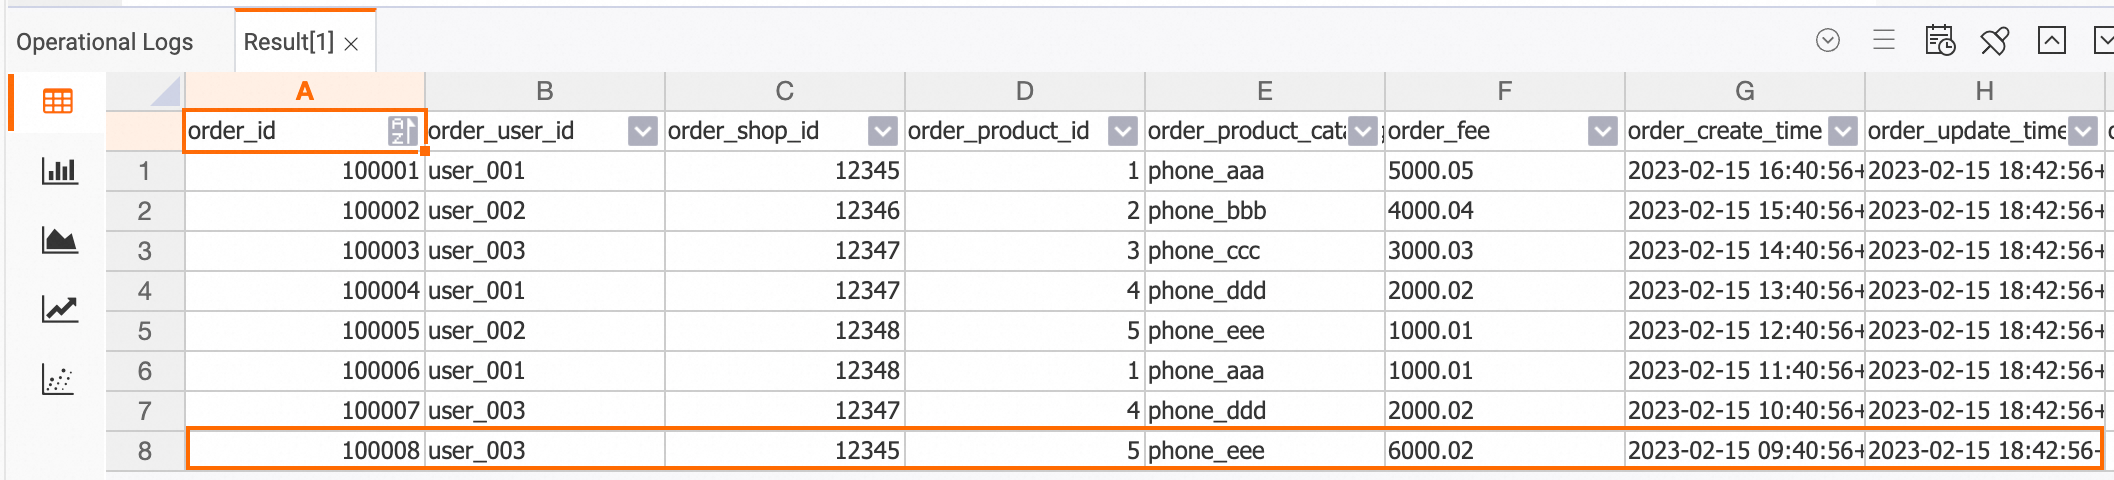
dws_users table
SELECT * FROM dws_users;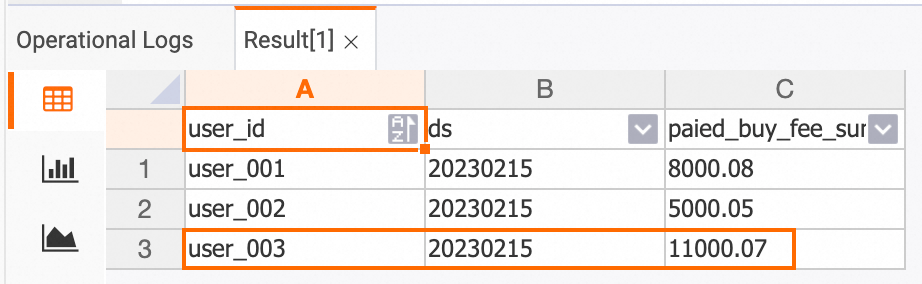
dws_shops table
SELECT * FROM dws_shops;
Perform data profiling
As binary logging is enabled, data profiling can be performed to help you directly view data changes. Additionally, data at every layer is persisted, so you can perform an ad-hoc query on intermediate results or check the correctness of the final calculation results.
Streaming mode
The Print connector can be used to check whether the messages sent to other sink tables meet the expectations.
Create and start a streaming job for data profiling.
Go to the development console of Realtime Compute for Apache Flink.
In the left-side navigation pane, choose .
Click New to create an SQL stream draft named
Data-explorationand copy the following code to the SQL editor.-- Perform data profiling in streaming mode. You can create a print table to view the data changes. CREATE TEMPORARY TABLE print_sink( order_id bigint not null, order_user_id string, order_shop_id bigint, order_product_id bigint, order_product_catalog_name string, order_fee numeric(20,2), order_create_time timestamp, order_update_time timestamp, order_state int, pay_id bigint, pay_platform int, pay_create_time timestamp, PRIMARY KEY(order_id) NOT ENFORCED ) WITH ( 'connector' = 'print' ); INSERT INTO print_sink SELECT * FROM dw.order_dw.dwd_orders /*+ OPTIONS('startTime'='2023-02-15 12:00:00') */ -- The startTime parameter specifies the time when binary log data is generated. WHERE order_user_id = 'user_001';Click Deploy to create a deployment from the draft.
Go to , and click Start in the Actions column of the deployment.
View the data profiling result.
In the left-side navigation pane of the development console, choose .
On the Deployments page, click the name of the target deployment.
Under the Logs tab, click the Logs left-side subtab.
Select the Running Task Managers tab and click a value in the Path, ID column.
On the Stdout tab, search for logs that are related to
user_001.
Batch mode
In batch mode, data is not written to any sink table. Instead, final data at the current moment is retrieved and available to view. Do the following:
In the left-side navigation pane, choose .
On the page that appears, click New to create an SQL stream draft.
Copy the following code to the SQL editor, and then click Debug. For more information, see Debug a deployment.
SELECT *
FROM dw.order_dw.dwd_orders /*+ OPTIONS('binlog'='false') */
WHERE order_user_id = 'user_001' and order_create_time > '2023-02-15 12:00:00'; -- Data profiling in batch mode supports filter pushdown to enhance the execution efficiency of batch jobs.
The following figure shows the results of data profiling:

Step 3: Use the real-time data warehouse
The previous section describes how to build a hierarchical streaming warehouse with Realtime Compute for Apache Flink and Hologres. This section introduces some common use cases of the streaming warehouse.
Key-based query
Query aggregate tables at the DWS layer based on a primary key. Up to a million RPS are supported.
The following sample code shows how to query the payment amount of a specific user on a specific date in the HoloWeb console.
-- holo sql
SELECT * FROM dws_users WHERE user_id ='user_001' AND ds = '20230215';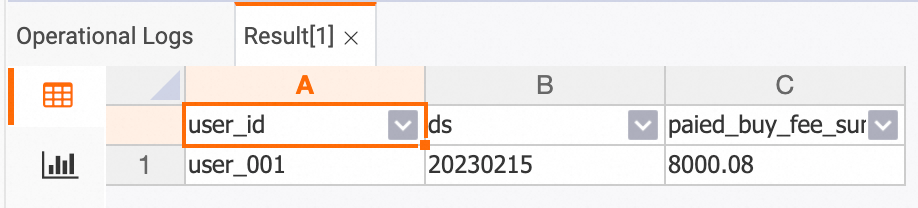
Order details query
Perform OLAP analysis on the consolidated table at the DWD layer.
The following sample code provides an example on how to query the order details of a customer on a specific payment platform in February 2023 in the HoloWeb console.
-- holo sql
SELECT * FROM dwd_orders
WHERE order_create_time >= '2023-02-01 00:00:00'  and order_create_time < '2023-03-01 00:00:00'
AND order_user_id = 'user_001'
AND pay_platform = 0
ORDER BY order_create_time LIMIT 100;
Real-time reports
Display real-time reports based on the data of the consolidated table at the DWD layer. Hybrid row-column data storage and column-oriented data storage of Hologres provide high OLAP analytics capabilities. Data queries can be responded within seconds.
The following sample code provides an example on how to query the total order volume and total order amount of each category in February 2023 in the HoloWeb console.
-- holo sql
SELECT
  TO_CHAR(order_create_time, 'YYYYMMDD') AS order_create_date,
  order_product_catalog_name,
  COUNT(*),
  SUM(order_fee)
FROM
  dwd_orders
WHERE
  order_create_time >= '2023-02-01 00:00:00'  and order_create_time < '2023-03-01 00:00:00'
GROUP BY
  order_create_date, order_product_catalog_name
ORDER BY
  order_create_date, order_product_catalog_name;
References
Hands-on:
For more information about binary logging of Hologres, see Subscribe to Hologres binlogs.
Multiple INSERT INTO statements can be written in one deployment of Realtime Compute for Apache Flink. For more information about the syntax of INSERT INTO statements, see INSERT INTO statement.
Realtime Compute for Apache Flink supports various connectors. For more information, see Supported connectors.