This topic describes how to manage workspaces, namespaces, and deployments of Realtime Compute for Apache Flink and how to use related features. For example, you can change the configurations of resources, view the ID of a workspace, view the engine version of a deployment, and configure parameters of a deployment.
Workspace and namespace management
How do I view the information about a workspace, such as the workspace ID?
What do I do if resource allocation fails during namespace scale-down?
How do I upload a file in the OSS console for Realtime Compute for Apache Flink deployments to use?
How do I fix "Unknown Error: Http failure response for xxxxx" during artifact upload?
Deployment management
Can I change the name of a workspace?
You cannot change the name of a workspace.
Can I change the VPC and vSwitch of an instance?
You cannot change the VPC of an instance, but you can change the vSwitch of an instance.
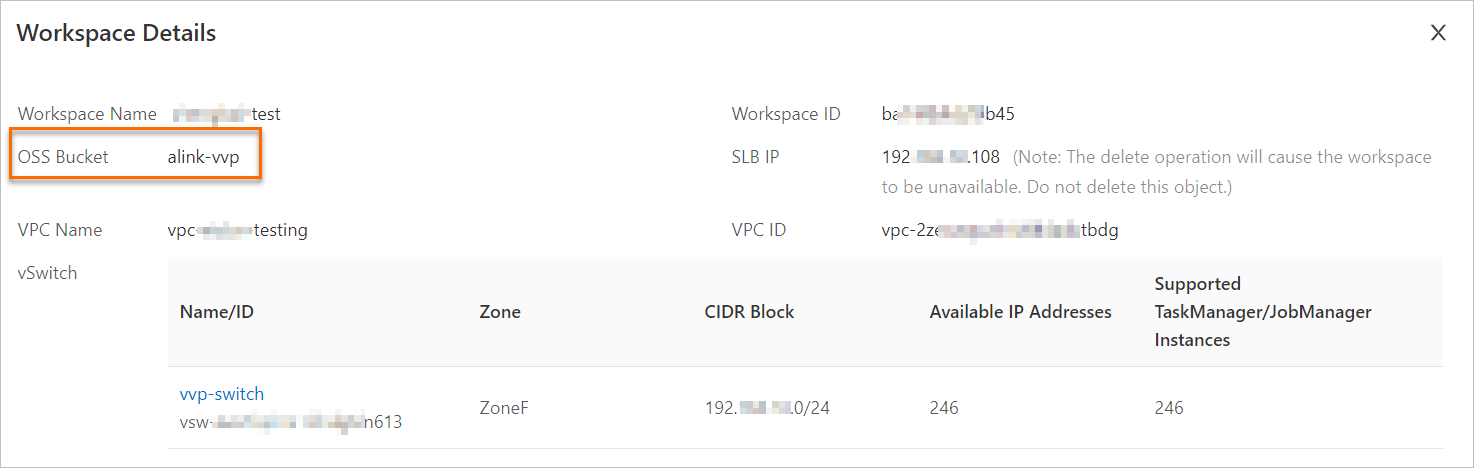
How do I view the information about a workspace, such as the workspace ID?
Log on to the management console of Realtime Compute for Apache Flink, find the workspace that you want to manage, and then choose in the Actions column to view the information about the workspace, such as the workspace ID.

What do I do if resource allocation fails during namespace scale-down?
Problem description
Resource allocation fails when you scale down a namespace.

Cause
All resources are allocated or used.
Solution
Reduce the amount of the resources that are allocated to the queues in the namespace and then scale down the namespace. For more information about how to modify resources, see Reconfigure the number of CUs that can be used in a queue.

What do I do if the configurations of Realtime Compute for Apache Flink computing resources do not take effect after the configurations are upgraded?
Subscription
Use a top-down approach for Realtime Compute for Apache Flink scale-up. Increase the resource quota of the workspace, allocate resources to namespaces in the workspace, and then assign resources to the queues in the namespaces. For more information, see Reconfigure resources.

Pay-as-you-go
The pay-as-you-go billing method allows you to use resources before you pay for the resources. The system calculates the fees based on the actual resource usage of your workspace. You do not need to reconfigure resources. Find the workspace that you want to manage and choose in the Actions column. On the Edit Workspace Quota Limit dialog box, configure resources for the queue in the namespace to better meet the requirements of batch deployment scenarios that require resource isolation and management. For more information, see Manage queues.
How do I view the AccessKey pair of an account?
AccessKey ID
To view the AccessKey ID of an Alibaba Cloud account, log on to the Alibaba Cloud Management Console by using your Alibaba Cloud account. Move the pointer over the profile picture in the upper-right corner of the page that appears and click AccessKey.
To view the AccessKey ID of a RAM user, follow the instruction provided in View the information about AccessKey pairs of a RAM user.
AccessKey Secret
The AccessKey secret is displayed only when you create an AccessKey pair for an Alibaba Cloud account or a RAM user. You cannot view the AccessKey secret in subsequent operations. This reduces the risks of AccessKey pair leaks. Record the AccessKey secret and keep it confidential when you create an AccessKey pair.
If you forget the AccessKey pair, you must create another pair. For more information, see Create an AccessKey pair.
How do I upload a file in the OSS console for Realtime Compute for Apache Flink deployments to use?
If you select OSS Bucket as the storage type when you activate a Realtime Compute for Apache Flink workspace, you can upload a file to the Object Storage Service (OSS) bucket that is associated with the workspace and use the object in Realtime Compute for Apache Flink deployments. You can also upload files on the Artifacts page of the development console of Realtime Compute for Apache Flink. For more information, see Manage artifacts.
Log on to the management console of Realtime Compute for Apache Flink, find your workspace, and then choose in the Actions column to view the information about the OSS bucket associated with the workspace.
Upload a resource file to the OSS bucket by using one of the following methods:
Log on to the OSS console and upload the resource file to the /artifacts/namespaces directory of the OSS bucket.

Call an API operation to upload the resource file. For more information, see PutObject.
In the left-side navigation pane of the development console of Realtime Compute for Apache Flink, click Artifacts to view the resource file that you uploaded in the OSS console.

What do I do if an activated workspace is not displayed in the Realtime Compute for Apache Flink console?
Troubleshoot the issue from the following aspects. If the issue persists, submit a ticket.
Check whether the Realtime Compute for Apache Flink workspace is initialized. In most cases, the initialization requires 5 to 10 minutes.
Make sure that the region you select in the top navigation bar of the Realtime Compute for Apache Flink console is the region you selected when you activated the workspace.

If you log on to the console as a RAM user, make sure that the RAM user has the required permissions on the management console of Realtime Compute for Apache Flink. For more information about permission configurations, see Permission management.
What do I do if the error message "Has not enough ip address: abnormal event detected from kubernetes" appears?
Error message
Has not enough ip address:abnormal event detected from kubernetes (type:[Warning], reason:[CniError_CodeUnKnownErr], message:[CniAllocateError: allocateIP failed: ipamCreate failed: failed to create ENI: all vSwitches ([*****]) cannot be used: CreateNetworkInterface: RequestId: 67959AE5-EA20-5CB4-8560-5BD6752472FD, ErrorCode: InvalidVSwitchId.IpNotEnough, Message: The specified VSwitch "*****" has not enough IpAddress., elapsedTime: 245.03232ms])Cause
No IP address is available in the CIDR block of the vSwitch.
Solution
Create a vSwitch that has an available IP address. For more information, see Change a vSwitch.
How do I fix "Unknown Error: Http failure response for xxxxx" during artifact upload?
Description
Artifact upload failed with the error:
Unknown Error: Http failure response for https://<bucketName>.oss-ap-southeast-1.aliyuncs.com: 0 Unknown Error.Cause
After Alibaba Cloud's international site changed its domain name to alibabacloud.com, your OSS bucket needs cross-origin resource sharing (CORS) settings for Flink requests to succeed.
Solution
Set up a CORS rule in the OSS console for your Flink workspace's OSS bucket. Follow the instructions on Manage artifacts.
How do I view the engine version of a job?
You can use one of the following methods to view the engine version of Realtime Compute for Apache Flink that is used by a deployment:
Go to the ETL or Data Ingestion page of the deployment. Click the Configurations tab in the right-side navigation pane of the page that appears. In the Configurations panel, view the engine version of Realtime Compute for Apache Flink that is used by the deployment in the Engine Version field.

On the page, find the deployment that you want to manage and click its name. On the Configuration tab, view the engine version of Realtime Compute for Apache Flink that is used by the deployment in the Engine Version field of the Basic section.

How do I change the engine version of Realtime Compute for Apache Flink that is used by a deployment?
SQL or YAML deployments
Go to the ETL or Data Ingestion page of a deployment. Click the Configurations tab in the right-side navigation pane of the page that appears. In the Configurations panel, select the destination engine version from the Engine Version drop-down list. If the engine version of a deployment is changed, you must redeploy the draft and start the deployment to make the version change take effect.
JAR or Python deployments
On the Deployments page, find the deployment that you want to manage and click its name. On the Configuration tab, click Edit in the upper-right corner of the Basic section. Select the destination engine version from the Engine Version drop-down list, click Save, and then click Start.
How do I configure custom parameters for deployment running?
Log on to the management console of the Realtime Compute for Apache Flink.
Find the workspace that you want to manage and click Console in the Actions column.
In the left-side navigation pane, click Deployments. On the Deployments page, find the deployment that you want to manage and click its name.
On the Configuration tab, click Edit in the upper-right corner of the Parameters section.
In the Parameters section, add parameter configurations to the Other Configuration field.
Make sure that a space exists after the colon (:) between each key-value pair. Sample code:
task.cancellation.timeout: 180sClick Save.
How do I make common configurations of Realtime Compute for Apache Flink persistent to improve configuration efficiency?
Realtime Compute for Apache Flink provides the draft template feature. This feature allows you to save common parameter configurations as defaults. This way, you do not need to manually configure the parameters when you create a draft.

How do I prevent the leaks of sensitive information such as AccessKey pairs or passwords?
Use variables to prevent security risks caused by information such as AccessKey pairs and passwords in plaintext. By using variables, you do not need to repeatedly write the same code or values. This simplifies configuration management. You can reference a variable in various scenarios, such as the development of SQL drafts and JAR or Python deployments, log output configuration, and UI-based parameter configuration. For more information, see Manage variables.
How do I utilize the computing resources for Realtime Compute for Apache Flink deployments?
Use the following methods:
Manual adjustment: On the Diagnosis tab of a deployment, click Diagnose to view the resource analysis results and manually adjust the resources as prompted.

Automatic adjustment: Enable the automatic tuning feature. This feature allows the system to automatically adjust resources. For more information about application scenarios and configurations, see Configure automatic tuning.