You can create an ApsaraDB RDS instance in the ApsaraDB RDS console or by calling an API operation. This topic shows you how to create an ApsaraDB RDS for MySQL instance in the console.
Prerequisites
If you use a RAM user to create an ApsaraDB RDS instance, the RAM user must have the AliyunRDSFullAccess and AliyunBSSOrderAccess permissions. For more information about how to grant permissions, see Grant permissions to a RAM user.
Procedure
-
Select a billing method:
Billing method
Recommendation
Benefit
subscription
For long-term use, select subscription (pay upfront) and select a Duration in the lower-left corner of the page.
Subscription is more cost-effective than pay-as-you-go. Longer subscription durations provide higher discounts.
pay-as-you-go
For short-term use, select pay-as-you-go (billed by the hour).
You can create a pay-as-you-go instance first and then convert it to a subscription instance after you confirm that it meets your requirements.
You can release the instance at any time to stop billing.
serverless
For use cases that involve scheduled tasks, fluctuating workloads, fully managed services, or a zero-maintenance approach, select serverless.
ImportantFor more information about serverless instances and how to create one, see ApsaraDB RDS for MySQL serverless instances.
This model departs from fixed-resource payments, allowing resources to dynamically scale with your workload. You are billed only for what you use, which can lead to significant cost savings.
NoteYou can view the price in the lower-right corner of the page. The final price is determined after you specify all configuration settings.
-
Select the region in which to create the ApsaraDB RDS instance.
We recommend that you create the ApsaraDB RDS instance in the same region as your ECS instance. Otherwise, connections must traverse the public internet, which degrades performance and increases latency.
Note-
You cannot change the region of an ApsaraDB RDS instance after it is created. To allow your ECS instance to connect to the ApsaraDB RDS instance over an internal network, make sure they are in the same region.
-
To view the region of your ECS instance, see Preparations.
-
If you plan to connect to the ApsaraDB RDS instance from a device other than an ECS instance, such as an on-premises server or a personal computer, choose a region that is geographically close to the device. You can then connect to the ApsaraDB RDS instance by using its public endpoint.
-
-
Configure the Engine, Edition, Product Type, and storage type.
-
Select the database Engine.
This topic uses MySQL as an example. Select MySQL. We recommend that you select a recent version, such as 8.0, or the same version as your on-premises MySQL database. The default version is 8.0.
NoteFor information about the lifecycle of major MySQL versions, see Lifecycle policy for major versions of ApsaraDB RDS for MySQL.
-
Select an Edition.
Edition
Description
Features
Basic Edition
A single node.
Cost-effective. Suitable for learning and testing purposes.
Recovery from failures and restarts takes a long time.
High-availability Edition
Includes one primary node and one secondary node. You can also add read-only nodes.
Highly available for production workloads. Suitable for more than 80% of use cases.
Cluster Edition (Recommended)
Includes one primary node and multiple secondary nodes.
Provides a multi-node, high-availability deployment. You can use secondary nodes for read operations.
Note-
The available Editions depend on the region and database engine that you select.
-
Cluster Edition instances support only MySQL 8.0 and 5.7.
-
-
Select a Product Type.
You can select Standard or Yitian. Yitian is available only in specific regions. For more information, see Product types.
Note-
Yitian is supported only for MySQL 8.0 and 5.7.
-
Basic Edition instances do not offer different product types. You do not need to configure this parameter.
-
-
Select a storage type.
Metric
Local SSD (Recommended)
General-purpose cloud disk
ESSD
Elastic scaling
★★★★
-
Up to 16,000 GB.
-
Storage expansion may cause a brief connection drop unless sufficient local resources are available.
-
Scaling out may take several hours.
-
Automatic scaling is not supported.
★★★★★
-
Up to 64,000 GB.
-
No connection drops during storage expansion.
-
Online upgrade and scaling in seconds.
-
Automatic scaling is supported.
★★★★★
-
Up to 64,000 GB.
-
No connection drops during storage expansion.
-
Online upgrade and scaling in seconds.
-
Automatic scaling is supported.
Performance
★★★★★★
Local data storage and access provide high I/O performance and microsecond-level latency.
★★★★★
Provides I/O bursting, Buffer Pool Extension (BPE), and data archiving, while being compatible with all features of ESSDs.
For more information, see What are general-purpose cloud disks?.
★★★★
-
PL1 < PL2 < PL3
-
PL2 provides up to 2 times the IOPS and throughput of PL1.
-
PL3 provides up to 20 times the IOPS and 11 times the throughput of PL1.
Backup
★★★★
-
Backups take a long time.
-
Maximum backup frequency: once per day.
★★★★★
-
Minute-level or second-level backups.
-
Maximum backup frequency: every 15 minutes.
★★★★★
-
Minute-level or second-level backups.
-
Maximum backup frequency: every 15 minutes.
Note-
Basic Edition instances of MySQL 8.0 and 5.7 support only cloud disks. High-availability Edition instances of MySQL 5.6 and 5.5 support only local SSDs.
-
For more information about the feature differences between cloud disks and local SSDs, see Features of ApsaraDB RDS for MySQL.
-
-
(Optional) For instances that use cloud disks, enable cloud disk encryption.
-
-
Configure the network. The network type is fixed to VPC.
-
Select a VPC.
NoteWe recommend that you select the same VPC as your ECS instance. If the ApsaraDB RDS instance and the ECS instance are in different VPCs, they cannot communicate over the internal network.
-
Select whether to add the VPC CIDR block to the IP whitelist.
NoteIf you select No, you can manually configure the IP whitelist after the instance is created. For more information, see Configure an IP address whitelist.
-
-
Select the zone, vSwitch, and deployment architecture for the instance.
-
Select a zone
A zone is an independent physical area within a region. For example, the China (Hangzhou) region has Zone H, Zone I, and Zone J.
-
Different zones in the same region do not have significant differences.
-
Connecting from an ECS instance in the same zone provides slightly better performance than connecting from a different zone within the same region.
-
-
Select a vSwitch
A vSwitch is a subnet within a VPC that connects different cloud resources. When you create a cloud resource in a VPC, you must connect it to a vSwitch.
Select an existing vSwitch or click Create VSwitch to create one. For information about parameter configurations, see Create and manage a vSwitch.
-
Select a deployment architecture
-
multi-zone deployment (Recommended): The primary and secondary nodes are located in different zones within the same region, which provides cross-zone disaster recovery.
If you select multi-zone deployment, you must configure the Primary AZ and Network and the Secondary AZ and Network.
-
single-zone deployment: The primary and secondary nodes are located in the same zone.
If you select the Basic Edition for the instance, you can select only single-zone deployment.
Note-
For instances that have primary and secondary nodes, we recommend that you select multi-zone deployment to enable cross-zone disaster recovery.
-
If you select the Cluster Edition, you must also select the number of secondary nodes and the zones for the primary and secondary nodes.
-
-
-
Select an instance type.
-
Select a Category: General-purpose or Dedicated.
Category
Description
Features
General-purpose
Dedicated resources: memory and I/O
Shared resources: CPU and storage
High cost-effectiveness
Dedicated
Dedicated resources: CPU, memory, storage, and I/O
NoteDedicated host instance types are the top-tier offering in the dedicated category. They provide exclusive access to the CPU, memory, storage, and I/O of an entire physical server.
Improved and more stable performance
NoteThe Basic Edition does not support dedicated instance types.
-
Select a specific instance type (vCPUs and memory). For a list of available instance types, see ApsaraDB RDS for MySQL instance types.
-
Test environment: 1 vCPU or more.
-
Production environment: 4 vCPUs or more is recommended.
NoteFor Cluster Edition instances, the reference price displayed in the console is for a single node. If you purchase a Cluster Edition instance with one primary and two secondary nodes (three nodes in total), the total price is three times the reference price.
-
-
-
Select a database proxy.
The general-purpose proxy is free of charge and can be enabled on the purchase page or after the instance is created. The proxy feature supports advanced functions such as read/write splitting, connection persistence, transaction splitting, connection pooling, and SSL encryption. The system enables the database proxy with the recommended specifications. For more information, see Recommended specifications for a database proxy.
Note-
When you create a High-availability Edition instance, the database proxy is disabled by default. You can manually enable the general-purpose database proxy.
-
When you create a Cluster Edition instance, the general-purpose database proxy is enabled by default. You can manually disable it.
-
If you need to change the proxy specifications or type, you can do so after the instance is created.
-
-
Select the storage capacity.
The available storage capacity depends on the instance type and storage type that you select. The storage capacity can be increased or decreased in 5 GB increments.
NoteIf you selected the High-availability Edition and cloud disk storage, you can select Enable Automatic Storage Expansion. You can set the trigger conditions and upper limit for automatic expansion. When triggered, the system automatically expands the storage by 5 GB or 15% of the current storage capacity, whichever is larger. This prevents the instance from being locked due to insufficient storage space.
-
(Optional) If you are creating a subscription instance with local SSD storage, you must configure the Backup Retention Policy After Release. We recommend that you select Retain the Last Backup or Retain All Backups to prevent data loss if you forget to renew the instance. For more information, see Configure a backup retention policy for a released ApsaraDB RDS for MySQL instance.
-
(Optional) If the billing method is subscription, set the Duration.
Different subscription durations offer different discounts. You can hover over View Details next to Configuration Fee to view a cost breakdown.
-
(Optional) Configure other parameters. You can keep the default values if you do not have specific requirements.
Parameter
Description
Database port
The port that you want to use for the ApsaraDB RDS for MySQL instance. Valid values: 1000 to 65534.
Default storage engine
The default value is InnoDB (Open Source Default), which provides comprehensive features.
NoteThis parameter is available only when you select MySQL 8.0 and the High-availability Edition or Basic Edition.
Parameter template
Select a high-performance, asynchronous, default, or custom parameter template. The parameters in the template are displayed on the right. For more information, see Use a parameter template.
NoteThis parameter is available only when you select the High-availability Edition or Basic Edition.
Time zone
The time zone for the instance.
NoteThis parameter is available only when you select the High-availability Edition or Basic Edition.
Table name case sensitivity
The default value is Case-insensitive. If your on-premises database is case-sensitive for table names, you can select Case-sensitive to facilitate data migration.
NoteThis parameter is available only when you select the High-availability Edition or Basic Edition.
Release protection
Select this option to enable release protection for pay-as-you-go instances, which prevents them from being accidentally released. For more information, see Enable or disable release protection for an ApsaraDB RDS instance.
Minor engine version update policy
The update policy for the minor engine version.
-
Auto Update (Recommended): The instance is automatically updated to the latest minor version during the maintenance window. You can change the update time on the Scheduled Events page.
-
Manual Update: You can manually update the minor version on the Basic Information page of the instance.
NoteIf you do not want to use the latest minor version, select Select Minor Version to specify a version.
Resource group
Select a default or custom resource group to facilitate instance management.
Instance Name
Enter a descriptive name for the instance.
Tag
If you have a large number of instances, you can add tags to categorize and manage them. For more information, see Filter instances by tag.
-
-
In the upper-right corner of the page, select the number of instances to create.
The default is 1. You can create up to 20 instances at a time. Select a quantity based on your needs.
-
Confirm your order details, quantity, and duration (for subscription instances only), and then click Confirm Order and complete the payment.
Note-
For subscription instances, we recommend that you select Enable Auto-renewal to avoid service interruptions due to a missed renewal payment.
-
If you purchase a monthly subscription, the auto-renewal cycle is one month. If you purchase a yearly subscription, the auto-renewal cycle is one year. The specific cycle depends on the order. You can cancel auto-renewal at any time. For more information, see Enable auto-renewal.
-
-
View the instance.
On the Instances page, select the region where you created the instance, and find the new instance by its Creation Time.
NoteInstance creation takes about 1 to 10 minutes. Refresh the page to view the latest status.
What to do next
FAQ
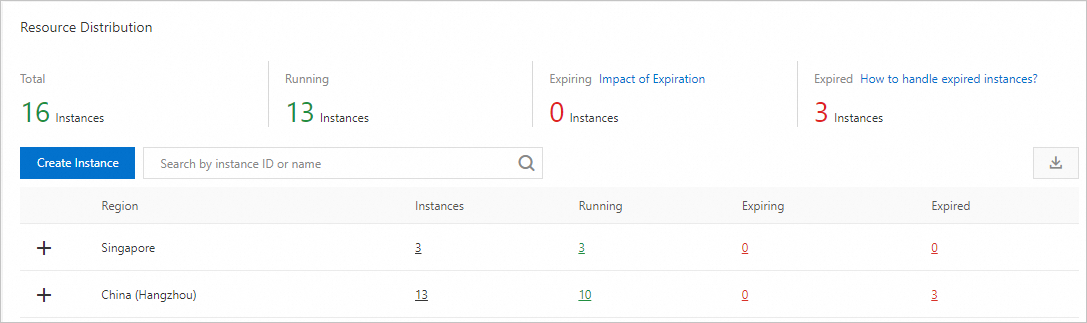
Log on to the ApsaraDB RDS overview page to view the total number of ApsaraDB RDS instances for all database engines in your account. On this page, you can also see the regions where your instances are deployed and the number of running instances in each region.
References
-
Create an ApsaraDB RDS instance by calling an API operation: CreateDBInstance
-
To create other types of instances, see the following topics:
Appendix: Quick creation with ROS
Resource Orchestration Service (ROS) is an Alibaba Cloud service that simplifies cloud resource management and automated deployment through an Infrastructure as Code (IaC) approach. You can write templates to define your required Alibaba Cloud resources, such as ECS instances and ApsaraDB RDS database instances, and their dependencies. The ROS engine then automatically creates and configures all resources based on the template, which enables automated deployment and operations.
As an alternative to the standard creation process, you can use the ROS template provided in this topic to create and configure an ApsaraDB RDS for MySQL instance, a database, and an account in a single operation. ROS manages these resources as a unified stack.
-
Open the quick configuration template to go to the Create Stack page in the ROS console.
Important-
Cloud resources and their dependencies created from an ROS template are managed within a ROS stack. You can view and manage these resources in their respective service consoles or manage them collectively as a stack.
-
Resources created from an ROS template are real, billable services. Alibaba Cloud bills you for all resources that you create and use. If you no longer need the resources in a stack, release the stack in a timely manner to avoid unnecessary charges.
-
-
In the top menu bar, select a region. To enable internal network communication with an ECS instance, we recommend that you select the same region as the ECS instance.
-
Enter a Stack Name. This topic uses
ros_test1as an example. You can also use the default stack name.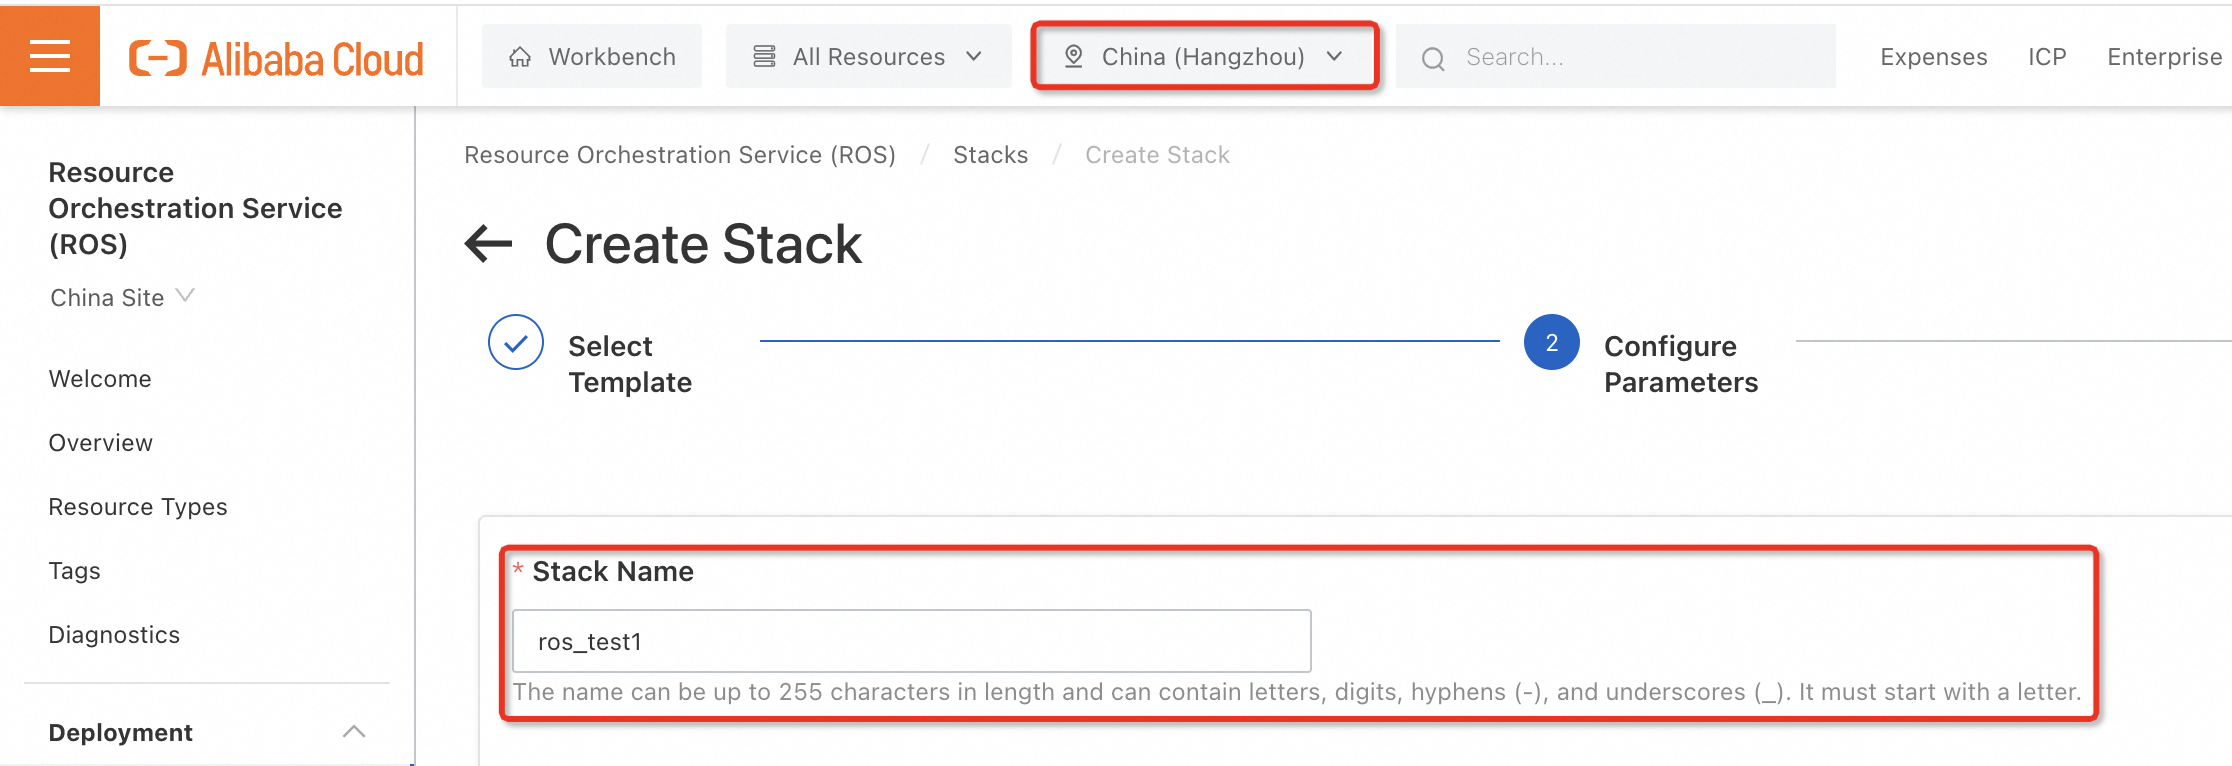
-
In the Basic Resource Configurations section, select a Zone for VSwitch. Different zones offer different instance types. If you do not have specific zone requirements, you can select a zone that offers a wider range of instance types for your region.
NoteThis ROS template automatically creates a VPC and vSwitch for the RDS instance. You only need to select a zone for the vSwitch; the network setup is automated.
-
In the RDS Configurations section, configure the instance.
NoteThis ROS template configures the ApsaraDB RDS for MySQL instance and database with the following default parameters. You must configure the other parameters manually:
-
Instance edition: High-availability Edition
-
Database engine: MySQL
-
Billing method: pay-as-you-go
-
Select an Instance Network Type. Intranet specifies a Virtual Private Cloud (VPC) and Internet specifies a classic network. If you want to communicate with ECS instances over an internal network, select VPC. This topic uses Intranet as an example.
-
Select a DB Engine Version. This topic uses 8.0 as an example.
-
Select an Instance storage type. local_ssd specifies a local SSD, cloud_ssd specifies an SSD cloud disk, cloud_essd specifies an ESSD PL1, cloud_essd2 specifies an ESSD PL2, and cloud_essd3 specifies an ESSD PL3. This topic uses cloud_essd as an example.
-
Select the Storage capacity. This topic uses
20GBas an example. You can adjust the storage capacity in 5 GB increments based on your needs. -
Select an Instance type. If you are just trying out the ApsaraDB RDS for MySQL product, you can select the lowest-spec instance type available in the zone to minimize costs. If you plan to use it for the long term, select an instance type that meets your requirements.
-
Enter a Database Name. This topic uses
demodbas an example. You can specify a different name that meets the requirements displayed on the page. -
Select an Account Type. Super specifies a privileged account, and Normal specifies a standard account. This topic uses Super as an example.
-
Enter an Account Name and Password. This topic uses
demouseras the account name. You must create a custom password that meets the requirements.
-
-
(Optional) In the Configure Stack section, configure additional parameters for the ROS stack. You can skip this step if you do not need to configure other parameters.
ImportantIf this is your first time using an ROS template or if you are unfamiliar with the resource creation process, we recommend that you select Yes for the Rollback on Failure option. If the stack creation fails, ROS attempts to delete any resources that were successfully created, which helps prevent unexpected charges.

-
Click Next to review the Parameters and Price. Before you create the stack, confirm that the stack name is correct, the selected parameters meet your needs, and the price is as expected. If you need to make changes, click Previous to return to the parameter settings page.
-
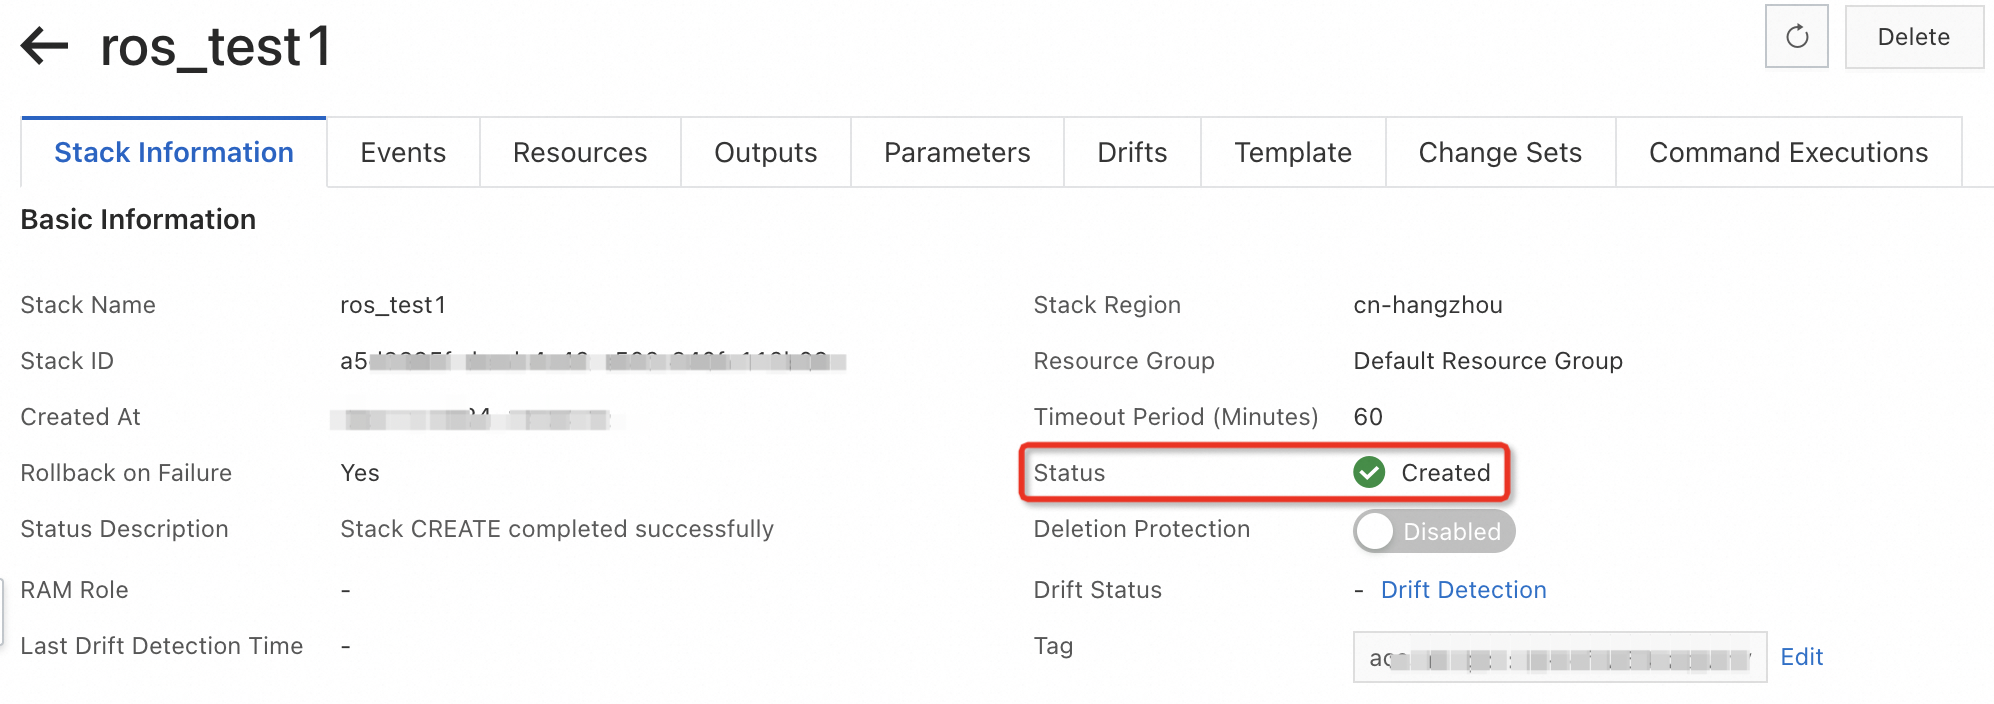
Click Create to create the stack. The creation process takes about 2 to 3 minutes. When the stack Status changes to CreateSucceeded, the stack is created and ready to use.
-
On the stack details page, click the Resources tab to view the cloud resources and dependencies in the stack. To view the details of a specific resource, click its Resource ID. ROS redirects you to the corresponding service console page.

-
(Optional) Delete the stack. If you have finished trying the ApsaraDB RDS for MySQL product and need to delete the ApsaraDB RDS instance and its associated VPC and vSwitch, you do not need to delete them individually in each service console. Go to the ROS console, click Stacks in the navigation pane on the left to go to the Stacks page, find the stack, and click Delete in the Actions column. ROS releases the entire stack and all resources and dependencies within it.
