This topic describes how to use Realtime Compute for Apache Flink to synchronize log data from Kafka to Hologres in real time.
Prerequisites
The Resource Access Management (RAM) user or RAM role that you use to access the development console of Realtime Compute for Apache Flink has the required permissions. For more information, see Permission management.
A Flink workspace is created. For more information, see Activate Realtime Compute for Apache Flink.
Upstream and downstream storage instances are created.
NoteYour ApsaraMQ for Kafka and Hologres instances must reside in the same VPC as your Flink workspace. If they are not in the same VPC, you need to create connections among them. For more information, see How does Realtime Compute for Apache Flink access a service across VPCs? or How does Realtime Compute for Apache Flink access the Internet?
Step 1: Configure IP address whitelists
To allow your Flink workspace to access your Kafka and Hologres instances, you must add the CIDR block of the vSwitch where your Flink workspace resides to the whitelists of the Kafka and Hologres instances.
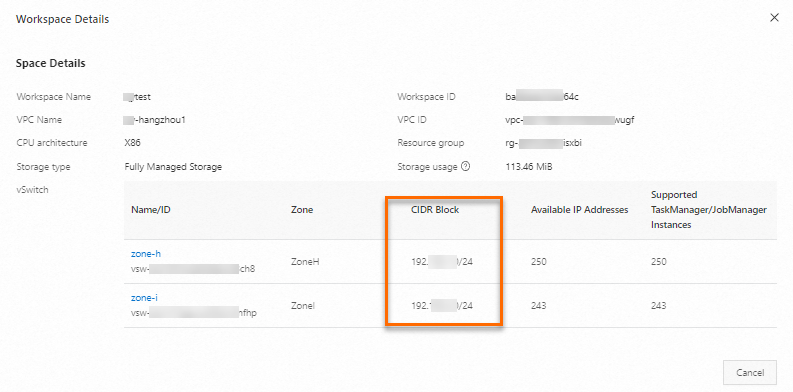
Obtain the vSwitch CIDR block where your Flink workspace resides.
Log on to the Realtime Compute for Apache Flink console.
Find the target workspace and choose in the Actions column.
In the Workspace Details dialog box, copy the CIDR block of the vSwitch.
Add the CIDR block to the IP whitelist of your Kafka instance.
Set up the whitelist for the endpoint with VPC network.
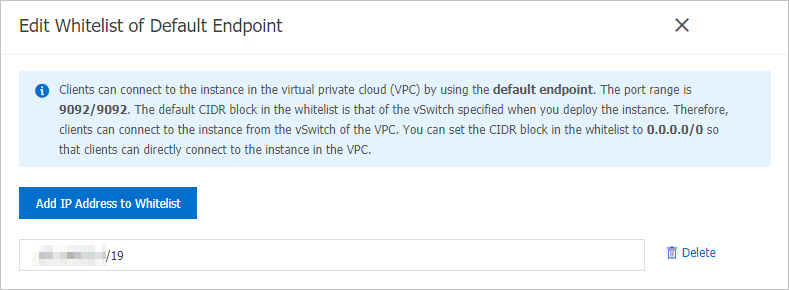
Add the CIDR block to the IP whitelist of your Hologres instance.
Step 2: Prepare test data for the ApsaraMQ for Kafka instance
Use the Faker connector of Realtime Compute for Apache Flink as a data generator and write the data to the ApsaraMQ for Kafka instance. You can perform the following steps to write data to your Kafka instance in the development console of Realtime Compute for Apache Flink.
Create a topic named users in the ApsaraMQ for Kafka console.
Develop a job that writes data to your Kafka topic.
Log on to the management console of Realtime Compute for Apache Flink.
Find the target workspace and click Console in the Actions column.
In the left-side navigation pane, choose . On the page that appears, click New.
In the New Draft dialog box, select a template, such as Blank Stream Draft. Click Next. Then, configure the draft as shown in the table below:
Configuration item
Example
Description
Name
kafka-data-input
The name of the SQL draft.
NoteThe draft name must be unique in the current namespace.
Location
Development
The folder in which the code file of the draft is stored. By default, the code file of a draft is stored in the Development folder.
You can also click the
 icon to the right of an existing folder to create a subfolder.
 Engine Version
vvr-8.0.11-flink-1.17
Select the engine version for the draft from the drop-down list.
Click Create.
Write code.
Copy and paste the following code snippet into the SQL editor, and make necessary modifications.
CREATE TEMPORARY TABLE source (
  id INT,
  first_name STRING,
  last_name STRING,
  `address` ROW<`country` STRING, `state` STRING, `city` STRING>,
  event_time TIMESTAMP
) WITH (
  'connector' = 'faker',
  'number-of-rows' = '100',
  'rows-per-second' = '10',
  'fields.id.expression' = '#{number.numberBetween ''0'',''1000''}',
  'fields.first_name.expression' = '#{name.firstName}',
  'fields.last_name.expression' = '#{name.lastName}',
  'fields.address.country.expression' = '#{Address.country}',
  'fields.address.state.expression' = '#{Address.state}',
  'fields.address.city.expression' = '#{Address.city}',
  'fields.event_time.expression' = '#{date.past ''15'',''SECONDS''}'
);

CREATE TEMPORARY TABLE sink (
  id INT,
  first_name STRING,
  last_name STRING,
  `address` ROW<`country` STRING, `state` STRING, `city` STRING>,
  `timestamp` TIMESTAMP METADATA
) WITH (
  'connector' = 'kafka',
  'properties.bootstrap.servers' = 'alikafka-host1.aliyuncs.com:9092,alikafka-host2.aliyuncs.com:9092,alikafka-host3.aliyuncs.com:9092',
  'topic' = 'users',
  'format' = 'json'
);

INSERT INTO sink SELECT * FROM source;
Replace the placeholder values in the commands above with your actual values:
Configuration item
Example
Description
properties.bootstrap.servers
alikafka-host1.aliyuncs.com:9092,alikafka-host2.aliyuncs.com:9092,alikafka-host3.aliyuncs.com:9092
The IP addresses or endpoints of Kafka brokers.
Format: host:port,host:port,host:port. Separate multiple host:port pairs with commas (,).
NoteTo obtain the endpoint of your ApsaraMQ for Kafka instance, follow these steps:
In the ApsaraMQ for Kafka console, click the target instance name.
In the Endpoint Information section of the Instance Details page that appears, find the endpoint with VPC network.
Copy the value in the Domain Name column.
topic
users
The name of the Kafka topic.
Start the job.
In the upper right corner of the SQL editor, click Deploy.
In the Deploy draft dialog box, click Confirm.
Go to , find the target deployment, and click Start in the Actions column.
For information about the parameters that you must configure when you start your deployment, see Start a deployment
On the Deployments page, view the state of the deployment.

The Faker connector provides bounded streams. Therefore, the deployment becomes FINISHED about one minute after the deployment remains RUNNING. When the deployment is finished, it indicates data has been written to the destination Kafka topic. The following is a sample JSON-formatted message written to ApsaraMQ for Kafka.
{
  "id": 765,
  "first_name": "Barry",
  "last_name": "Pollich",
  "address": {
    "country": "United Arab Emirates",
    "state": "Nevada",
    "city": "Powlowskifurt"
  }
}
Step 3: Create a Hologres catalog
If you want to perform single-table synchronization, you must create a destination table in a destination catalog. You can create a destination catalog in the development console of Realtime Compute for Apache Flink. In this topic, a Hologres catalog is used as the destination catalog. This section briefly describes essential configuration items when you create a Hologres catalog. For detailed information, see Create a Hologres catalog.
Configuration item | Description |
catalog name | Enter a custom name; in this example, holo is used. |
endpoint | The endpoint of your Hologres instance. |
username | The AccessKey ID of the Alibaba Cloud account. |
password | The AccessKey secret of the Alibaba Cloud account. |
dbname | Enter the name of an existing database in Hologres. This example uses flink_test_db. Important Make sure the flink_test_db database specified for this field has already been created in your Hologres instance. Otherwise, an error will error. For more information, see Create a database in the Hologres documentation. |
Step 4: Develop and start a data synchronization job
Log on to the development console of Realtime Compute for Apache Flink and develop a job that synchronizes data.
Log on to the management console of Realtime Compute for Apache Flink.
Find the target workspace and click Console in the Actions column.
In the left-side navigation pane, choose . On the page that appears, click New.
In the New Draft dialog box, select a template, such as Blank Stream Draft. Click Next. Then, configure the draft as shown in the table below:
Configuration item
Example
Description
Name
flink-quickstart-test
The name of the SQL draft.
NoteThe draft name must be unique in the current namespace.
Location
Development
The folder in which the code file of the draft is stored. By default, the code file of a draft is stored in the Development folder.
You can also click the
icon to the right of an existing folder to create a subfolder. Engine Version
vvr-8.0.11-flink-1.17
Select the engine version for the draft from the drop-down list.
Click Create.
Write code. Copy and paste the following code snippet into the SQL editor, and make necessary modifications.
Use one of the following methods to synchronize data from the users Kafka topic to the sync_kafka_users table of the flink_test_db database in Hologres.
CTAS
Using the CREATE TABLE AS (CTAS) statement for data synchronization eliminates the need to manually create the sync_kafka_users table in Hologres and specify column types as JSON or JSONB:
CREATE TEMPORARY TABLE kafka_users ( `id` INT NOT NULL, `address` STRING, `offset` BIGINT NOT NULL METADATA, `partition` BIGINT NOT NULL METADATA, `timestamp` TIMESTAMP METADATA, `date` AS CAST(`timestamp` AS DATE), `country` AS JSON_VALUE(`address`, '$.country'), PRIMARY KEY (`partition`, `offset`) NOT ENFORCED ) WITH ( 'connector' = 'kafka', 'properties.bootstrap.servers' = 'alikafka-host1.aliyuncs.com:9092,alikafka-host2.aliyuncs.com:9092,alikafka-host3.aliyuncs.com:9092', 'topic' = 'users', 'format' = 'json', 'json.infer-schema.flatten-nested-columns.enable' = 'true', -- Automatically expand nested columns. 'scan.startup.mode' = 'earliest-offset' ); CREATE TABLE IF NOT EXISTS holo.flink_test_db.sync_kafka_users WITH ( 'connector' = 'hologres' ) AS TABLE kafka_users;NoteTo prevent duplicate data from being written to Hologres after a job fails over, you can add the related primary key to the table to uniquely identify data. If data is retransmitted, Hologres ensures that only one copy of data with the same partition and offset values is retained.
Replace the placeholder values in the commands above with your actual values:
Configuration item
Example
Description
properties.bootstrap.servers
alikafka-host1.aliyuncs.com:9092,alikafka-host2.aliyuncs.com:9092,alikafka-host3.aliyuncs.com:9092
The IP addresses or endpoints of Kafka brokers.
Format: host:port,host:port,host:port. Separate multiple host:port pairs with commas (,).
NoteTo obtain the endpoint of your ApsaraMQ for Kafka instance, follow these steps:
In the ApsaraMQ for Kafka console, click the target instance name.
In the Endpoint Information section of the Instance Details page that appears, find the endpoint with VPC network.
Copy the value in the Domain Name column.
topic
users
The name of the Kafka topic.
INSERT INTO
A special method is used to optimize JSON and JSONB data in Hologres. Therefore, you can use the INSERT INTO statement to synchronize nested JSON data to Hologres.
This method requires you to manually create a table named sync_kafka_users in Hologres before synchronizing data by using the following SQL commands:
CREATE TEMPORARY TABLE kafka_users (
  `id` INT NOT NULL,
  'address' STRING, -- The data in this column is nested JSON data.
  `offset` BIGINT NOT NULL METADATA,
  `partition` BIGINT NOT NULL METADATA,
  `timestamp` TIMESTAMP METADATA,
  `date` AS CAST(`timestamp` AS DATE),
  `country` AS JSON_VALUE(`address`, '$.country')
) WITH (
  'connector' = 'kafka',
  'properties.bootstrap.servers' = 'alikafka-host1.aliyuncs.com:9092,alikafka-host2.aliyuncs.com:9092,alikafka-host3.aliyuncs.com:9092',
  'topic' = 'users',
  'format' = 'json',
  'json.infer-schema.flatten-nested-columns.enable' = 'true', -- Automatically expand nested columns.
  'scan.startup.mode' = 'earliest-offset'
);

CREATE TEMPORARY TABLE holo (
  `id` INT NOT NULL,
  `address` STRING,
  `offset` BIGINT,
  `partition` BIGINT,
  `timestamp` TIMESTAMP,
  `date` DATE,
  `country` STRING
) WITH (
  'connector' = 'hologres',
  'endpoint' = 'hgpostcn-****-cn-beijing-vpc.hologres.aliyuncs.com:80',
  'username' = '************************',
  'password' = '******************************',
  'dbname' = 'flink_test_db',
  'tablename' = 'sync_kafka_users'
);

INSERT INTO holo
SELECT * FROM kafka_users;
Replace the placeholder values in the commands above with your actual values:
Configuration item
Example
Description
properties.bootstrap.servers
alikafka-host1.aliyuncs.com:9092,alikafka-host2.aliyuncs.com:9092,alikafka-host3.aliyuncs.com:9092
The IP addresses or endpoints of Kafka brokers.
Format: host:port,host:port,host:port. Separate multiple host:port pairs with commas (,).
NoteTo obtain the endpoint of your ApsaraMQ for Kafka instance, follow these steps:
In the ApsaraMQ for Kafka console, click the target instance name.
In the Endpoint Information section of the Instance Details page that appears, find the endpoint with VPC network.
Copy the value in the Domain Name column.
topic
users
The name of the Kafka topic.
endpoint
hgpostcn-****-cn-beijing-vpc.hologres.aliyuncs.com:80
The endpoint of the Hologres instance.
Format: <ip>:<port>.
NoteTo obtain the endpoint value, follow these steps:
Go to the Hologres Console.
Click the name of your Hologres instance.
In the Network Information section of the instance details page, locate the endpoint that corresponds to Select VPC and copy the endpoint value.
username
************************
The username and password that are used to access the Hologres database. Enter the AccessKey ID and secret of your Alibaba Cloud account.
ImportantTo improve the security of your credentials, avoid hardcoding AccessKey pairs in plaintext; use variables instead. For more information, see Manage variables.
password
******************************
dbname
flink_test_db
The name of the Hologres database that you want to access.
tablename
sync_kafka_users
The name of the Hologres table.
NoteIf you use the INSERT INTO statement to synchronize data, you must create the sync_kafka_users table and define required fields in the database of the destination Hologres instance in advance.
If a public schema is not used, you must specify tablename in the schema.tableName format.
Save the draft.
Click Deploy.
Go to , find the target deployment, and click Start in the Actions column.
For information about the parameters to configure at deployment startup, see Start a deployment.
You can view the state and other information about the deployment on the Deployments page after it is started.

Step 5: View the result of full data synchronization
Log on to the Hologres console.
On the Instances page, click the name of the target instance.
In the upper-right corner of the page, click Connect to Instance.
On the Metadata Management tab, view the schema and data of the sync_kafka_users table that receives data from the Kafka topic named users.
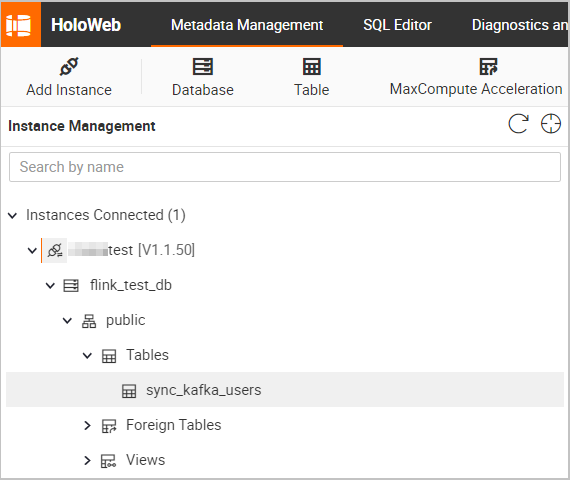
The following figures show the schema and data of the sync_kafka_users table after data synchronization.
Table schema
Double-click the name of the sync_kafka_users table to view the table schema.
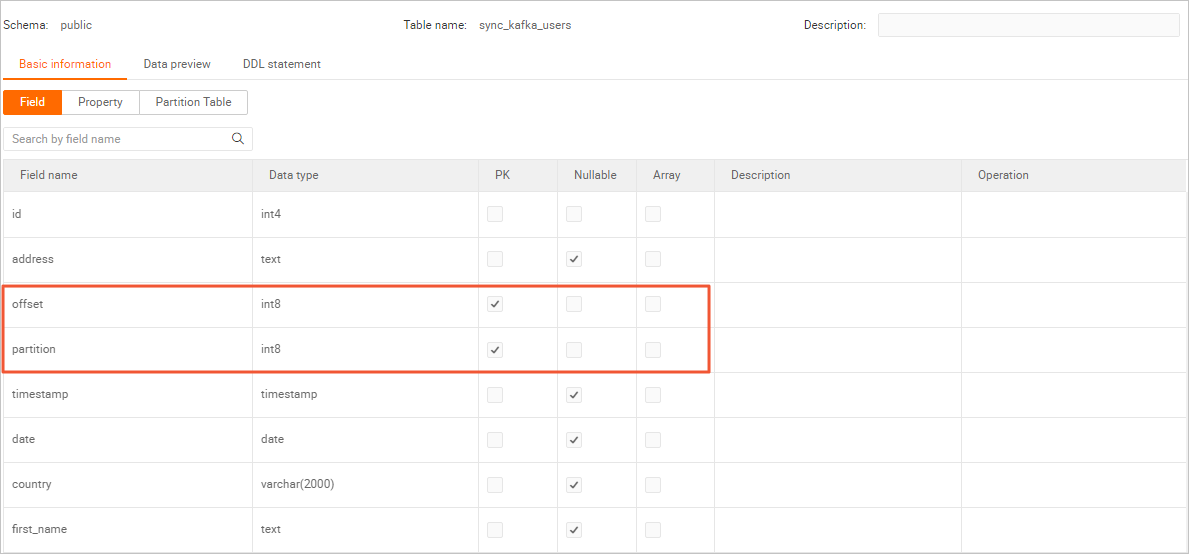 Note
NoteWhen developing the data synchronization job, we recommend that you declare the partition and offset fields of Kafka as the primary key for the Hologres table. This way, if data is retransmitted due to a deployment failover, only one copy of the data with the same partition and offset values is stored.
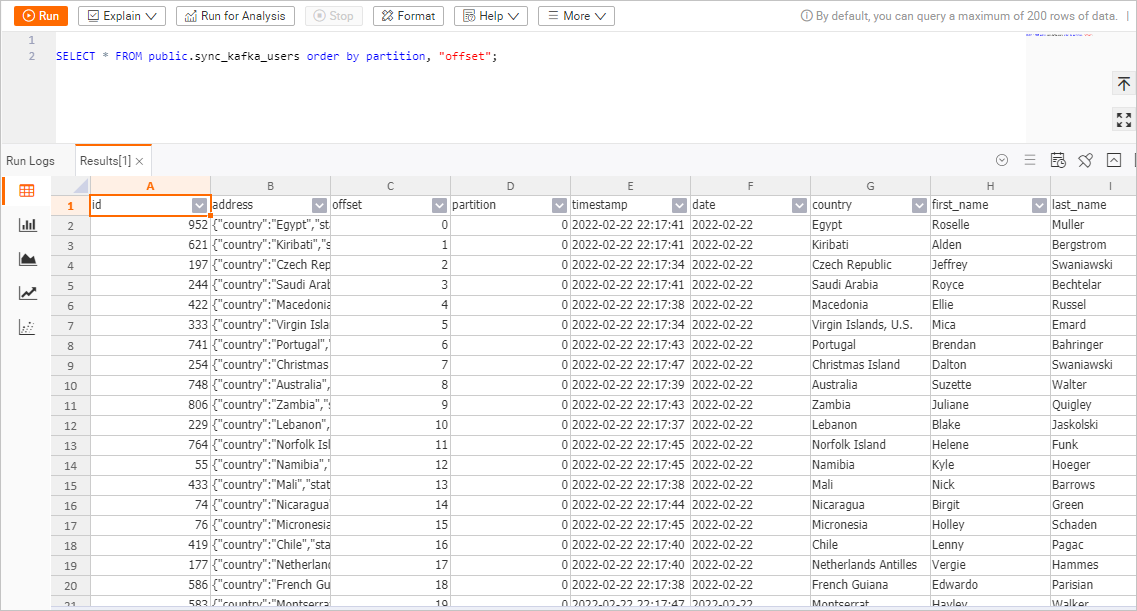
Table data
In the upper-right corner of the page for the sync_kafka_users table, click Query table. In the SQL editor, copy and paste the following statement and click Running.
SELECT * FROM public.sync_kafka_users order by partition, "offset";The following figure shows the data of the sync_kafka_users table.
Step 6: Check whether table schema changes are automatically synchronized
In the ApsaraMQ for Kafka console, send a message that contains a new column.
Log on to the ApsaraMQ for Kafka console.
On the Instances page, click the name of the target instance.
In the left-side navigation pane of the page that appears, click Topics. On the page that appears, find the topic named users.
Click Send Message in the Actions column.
In the Start to Send and Consume Message panel, configure the parameters as follows.
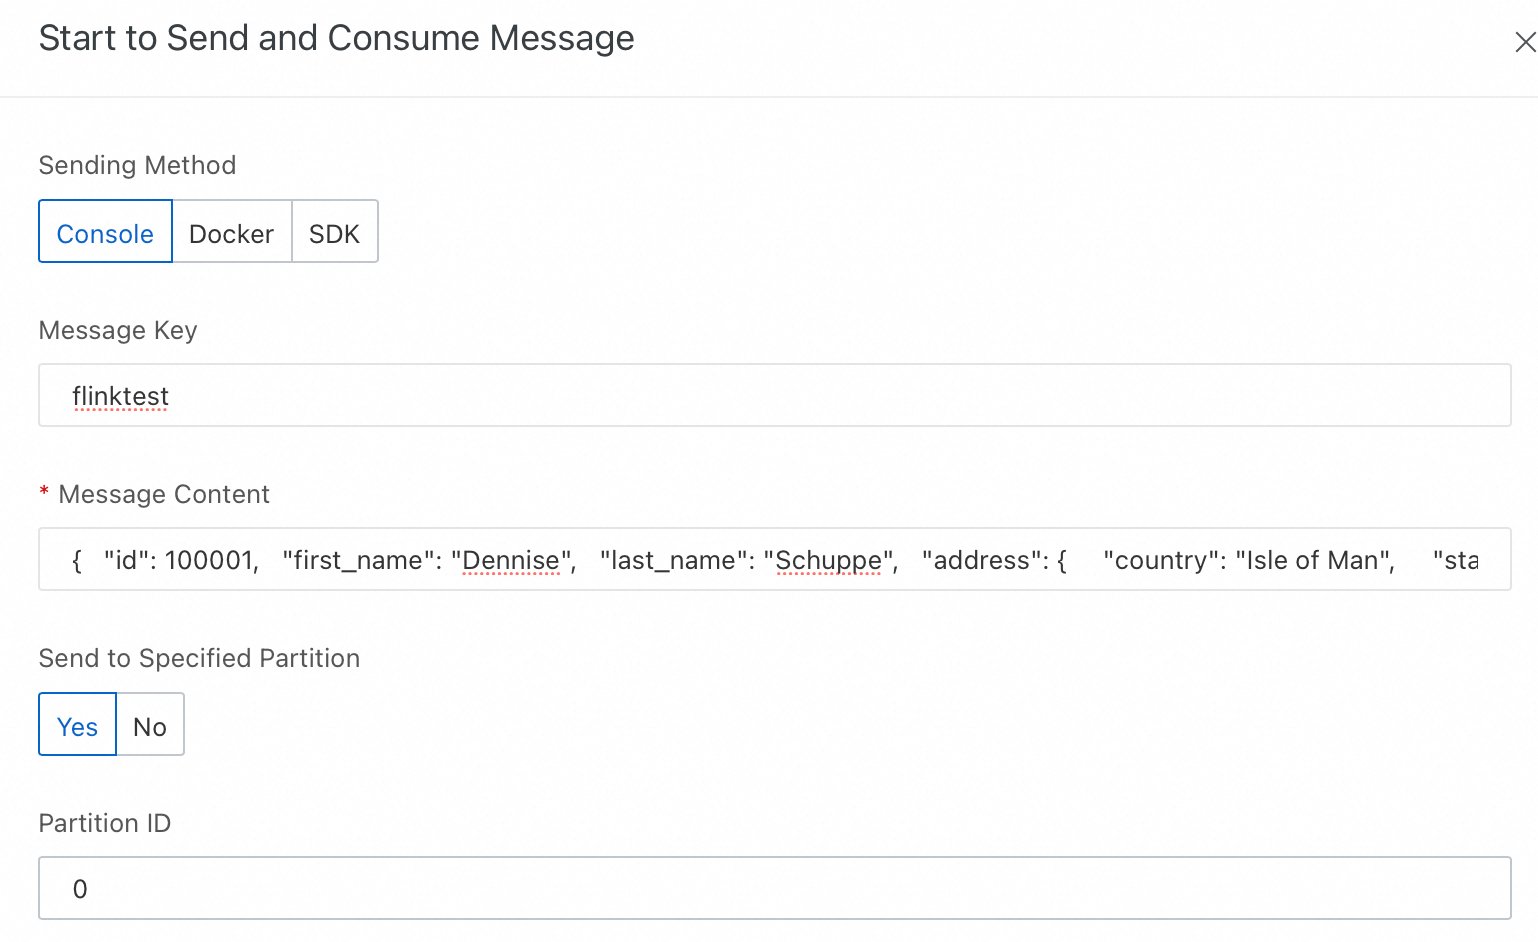
Configuration item
Example
Method of Sending
Select Console.
Message Key
Enter flinktest.
Message Content
Copy and paste the following JSON content to the Message Content field.
{ "id": 100001, "first_name": "Dennise", "last_name": "Schuppe", "address": { "country": "Isle of Man", "state": "Montana", "city": "East Coleburgh" }, "house-points": { "house": "Pukwudgie", "points": 76 } }NoteIn the JSON code above, house-points is a new nested column.
Send to Specified Partition
Select Yes.
Partition ID
Enter 0.
Click OK.
In the Hologres console, view the changes to the schema and data of the sync_kafka_users table.
Log on to the Hologres console.
On the Instances page, click the name of the target instance.
In the upper-right corner of the page, click Connect to Instance.
On the Metadata Management tab, double-click the name of the sync_kafka_users table.
In the upper-right corner of the page for the sync_kafka_users table, click Query table. In the SQL editor, enter the following statement and click Running.
SELECT * FROM public.sync_kafka_users order by partition, "offset";View the data of the table.
The following figure shows the data of the sync_kafka_users table.
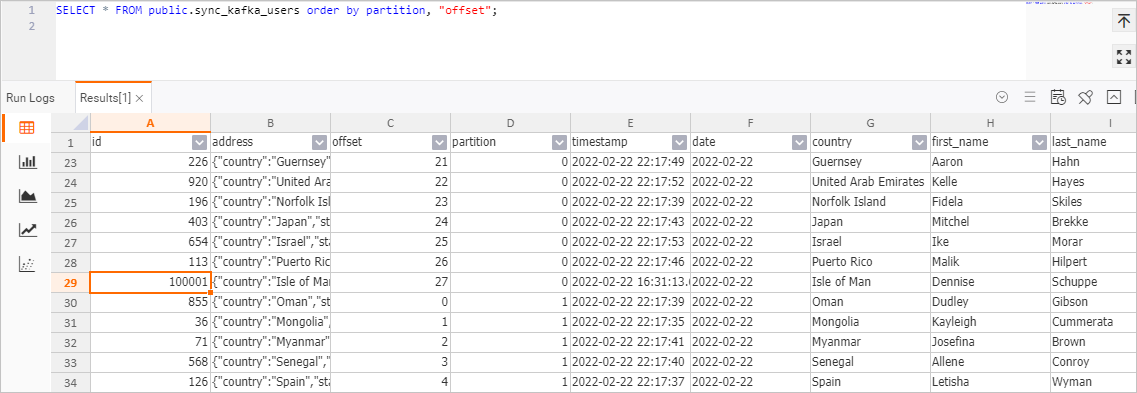
The figure shows that the data record with id 100001 is written to Hologres. In addition, the house-points.house and house-points.points columns are added to Hologres.
NoteOnly data in the nested column house-points is included in the data that is inserted into the table of ApsaraMQ for Kafka. However, json.infer-schema.flatten-nested-columns.enable is specified in the WITH clause for creating the Kafka users table. In this case, Realtime Compute for Apache Flink automatically expands the new nested column. After the column is expanded, the path to access the column is used as the name of the column.
References
For information about improving job performance by modifying node parallelism and resources, see Configure a deployment.