The PostgreSQL data source provides a bidirectional channel for reading data from and writing data to PostgreSQL. You can configure data synchronization tasks using the codeless UI or the code editor. This topic describes how DataWorks supports data synchronization for PostgreSQL.
Supported versions
You can configure data sources for PostgreSQL versions 10, 11, 12, 13, 14, 15, and 16.4. To check the version of your PostgreSQL database, run the following statement.
SHOW SERVER_VERSION;Limits
Offline read and write
You can read data from views.
The PostgreSQL data source supports password-based authentication, including the SCRAM-SHA-256 method. If you change the password or authentication method in the PostgreSQL database, you must update the data source configuration, test the connection again, and manually run related tasks to verify the changes.
If a table or field name in PostgreSQL starts with a digit, is case-sensitive, or includes a hyphen (-), you must enclose the name in double quotation marks (""). Otherwise, the PostgreSQL plugin cannot read or write data. In the PostgreSQL Reader and Writer plugins, double quotation marks ("") are a JSON keyword. Therefore, you must escape the double quotation marks with a backslash (\). For example, if a table is named
123Test, the escaped name is\"123Test\".NoteBoth the opening and closing double quotation marks must be escaped with a backslash (\).
The codeless UI does not support escaping. You must switch to the code editor to escape characters.
The following code shows an example of how to escape characters in the code editor.
"parameter": {
    "datasource": "abc",
    "column": [
        "id",
        "\"123Test\"", // Add escape characters.
],
"where": "",
"splitPk": "id",
"table": "public.wpw_test"
},
Updating data in a PostgreSQL data source based on a unique index is not supported. To update data, you must first write the data to a temporary table and then use the
RENAMEoperation.
Real-time read
The following limits apply to real-time sync tasks in Data Integration:
Data Integration provides special support for
ADD COLUMN:Constraint: You cannot combine an
ADD COLUMNoperation with otherADD COLUMN,DROP COLUMN, or other Data Definition Language (DDL) statements in a single transaction.ImportantIf you use
ADD COLUMNwith other operations, such asDROP COLUMN or RENAME COLUMN, which areALTER COLUMNbehaviors, the data synchronization task will fail.Limit: Data Integration cannot detect DDL operations other than
ADD COLUMN.
The ALTER TABLE and
CREATE TABLEoperations are not supported.Replication of TEMPORARY, UNLOGGED, and Hyper tables is not supported. PostgreSQL does not provide a mechanism to parse logs and subscribe to these types of tables.
Replication of Sequences (
serial/bigserial/identity) is not supported.The TRUNCATE operation is not supported.
Replication of large objects (Bytea) is not supported.
Replication of views, materialized views, and foreign tables is not supported.
Supported data types
Most PostgreSQL data types are supported. However, some types are not supported for offline read and write operations. You must verify that your data types are supported.
The following table lists the PostgreSQL data type mappings.
Category | PostgreSQL data type |
Integer types | BIGINT, BIGSERIAL, INTEGER, SMALLINT, and SERIAL |
Floating-point types | DOUBLE PRECISION, MONEY, NUMERIC, and REAL |
String types | VARCHAR, CHAR, TEXT, BIT, and INET |
Date and time types | DATE, TIME, and TIMESTAMP |
Boolean type | BOOL |
Binary type | BYTEA |
Data types not listed in the table are not supported.
For the PostgreSQL Reader, you must convert the MONEY, INET, and BIT data types using a syntax such as
a_inet::varchar.
Preparations
Before you can synchronize data in DataWorks, you must prepare the PostgreSQL environment as described in this section. This preparation ensures that the PostgreSQL data synchronization task can be configured and run as expected. The following sections describe the required preparations.
Preparation 1: Create an account and configure permissions
Create a database logon account for subsequent operations. This account must have the REPLICATION and LOGIN permissions.
Real-time synchronization supports only logical replication. Logical replication uses a publish and subscribe model. In this model, one or more subscribers subscribe to one or more publications on a publisher node. Subscribers pull data from the publications to which they subscribe.
Logical replication of a table typically starts by taking a snapshot of the data in the publisher database and copying it to the subscriber. After the snapshot is copied, changes on the publisher are sent to the subscriber in real time.
Create an account.
For more information, see Create a database and an account.
Configure permissions.
Check if the account has the
replicationpermission.select userepl from pg_user where usename='xxx'If the command returns `True`, the permission is granted. If it returns `False`, the permission is not granted. To grant the permission, run the following statement:
ALTER USER <user> REPLICATION;
Preparation 2: Check for secondary database support
SELECT pg_is_in_recovery()
Only primary databases are supported. The command must return `False`. If it returns `True`, the database is a secondary database. Real-time synchronization does not support secondary databases. You must change the data source configuration to use the primary database. For more information, see Configure a PostgreSQL data source.
Preparation 3: Check if wal_level is set to logical
show wal_level
The wal_level parameter specifies the level of the wal_log. The command must return `logical`. If it does not, the logical replication mechanism is not supported.
Preparation 4: Check if a wal_sender process can be started
-- Query max_wal_senders.
show max_wal_senders;

-- Query the number of pg_stat_replication processes.
select count(*) from pg_stat_replication
If max_wal_senders is not empty, and the max_wal_senders value is greater than the number of entries in pg_stat_replication, idle wal_sender processes are available. A PostgreSQL database starts a wal_sender process for a data synchronization program to send logs to subscribers.
For each table that you want to synchronize, you must run the ALTER TABLE [tableName] REPLICA IDENTITY FULL statement to grant the required permissions. Otherwise, the real-time sync task reports an error.
After a real-time PostgreSQL sync task starts, it automatically creates a slot and a publication in the database. The slot name is in the format di_slot_ + Solution ID, and the publication name is in the format di_pub_ + Solution ID. After the real-time sync task is stopped or unpublished, you must manually delete the slot and publication. Otherwise, the PostgreSQL Write-Ahead Logging (WAL) may continue to grow.
Add a data source
Before you develop a synchronization task in DataWorks, you must add the required data source to DataWorks by following the instructions in Data Source Management. You can view the infotips of parameters in the DataWorks console to understand the meanings of the parameters when you add a data source.
If SSL authentication is enabled for your PostgreSQL database, you must also enable SSL authentication when you add the PostgreSQL data source in DataWorks. For more information, see Appendix 2: Add SSL authentication to a PostgreSQL data source.
Develop a data synchronization task: PostgreSQL synchronization guide
For information about the entry point for and the procedure of configuring a synchronization task, see the following configuration guides.
Guide to configuring offline sync tasks for a single table
For more information, see Configure a batch synchronization task using the codeless UI and Configuration in the code editor.
For a complete list of parameters and a script example for the code editor, see Appendix 1: Script examples and parameter descriptions.
Guide to configuring full database offline read and real-time sync tasks
For more information, see Configure a real-time sync task for a full database.
FAQ
Data restoration in an active/standby synchronization setup.
This issue can occur when PostgreSQL is configured for active/standby disaster recovery. In this configuration, the secondary database continuously restores data from the primary database. A time lag exists in the data synchronization between the primary and secondary databases. In some cases, such as network latency, the data on the secondary database can differ significantly from the data on the primary database. As a result, the data synchronized from the secondary database is not a complete, up-to-date image of the primary database.
Consistency constraints.
PostgreSQL is a relational database management system (RDBMS) that provides strongly consistent data query interfaces. For example, if another process writes data to the database during a sync task, the PostgreSQL Reader does not retrieve the updated data because of the database's snapshot feature.
The preceding description applies to the data consistency of the PostgreSQL Reader in a single-threaded model. The PostgreSQL Reader can also use concurrent data extraction based on your configuration. In this case, it cannot strictly guarantee data consistency.
After the PostgreSQL Reader shards data based on the `splitPk` parameter, it starts multiple concurrent tasks to synchronize the data. These concurrent tasks do not belong to the same read transaction and have time intervals between them. Therefore, the synchronized data is not from a single, consistent snapshot.
A technical solution for a consistent snapshot across multiple threads is not currently available. You can address this issue only from an engineering perspective. The following solutions involve trade-offs, and you can choose one based on your requirements.
Use single-threaded synchronization without data sharding. This method is slower but ensures consistency.
Disable other data writers to ensure that the data is static. For example, you can lock tables or disable secondary database synchronization. This method may affect online services.
Database encoding issues.
PostgreSQL servers support only the EUC_CN and UTF-8 encodings for Simplified Chinese. The PostgreSQL Reader uses Java Database Connectivity (JDBC) for data extraction. JDBC is compatible with various encodings and performs encoding conversion at the underlying layer. Therefore, you do not need to specify an encoding for the PostgreSQL Reader because it automatically detects and transcodes the encoding.
If the underlying write encoding of PostgreSQL is inconsistent with its configured encoding, the PostgreSQL Reader cannot identify this issue or provide a solution. As a result, the exported data may contain garbled characters.
Methods for incremental data synchronization.
The PostgreSQL Reader uses a JDBC SELECT statement to extract data. This lets you use
SELECT…WHERE…for incremental data extraction as follows:If an online application populates a `modify` field with a timestamp for all changes, the PostgreSQL Reader can add a `WHERE` clause that uses the timestamp of the last synchronization to retrieve only new or updated data.
For new stream data, the PostgreSQL Reader can add a `WHERE` clause that uses the maximum auto-increment ID from the previous synchronization.
If your business logic does not include a field to distinguish between new and modified data, the PostgreSQL Reader cannot perform incremental data synchronization. In this case, it can only perform a full data synchronization.
SQL security.
The PostgreSQL Reader provides the querySql parameter, which lets you customize the `SELECT` statement for data extraction. The PostgreSQL Reader does not perform any security checks on the querySql statement.
Appendix 1: Script examples and parameter descriptions
Configure a batch synchronization task by using the code editor
If you want to configure a batch synchronization task by using the code editor, you must configure the related parameters in the script based on the unified script format requirements. For more information, see Configuration in the code editor. The following information describes the parameters that you must configure for data sources when you configure a batch synchronization task by using the code editor.
Reader script example
To configure a job that synchronizes and extracts data from a PostgreSQL database, see the instructions in Configuration in the code editor.
{
    "type":"job",
    "version":"2.0",// The version number.
    "steps":[
        {
            "stepType":"postgresql",// The plugin name.
            "parameter":{
                "datasource":"",// The data source.
                "column":[// The fields.
                    "col1",
                    "col2"
                ],
                "where":"",// The filter condition.
                "splitPk":"",// The field used for data sharding. Data synchronization starts concurrent tasks to synchronize data.
                "table":""// The table name.
            },
            "name":"Reader",
            "category":"reader"
        },
        {
            "stepType":"stream",
            "parameter":{},
            "name":"Writer",
            "category":"writer"
        }
    ],
    "setting":{
        "errorLimit":{
            "record":"0"// The number of error records.
        },
        "speed":{
            "throttle":true, // If throttle is set to false, the mbps parameter does not take effect and throttling is disabled. If throttle is set to true, throttling is enabled.
            "concurrent":1, // The number of concurrent jobs.
            "mbps":"12"// The throttling rate. 1 mbps is equal to 1 MB/s.
        }
    },
    "order":{
        "hops":[
            {
                "from":"Reader",
                "to":"Writer"
            }
        ]
    }
}
Reader script parameters
Parameter | Description | Required | Default value |
datasource | The name of the data source. The code editor supports adding data sources. The value of this parameter must be the same as the name of the added data source. | Yes | None |
table | The name of the table to synchronize. | Yes | None |
column | The set of columns to synchronize from the specified table. Use a JSON array to describe the field information. By default, all columns are used, for example, [ * ].
| Yes | None |
splitFactor | Specifies the number of shards for data synchronization. If you configure multiple concurrent threads, the data is sharded into a number of shards equal to Number of concurrent threads × splitFactor. For example, if the number of concurrent threads is 5 and `splitFactor` is 5, five concurrent threads are used to perform sharding, and the data is distributed into 25 (5 × 5) shards. Note The recommended value is from 1 to 100. A large value may cause an out-of-memory (OOM) error. | No | 5 |
splitPk | When PostgreSQL Reader extracts data, specifying the splitPk parameter indicates that you want to shard data based on the field represented by splitPk. Data synchronization then starts concurrent tasks to improve data synchronization efficiency:
| No | None |
where | The filter condition. The PostgreSQL Reader constructs an SQL statement based on the specified column, table, and where parameters, and then extracts data based on that SQL statement. For example, during testing, you can use a where clause to specify a business scenario. Typically, you might synchronize data for the current day by setting the where clause to
| No | None |
querySql (Advanced mode, not available in the codeless UI) | In some business scenarios, the where parameter is not sufficient to describe the filter conditions. You can use this parameter to customize the filter SQL. When this parameter is configured, the data synchronization system ignores the tables, columns, and splitPk parameters and uses the content of this parameter to filter data. For example, to synchronize data after a multi-table JOIN, use | No | None |
fetchSize | This parameter defines the number of data records fetched in each batch from the database server. This value determines the number of network interactions between Data Integration and the server, which can significantly improve data extraction performance. Note A fetchSize value that is too large (>2048) may cause an OOM error in the data synchronization process. | No | 512 |
Writer script example
The following code provides a script configuration example. For more information, see the parameter descriptions that follow.
{
  "type":"job",
  "version":"2.0",// The version number.
  "steps":[
    {
      "stepType":"stream",
      "parameter":{},
      "name":"Reader",
      "category":"reader"
    },
    {
      "stepType":"postgresql",// The plugin name.
      "parameter":{
        "datasource":"",// The data source.
        "column":[// The fields.
          "col1",
          "col2"
        ],
        "table":"",// The table name.
        "preSql":[],// The SQL statement to execute before the data synchronization task runs.
        "postSql":[],// The SQL statement to execute after the data synchronization task runs.
      },
      "name":"Writer",
      "category":"writer"
    }
  ],
  "setting":{
    "errorLimit":{
      "record":"0"// The number of error records.
    },
    "speed":{
      "throttle":true,// If throttle is set to false, the mbps parameter does not take effect and throttling is disabled. If throttle is set to true, throttling is enabled.
      "concurrent":1, // The number of concurrent jobs.
      "mbps":"12"// The throttling rate. 1 mbps is equal to 1 MB/s.
    }
  },
  "order":{
    "hops":[
      {
        "from":"Reader",
        "to":"Writer"
      }
    ]
  }
}
Writer script parameters
Parameter | Description | Required | Default value |
datasource | The name of the data source. The code editor supports adding data sources. The value of this parameter must be the same as the name of the added data source. | Yes | None |
table | The name of the table to synchronize. | Yes | None |
writeMode | The import mode. The `insert` and `copy` modes are supported:
| No | insert |
column | The fields in the destination table to which you want to write data. Separate the fields with commas (,). For example, | Yes | None |
preSql | The SQL statement to execute before the data synchronization task runs. The codeless UI lets you execute only one SQL statement. The code editor supports multiple SQL statements, for example, to clear old data. | No | None |
postSql | The SQL statement to execute after the data synchronization task runs. The codeless UI lets you execute only one SQL statement. The code editor supports multiple SQL statements, for example, to add a timestamp. | No | None |
batchSize | The number of records to submit in a single batch. A larger value can significantly reduce network interactions between Data Integration and PostgreSQL and improve overall throughput. However, setting this value too high may cause an OOM error in the Data Integration process. | No | 1,024 |
pgType | Configuration for converting PostgreSQL-specific types. The bigint[], double[], text[], Jsonb, and JSON types are supported. The following code shows a configuration example. | No | None |
Appendix 2: Add SSL authentication to a PostgreSQL data source
PostgreSQL SSL authentication files
When you create or modify a connection for a PostgreSQL data source in DataWorks, you can configure SSL authentication. The following table describes the configuration items related to SSL authentication.
PostgreSQL database | DataWorks PostgreSQL data source configuration | |||
SSL link encryption | Client-based encryption | Configure ACL | Configuration item | Description |
Enabled | Disabled | Not applicable | Truststore File | Optional. The client uses this certificate to authenticate the server.
|
Enabled | Set Configure ACL to prefer |
| The Keystore Certificate File and Private Key File are optional. Setting Configure ACL to prefer means the server does not enforce client verification.
| |
Set Configure ACL to verify-ca |
| |||
If the Access Control List (ACL) configuration is set to `prefer`, the client content is not forcibly verified.
If no files are configured for SSL authentication, a regular connection is used.
If you add authentication files for SSL, see the corresponding descriptions in the table.
If the ACL configuration is set to `verify-ca`, you must configure the Keystore File, Private Key File, and Private Key Password to create the data source.
Obtain PostgreSQL SSL authentication files
This section uses an ApsaraDB RDS for PostgreSQL instance as an example to generate SSL authentication certificates.
Obtain the Truststore File.
For more information about how to obtain the Truststore File, see Use a cloud certificate to quickly enable SSL encryption.
Go to the RDS Instances page, find the RDS instance in the target region, and then click the instance ID to go to the instance details page.
Select the connection string to protect, as shown in the following figure:
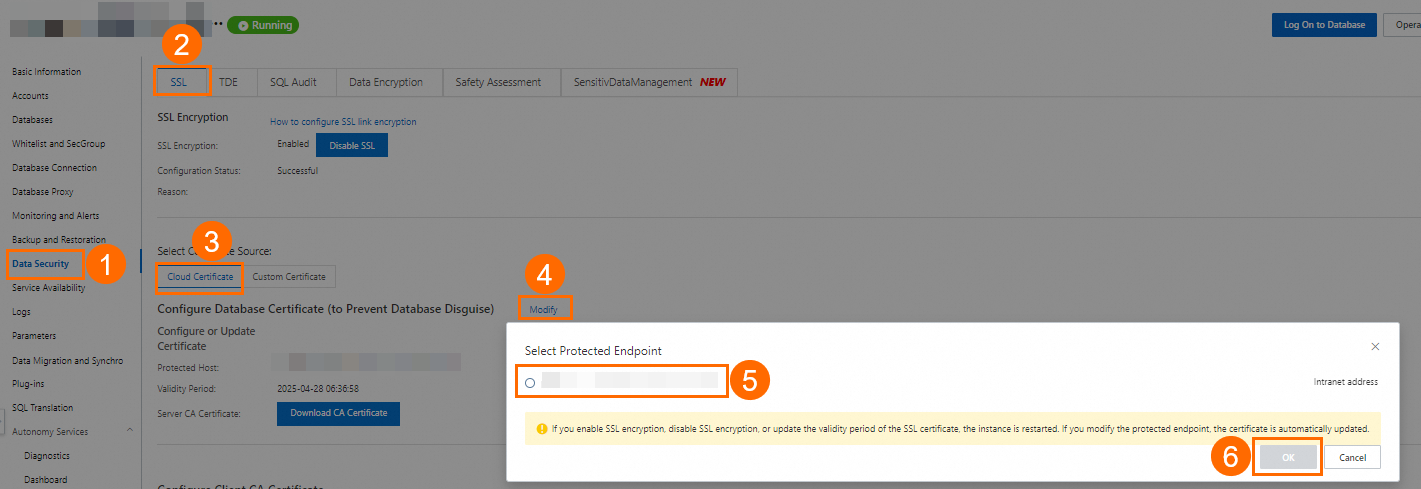 Note
NoteIf a public endpoint is enabled, the system displays both an internal endpoint and a public endpoint. A cloud certificate can protect only one endpoint. We recommend that you protect the public endpoint because it is exposed to the internet, whereas the internal endpoint is more secure within the VPC. For more information about how to view the internal and public endpoints, see View internal and public endpoints.
To protect both the internal and public endpoints, see Use a custom certificate to enable SSL encryption.
After you configure the cloud certificate, the Running Status of the instance changes to Modifying SSL. This process takes about three minutes. Wait until the status changes to Running before you proceed.
Click Download CA Certificate to obtain the Truststore File.
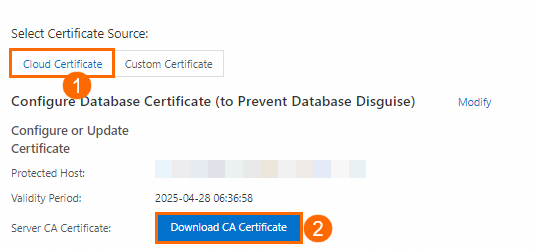
The downloaded CA certificate package contains three files. When you configure the PostgreSQL data source in DataWorks, upload the file with the
.pemor.p7bextension to the Truststore File field.Obtain and configure the Keystore File, Private Key File, and Private Key Password.
Prerequisites: You have completed the steps in Use a cloud certificate to quickly enable SSL encryption or Use a custom certificate to enable SSL encryption, and you have the OpenSSL tool installed.
NoteLinux systems include the OpenSSL tool by default. If you use a Windows system, you must obtain and install the OpenSSL package.
For more information about how to obtain and configure the Keystore File, Private Key File, and Private Key Password, see Configure a client CA certificate.
Use the OpenSSL tool to generate a self-signed certificate (`ca1.crt`) and a private key (`ca1.key`).
openssl req -new -x509 -days 3650 -nodes -out ca1.crt -keyout ca1.key -subj "/CN=root-ca1"Generate a client certificate signing request (CSR) file (`client.csr`) and a client private key (`client.key`).
openssl req -new -nodes -text -out client.csr -keyout client.key -subj "/CN=<Client username>"In this command, set the Common Name (CN) value after the
-subjparameter to the username that the client uses to access the database.Generate a client certificate (`client.crt`).
openssl x509 -req -in client.csr -text -days 365 -CA ca1.crt -CAkey ca1.key -CAcreateserial -out client.crtIf your ApsaraDB RDS for PostgreSQL server needs to verify the client CA certificate, open the generated self-signed certificate file `ca1.crt`. Copy the certificate content and paste it into the Enter Public Key from Client Certificate Authority dialog box.
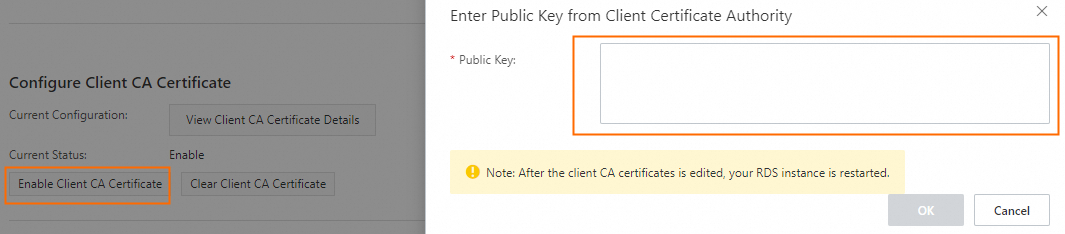
After you configure the client CA certificate on the RDS instance, you must convert the client private key file `client.key` to the PKCS#8 format (`client.pk8`). When you configure the PostgreSQL data source in DataWorks, upload the `client.pk8` file to the Private Key File field.
cp client.key client.pk8Configure the private key password.
openssl pkcs8 -topk8 -inform PEM -in client.key -outform der -out client.pk8 -v1 PBE-MD5-DESNoteWhen you run the command to configure the private key password, you are prompted to enter a password. If you set a password, you must use the same password for the Private Key Password field in the DataWorks PostgreSQL data source configuration.
Configure PostgreSQL SSL authentication files
When you upload the certificate files to the PostgreSQL data source configuration in DataWorks, follow these steps:
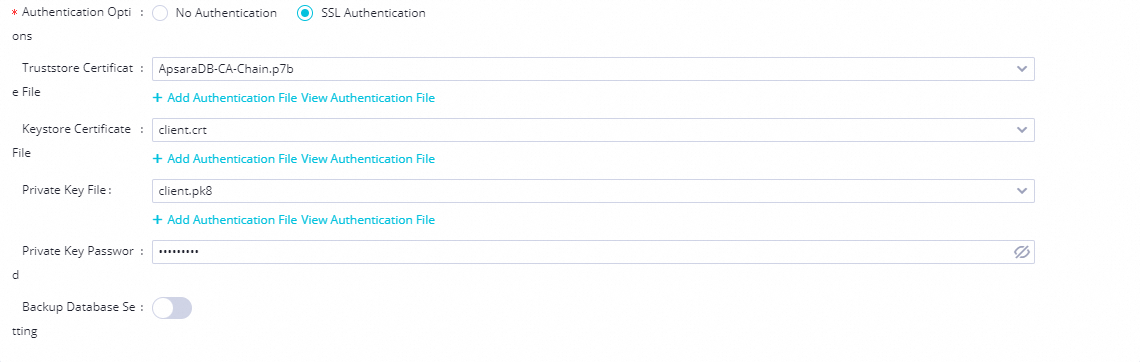
Truststore File: Upload the
.pemor.p7bfile that you obtained in the Obtain the Truststore certificate file step.Keystore File: Upload the `client.crt` file that you obtained in the Generate a client certificate step.
Private Key File: Upload the `client.pk8` file that you obtained in the Convert the private key file step.
Private Key Password: The password configured in the Configure the private key password step.
Configure ACL: Go to the RDS Instances page, find the RDS instance in the target region, and then click the instance ID to go to the instance details page. Click to modify the settings. You can choose from different SSL authentication methods. For more information, see Force clients to use SSL connections.
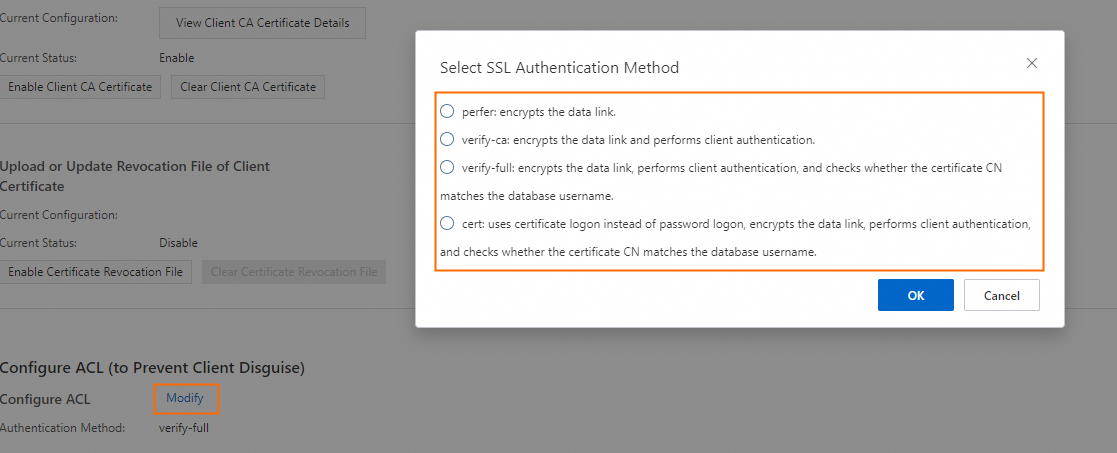
If the ACL authentication method is set to `prefer`, the PostgreSQL server does not forcibly verify the client certificate.
If the ACL authentication method is set to `verify-ca` in ApsaraDB RDS for PostgreSQL, you must upload the correct client certificate when you configure the PostgreSQL data source in DataWorks. This configuration ensures that the server can verify the authenticity of the client.