Add your site to Edge Security Acceleration (ESA) via NS or CNAME for unified management, whole-site acceleration, edge computing, and security.
Procedure
To connect a domain name to Edge Secure Acceleration (ESA), follow these steps:
Add site: In the ESA console, add the root domain for your site, select an acceleration region and an access method (NS or CNAME), and purchase a plan.
Enable security protection: Configure an SSL certificate to encrypt data in transit, and enable WAF and DDoS protection.
Optimize performance: Configure cache acceleration, resource compression, and network optimization to improve site access speed.
Verify and enable site: Complete the DNS configuration and switch traffic to ESA nodes.
Verify acceleration: Confirm that ESA is accelerating your site traffic.
Prerequisites
You have completed Alibaba Cloud account registration.
You have a domain name registration to add to ESA.
You have an origin server with a website deployed.
Step 1: Add a site
Before adding a site, you must add its root domain to ESA.
In the ESA console, select Websites and then click Add Website.
On the Enter Website page, enter the site's root domain (for example,
example.com) and click Next.
We recommend using the root domain (for example,
example.com) as the site name. This lets you manage all subdomains from one site — for example, bothwww.example.comandexample.comcan be accelerated by adding their respective DNS records in the ESA console after the site is created.If you only need to accelerate specific subdomains, you can add a subdomain (for example,sub.example.com) as the site. This does not negatively affect your existing services. If you want to add the root domain as a site but are concerned about impacting your current DNS configuration, use CNAME connection with TXT-based domain ownership verification — this adds the domain without modifying your existing DNS server settings.On the Select Location and DNS Setup page, select an acceleration region and a connection method, then click Next.
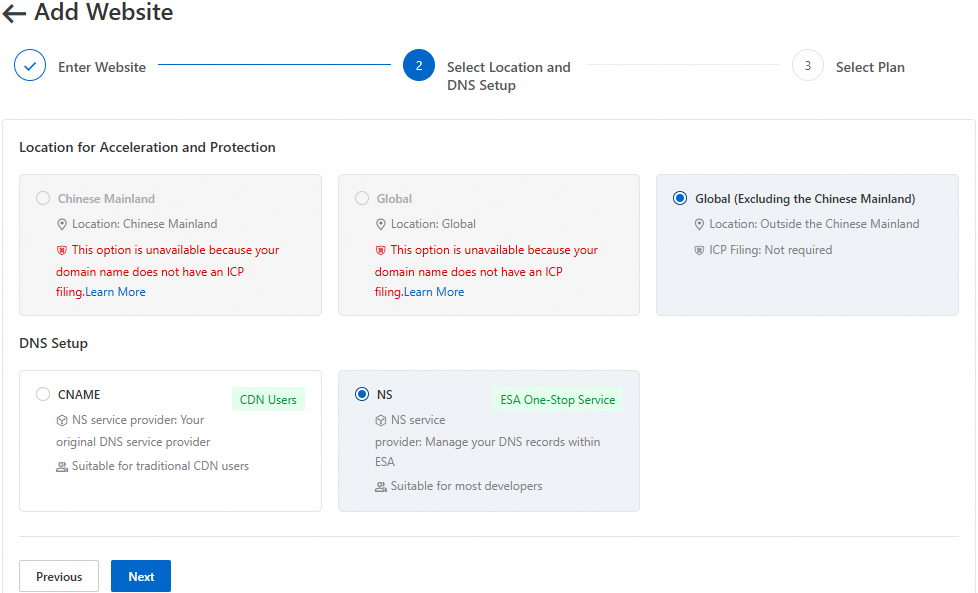
Acceleration region
ESA assigns nodes based on the selected acceleration region to provide security and acceleration services.
Acceleration region
Description
Chinese Mainland
ESA assigns node resources in the Chinese mainland to provide security and acceleration services for your site. If you select this acceleration region, your domain name must have an ICP filing.
Global
ESA assigns global node resources to provide security and acceleration services worldwide. If you select this acceleration region, your domain name must have an ICP filing.
Global (Excluding Chinese mainland)
ESA assigns node resources outside the Chinese mainland to provide security and acceleration services. If you select this acceleration region, your domain name does not require an ICP filing.
Connection method
ESA provides two connection methods: NS connection and CNAME connection. Select the one that best suits your needs.
Connection method
Description
Applicable scenarios
Advantages
NS connection
Delegates all DNS resolution for the domain to ESA for centralized management of DNS and acceleration.
You have a newly registered domain with no existing DNS configuration.
You are using a CDN or acceleration service for the first time.
You need a one-stop solution for DNS hosting and traffic management.
Having ESA fully handle DNS resolution enables centralized management.
Supports intelligent routing and global traffic scheduling.
Simplify operations, improve security, and accelerate performance.
CNAME connection
Your DNS resolution remains with your current DNS provider, while ESA provides domain acceleration and centralized management.
You are more familiar with traditional CDN-like products.
You only need to connect specific services to ESA and want to keep your existing DNS architecture.
Integrates flexibly without affecting existing DNS configurations.
Allows acceleration for specific subdomains.
Key rules for CNAME connection
CNAME values are domain-specific: ESA generates a unique CNAME record value for each connected domain. You must use the CNAME value that ESA assigns for that specific domain. CNAME values cannot be shared or reused across different domains.
Cross-domain CNAME resolution is not supported: You cannot point a domain that is not connected to ESA directly to a domain that is already connected to ESA via CNAME. If multiple domains (for example, a root domain and its subdomains, or different business domains) all require acceleration, each domain must be individually configured in ESA as a separate site or DNS record entry.
Scope of acceleration: NS connection delegates DNS resolution for the entire root domain to ESA, so all subdomains under the root domain are centrally managed and automatically covered. CNAME connection only accelerates the specific subdomains for which you have explicitly added an ESA CNAME record at your DNS provider. Subdomains without a configured CNAME record will not receive ESA acceleration.
Multiple domains, one origin server: Multiple different domain names can all point to the same origin server. Connecting them to ESA independently does not cause any conflicts.
On the Select Plan page, you can choose a suitable plan by selecting New Plans or binding an Purchased Plans, and then follow the instructions in the console to complete the plan purchase.
New plan
On the New Plans tab, select a plan.

Existing plan
On the Purchased Plans tab, select an existing plan to bind.

Step 2: Enable site security
After adding your site, configure security protection to secure data in transit and ensure service availability.
Quick notes on basic settings
Site type (web page browsing or large file download): This setting does not materially affect how your site operates in practice. You can change it at any time in your site's DNS settings after onboarding.
Origin server IP protection: Once your domain is connected to ESA, client requests resolve to ESA edge node IP addresses rather than your origin server's IP address. This effectively shields your real server IP without requiring any additional DNS configuration.
For a comparison of ESA plan features and a detailed configuration guide, refer to ESA plan comparison.
To enhance your website's data-in-transit security and overall protection, you can configure several security features. These include SSL certificate management to encrypt data, DDoS protection to mitigate high-volume traffic attacks, and a Web Application Firewall (WAF) to shield your web applications from malicious attacks. These features work together to create a secure and reliable web environment.
Data encryption in transit
Encrypting data in transit is critical to prevent sensitive data from being stolen or tampered with during transmission. ESA provides a comprehensive solution for securing data in transit between clients and your origin server, ensuring protection at every step.
By default, ESA enables SSL/TLS encryption. You should apply for and configure an SSL certificate to prevent interruptions to your HTTPS services.
You can also use ESA to enable mutual TLS authentication for edge nodes. This establishes two-way authentication between clients and ESA nodes to ensure that only authorized clients can access your server, which enhances data security and prevents attacks.
These layered security measures protect your business data and services from various network threats.
Anomalous access protection
Abnormal access protection is an important component of website security. It effectively defends against malicious attacks to ensure the stability and availability of your website and safeguards your business by using various security protection measures.

ESA uses its built-in WAF capabilities, combined with pre-defined and custom rules, to intelligently filter client request traffic. This ensures that only legitimate, clean traffic reaches your origin server, reducing potential security risks. You can also enable bot protection to prevent malicious resource scraping and ensure service stability and security.
During operations, ESA uses the security analysis and event analysis modules to collect and analyze client request data in real time to identify anomalous behavior. Using WAF custom rules, you can configure protective actions—such as blocking, challenging, or redirecting requests—to counter different attack types.
By default, ESA enables basic DDoS protection for your site, which mitigates large-scale DDoS and CC attacks to ensure website stability during high-volume attacks.
With these layered protection measures, ESA helps you quickly identify and block malicious traffic. It also provides robust security during complex attacks.
Step 3: Optimize site performance
Once security is configured, use the following optimizations to improve your site's access speed and user experience.
ESA improves site access speed and network performance by using technologies such as image transformation, resource compression, and IPv6 support.
Configure cache acceleration
Configure your site's caching policy or create a cache rule to store resource files on ESA edge nodes. When a user requests a file, the edge node responds directly, avoiding slow back-to-origin requests and accelerating content delivery.
Optimize resource access performance
ESA improves application performance by optimizing website settings. ESA uses advanced technologies to optimize resource access, including image transformation, resource compression, and protocol optimization. These optimizations improve access speed and the overall user experience.
Set up image transformation: Automatically adjusts image sizes and formats to match the user's device and screen, reducing unnecessary data transfer.
Set up resource compression: Compresses and optimizes static resources by removing redundant code and unused data to reduce file sizes.
Configure protocol optimization: Supports the latest transport protocols, such as HTTP/2 and HTTP/3, to improve data transfer efficiency and reduce latency.
Optimize network performance
For faster network transfers, ESA offers several optimization features, including advanced protocol support and real-time communication methods.
Configure network optimization: Enables full IPv6 compatibility to improve network address utilization and connection efficiency.
Configure network optimization: Uses the WebSocket protocol for real-time communication, reducing data transfer latency and improving the responsiveness of real-time applications.
Configure network optimization: Uses gRPC for low-latency, high-throughput service interactions, making it ideal for performance-critical applications.
Configure network optimization: Uses intelligent traffic control and load balancing to prevent network congestion and overload and to ensure stable network transfer speeds under high concurrency.
Step 4: Verify and enable your site
Simply adding a site does not enable acceleration or protection. You must enable the site to use the services provided by ESA.
Test the accelerated domain name locally
If your domain hosts live services, test the accelerated domain name locally before enabling the site. This ensures a smooth DNS resolution transition without service interruption.
NS method
CNAME method
Enable your site
NS method
Step 1: Add DNS records
To prevent service interruptions caused by invalid DNS records, add your existing DNS records to ESA before you change your DNS servers.
Import multiple records (Recommended)
Select and click Import.
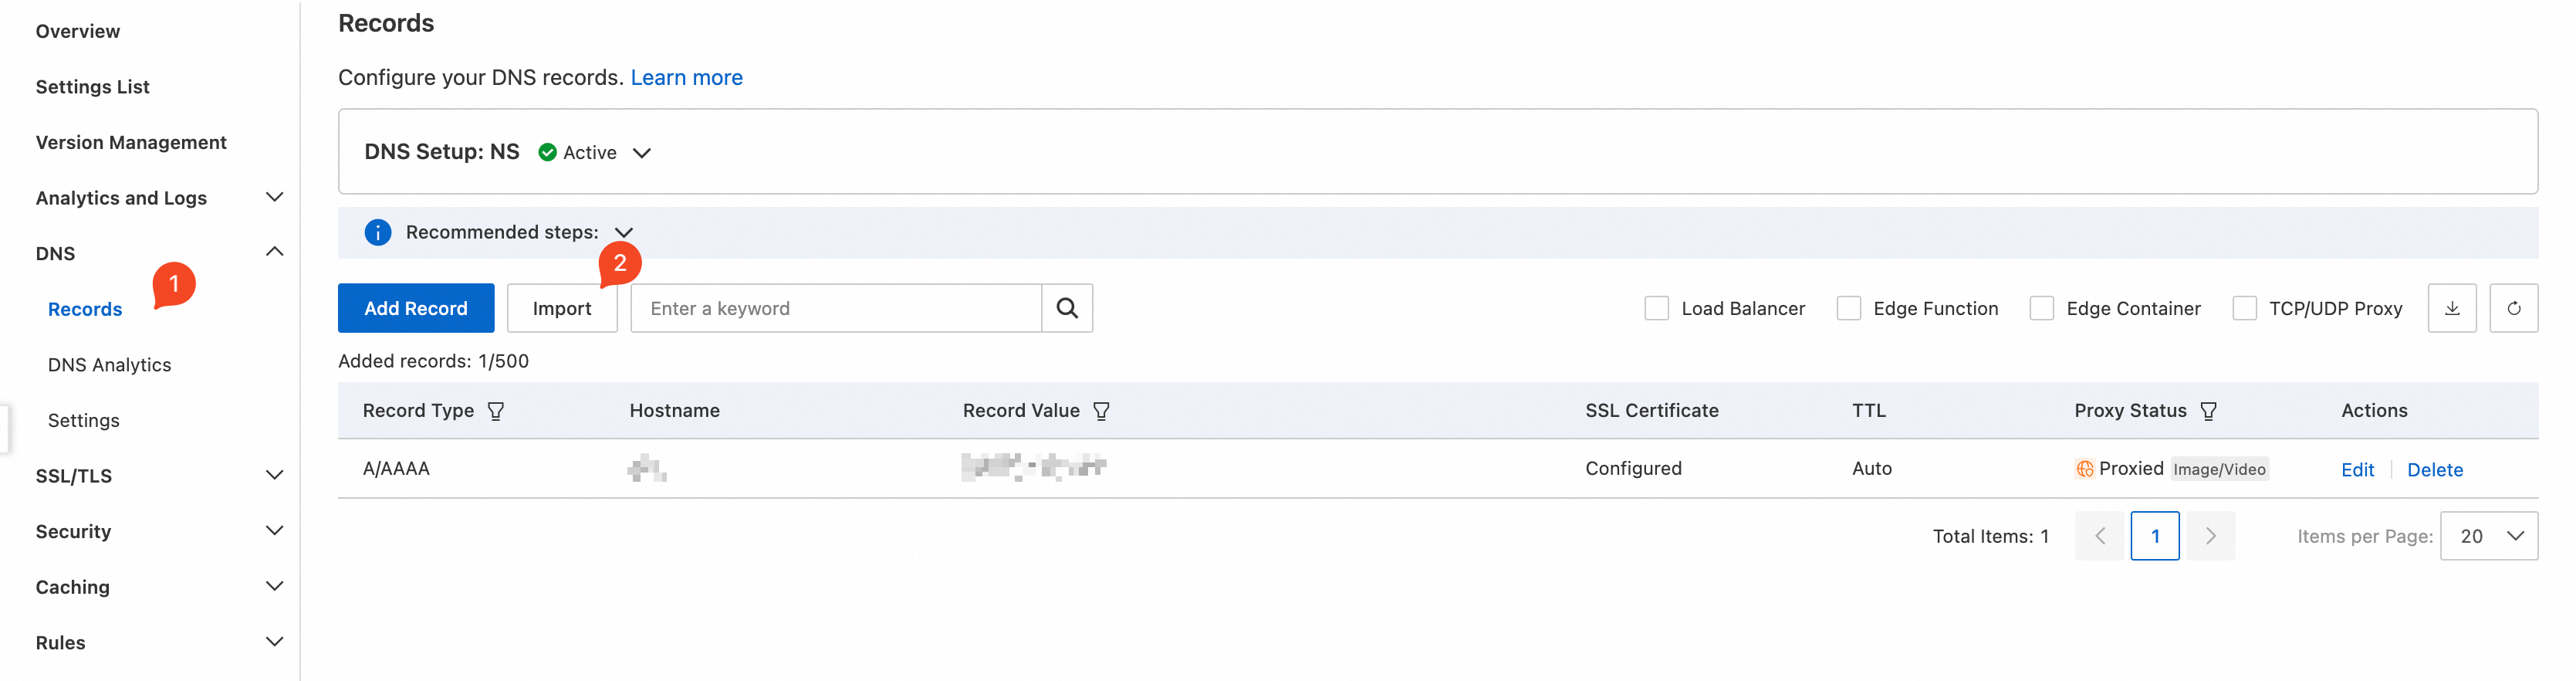
On the Import from File page, upload your DNS record file.
To migrate DNS records from Cloudflare, Alibaba Cloud DNS, or DNSPod to ESA, first obtain the DNS record file from your original DNS provider and upload it.
Select Cloudflare, Alibaba Cloud DNS, or DNSPod as needed, and then click Select File.
Select the DNS record file and upload it to ESA.
To use an ESA template to manually enter and import DNS records:
Select Import from Template and click Download Template.
In the file template, add or modify the DNS records according to the template's format, then save the file.
Click Select File, select the saved template, and upload it.
On the Import page, check and adjust the record configurations. By default, ESA provides only DNS resolution for these records. You can enable the ESA proxy acceleration switch for desired records in the Proxy Status column.

After adjusting the DNS records, click OK. The imported records will then appear on the Records page.
 Note
NoteAfter importing DNS records from a file, the system may retain CNAME record values from your original DNS provider. You must manually verify that all CNAME records are using the correct ESA-assigned values. Leaving outdated CNAME values in place will prevent ESA acceleration from taking effect. You can also add multiple domains or records directly from the ESA console in bulk.
Add single record
Select and click Add Record.
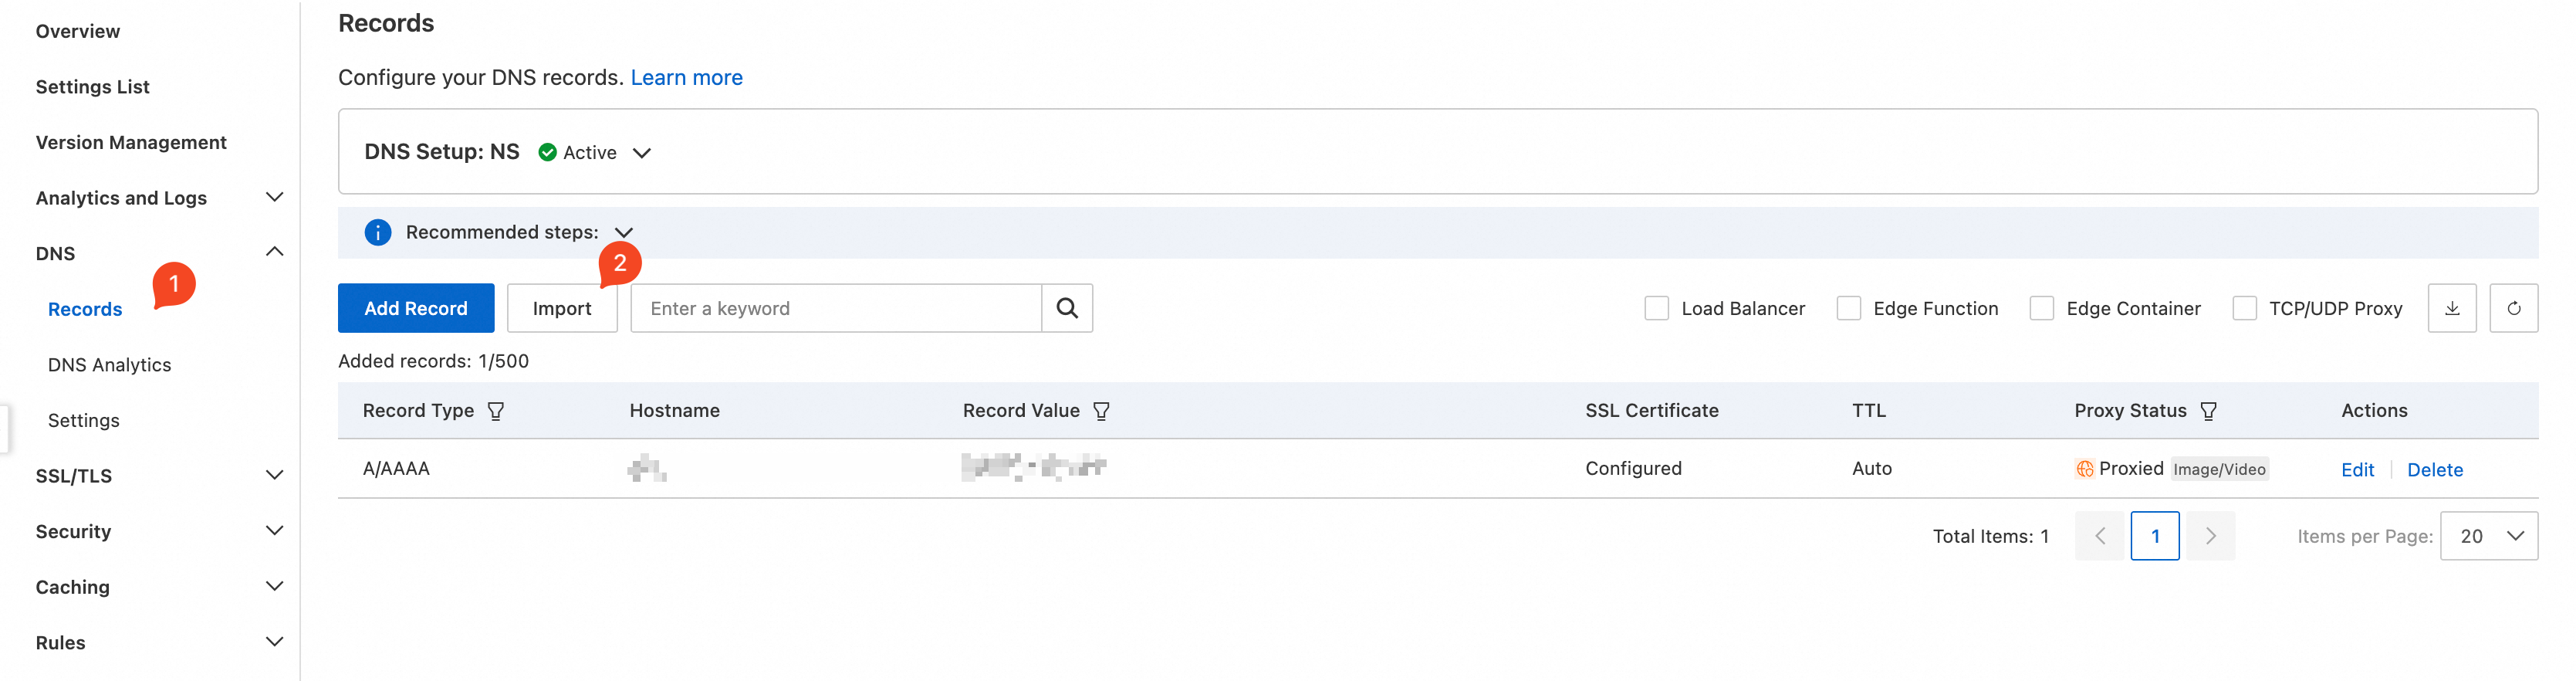
Click Add Record, enter the DNS record details, and then click Next.
Example: To accelerate the subdomain
www.example.cnfor your siteexample.cn, where the origin server IP is198.2.XX.XX, configure the record as shown below. For detailed instructions on configuring other records, see DNS Parameter Introduction.
Select a type based on your business needs, and then click OK.

When adding a DNS record for a subdomain that uses a non-standard port (not 80 or 443), use one of the following configuration methods:
All subdomains use the same non-standard port: If all subdomains access the origin server through the same non-standard port, you can customize the origin-pull port by using Configure origin-pull protocol and port.
Subdomains use different non-standard ports: If different subdomains access the origin server through different non-standard ports, you can use Origin Protocol and Port Rules to customize the origin-pull port for each subdomain.
Step 2: Change DNS servers and enable site
After you add the DNS records, change your site's original DNS servers to the ESA DNS servers.
In the left-side navigation pane, click Overview. Click
 to copy the two NS values provided by ESA.
At your DNS provider, change your domain's DNS servers to the two ESA NS values you copied.

The following sections provide examples for popular DNS providers. If your provider is not listed, consult their documentation for assistance.
GoDaddy
Log in to the GoDaddy console.
Select My Products > Manage All, and then select the target domain.
Under Additional Settings, click Manage DNS. Under Nameservers, click Change Nameservers.

Select Enter my own nameservers (advanced), enter the two NS values provided by ESA, and then click Save.
After you save your settings, wait for the DNS server configuration to take effect.
Namecheap
Log in to the Namecheap console.
On the Domain Name page, change the DNS servers.

Name.com
Log in to the Name.com console.
Go to the manage nameservers page.

Google Domains
Log in to the Google Domains console.
Click DNS > Nameservers > Update Nameservers.

Click Confirm.
After you change the NS servers, click Verify Nameserver. NS propagation can take from several minutes to 48 hours. If verification fails, wait for the changes to propagate and try again. The system also checks for the changes automatically. Once the site is active, you will receive an email and a console notification.
CNAME method
Step 1: Verify domain ownership
When adding a domain to ESA for the first time, you must complete domain ownership verification. This one-time verification for a root domain also applies to all its future subdomains.
In the left-side navigation pane, select Overview, and then click
to copy the TXT record provided by ESA.
At your DNS provider, add a TXT record for your domain using the details you copied.

The following sections provide examples for popular DNS providers. If your provider is not listed, consult their documentation for assistance.
Cloudflare
If Cloudflare is your DNS provider, follow these steps to add a TXT record.
Log in to the Cloudflare console.
Go to the DNS page, click Add Record, and add a TXT record.

Click Save.
GCP
If Google Cloud is your DNS provider, follow these steps to add a TXT record.
Log in to the Google Cloud console.
Go to the DNS page, click Add Record, and add a TXT record.

Click Save.
AWS
If AWS is your DNS provider, follow these steps to add a TXT record.
Log in to the AWS Management Console.
Go to the DNS page, click Add Record, and add a TXT record.

Click Save.
Dyn
If Dyn is your DNS provider, follow these steps to add a TXT record.
Log in to the Dyn console.
Go to the DNS page, click Add Record, and add a TXT record.

Click Create Record.
Return to the ESA console and click Verify.
NoteAdding the TXT record for domain ownership verification (host record:
_esaauth) does not affect your existing website traffic or business operations. Traffic is only switched to ESA after your CNAME records are configured and DNS propagation is complete.If verification has no response or fails (for example, a "network error" message appears), check the following:
Confirm that the TXT record has been correctly configured at your DNS provider: the host record must be
_esaauthand the record value must match theverify_xxxstring provided by ESA.DNS propagation can take from several minutes to a few hours. Wait for the changes to propagate and then try again.
Step 2: Add the accelerated domain name
After verifying domain ownership, configure the ESA proxy acceleration service for your subdomain.
Obtain CNAME value from ESA
To obtain a CNAME record value, add a DNS record in ESA that specifies the hostname and origin server address for your accelerated domain.
In the navigation pane, select .
On the Records page, add DNS records manually or by importing a file to obtain a CNAME record value from ESA.
Add single record
On the Records page, click Add Record.
On the Add Record page, enter the required information.
Example: To accelerate the subdomain
www.example.cnfor your siteexample.cn, where the origin server IP is198.2.XX.XX, configure the record as shown below. For detailed instructions on configuring other records, see DNS Parameter Introduction.Click Next, then select a record type based on your business needs to finish adding the record.
After you add the record, follow the instructions in the console and click
 to copy the CNAME value provided by ESA. This CNAME record points to the ESA edge nodes.
Import multiple records
On the Records page, click Import.
On the Import page, upload your DNS record file.
To migrate DNS records from Cloudflare, Alibaba Cloud DNS, or DNSPod to ESA, first obtain the DNS record file from your original DNS provider and upload it.
Select Cloudflare, Alibaba Cloud DNS, or DNSPod as needed, and then click Select File.
Select the DNS record file and upload it to ESA.
To use an ESA template to manually enter and import DNS records:
Select Import from Template, and then click Download Template.
In the file template, add or modify the DNS records according to the template's format, then save the file.
Click Select File, select the saved template, and upload it.
On the Import page, review and adjust the record configurations, and then click OK.

After the import is successful, click
 in the CNAME column of the DNS record list to copy the CNAME record value.
When adding a DNS record for a subdomain that uses a non-standard port (not 80 or 443), use one of the following configuration methods:
All subdomains use the same non-standard port: If all subdomains access the origin server through the same non-standard port, you can customize the origin-pull port by using Configure origin-pull protocol and port.
Subdomains use different non-standard ports: If different subdomains access the origin server through different non-standard ports, you can use Origin Protocol and Port Rules to customize the origin-pull port for each subdomain.
Add CNAME record at DNS provider
After obtaining the CNAME value from ESA, you must add it as a CNAME record at your DNS provider. This routes requests for your accelerated domain name through your DNS provider to the appropriate ESA edge node, enabling proxy acceleration.
At your DNS provider, add a CNAME record using the value you copied from ESA.
Return to the ESA console, select , and confirm that the CNAME Status for the newly added record is Configured.
 Note
NoteIf verification fails, wait for the record to propagate and then try again.
Step 5: Verify acceleration
After your site is connected to ESA, client requests are automatically routed to the nearest ESA node. You can verify that acceleration is working by checking the IP address.
Method 1: Browser developer tools
This test requires a DNS record with proxy acceleration enabled. DNS records without proxy acceleration are not routed through ESA edge nodes and cannot be verified with this method.
In a browser, access a resource on your site, such as
https://api.example.com/test.txt. Open the browser's developer tools and find the IP address of the request.
Use the IP Address Ownership tool to check if the IP address belongs to ESA. If the result is "Yes," this confirms that ESA is accelerating your site.

Method 2: CLI
This test requires a DNS record with proxy acceleration enabled.
DNS records without proxy acceleration are not routed through ESA edge nodes and cannot be verified with this method.
Windows
Open the Command Prompt.
Enter
nslookup -type=A <domain_name>(for example,nslookup -type=A test.example.com) to find the resolved IP address.
Use the IP Address Ownership tool to check if the IP address belongs to ESA.
If the result is "Yes," this confirms that ESA is accelerating your site.

Linux, macOS
Open the terminal.
Enter
dig <domain_name>(for example,dig test.example.com) to find the resolved IP address.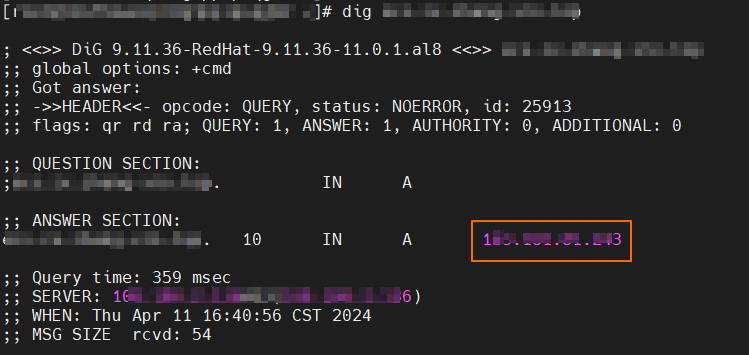
Use the IP Address Ownership tool to check if the IP address belongs to ESA.
If the result is "Yes," this confirms that ESA is accelerating your site.
Method 3: Real-time logs
Real-time logs are not supported for the Entrance plan. If your plan is the Entrance plan, you can use method one or two for verification, or upgrade your plan and then use method three for verification.
In the ESA console, select Websites, and then click the site's name in the Website column.
In the left-side navigation pane, go to , and then click Start Monitoring.
If logs appear, this confirms that ESA is accelerating your site.

FAQ
Q: My new site shows no traffic or is inaccessible. Does this mean the connection failed?
No traffic on a new site typically means the domain has not yet successfully connected to ESA, or no real user requests have been made. Check the following:
In the ESA console, confirm that the correct DNS records (A, AAAA, or CNAME) have been added and that DNS resolution binding is complete.
If the site is active but still inaccessible, the CNAME resolution may not have propagated globally yet. You can test connectivity by binding the ESA node IP to your local hosts file and accessing the domain locally, or wait for DNS propagation to complete before retesting.
Check that the Proxy switch is enabled for the relevant DNS records. DNS records without proxy acceleration enabled are not routed through ESA edge nodes and will not generate ESA traffic — they also cannot be verified using the acceleration verification methods in Step 5.
Q: Can I use my existing CDN or DCDN resource packs with ESA?
No. ESA uses its own dedicated resource packs and plans that are separate from CDN and DCDN resource packs. They are not interchangeable.
If you have purchased CDN or DCDN resource packs by mistake, you can apply for a refund or cancellation through the Billing and Cost Management console.
DCDN is no longer recommended for new workloads. We recommend migrating to ESA and following the steps in this guide to complete site onboarding.
Add an OSS bucket after connecting a site to ESA
After your site is connected to ESA, to accelerate an additional OSS bucket, simply add a CNAME record on the DNS records page. You do not need to complete domain ownership verification again.
In the ESA console, go to Site Management, and then click the target site.
In the left-side navigation pane, select DNS > Records, and then click Add Record.
Set Record Type to CNAME. For Host Record, enter the new subdomain prefix, for example,
bucket2.For Record Value/Origin, select OSS, and then select an OSS bucket under the same account from the drop-down list. Select an origin access type as needed: Public Access, Private Access-Same Account, or Private Access-Cross Account.
Click Next, select a business type, and then click Finish.
In the CNAME configuration wizard, copy the CNAME value, and then add a CNAME record at your DNS provider.
Supported origin types include: Domain Name, OSS, S3-compatible, Load Balancer, and Origin Address Pool.
no A/AAAA records for the CNAME target after CNAME onboarding
If you onboarded your site to ESA through CNAME and the CNAME target domain cannot be resolved (no A/AAAA records are returned), troubleshoot as follows:
Use
nslookupordigto query the CNAME target domain and check whether A/AAAA records are returned.Log on to the ESA console and check the site status on the Site Management page. A status of Pending means that the NS servers are not verified, and ESA does not serve DNS resolution for the CNAME zone.
Obtain the NS server addresses assigned by ESA in the ESA console, and change the NS records to the ESA-assigned NS servers at your domain's DNS provider.
After the NS change takes effect, ESA automatically detects and activates the site. After the site status becomes Active, create a DNS record on the DNS Management page and enable Proxy acceleration.
Verify that the CNAME record value configured at your DNS provider matches the CNAME value assigned by ESA in the ESA console.
Wait for the DNS TTL to expire (10 minutes by default), and then query the CNAME target domain again to confirm that ESA edge node IP addresses are returned. You can check the resolution status by using real-time logs.
Learn more
Beyond site security and performance, ESA provides features for site management, including cache, edge computing, rules, analytics and logs, and traffic.
Edge computing
ESA provides an efficient, flexible, and low-latency edge computing solution through three products: Functions and Pages, edge containers, and edge storage.
Functions and Pages is a full-stack development platform that provides a complete deployment solution, from code submission to global distribution. By integrating Git-based workflows, a global edge network, and an intelligent build system, it supports various applications, including static websites, single-page applications (SPAs), server-side rendered (SSR) applications, and edge functions, for deployments of any scale.
edge containers provide elastic and maintainable compute resources for containerized applications deployed on edge nodes. Using global deployment and proximity-based scheduling, this service simplifies protocol handling and significantly reduces response latency.
edge storage is a key-value storage service on the edge. When combined with an edge function, it lets you access data from the same node, allowing you to deploy lightweight services like BaaS and API gateways.
Custom rules
You can create and deploy conditional rules across various features, such as cache, redirects, compression, back-to-origin, and WAF, by using a consistent syntax and configuration logic. This provides precise control over policy execution for more efficient management.
Analytics and logs
When ESA processes your requests, it generates real-time traffic data and detailed logs. Use this data to optimize resource allocation, troubleshoot issues, generate real-time monitoring metrics, and analyze network connection quality for performance testing. This helps ensure your site runs reliably and efficiently.
Traffic control
ESA's edge nodes monitor and regulate data flow in real time, improving service availability and stability by optimizing traffic distribution, balancing loads, and significantly reducing link latency.