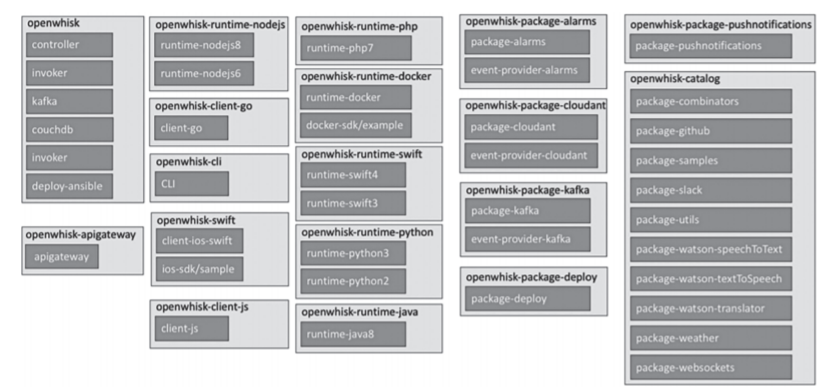
OpenWhisk is a cloud-based distributed event-driven programming service. OpenWhisk provides a programming model to register event handlers with cloud services to handle various services. It can support thousands of triggers and calls and can respond to events of different sizes. OpenWhisk contains many components that make OpenWhisk an excellent open-source FaaS platform.

Component Structure of Apache OpenWhisk
The operating system of the experimental machine is Ubuntu 18.04 Desktop. Use the incubator-openwhisk provided on GitHub to install it. If Git is not installed on this machine, install it first:
apt install gitNext, clone the repo to the local directory:
git clone https://github.com/apache/incubator-openwhisk.git openwhiskAfter cloning is completed, it is displayed as shown in the figure below:

Apache OpenWhisk Project Clone
Go to the OpenWhisk directory and execute the script. OpenWhisk is developed by Scala and requires a Java environment to run. The following script implements the installation of the Java environment and other required software:
cd openwhisk && cd tools/ubuntu-setup && ./all.shThe Apache OpenWhisk installation and configuration is shown in the figure below:

Apache OpenWhisk Installation and Configuration
OpenWhisk uses ansible for deployment. Environment variables are defined under ansible/environments/group_vars/all:
limits:invocationsPerMinute: "{{ limit_invocations_per_minute | default(60) }}"concurrentInvocations: "{{ limit_invocations_concurrent | default(30) }}"concurrentInvocationsSystem: "{{ limit_invocations_concurrent_system | default (5000) }}"firesPerMinute: "{{ limit_fires_per_minute | default(60) }}"sequenceMaxLength: "{{ limit_sequence_max_length | default(50) }}"The preceding program defines the limitations of OpenWhisk in the system.
invocationsPerMinute indicates the number of Actions called per minute for the same Namespace.
concurrentInvocations indicates the number of concurrent calls for the same Namespace.
concurrentInvocationsSystem indicates the number of concurrent calls for all Namespaces in the system.
firesPerMinute indicates the number of triggers called per minute in the same Namespace.
sequenceMaxLength indicates the maximum sequence length of an Action.
If you need to modify the preceding default values, you can add the modified values to the file.
The end of the ansible/environments/local/group_vars/all.
For example, if the maximum sequence length of an Action is 100, you can add sequenceMaxLength: 120 to the end of the file. Next, configure a database with persistent storage for OpenWhisk; CouchDB and Cloudant are optional. Use CouchDB as an example to configure the environment:
export OW_DB=CouchDBexport OW_DB_USERNAME=rootexport OW_DB_PASSWORD=PASSWORDexport OW_DB_PROTOCOL=httpexport OW_DB_HOST=172.17.0.1export OW_DB_PORT=5984In the openwhisk/ansible directory, run the script, as shown in the image below:
ansible-playbook -i environments/local/ setup.yml
Script Execution Procedure
Next, use CouchDB to deploy OpenWhisk to ensure that you have db_local.ini locally. Run the following command in the openwhisk/directory:
./gradlew distDockerIf problems occur during deployment (as shown in the following figure), it may be caused by not installing npm. In this case, you can execute the following instructions:

Examples of Possible Error Reports during Deployment
apt install npmWait a moment and you can see the Build success page, as shown in the image below:

Build Success Example
Next, go to the openwhisk/ansible directory:
ansible-playbook -i environments/local/ couchdb.ymlansible-playbook -i environments/local/ initdb.ymlansible-playbook -i environments/local/ wipe.ymlansible-playbook -i environments/local/ apigateway.ymlansible-playbook -i environments/local/ openwhisk.ymlansible-playbook -i environments/local/ postdeploy.ymlThe process of executing the script is shown in the figure:

Script Execution Procedure
After successful deployment, OpenWhisk starts several Docker containers in the system. We can use docker ps to view:
docker ps --format "{{.Image}} \t {{.Names }}"The list of containers after successful installation is shown in the figure below:

The List of Containers after Successful Installation
OpenWhisk provides a unified command line interface wsk. The generated wsk is under openwhisk/bin. It has two properties that need to be configured:
Set the API host. The IP in the standalone configuration should be 172.17.0.1, as shown in the figure below:
./bin/wsk property set --apihost '172.17.0.1'
Set API Host
Set key:
./bin/wsk property set --auth `cat ansible/files/auth.guestThe permission settings are shown in the figure below:

Set Permissions
OpenWhisk stores the configuration information of the CLI in ~/.wskprops. The location of this file can also be specified by the environment variable WSK_CONFIG_FILE.
Verify the CLI:
wsk action invoke /whisk.system/utils/echo –p message hello –result{ "message": "hello"}Create a simple action with the following code:
# test.pydef main(args): num = args.get("number", "30") return {"fibonacci": F(int(num))}def F(n): if n == 0: return 0 elif n == 1: return 1 else: return F(n - 1) + F(n - 2)Create an action:
/bin/wsk action create myfunction ./test.py --insecureFunction creation is shown in the figure below:

Create a Function
Trigger action:
./bin/wsk -i action invoke myfunction --result --blocking --param nember 20The result is shown below:

Execute a Function
So far, we have completed the deployment and testing of the OpenWhisk project.
Serverless Engineering Practices | Build a Kubeless Platform Quickly
99 posts | 7 followers
FollowAlibaba Clouder - April 12, 2019
Alibaba Clouder - June 3, 2020
Alibaba Clouder - April 12, 2019
Alibaba Cloud Community - March 8, 2022
Alibaba Developer - August 8, 2019
Alibaba Developer - March 3, 2022
99 posts | 7 followers
Follow Message Queue for Apache Kafka
A fully-managed Apache Kafka service to help you quickly build data pipelines for your big data analytics.
Learn More Realtime Compute for Apache Flink
Realtime Compute for Apache Flink offers a highly integrated platform for real-time data processing, which optimizes the computing of Apache Flink.
Learn More Managed Service for Prometheus
Multi-source metrics are aggregated to monitor the status of your business and services in real time.
Learn More Function Compute
Alibaba Cloud Function Compute is a fully-managed event-driven compute service. It allows you to focus on writing and uploading code without the need to manage infrastructure such as servers.
Learn MoreMore Posts by Alibaba Cloud Serverless