By Sai Sarath Chandra, Alibaba Cloud Tech Share Author. Tech Share is Alibaba Cloud's incentive program to encourage the sharing of technical knowledge and best practices within the cloud community.
In the previous article, we have set up our Elastic Compute Service (ECS) instance and configured it with Docker. Now, we need to install CouchDB on the system and complete the OpenWhisk installation.
CouchDB is one of many offerings available in the NoSQL space and is a document-based database. All the data is stored in the JSON documents as a key value pairs as a map. The unique feature of CouchDB is there is also a _rev(revision) along with _id(Unique identifier) shows how many changes are made.
The advantage of CouchDB over other NoSql offerings are
Adding the CouchDB GPG key to the keyring, by executing following command
~root@iZa2d4spx9n9e90jofcyxoZ:~# curl -L https://couchdb.apache.org/repo/bintray-pubkey.asc | apt-key add -You will get the output similar to this
  % Total    % Received % Xferd  Average Speed   Time    Time     Time  Current
                                 Dload  Upload   Total   Spent    Left  Speed

  0     0    0     0    0     0      0      0 --:--:-- --:--:-- --:--:--     0
  0     0    0     0    0     0      0      0 --:--:--  0:00:01 --:--:--     0
  0     0    0     0    0     0      0      0 --:--:--  0:00:01 --:--:--     0
100  3100  100  3100    0     0   1429      0  0:00:02  0:00:02 --:--:--  1429
OK
Adding the repository to the sources
~root@iZa2d4spx9n9e90jofcyxoZ:~# echo "deb https://apache.bintray.com/couchdb-deb bionic main" | tee -a /etc/apt/sources.listUpdating the apt system
~root@iZa2d4spx9n9e90jofcyxoZ:~# sudo apt-get updateInstall the CouchDB using the command here:
~root@iZa2d4spx9n9e90jofcyxoZ:~# apt-get install -y couchdbWhile installing the CouchDB you will get the following screens for some information. The first screen asking for which type of installation is preferred, I chose standalone since we are prototyping
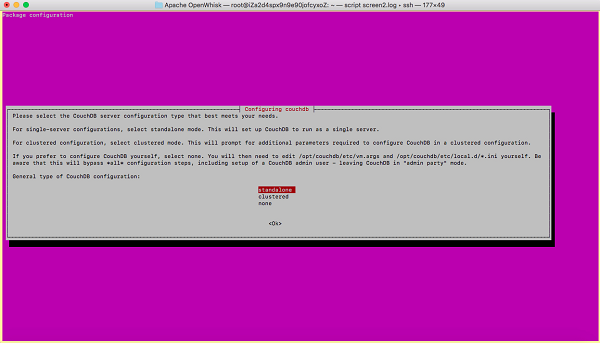
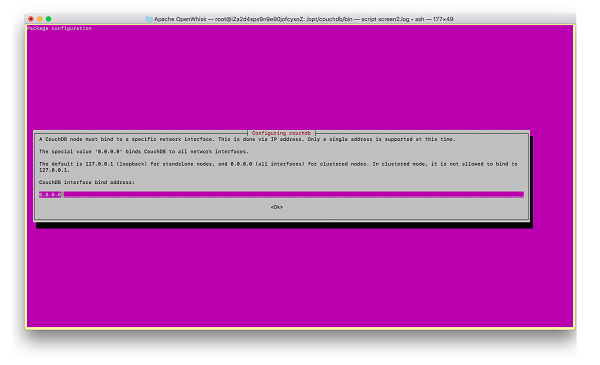
In next screen it will ask for the binding IP, like below. Choose 0.0.0.0
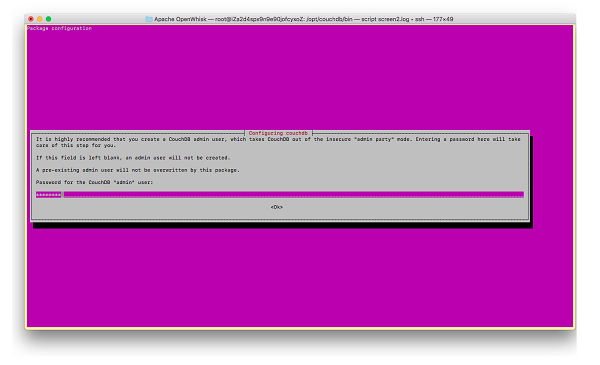
Then the admin password, the username by default is "admin". You can change this account and password later, but it is important to have those details here
Repeat the password
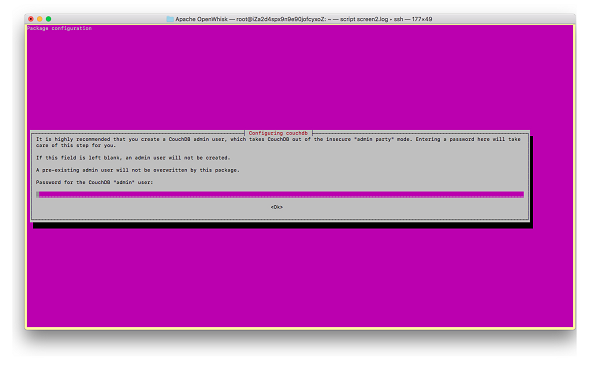
Once you confirm the password, the installation resumes and all the dependencies will be installed.
You can check the service status of the couch DB using the command below
~root@iZa2d4spx9n9e90jofcyxoZ:~# sudo service couchdb statusThe command gives an output similar to this showing the running state as active
couchdb.service - Apache CouchDB[m
   Loaded: loaded (/lib/systemd/system/couchdb.service; enabled; vendor preset: enabled)
   Active: active (running) since Sat CST; 28s ago
 Main PID: 27987 (beam.smp)
    Tasks: 27 (limit: 4915)
   CGroup: /system.slice/coucdb.service
           ├─27987 /opt/couchdb/bin/../erts-8.3.5.4/bin/beam.smp -K true -A 16 -Bd -- -root /opt/couchdb/bin/.. -progname couchdb -- -home /opt/couchdb -- -boot /opt
           ├─27997 /opt/couchdb/bin/../erts-8.3.5.4/bin/epmd -daemon
           ├─28028 erl_child_setup 1024
           ├─28036 sh -s disksup
           ├─28037 /opt/couchdb/bin/../lib/os_mon-2.4.2/priv/bin/memsup
           └─28038 /opt/couchdb/bin/../lib/os_mon-2.4.2/priv/bin/cpu_sup
One of the big features of CouchDB is the availability of REST API. If you run the following command, you should see all the information in a JSON format. This confirms that the API is up and running on the server
root@iZa2d4spx9n9e90jofcyxoZ:~# curl http://127.0.0.1:5984/
{"couchdb":"Welcome","version":"2.2.0","git_sha":"2a16ec4","features":["pluggable-storage-engines","scheduler"],"vendor":{"name":"The Apache Software Foundation"}}
Now, we will access fauxton which is installed as part of the CouchDB to make some configuration changes
The fauxton will be running in the same port as the CouchDB, headover to the browser and hit http://:5984 and you will see a login screen
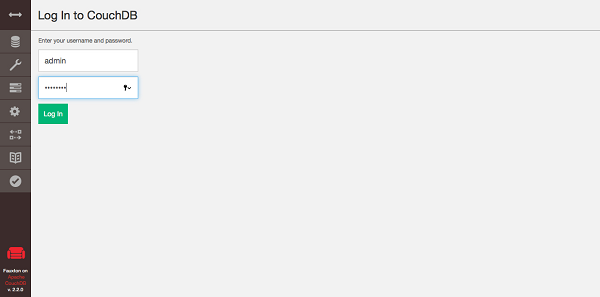
Login with your credentials created while installing the CouchDB, once you are logged in CouchDB will setup a default system database with all the relevant details, where we can manage users, replicators, global variables etc..
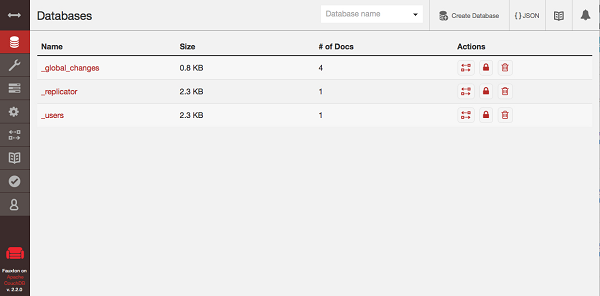
You can also change the credentials, create new users and the IP Address binding for each specific user right from the web console
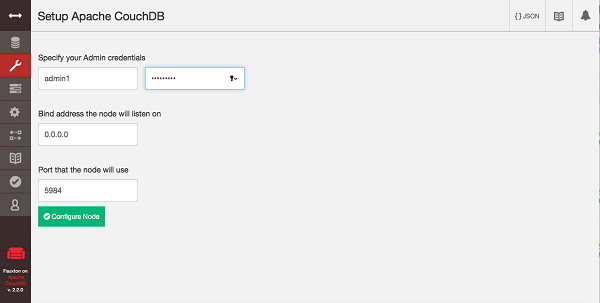
Here I am creating the user "admin1" default to the same port and the IP address and click on "Configure Node". That will take of creating the database in the background. Apache Openwhisk strongly recommends to change the "reduce_limit" property value of the CouchDB to false.
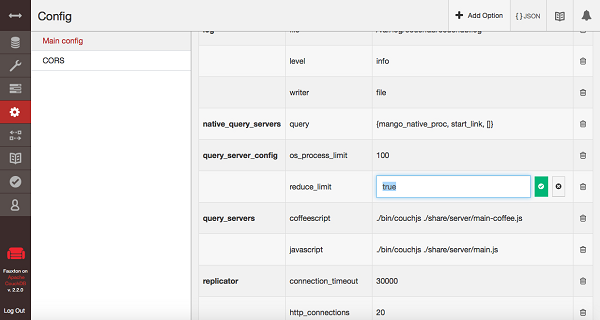
You will find it under the console > settings > "query_server_config" > reduce_limit change it to "false" by clicking on that. Once you click save you will see the prompt after the successful update like below
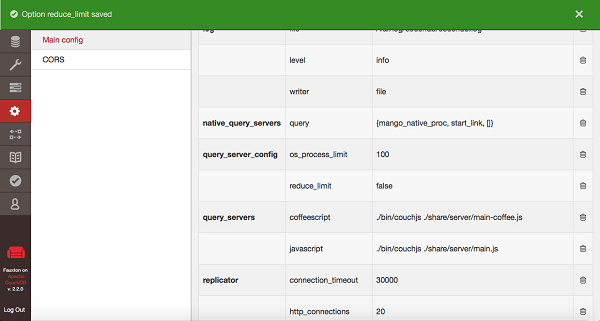
Once you have done this, you can also do the same using the standard REST API. To see what are all the users available. You can run the following command
curl http://127.0.0.1:5984/_all_dbs
{"error":"unauthorized","reason":"You are not a server admin."}
The error is common you need to authenticate the user when invoking the REST API. This can be fixed by adding a user authentication while making the call.
curl http://admin:password@127.0.0.1:5984/_all_dbs
["_global_changes","_replicator","_users"]
If you wish to see the "_global_changes" DB realted information you will do so by
curl http://admin:password@127.0.0.1:5984/_global_changes
{"db_name":"_global_changes","update_seq":"4-g1AAAAFTeJzLYWBg4MhgTmEQTM4vTc5ISXLIyU9OzMnILy7JAUoxJTIkyf___z8rkQGPoiQFIJlkD1bHiE-dA0hdPGHzEkDq6gmal8cCJBkagBRQ6Xz8ZkLULoCo3U-M2gMQtfeJUfsAohboXqYsANYbbzI","sizes":{"file":13699,"external":16,"active":860},"purge_seq":0,"other":{"data_size":16},"doc_del_count":0,"doc_count":4,"disk_size":13699,"disk_format_version":6,"data_size":860,"compact_running":false,"cluster":{"q":8,"n":1,"w":1,"r":1},"instance_start_time":"0"}Now we have completed the setup of CouchDB, we will install the Apache OpenWhisk.
We need to clone the git repository. The below command will clone the code into the openwhisk folder.
root@iZa2d4spx9n9e90jofcyxoZ:~# git clone https://github.com/apache/incubator-openwhisk.git openwhiskChange to openwhisk directory and run the scripts.
~root@iZa2d4spx9n9e90jofcyxoZ:~# cd openwhisk/Run the scripts, with sudo, as these scripts invoke sudo as part of their process
root@iZa2d4spx9n9e90jofcyxoZ:~/openwhisk# (cd tools/ubuntu-setup && ./all.sh)

+ JAVA_SOURCE=open
+ SOURCE=./all.sh
++ dirname ./all.sh
+ SCRIPTDIR=.
+ echo '*** installing basics'
*** installing basics
+ /bin/bash ./misc.sh
+ export DEBIAN_FRONTEND=noninteractive
+ DEBIAN_FRONTEND=noninteractive
You can see as above the script is running and it will take a while, keep track on the console, whether the installation is successful or any warnings popped up. If your installation is successful, you will see the below output at the end.
docker-ce is already the newest version (5:18.09.0~3-0~ubuntu-bionic).
0 upgraded, 0 newly installed, 0 to remove and 3 not upgraded.
+ sudo -E bash -c 'echo '\''DOCKER_OPTS="-H tcp://0.0.0.0:4243 -H unix:///var/run/docker.sock --storage-driver=aufs"'\'' >> /etc/default/docker'
++ whoami
+ sudo gpasswd -a root docker
Adding user root to group docker
+ sudo service docker restart
Now, it's time to run some ansible scripts, the scripts are generated under the ansible folder under openwhisk, change to ansible directory
root@iZa2d4spx9n9e90jofcyxoZ:~/openwhisk# cd ansibleExport all the DB parameters, the DB IP should be accessible from outside the Virtual Machine
export OW_DB=CouchDB
root@iZa2d4spx9n9e90jofcyxoZ:~/openwhisk/ansible# export OW_DB_PROTOCOL=http
root@iZa2d4spx9n9e90jofcyxoZ:~/openwhisk/ansible# export OW_DB_HOST=<public IP>
root@iZa2d4spx9n9e90jofcyxoZ:~/openwhisk/ansible# export OW_DB_PORT=5984
root@iZa2d4spx9n9e90jofcyxoZ:~/openwhisk/ansible# export OW_DB_USERNAME=admin
root@iZa2d4spx9n9e90jofcyxoZ:~/openwhisk/ansible# export OW_DB_PASSWORD=password
Apache Openwhisk team does a great job in providing the scripts for the complex installation, when we run the setup.yml it will generate all the config files
root@iZa2d4spx9n9e90jofcyxoZ:~/openwhisk/ansible# ansible-playbook setup.ymlGathering Facts -------------------- 0.81s
gen hosts if 'local' env is used --- 0.48s
generate invoker certificates ------ 0.48s
generate controller certificates --- 0.47s
ensure controller files directory exists ----- 0.46s
gen untrusted client certificate for host ---- 0.41s
ensure invoker files directory exists -------- 0.38s
gen untrusted server certificate for host ---- 0.37s
prepare db_local.ini --------------- 0.32s
check if db_local.ini exists? ------ 0.18s
ensure kafka files directory exists 0.04s
get the docker-machine ip ---------- 0.04s
gen hosts for docker-machine ------- 0.03s
clean up old kafka keystore -------- 0.03s
generate kafka certificates -------- 0.03s
find the ip of docker-machine ------ 0.03sInstall the prerequsites on all the openwhisk nodes
root@iZa2d4spx9n9e90jofcyxoZ:~/openwhisk/ansible# ansible-playbook prereq.ymlGathering Facts ------------------------ 0.78s
prereq : install docker for python ----- 0.66s
prereq : install requests -------------- 0.64s
prereq : install httplib2 -------------- 0.64s
Gathering Facts ------------------------ 0.55s
Gathering Facts ------------------------ 0.55s
Gathering Facts ------------------------ 0.55s
prereq : check for pip ----------------- 0.44s
prereq : install pip ------------------- 0.03s
prereq : remove docker ----------------- 0.03s
prereq : remove requests --------------- 0.03s
prereq : remove httplib2 --------------- 0.02sBuild and distribute the docker images using docker, make sure you move to the openwhisk root repository
root@iZa2d4spx9n9e90jofcyxoZ:~/openwhisk# ./gradlew distDockerDeploying CouchDB and openwhisk deployment
root@iZa2d4spx9n9e90jofcyxoZ:~/openwhisk/ansible# ansible-playbook initdb.yml
root@iZa2d4spx9n9e90jofcyxoZ:~/openwhisk/ansible# ansible-playbook wipe.yml
root@iZa2d4spx9n9e90jofcyxoZ:~/openwhisk/ansible# ansible-playbook openwhisk.yml
root@iZa2d4spx9n9e90jofcyxoZ:~/openwhisk/ansible# ansible-playbook postdeploy.yml
Now you can find the docker process by running the following command,
root@iZa2d4spx9n9e90jofcyxoZ:~/openwhisk/ansible# docker psYou will see all the nodes are running with different workloads on them
CONTAINER ID        IMAGE                            COMMAND                  CREATED             STATUS              PORTS                                                                                                 NAMES
73c17753ad74        nginx:1.13                       "nginx -g 'daemon of…"   2 minutes ago       Up 2 minutes        0.0.0.0:80->80/tcp, 0.0.0.0:443->443/tcp, 0.0.0.0:8443->8443/tcp                                      nginx
b51d882d6295        openwhisk/nodejs6action:latest   "/bin/sh -c 'node --…"   2 minutes ago       Up 2 minutes                                                                                                              wsk00_4_prewarm_nodejs6
cb6d90d7fce5        openwhisk/nodejs6action:latest   "/bin/sh -c 'node --…"   2 minutes ago       Up 2 minutes                                                                                                              wsk00_2_prewarm_nodejs6
e83e0a8ff8a3        whisk/invoker:latest             "/bin/sh -c 'exec /i…"   2 minutes ago       Up 2 minutes        0.0.0.0:17000->17000/tcp, 0.0.0.0:18000->18000/tcp, 0.0.0.0:12001->8080/tcp                           invoker0
3f1287e56e07        whisk/controller:latest          "/bin/sh -c 'exec /i…"   10 minutes ago      Up 10 minutes       0.0.0.0:15000->15000/tcp, 0.0.0.0:16000->16000/tcp, 0.0.0.0:8000->2551/tcp, 0.0.0.0:10001->8080/tcp   controller0
e4f4b8a35182        wurstmeister/kafka:0.11.0.1      "start-kafka.sh"         10 minutes ago      Up 10 minutes       0.0.0.0:9072->9072/tcp, 0.0.0.0:9093->9093/tcp                                                        kafka0
db10c72113e4        zookeeper:3.4                    "/docker-entrypoint.…"   10 minutes ago      Up 10 minutes       0.0.0.0:2181->2181/tcp, 0.0.0.0:2888->2888/tcp, 0.0.0.0:3888->3888/tcp                                zookeeper0
71df5847d252        redis:3.2                        "docker-entrypoint.s…"   22 minutes ago      Up 22 minutes       0.0.0.0:6379->6379/tcp                                                                                redis
You can see all the relevant dependencies nginx, nodejs6, kafka, redis, zookeeper working on different docker containers
root@iZa2d4spx9n9e90jofcyxoZ:~/openwhisk/ansible# ansible-playbook -i environments/local openwhisk.ymlChange to binaries of the openwhisk directory, and add the tool to the path
root@iZa2d4spx9n9e90jofcyxoZ:~/openwhisk/bin# export PATH=$PATH:$PWDroot@iZa2d4spx9n9e90jofcyxoZ:~/openwhisk/bin# wsk
____ ___ _ _ _ _ _
/\ \ / _ \ _ __ ___ _ __ | | | | |__ (_)___| | __
/\ /__\ \ | | | | '_ \ / _ \ '_ \| | | | '_ \| / __| |/ /
/ \____ \ / | |_| | |_) | __/ | | | |/\| | | | | \__ \ <
\ \ / \/ \___/| .__/ \___|_| |_|__/\__|_| |_|_|___/_|\_\
\___\/ tm |_|You will be able to see the openwhisk after the successful installation like above message
Create file hello.js and update with the file
sudo nano hello.jsThen, copy the below code
/**
 * Hello world as an OpenWhisk action.
 */
function main(params) {
    var name = params.name || 'World';
    return {payload:  'Hello, ' + name + '!'};
}
Create an action named 'hello' using the command line tool
wsk action create hello hello.jsYou can invoke the action using this, add -i for disabling authentication
wsk action invoke hello --result{
"payload": "Hello, World!"
}Congratulations! It means Apache OpenWhisk is installed on your Ubuntu machine and operational. You can learn about working on Apache OpenWhisk here: https://github.com/apache/incubator-openwhisk
Alibaba Cloud QuickBI Demo: Analyzing US Census Bureau Data Set

2,593 posts | 790 followers
FollowAlibaba Clouder - April 12, 2019
Alibaba Clouder - June 3, 2020
Alibaba Cloud Serverless - February 22, 2022
francisndungu - February 24, 2020
francisndungu - February 24, 2020
francisndungu - December 10, 2019

2,593 posts | 790 followers
Follow Function Compute
Alibaba Cloud Function Compute is a fully-managed event-driven compute service. It allows you to focus on writing and uploading code without the need to manage infrastructure such as servers.
Learn More OSS(Object Storage Service)
An encrypted and secure cloud storage service which stores, processes and accesses massive amounts of data from anywhere in the world
Learn More Marketplace
Marketplace is an online market for users to search and quickly use the software as image for Alibaba Cloud products.
Learn MoreMore Posts by Alibaba Clouder