A global database network (GDN) consists of multiple PolarDB clusters that are deployed in multiple regions across the globe. This topic describes GDN and its features.
Data is synchronized across all clusters in a GDN, which enables geo-disaster recovery. All clusters handle read requests while write requests are handled only by the primary cluster. GDN is ideal for the following scenarios:
If you deploy applications in multiple regions but deploy databases only in the primary region, applications that are not deployed in the primary region must communicate with the databases that may be located in a geographically distant region. This results in high latency and poor performance. GDN replicates data across regions at low latencies and provides cross-region read/write splitting. GDN allows applications to read data from a database local to the region. This allows databases to be accessed within 2 seconds.
GDN supports geo-disaster recovery regardless of whether your applications are deployed in the same region. If a fault occurs in the region where the primary cluster is deployed, you need only to manually switch your service over to a secondary cluster.
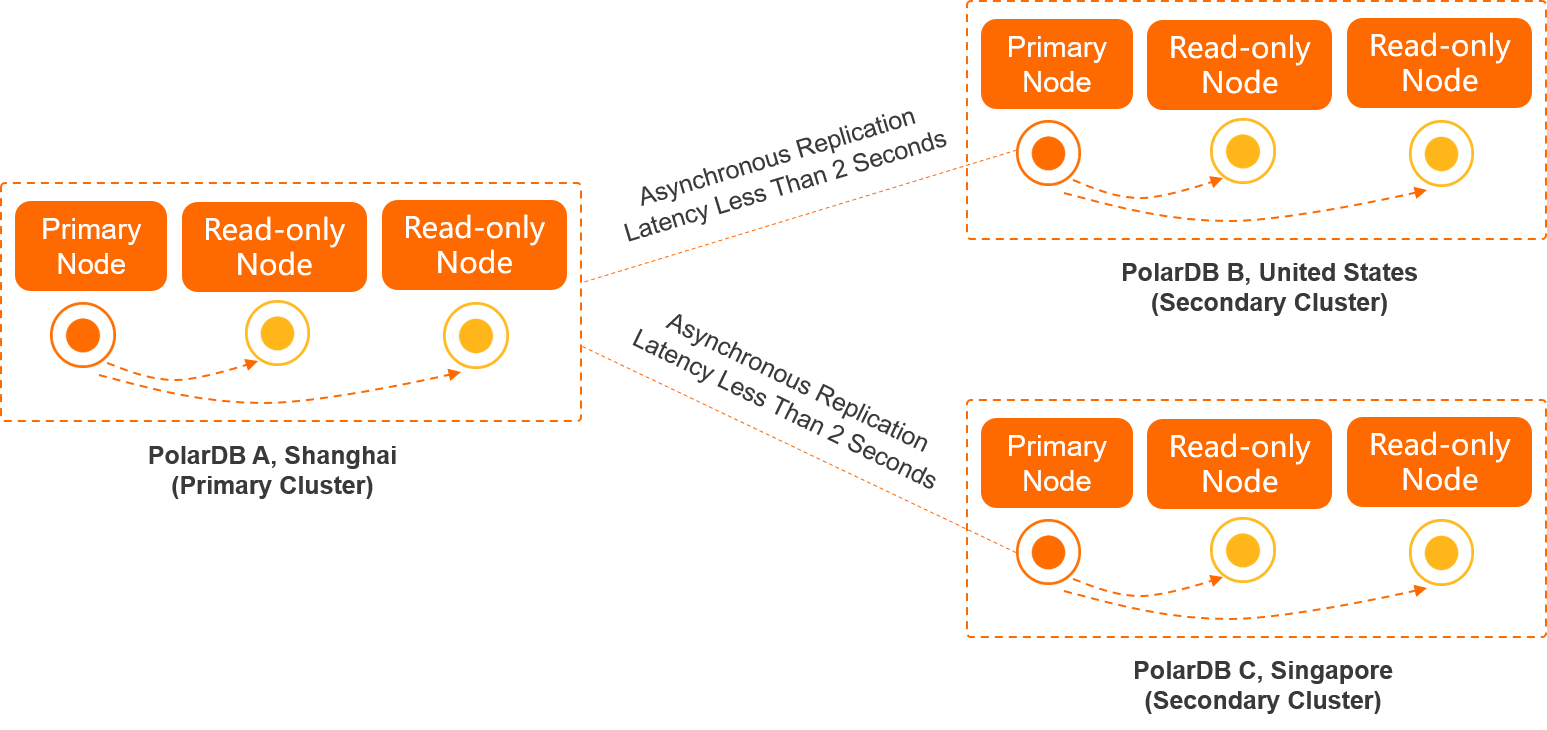
Geo-disaster recovery and cross-region deployment are typical scenarios in which global database networks (GDNs) are used.
The geo-disaster recovery feature allows you to achieve high availability across regions. This enhances data security and improves service availability. If a data center breakdown occurs, services can be rapidly recovered. Architectures can be implemented, such as three data centers across two zones, four data centers across two zones, and six data centers across three zones.
The databases are deployed in two PolarDB clusters:
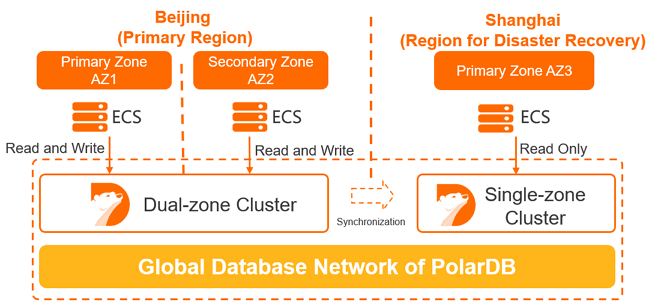
The application is deployed in the China (Beijing) region and performs local read and write operations on the database in AZ 1.
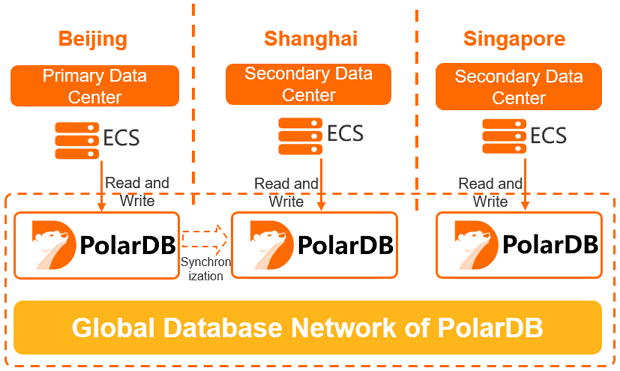
The services of an enterprise may be deployed across a country or on a global scale. In this case, data must be synchronized to enable cross-region reads and writes. GDN ensures that the database can be accessed from multiple regions across the globe. In most cases, read requests are forwarded to the secondary cluster in the same region, while write requests are forwarded to the primary cluster.
The following example shows the service architecture:
1. Log on to the PolarDB console.
2. In the left-side navigation pane, click Cluster. On the Cluster page, click Create Cluster to create primary cluster first.

3. Back to the left-side navigation pane, click Global Database Network. On the Global Database Network page, click Create GDN.

4. In the Create GDN dialog box, specify the following parameters.
| Parameter | Description |
| Name | The name of the GDN that you want to create. We recommend that you set a descriptive name that makes it easy to identify. GDN names do not have to be unique. |
| Primary Region | The region where the primary cluster is deployed. Note Select the region where the primary cluster is deployed. |
| Primary Cluster | Select an existing cluster as the primary cluster of the GDN. |
5. After you specify the preceding parameters, click OK.
6. Back to the left-side navigation pane. Find the GDN to which you want to add a secondary cluster and click Add Secondary Cluster in the Actions column.

7. On the buy page, select Subscription or Pay-As-You-Go.
8. Configure the parameters described in the following table.
| Parameter | Description |
| Region | The region where you want to create a cluster. You cannot change the region after the cluster is created. Note Make sure that the PolarDB cluster and the ECS instance to which you want to connect are deployed in the same region. Otherwise, the PolarDB cluster and the ECS instance can communicate only over the Internet, which results in decreased cluster performance. |
| Create Type | The type of cluster to be created. Select Create Secondary Cluster. |
| GDN | The GDN in which you want to create a secondary cluster. Note By default, the GDN that you select before you create the secondary cluster is used. |
| Primary Availability Zone | The primary zone where the cluster is deployed.A zone is an independent geographical location in a region. All of the zones in a region provide the same level of service performance. You can deploy your PolarDB cluster and ECS instance in the same zone or in different zones.You need to specify only the primary zone. The system automatically selects a secondary zone. |
| Network Type | This parameter can be set only to VPC. You do not need to change this parameter value.Note Before you use the classic network, you must select a virtual private cloud (VPC). After the cluster is created, configure the classic network. For more information, see Cluster endpoints and primary endpoints. |
| VPC**VSwitch | Make sure that the PolarDB cluster and the ECS instance to which you want to connect are deployed in the same VPC. Otherwise, the cluster and the ECS instance cannot communicate over a VPC, which results in decreased cluster performance.If you have an existing VPC that meets your network requirements, select the VPC. For example, if you have created an ECS instance and the VPC to which the ECS instance is connected meets your network requirements, select this VPC. Otherwise, use the default VPC and the default vSwitch. Default VPC: Only one VPC is specified as the default VPC in the region that you select.The default VPC uses a 16-bit subnet mask. For example, the CIDR block 172.31.0.0/16 provides up to 65,536 internal IP addresses. The default VPC does not consume the quota of the VPCs that you can create on Alibaba Cloud. Default vSwitch: Only one vSwitch is specified as the default vSwitch in the zone that you select. The default VPC uses a 20-bit subnet mask. For example, the CIDR block 172.16.0.0/20 provides up to 4,096 internal IP addresses. The default vSwitch does not consume the quota of the vSwitches that you can create in a VPC. If the default VPC and vSwitch cannot meet your business requirements, you can create your own VPC and vSwitch. For more information, see Create and manage a VPC. |
| Compatibility | MySQL 8.0, MySQL 5.7, and MySQL 5.6 are supported. The value of this parameter must be specified the same as the compatibility of the primary cluster. |
| Edition | This parameter can only be set to Cluster (2-16 Nodes) (Recommended). You do not need to change this parameter value. |
| Node Specification | Specify the node specification based on your business requirements. For more information, see Specifications of compute nodes. |
| Nodes | By default, each Cluster (2-16 Nodes) (Recommended) cluster consists of one primary node and one read-only node. Both of the nodes have the same specifications. Keep the default setting. Note If the primary node fails, the system upgrades the read-only node to a primary node and creates another read-only node. For more information about read-only nodes, see Architecture. |
| Storage Cost | The storage cost. You do not need to change this parameter value. You are charged by hour for the actual volume of storage space that is consumed. For more information, see Billable items. Note You do not need to specify the storage capacity when you create a cluster. The system scales the storage capacity when the amount of data is increased or decreased. |
| Time Zone | The time zone of the cluster. The default value is UTC+08:00. |
| Table Name Case Sensitivity | Specifies whether table names are case-sensitive. The default value is Not Case-sensitive. If the table names of your on-premises database are case-sensitive, we recommend that you select Case-sensitive. This ensures that data is migrated smoothly. Note After the cluster is created, you cannot change the value of this parameter. We recommend that you configure this parameter based on your business requirements. |
| Release Cluster | The backup retention policy that is used when the cluster is deleted or released. The default value is Retain Last Automatic Backup (Automatic Backup before Release) (Default).Retain Last Automatic Backup (Automatic Backup before Release) (Default): The system retains the last backup when you release the cluster. Retain All Backups: The system retains all backups when you release the cluster. Delete All Backups (Cannot be restored): The system retains no backups when you release the cluster. Note You may be charged for the backups that are retained after you delete or release a cluster. For more information, see Release a cluster. |
| Cluster Name | The name of the new cluster. It must be 2 to 128 characters in length and can contain letters, digits, periods (.), underscores (_), and hyphens (-). It must start with a letter.If you leave this parameter empty, the system generates a cluster name. You can change the cluster name after the cluster is created. |
| Resource Group | Select a resource group from available resource groups. For more information, see Create a resource group. Note A resource group is a group of resources that belong to an Alibaba Cloud account. Resource groups allow you to manage these resources in a centralized manner. A resource belongs to only one resource group. For more information, see Use RAM to create and authorize resource groups. |
9. If you create a subscription cluster, set Purchase Plan and Number and click Buy Now on the right side.
10. On the Confirm Order page, confirm your order information. Read and accept the terms of service.
After you complete the payment, it requires 10 to 15 minutes to create the cluster. Then, the newly created cluster is displayed on the Clusters page.
A global database network (GDN) consists of multiple PolarDB clusters that are distributed across regions around the world.
A GDN does not provide an endpoint. However, each cluster in the GDN provides a separate cluster endpoint. A GDN consists of the primary cluster and secondary clusters. Applications in each region use the endpoint of the cluster that is deployed in the same region to connect to the GDN.
Data is synchronized from the primary cluster to all secondary clusters in a GDN. In most cases, read requests are forwarded to the secondary cluster in the same region. Write requests are forwarded to the primary cluster.

Applications in different regions connect to the GDN by using the cluster endpoint of the cluster that is deployed in the same region as the applications. The GDN automatically performs read/write splitting.
1. Connect GDN primary cluster via Primary Cluster Endpoint
2. Create a table and insert a record
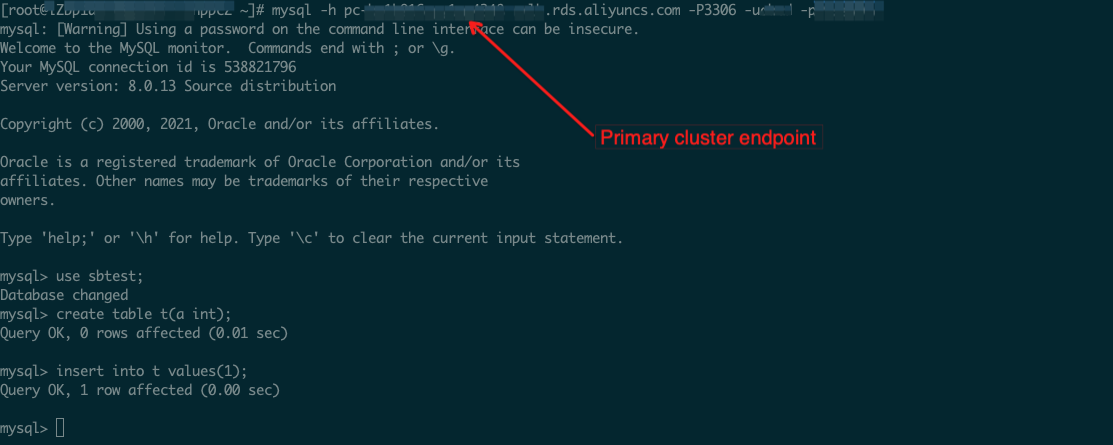
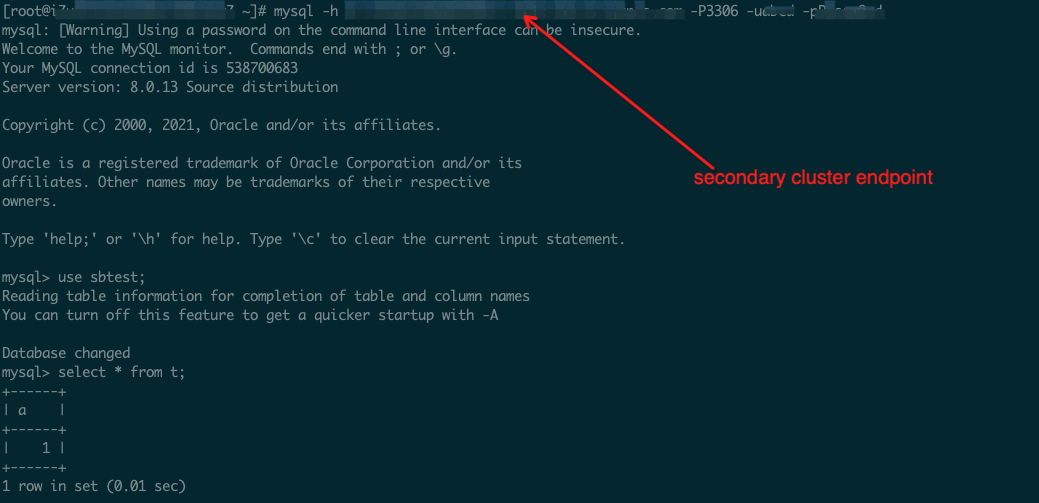
3. Connect GDN secondary cluster via Secondary Cluster Endpoint
4. Read that record locally from secondary cluster
Find the GDN that you want to manage and click GDN ID/Name.
In the Clusters section, find the cluster for which you want to trial a cross region primary switching.
Click Switch to Primary Cluster button, wait for a few minutes. Then the old secondary cluster become a new primary cluster.

Implementation of Real-Time Data Warehouse Storage and Analysis of Various Technical Architectures
ApsaraDB - April 27, 2023
ApsaraDB - May 30, 2023
ApsaraDB - July 12, 2023
ApsaraDB - April 26, 2023
ApsaraDB - April 27, 2023
ApsaraDB - April 27, 2023
 PolarDB for MySQL
Alibaba Cloud PolarDB for MySQL is a cloud-native relational database service 100% compatible with MySQL.
Learn More PolarDB for PostgreSQL
Alibaba Cloud PolarDB for PostgreSQL is an in-house relational database service 100% compatible with PostgreSQL and highly compatible with the Oracle syntax.
Learn More PolarDB for Xscale
Alibaba Cloud PolarDB for Xscale (PolarDB-X) is a cloud-native high-performance distributed database service independently developed by Alibaba Cloud.
Learn More AnalyticDB for MySQL
AnalyticDB for MySQL is a real-time data warehousing service that can process petabytes of data with high concurrency and low latency.
Learn MoreMore Posts by ApsaraDB