By Suxing, Senior Engineer at Alibaba
This article shows how to extend the Kubernetes API through the Operator Framework based on current practices and use cases. This article consists of three parts: (1) basics of Operators, (2) basics of the Operator Framework and development process case study, and (3) Operators case study.
To start, let's take a look at the basic concepts involved in this article.
Webhooks are divided into mutating webhooks and validating webhooks. Mutating webhooks modify input objects, whereas validating webhooks only read input objects.
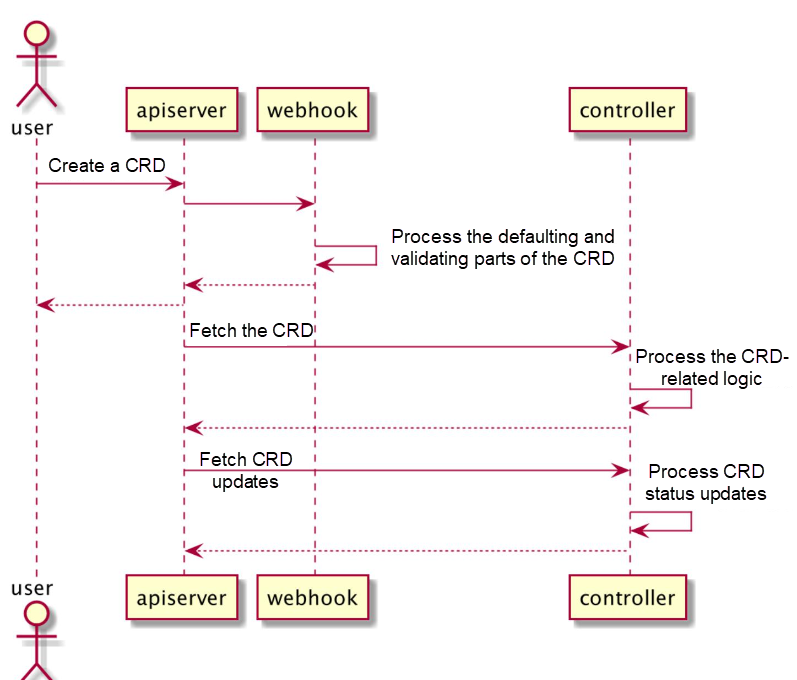
Workflow:
The Operator workflow is described at the high level and will be detailed through a case study later in this article.
To start, let's take a look at the basics of the Operator Framework. The Operator Framework provides webhooks and controllers and shields general underlying details from developers, allowing them to focus on implementing the O&M logic of managed applications without having to implement message notification triggers and re-queue upon failure.
Mainstream Operator frameworks include Kubebuilder and Operator SDK, both of which use controller-tools and controller-runtime. Kubebuilder provides comprehensive testing, deployment, and code scaffolding, whereas the Operator SDK provides better support for Ansible Operators and upper-layer operations.
This section shows how to use Kubebuilder through SidercarSets in Alibaba Cloud's open source project Kruise.
SidercarSets insert Sidecar containers (also called secondary containers) to pods. For example, you can insert containers used for monitoring and log collection to enrich the functions of the pods. SidercarSets update themselves based on the insertion status and pod status to record the secondary container status.
Procedure: Create a GitLab project and run the kubebuilder init --domain=kruise.io command.
Parameter description: The domain parameter indicates the group domain name used to register the CRD object.
Result: The dependency code library is pulled, and a code framework together with tool files, such as a Makefile and Dockerfile, is created.
The following is a simplified version of the created content:
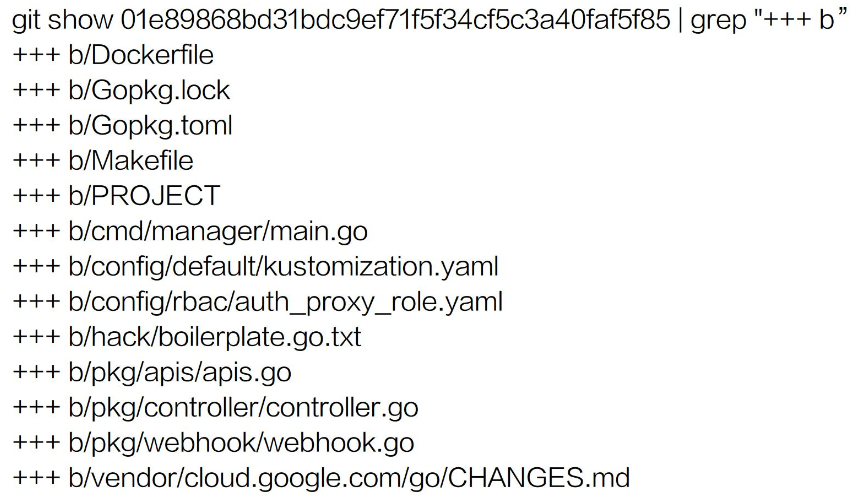
You can confirm the details in practice.
Procedure: Run the kubebuilder create api --group apps --version v1alpha1 --kind SidecarSet --namespace=false command.
The command creates a controller framework along with an API (or a CRD).
Parameter description:
Group: apps.kruise.io of the CRD consists of the group and domain parameters.The version parameter has three values specified by the community standard:
The parameters can be roughly divided into two types. The group, version, and kind parameters map to three important elements of the CRD metadata. You can refer to the general standards here when setting parameters. The namespaced parameter indicates whether the CRD is globally unique (similar to a node) or unique within the namespace (similar to a pod). Here, namespaced is set to false, indicating that the SidecarSet is globally unique.
Result:
Fill in the code after a CRD and a controller framework are created.
The result is as follows.
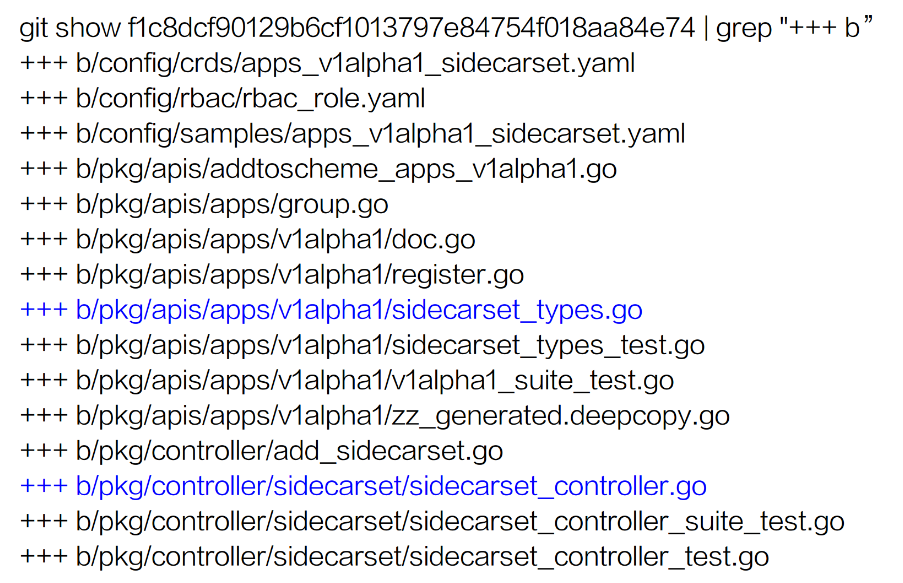
Pay attention to the content in blue. The CRD is defined by sidecarset_types.go, which must be filled in manually. The controller is defined by sidecarset_controller.go, which must also be filled in.
1. The created CRD is located in pkg/apis/apps/v1alpha1/sidecarset_types.go. Perform the following two operations:
(1) Adjust comments
The code generator depends on comments to generate code, so sometimes you need to adjust comments. In this example, adjust the following comments of the SidecarSet:
+genclient:nonNamespaced: Create a non-namespace object.
+kubebuilder:subresource:status: Create a status subresource.
+kubebuilder:printcolumn:name=MATCHED,type=integer,JSONPath=.status.matchedPods,description=xxx: kubectl get sidecarset: will be described later.
(2) Set fields
Set the following fields to make the CRD take effect:
2. Then, run the make command to generate code.
You do not need to complete underlying controller implementation for the CRD, such as gRPC interface configuration and codec.
The final fields are as follows.

SidecarSets are used to inject Sidecars into pods. Selector and Containers are defined in SidecarSetSpec, as shown in the figure on the left. Selector indicates the pods into which Sidecars are injected, and Containers defines a Sidecar container.
As shown in the figure on the right, SidecarSetStatus defines the status information. MatchedPods indicates the number of pods that match the SidecarSet. UpdatedPods indicates the number of pods injected with Sidecars. ReadyPods indicates the number of pods running normally.
For more information, see this document.
1. Create two mutating webhooks by running the following commands:
kubebuilder alpha webhook --group apps --version v1alpha1 --kind SidecarSet --type=mutating --operations=create
kubebuilder alpha webhook --group core --version v1 --kind Pod --type=mutating --operations=create
2. Create a validating webhook by running the following command:
kubebuilder alpha webhook --group apps --version v1alpha1 --kind SidecarSet --type=validating --operations=create,updateParameter description:
Result:
The result is as follows.
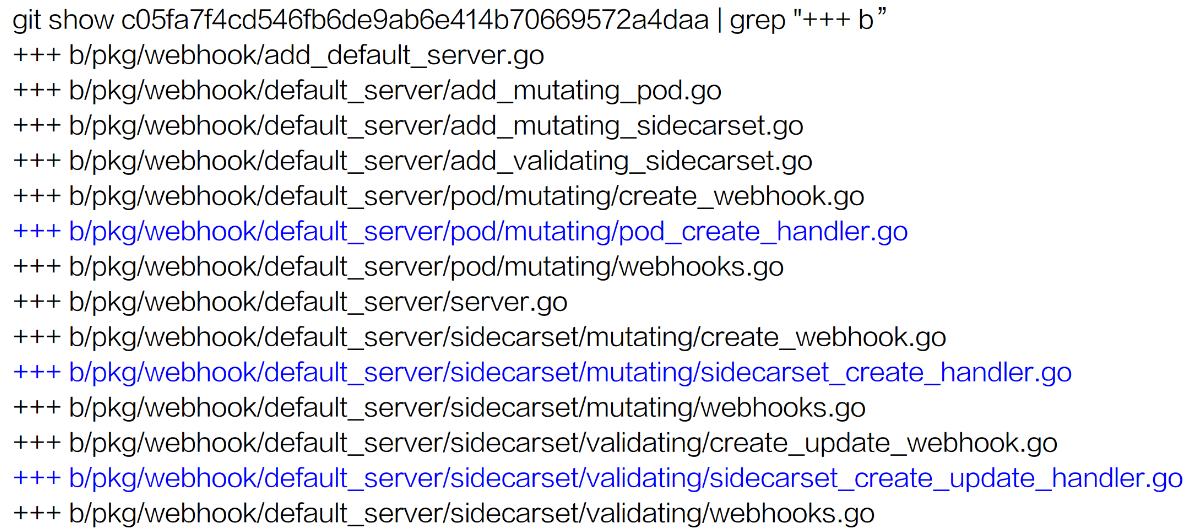
The content in blue indicates the three handlers that are created by running the preceding three commands. The following shows how to configure the handlers.
The created webhook handlers are located in:
Rewrite or fill in the code as follows.
The final code is as follows.
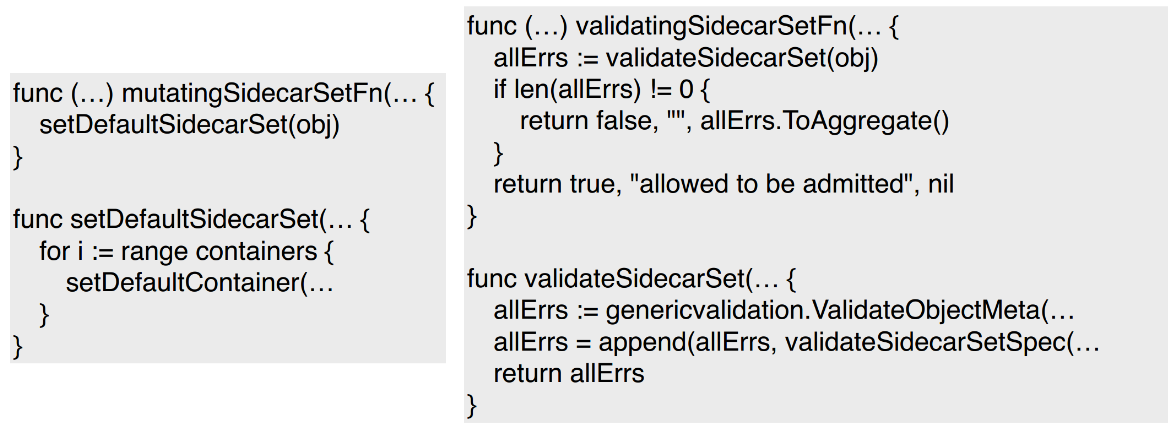
In Step 4, three webhooks are created, including the SidecarSet mutating webhook, SidecarSet validating webhook, and pod mutating webhook.
The preceding figure on the left shows the SidecarSet mutating webhook. The default settings are completed through setDefaultSidecarSet.
The preceding figure on the right shows the validating webhook used to check the fields of the SidecarSet.
The pod mutating webhook is not shown here. mutatingSidecarSetFn does not set the default value, but fetches the value of setDefaultSidecarSet and injects the value into pods.
The created controller framework is located in pkg/controller/sidecarset/sidecarset_controller.go. Make the following modifications:
The following figure shows the final code of the SidecarSet controller.

addPod is used to fetch the pod-matched SidecarSet and queues it up for processing by the Reconcile function.
After retrieving the SidecarSet, the Reconcile function selects the matched pod based on the Selector setting, calculates the cluster status based on the current pod status, and fills in the CRD status accordingly.
This section summarizes the SidecarSet workflow to help you understand how Operators work.
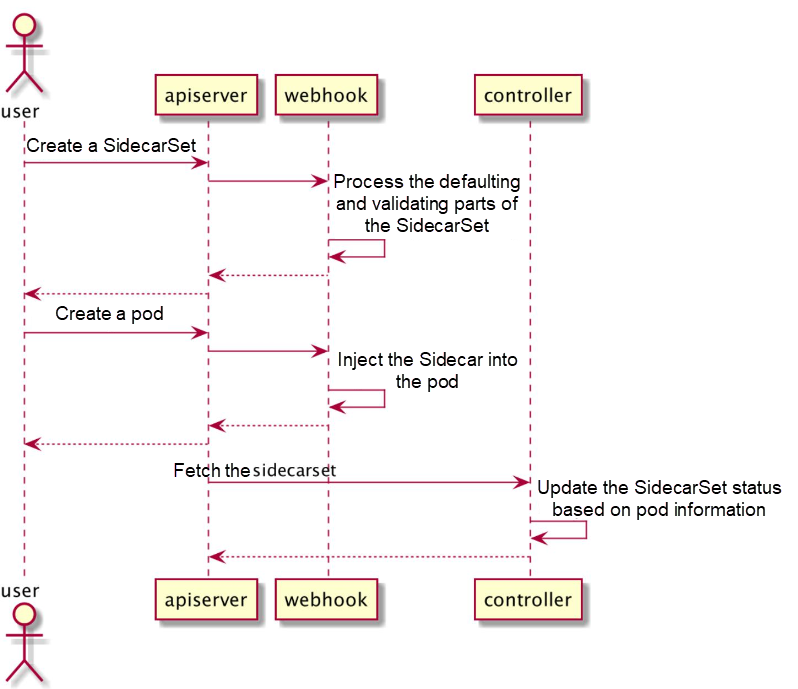
The preceding process is a simple implementation of a SidecarSet.
Additional information: Generally, webhooks implement business logic and update statuses through controllers. However, controllers are optional in some cases. In the preceding example, webhooks implement the main business logic without controller intervention.
Let's summarize what we have learned in this article:

634 posts | 55 followers
FollowAlibaba Developer - August 24, 2021
Alibaba Container Service - March 12, 2024
Alibaba Developer - April 7, 2020
Alibaba Developer - June 16, 2020
Alibaba Developer - September 23, 2020
Alibaba Container Service - February 24, 2021

634 posts | 55 followers
Follow Container Service for Kubernetes
Alibaba Cloud Container Service for Kubernetes is a fully managed cloud container management service that supports native Kubernetes and integrates with other Alibaba Cloud products.
Learn More ACK One
Provides a control plane to allow users to manage Kubernetes clusters that run based on different infrastructure resources
Learn More Cloud-Native Applications Management Solution
Accelerate and secure the development, deployment, and management of containerized applications cost-effectively.
Learn More Container Registry
A secure image hosting platform providing containerized image lifecycle management
Learn MoreMore Posts by Alibaba Cloud Native Community