By Liu Rui and Du Heng

From 2012 to 2013, the Alibaba middleware team has independently developed and open-sourced the third-generation distributed message engine RocketMQ. Its high performance, low latency, and accumulation-proof features support Alibaba Group's Double 11 business peaks with trillion-level data. Cloud product, Aliware MQ, also works in numerous scenarios, such as microservices, stream computing, IoT, asynchronous decoupling, and data synchronization.
In 2016, Alibaba Group donated RocketMQ to Apache Software Foundation. In the following year, RocketMQ was released from the Foundation and became a top-level open-source Apache project. Together with Apache Hadoop and Apache Spark, RocketMQ has brought many benefits to the developers in the global distribution and big data fields. However, in the cloud-native era, it is challenging but also valuable to implement ultra-simple O&M on large-scale clusters for RocketMQ as a stateful distributed service system.
RocketMQ supports multiple deployment modes. Take the basic dual-master-dual-slave architecture shown in the following figure, as an example.
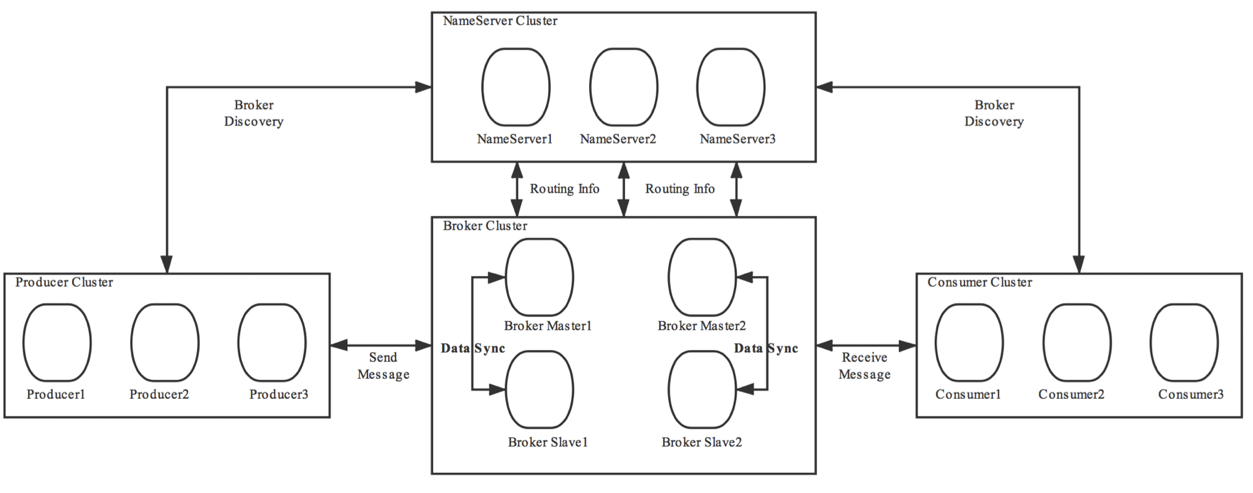
RocketMQ dual-master-dual-slave architecture
There are seven RocketMQ service instances: three NameServer instances, two Broker Master instances, and two Broker Slave instances.
The traditional deployment method performs environment and file configuration on each node manually or by writing scripts. In addition, as user businesses increase, the demand for seamless cluster scaling emerges. Traditionally, the O&M personnel visit different nodes and complete the deployment step by step according to the operation manuals and scripts, which is labor-consuming and prone to misoperations. Many companies may use some platforms and tools, such as Ansible, to help with automatic O&M. Moreover, an increasing number of companies have started integrating and using the Kubernetes-based cloud-native ecosystem.
Native resources, such as Deployment and StatefulSet provided by Kubernetes can be used to solve problems in managing stateless applications. However, there are many limitations for stateful applications, such as databases and RocketMQ. For example, for RocketMQ, scaling up is far more than starting new Pods. It also requires synchronously copying the broker status information, including the metadata such as the Topic information and subscriptions. At the same time, it requires correctly configuring the config parameters of the new broker, including brokerName and NameServer IP List, to make the newly scaled broker available. However, this cannot be done simply by users to compile StatefulSet, modify and then apply the size or replicas.
In fact, these are also what concern the Kubernetes developers. Therefore, the concept of custom resource definition and controller has been introduced, allowing developers to call the Kubernetes API with the Go language directly and solve the management problems regarding complex stateful applications by defining custom resources and compiling the corresponding controller logic. The code components that provide custom resources related to specific applications are called Operators. Operators are compiled by experts proficient in RocketMQ. Therefore, the professional knowledge in the application is shielded, allowing users to focus on and define only the final expected cluster state. This is also the design philosophy of the Kubernetes declarative API.
Based on Kubernetes, the Operator creates, configures, and manages complex stateful applications, such as distributed databases, by extending the Kubernetes API. Following the concept of custom controllers introduced since Kubernetes v1.7, Operators are built on custom resources and controllers, with specific application knowledge included. The key to implementing an Operator is the design of CRD (custom resource definition) and the controller.
From the Kubernetes perspective, Operators open the door to a new world for cloud-native applications. Custom resources allow developers to expand and add new functions, update existing functions, and automatically perform management tasks. These custom controllers function similarly to native Kubernetes components. Operators can directly use the Kubernetes API for development. Thus, they can create and change Pods and services and scale the running applications based on custom rules compiled by these controllers.
This article describes how to use RocketMQ Operator v0.2.1 to quickly create and deploy a RocketMQ service cluster in Kubernetes.
$ git clone https://github.com/apache/rocketmq-operator.git
$ cd rocketmq-operator$ ./install-operator.sh$ kubectl get pods
NAME READY STATUS RESTARTS AGE
rocketmq-operator-564b5d75d-jllzk 1/1 Running 0 108sPost-installation, the rocketmq-operator Pod will be in the running state similar to that in the preceding example.
apiVersion: rocketmq.apache.org/v1alpha1
kind: Broker
metadata:
  # name of broker cluster
  name: broker
spec:
  # size is the number of the broker cluster, each broker cluster contains a master broker and [replicaPerGroup] replica brokers.
  size: 1
  # nameServers is the [ip:port] list of name service
  nameServers: ""
  # replicationMode is the broker replica sync mode, can be ASYNC or SYNC
  replicationMode: ASYNC
  # replicaPerGroup is the number of each broker cluster
  replicaPerGroup: 1
  # brokerImage is the customized docker image repo of the RocketMQ broker
  brokerImage: apacherocketmq/rocketmq-broker:4.5.0-alpine
  # imagePullPolicy is the image pull policy
  imagePullPolicy: Always
  # resources describes the compute resource requirements and limits
  resources:
    requests:
      memory: "2048Mi"
      cpu: "250m"
    limits:
      memory: "12288Mi"
      cpu: "500m"
  # allowRestart defines whether allow pod restart
  allowRestart: true
  # storageMode can be EmptyDir, HostPath, StorageClass
  storageMode: EmptyDir
  # hostPath is the local path to store data
  hostPath: /data/rocketmq/broker
  # scalePodName is broker-[broker group number]-master-0
  scalePodName: broker-0-master-0
  # volumeClaimTemplates defines the storageClass
  volumeClaimTemplates:
    - metadata:
        name: broker-storage
      spec:
        accessModes:
          - ReadWriteOnce
        storageClassName: rocketmq-storage
        resources:
          requests:
            storage: 8Gi
---
apiVersion: rocketmq.apache.org/v1alpha1
kind: NameService
metadata:
  name: name-service
spec:
  # size is the the name service instance number of the name service cluster
  size: 1
  # nameServiceImage is the customized docker image repo of the RocketMQ name service
  nameServiceImage: apacherocketmq/rocketmq-nameserver:4.5.0-alpine
  # imagePullPolicy is the image pull policy
  imagePullPolicy: Always
  # hostNetwork can be true or false
  hostNetwork: true
  #  Set DNS policy for the pod.
  #  Defaults to "ClusterFirst".
  #  Valid values are 'ClusterFirstWithHostNet', 'ClusterFirst', 'Default' or 'None'.
  #  DNS parameters given in DNSConfig will be merged with the policy selected with DNSPolicy.
  #  To have DNS options set along with hostNetwork, you have to specify DNS policy
  #  explicitly to 'ClusterFirstWithHostNet'.
  dnsPolicy: ClusterFirstWithHostNet
  # resources describes the compute resource requirements and limits
  resources:
    requests:
      memory: "512Mi"
      cpu: "250m"
    limits:
      memory: "1024Mi"
      cpu: "500m"
  # storageMode can be EmptyDir, HostPath, StorageClass
  storageMode: EmptyDir
  # hostPath is the local path to store data
  hostPath: /data/rocketmq/nameserver
  # volumeClaimTemplates defines the storageClass
  volumeClaimTemplates:
    - metadata:
        name: namesrv-storage
      spec:
        accessModes:
          - ReadWriteOnce
        storageClassName: rocketmq-storage
        resources:
          requests:
            storage: 1Gi
Note that the storageMode: EmptyDir in this example indicates that EmptyDir is used for storage and data will be removed as Pods are deleted. Therefore, this method is only for development and testing purposes. Generally, HostPath or StorageClass is used for persistent data storage. When using HostPath, hostPath needs to be configured to declare the directory mounted to the host. When using storageClass, configure volumeClaimTemplates to declare the PVC template. For details, refer to RocketMQ Operator document.
Run the following command to apply the preceding YAML file:
$ kubectl apply -f example/rocketmq_v1alpha1_rocketmq_cluster.yaml
broker.rocketmq.apache.org/broker created
nameservice.rocketmq.apache.org/name-service created
Check the cluster Pod status as shown below:
$ kubectl get pods -owide
NAME                                 READY   STATUS    RESTARTS   AGE     IP             NODE             NOMINATED NODE   READINESS GATES
broker-0-master-0                    1/1     Running   0          27s     10.1.2.27      docker-desktop   <none>           <none>
broker-0-replica-1-0                 1/1     Running   0          27s     10.1.2.28      docker-desktop   <none>           <none>
name-service-0                       1/1     Running   0          27s     192.168.65.3   docker-desktop   <none>           <none>
rocketmq-operator-76b4b9f4db-x52mz   1/1     Running   0          3h25m   10.1.2.17      docker-desktop   <none>           <none>
Using the default file configuration of rocketmq_v1alpha1_rocketmq_cluster.yaml. You can see that one NameServer (name-service-0) and two brokers (one master and one slave) are started in the cluster.
Well done! So far, you have successfully deployed a RocketMQ service cluster by using the custom resources provided by the Operator.
Use the "tools.sh" script of RocketMQ to run the Producer example:
$ kubectl exec -it broker-0-master-0 bash
bash-4.4# sh ./tools.sh org.apache.rocketmq.example.quickstart.Producer
OpenJDK 64-Bit Server VM warning: ignoring option PermSize=128m; support was removed in 8.0
OpenJDK 64-Bit Server VM warning: ignoring option MaxPermSize=128m; support was removed in 8.0
06:56:29.145 [main] DEBUG i.n.u.i.l.InternalLoggerFactory - Using SLF4J as the default logging framework
SendResult [sendStatus=SEND_OK, msgId=0A0102CF007778308DB1206383920000, offsetMsgId=0A0102CF00002A9F0000000000000000, messageQueue=MessageQueue [topic=TopicTest, brokerName=broker-0, queueId=0], queueOffset=0]
...
06:56:51.120 [NettyClientSelector_1] INFO  RocketmqRemoting - closeChannel: close the connection to remote address[10.1.2.207:10909] result: true
bash-4.4#
Run Consumer example on the other node:
$ kubectl exec -it name-service-0 bash
bash-4.4# sh ./tools.sh org.apache.rocketmq.example.quickstart.Consumer
OpenJDK 64-Bit Server VM warning: ignoring option PermSize=128m; support was removed in 8.0
OpenJDK 64-Bit Server VM warning: ignoring option MaxPermSize=128m; support was removed in 8.0
07:01:32.077 [main] DEBUG i.n.u.i.l.InternalLoggerFactory - Using SLF4J as the default logging framework
Consumer Started.
ConsumeMessageThread_1 Receive New Messages: [MessageExt [queueId=0, storeSize=273, queueOffset=19845, sysFlag=0, bornTimestamp=1596768410268, bornHost=/30.4.165.204:53450, storeTimestamp=1596768410282, storeHost=/100.81.180.84:10911, msgId=6451B45400002A9F000014F96A0D6C65, commitLogOffset=23061458676837, bodyCRC=532471758, reconsumeTimes=0, preparedTransactionOffset=0, toString()=Message{topic='TopicTest', flag=0, properties={MIN_OFFSET=19844, TRACE_ON=true, eagleTraceId=1e04a5cc15967684102641001d0db0, MAX_OFFSET=19848, MSG_REGION=DefaultRegion, CONSUME_START_TIME=1596783715858, UNIQ_KEY=1E04A5CC0DB0135FBAA421365A5F0000, WAIT=true, TAGS=TagA, eagleRpcId=9.1}, body=[72, 101, 108, 108, 111, 32, 77, 101, 116, 97, 81, 32, 48], transactionId='null'}]]
ConsumeMessageThread_4 Receive New Messages: [MessageExt [queueId=1, storeSize=273, queueOffset=19637, sysFlag=0, bornTimestamp=1596768410296, bornHost=/30.4.165.204:53450, storeTimestamp=1596768410298, storeHost=/100.81.180.84:10911, msgId=6451B45400002A9F000014F96A0D7141, commitLogOffset=23061458678081, bodyCRC=1757146968, reconsumeTimes=0, preparedTransactionOffset=0, toString()=Message{topic='TopicTest', flag=0, properties={MIN_OFFSET=19636, TRACE_ON=true, eagleTraceId=1e04a5cc15967684102961002d0db0, MAX_OFFSET=19638, MSG_REGION=DefaultRegion, CONSUME_START_TIME=1596783715858, UNIQ_KEY=1E04A5CC0DB0135FBAA421365AB80001, WAIT=true, TAGS=TagA, eagleRpcId=9.1}, body=[72, 101, 108, 108, 111, 32, 77, 101, 116, 97, 81, 32, 49], transactionId='null'}]]
...Use the following command to delete a RocketMQ service cluster instance:
$ kubectl delete -f example/rocketmq_v1alpha1_rocketmq_cluster.yamlUse the following command to clear the RocketMQ Operator:
$ ./purge-operator.shClick Streaming & Messaging, and select the RocketMQ Operator;
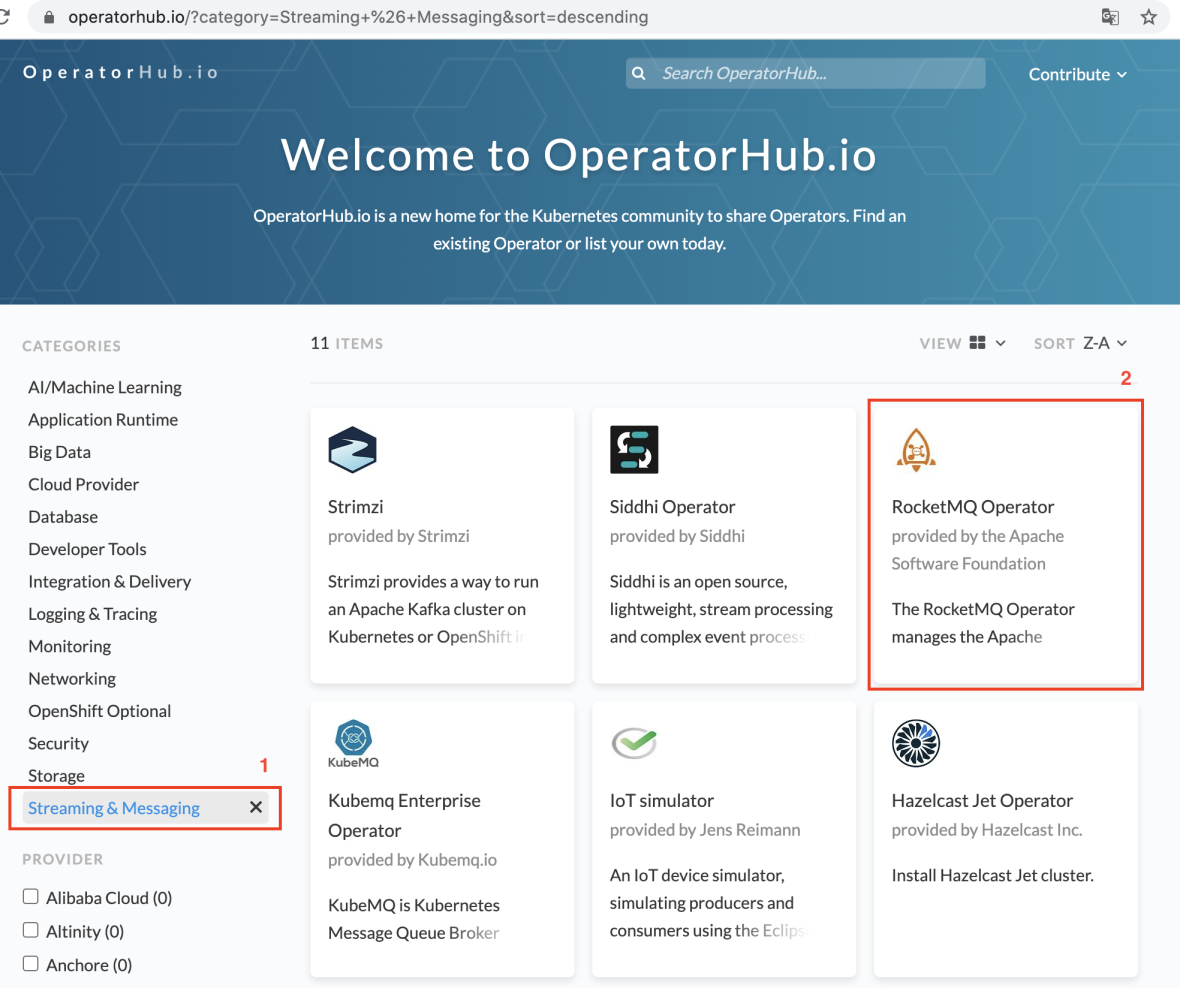
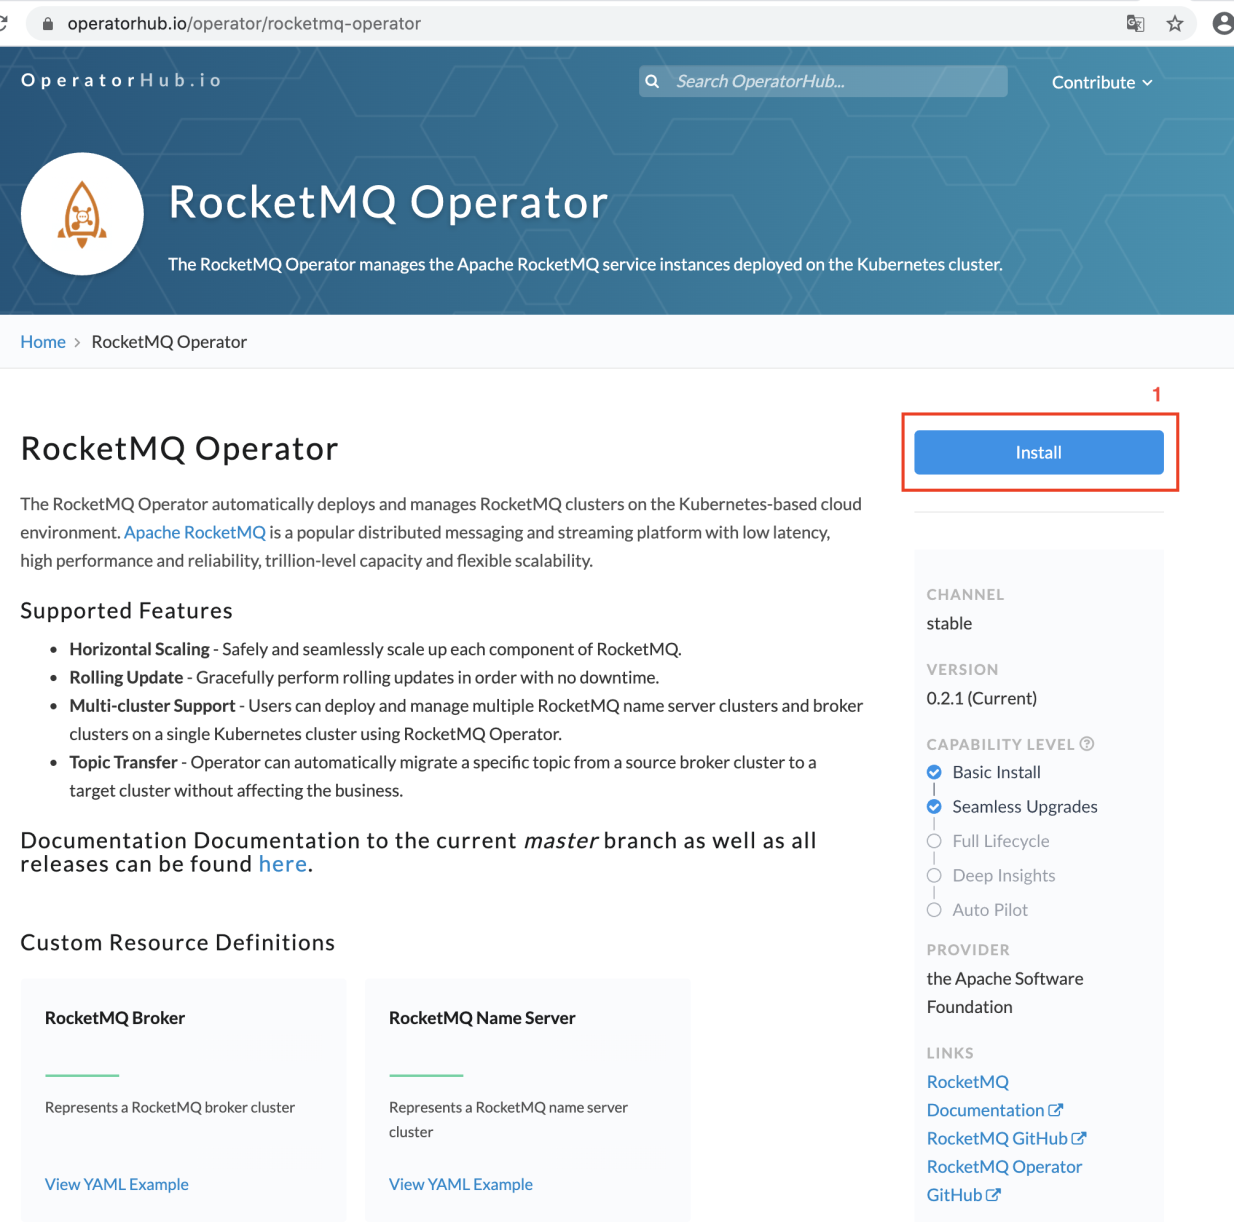
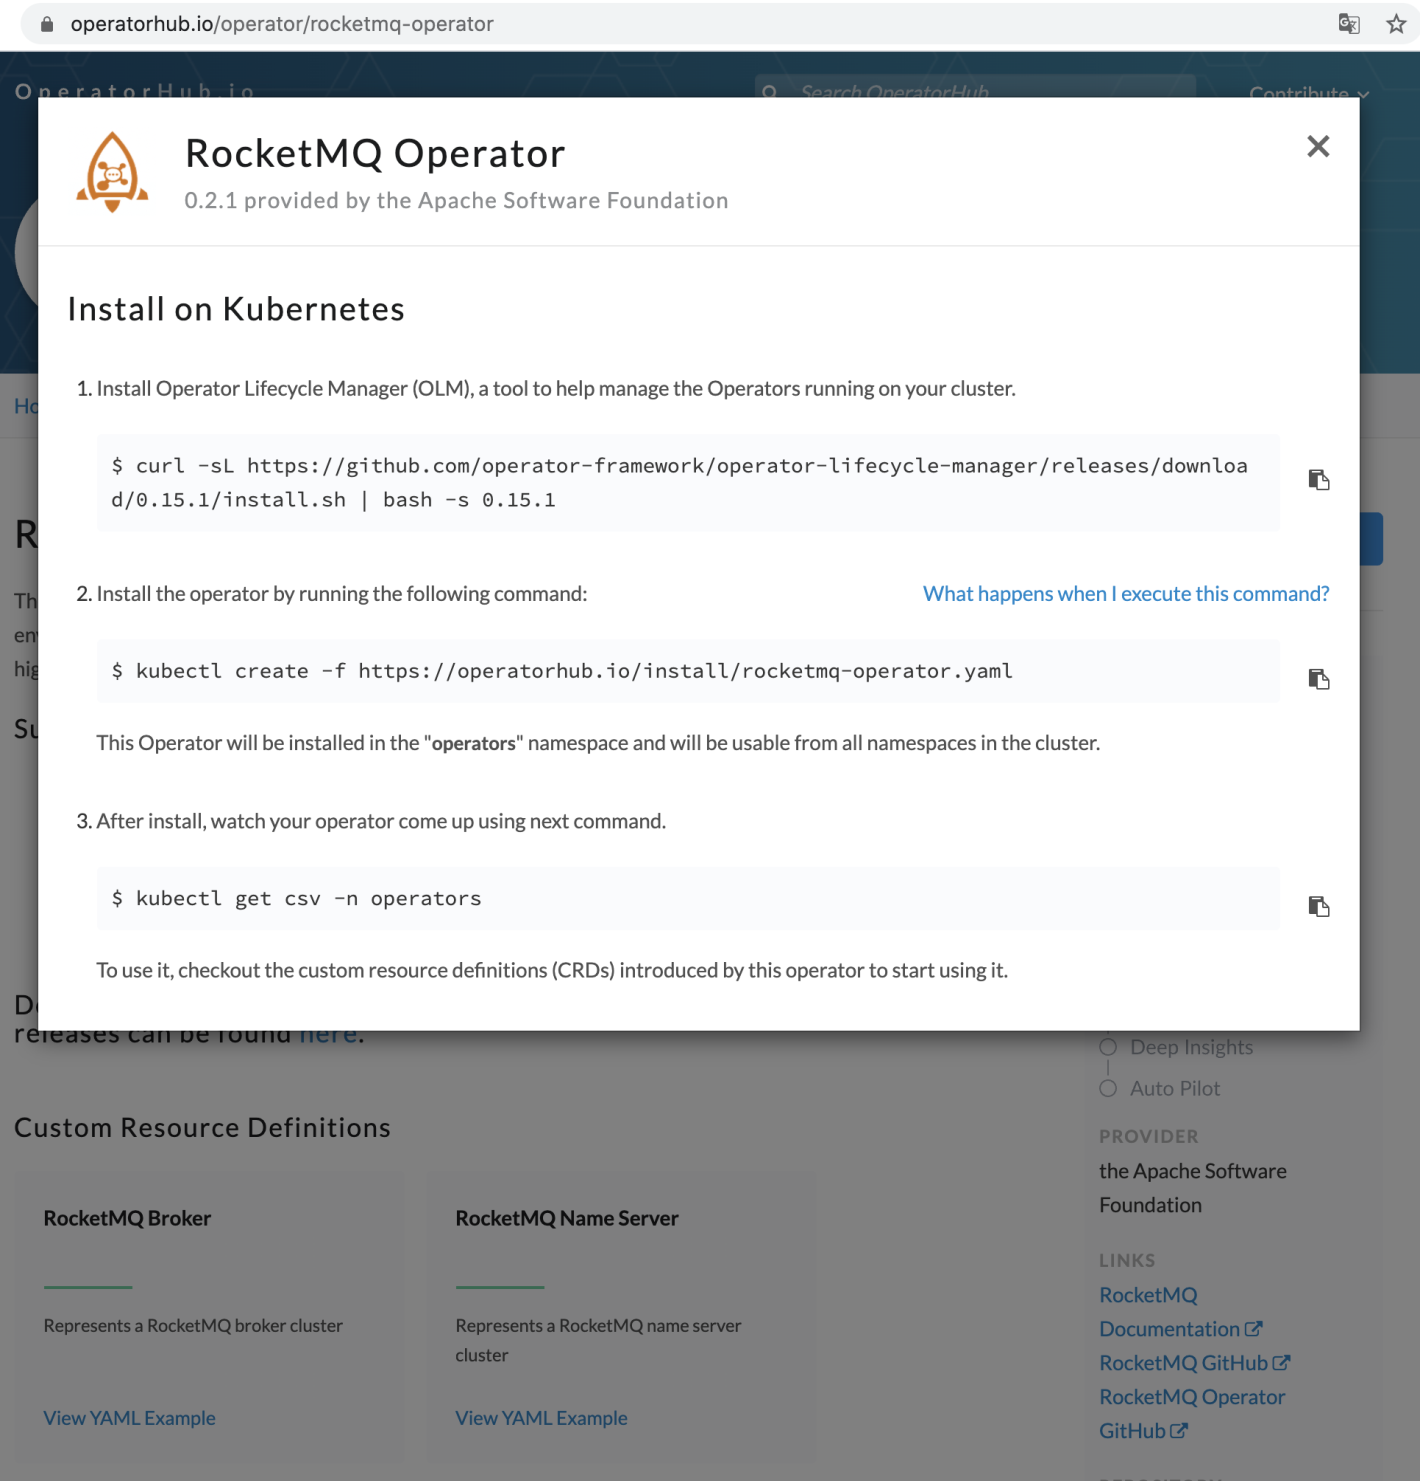
Reference: OLM installation documentation.
$ make run-console-local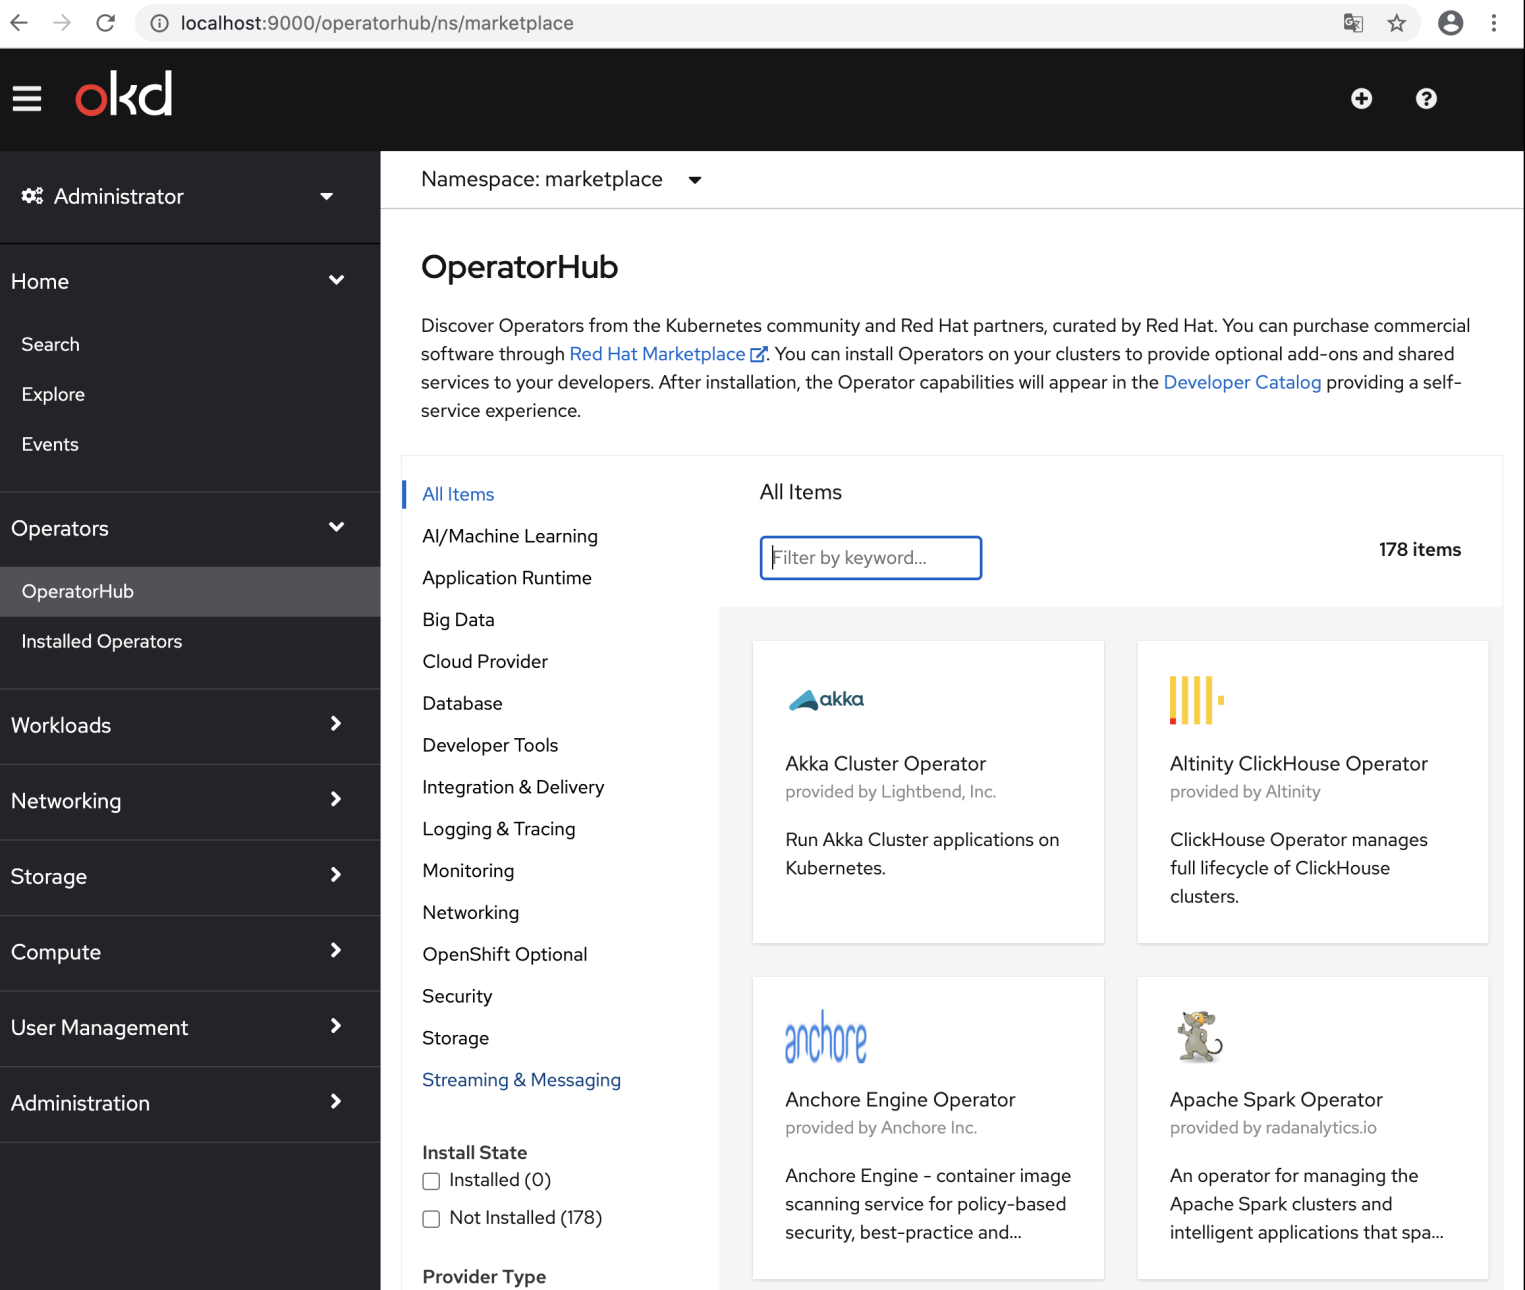
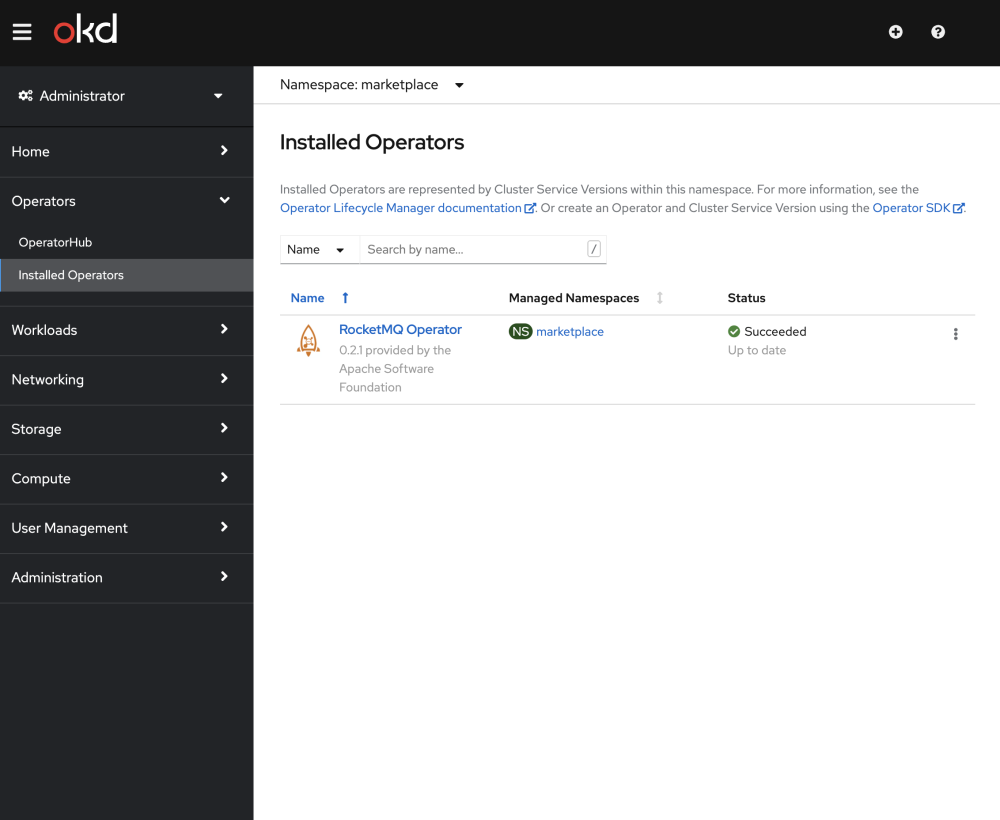
The Installed Operators interface
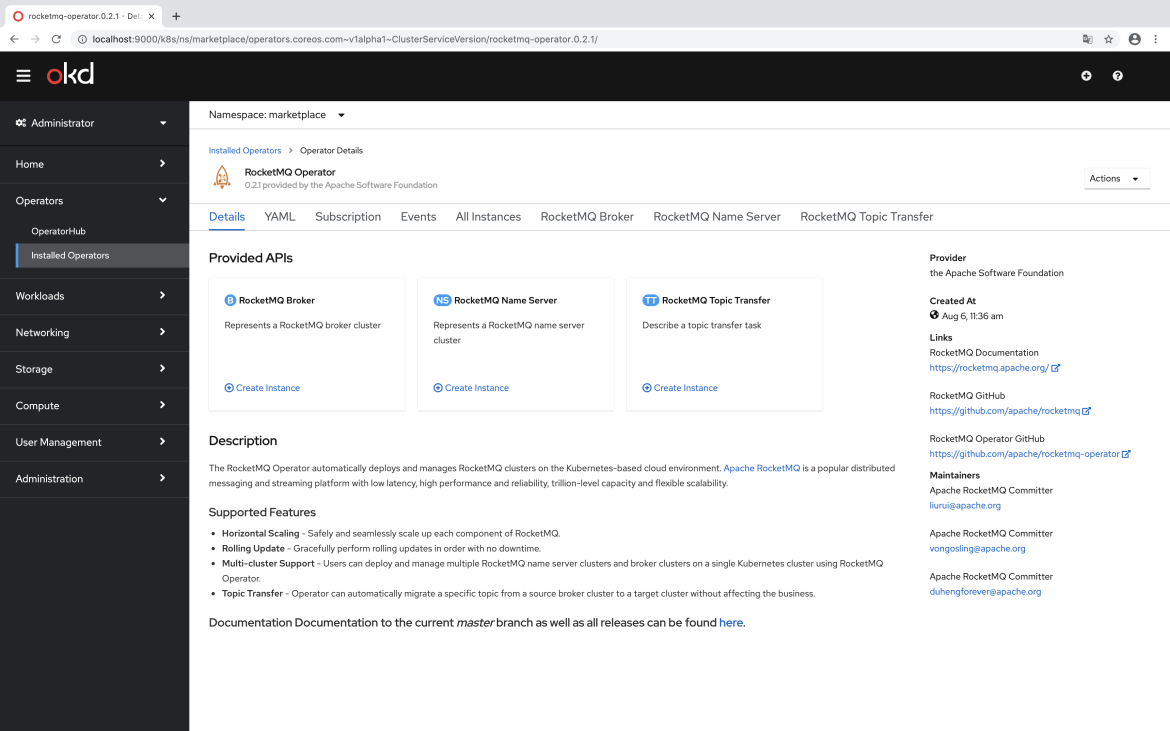
The introduction interface of RocketMQ Operator
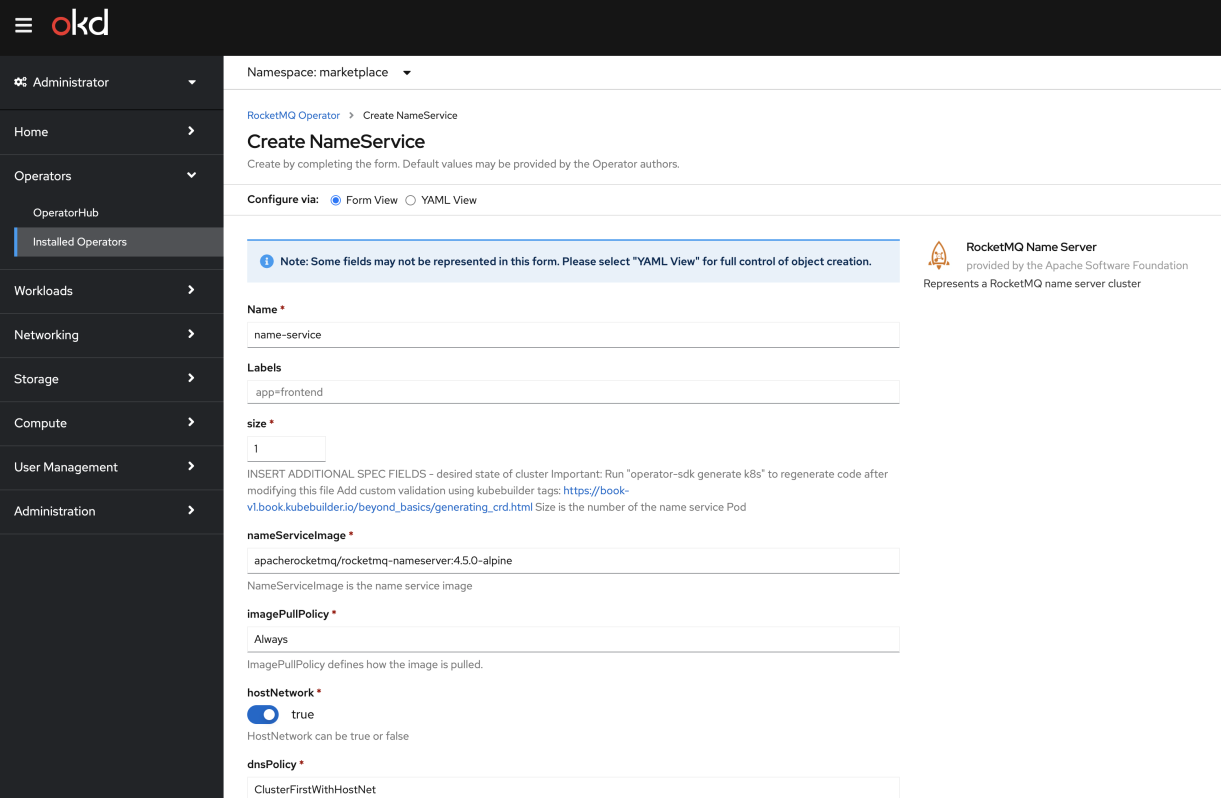
Users can create NameService and broker instances in the specified Namespace in the UI and browse and manage the instances. Users can also run commands to view the Pod status in the current Kubernetes cluster. For example:
$ kubectl get pods -A
NAMESPACE     NAME                                            READY   STATUS    RESTARTS   AGE
docker        compose-78f95d4f8c-8fr5z                        1/1     Running   0          32h
docker        compose-api-6ffb89dc58-nv9rh                    1/1     Running   0          32h
kube-system   coredns-5644d7b6d9-hv6r5                        1/1     Running   0          32h
kube-system   coredns-5644d7b6d9-mkqb6                        1/1     Running   0          32h
kube-system   etcd-docker-desktop                             1/1     Running   0          32h
kube-system   kube-apiserver-docker-desktop                   1/1     Running   0          32h
kube-system   kube-controller-manager-docker-desktop          1/1     Running   1          32h
kube-system   kube-proxy-snmxh                                1/1     Running   0          32h
kube-system   kube-scheduler-docker-desktop                   1/1     Running   1          32h
kube-system   storage-provisioner                             1/1     Running   1          32h
kube-system   vpnkit-controller                               1/1     Running   0          32h
marketplace   broker-0-master-0                               1/1     Running   0          5h3m
marketplace   broker-0-replica-1-0                            1/1     Running   0          5h3m
marketplace   name-service-0                                  1/1     Running   0          5h3m
marketplace   marketplace-operator-69756457d8-42chk           1/1     Running   0          32h
marketplace   rocketmq-operator-0.2.1-c9fffb5f-cztcl          1/1     Running   0          32h
marketplace   rocketmq-operator-84c7bb4ddc-7rvqr              1/1     Running   0          32h
marketplace   upstream-community-operators-5b79db455f-7t47w   1/1     Running   1          32h
olm           catalog-operator-7b788c597d-gjz55               1/1     Running   0          32h
olm           olm-operator-946bd977f-dhszg                    1/1     Running   0          32h
olm           operatorhubio-catalog-fvxp9                     1/1     Running   0          32h
olm           packageserver-789c7b448b-7ss7m                  1/1     Running   0          32h
olm           packageserver-789c7b448b-lfxrw                  1/1     Running   0          32h
It can be seen that the corresponding NameService and broker instance have also been created in the namespace of the marketplace.
The above sections explain the installation and usage of RocketMQ Operator based on OperatorHub and OLM. We will continue to push and maintain a new version of the RocketMQ Operator to this platform, allowing users to obtain the latest updates or to select an appropriate version of the Operator.
RocketMQ Operator is an open-source Apache Community project serving scenarios such as Alibaba Cloud's SaaS delivery Apsara Stack and the deployment of product private cloud environments. It has also received code submissions by open-source contributors from Internet companies such as iQiyi. Users are welcome to give feedback on community projects. Click on the link below and leave your information so that we can better improve the RocketMQ Operator.
Here's the link for quick reference.
Currently, the PR of RocketMQ Operator v0.2.1 has been merged into the community-operators repository. After RocketMQ Operator entered OperatorHub.io, users can use OLM to install and subscribe to RocketMQ Operators for continuous service support.
RocketMQ Operator v0.2.1 mainly supports the automatic creation of Name Server and broker clusters, the seamless scaling of Name Server cluster (the broker cluster is automatically notified to update the Name Server IP list), the seamless scaling of broker cluster under non-sequential messages (the new broker instance will synchronize metadata including Topic information and subscription information from the source broker Pod specified by broker CRD), Topic migration and so on.
In the coming times, we hope to work with the community to further improve the RocketMQ Operator project. This would include canary release, full-lifecycle data management, disaster recovery backup, metrics monitoring such as traffic monitoring, and automatic, elastic scaling to implement the full-lifecycle management of RocketMQ services through Operator finally.
You are welcome to use RocketMQ Operator, and your valuable suggestions will be appreciated.
Alibaba Cloud Native Passes Six Trusted Cloud Assessment Certifications with Flying Colors

640 posts | 55 followers
FollowAlibaba Developer - November 10, 2021
Alibaba Cloud Native Community - March 14, 2022
Alibaba Cloud Native Community - May 15, 2023
Alibaba Cloud Native Community - March 20, 2023
Alibaba Cloud Native Community - December 6, 2022
Alibaba Cloud Native Community - November 23, 2022

640 posts | 55 followers
Follow Container Service for Kubernetes
Alibaba Cloud Container Service for Kubernetes is a fully managed cloud container management service that supports native Kubernetes and integrates with other Alibaba Cloud products.
Learn More ACK One
Provides a control plane to allow users to manage Kubernetes clusters that run based on different infrastructure resources
Learn More Cloud-Native Applications Management Solution
Accelerate and secure the development, deployment, and management of containerized applications cost-effectively.
Learn More ApsaraMQ for RocketMQ
ApsaraMQ for RocketMQ is a distributed message queue service that supports reliable message-based asynchronous communication among microservices, distributed systems, and serverless applications.
Learn MoreMore Posts by Alibaba Cloud Native Community