By Yang Tongkai (Ziyu), Senior Technical Expert at Ant Financial
Let's take a look at the Kubernetes scheduling process. As shown in the following figure, a simple Kubernetes cluster architecture consists of a Kubernetes API server, a group of Webhook Controllers, a default Kubernetes scheduler, and two physical machine nodes: Node 1 and Node 2, each configured with a Kubelet.
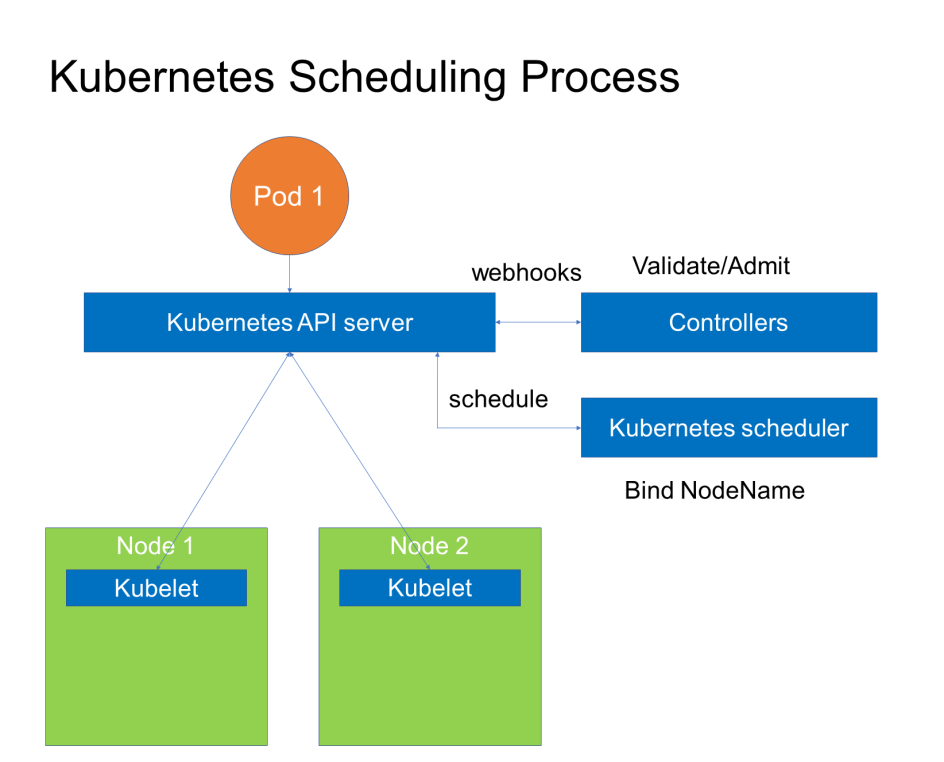
What is the scheduling process for submitting a pod to this Kubernetes cluster?
Assume that we have written a YAML file, that is, Pod 1 indicated by the orange circle in the following figure, and have submitted it to the Kubernetes API server.
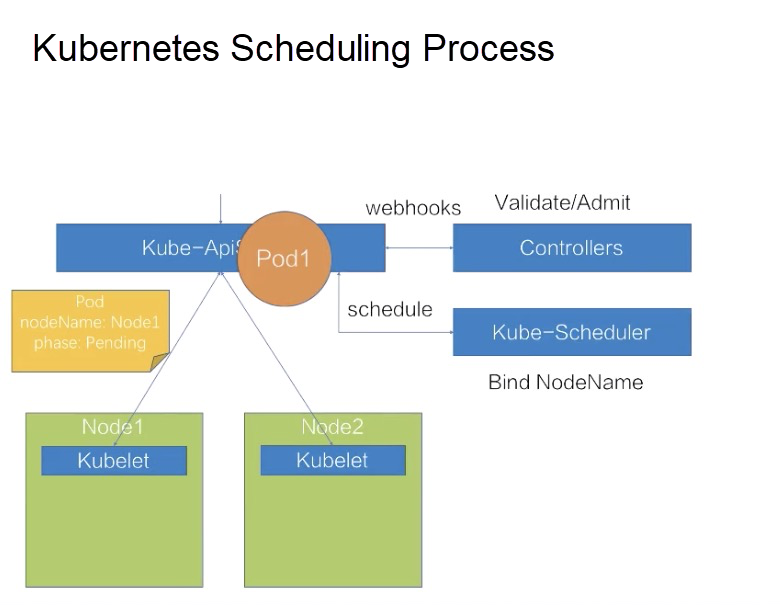
The Kubernetes API server first routes the pod generation request to the Webhook Controllers for verification.
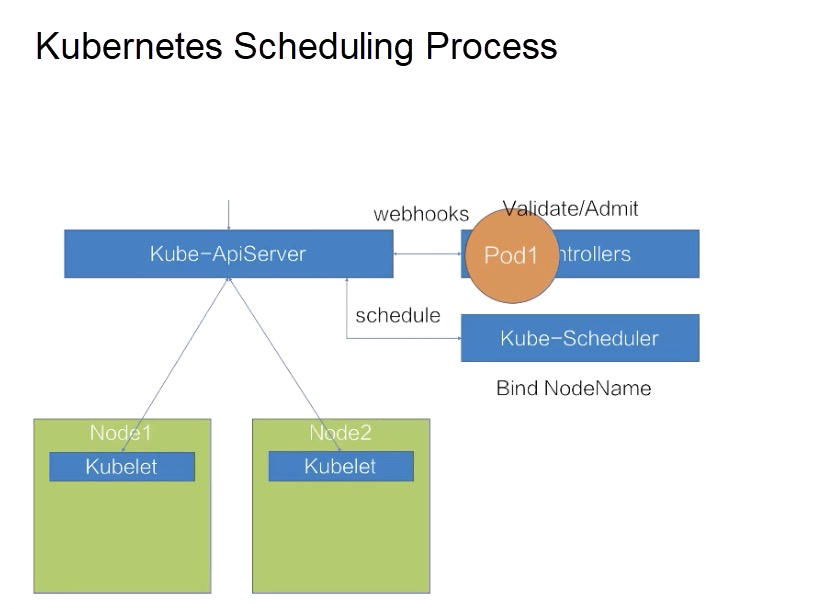
After the request is verified, the Kubernetes API server generates a pod in the cluster. The nodeName of the pod is empty, and the pod phase is Pending. After the pod is generated, the Kubernetes scheduler and Kubelets can learn of the generation event of the pod. When finding that the nodeName of the pod is empty, the Kubernetes scheduler determines that the pod is unscheduled.
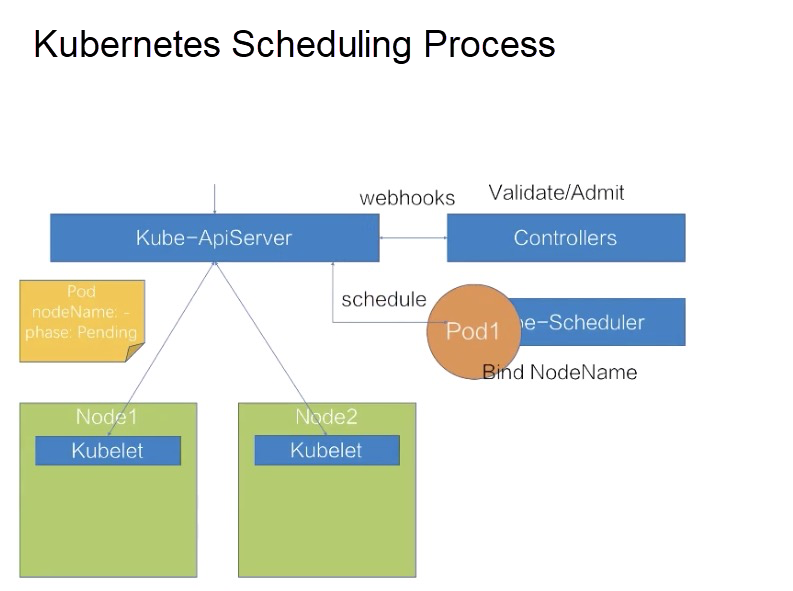
Next, the Kubernetes scheduler runs a series of scheduling algorithms, including filtering and rating algorithms, to select the most appropriate node. It then binds the node name to the spec of the pod to schedule the pod.
In this case, the nodeName in the spec of the pod has been updated to Node 1. After the nodeName is updated, the Kubelet on Node 1 learns that the pod belongs to Node 1.
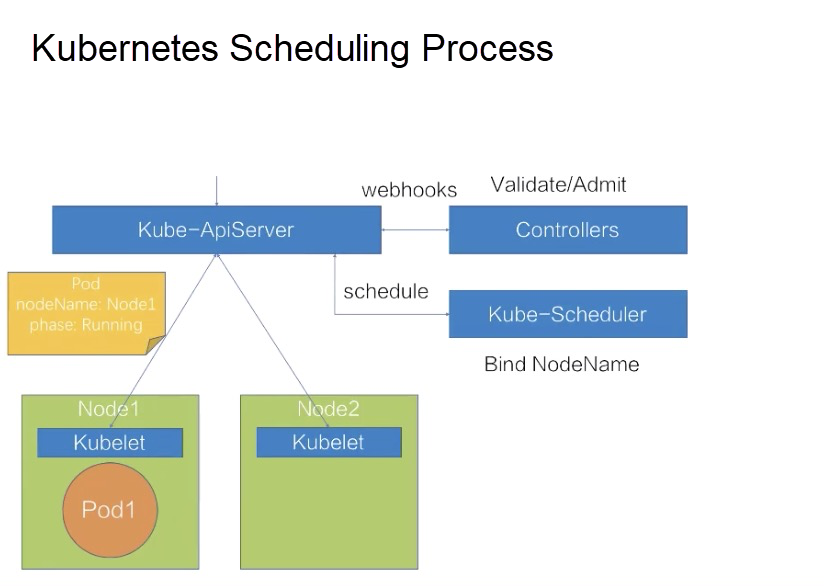
Then, the Kubelet performs operations on the pod, such as creating container storage and network resources. When all the resources are ready, the Kubelet updates the status to Running, thus completing the entire scheduling process.
This scheduling process can be simply summarized as a process of placing a pod on an appropriate node.
What nodes are "appropriate"? There are several criteria for an appropriate node:
When all the preceding criteria are met, the pod has been placed on an appropriate node.
The following describes how Kubernetes meets the requirements for pods and nodes.
The following describes the basic scheduling capabilities of Kubernetes in two parts:
(1) Resource scheduling: describes the basic resource configuration methods for Kubernetes, the concept of QoS, and the concept and usage of resource quotas.
(2) Relational scheduling: describes two relational scenarios.
Resource Configuration Methods for Pods
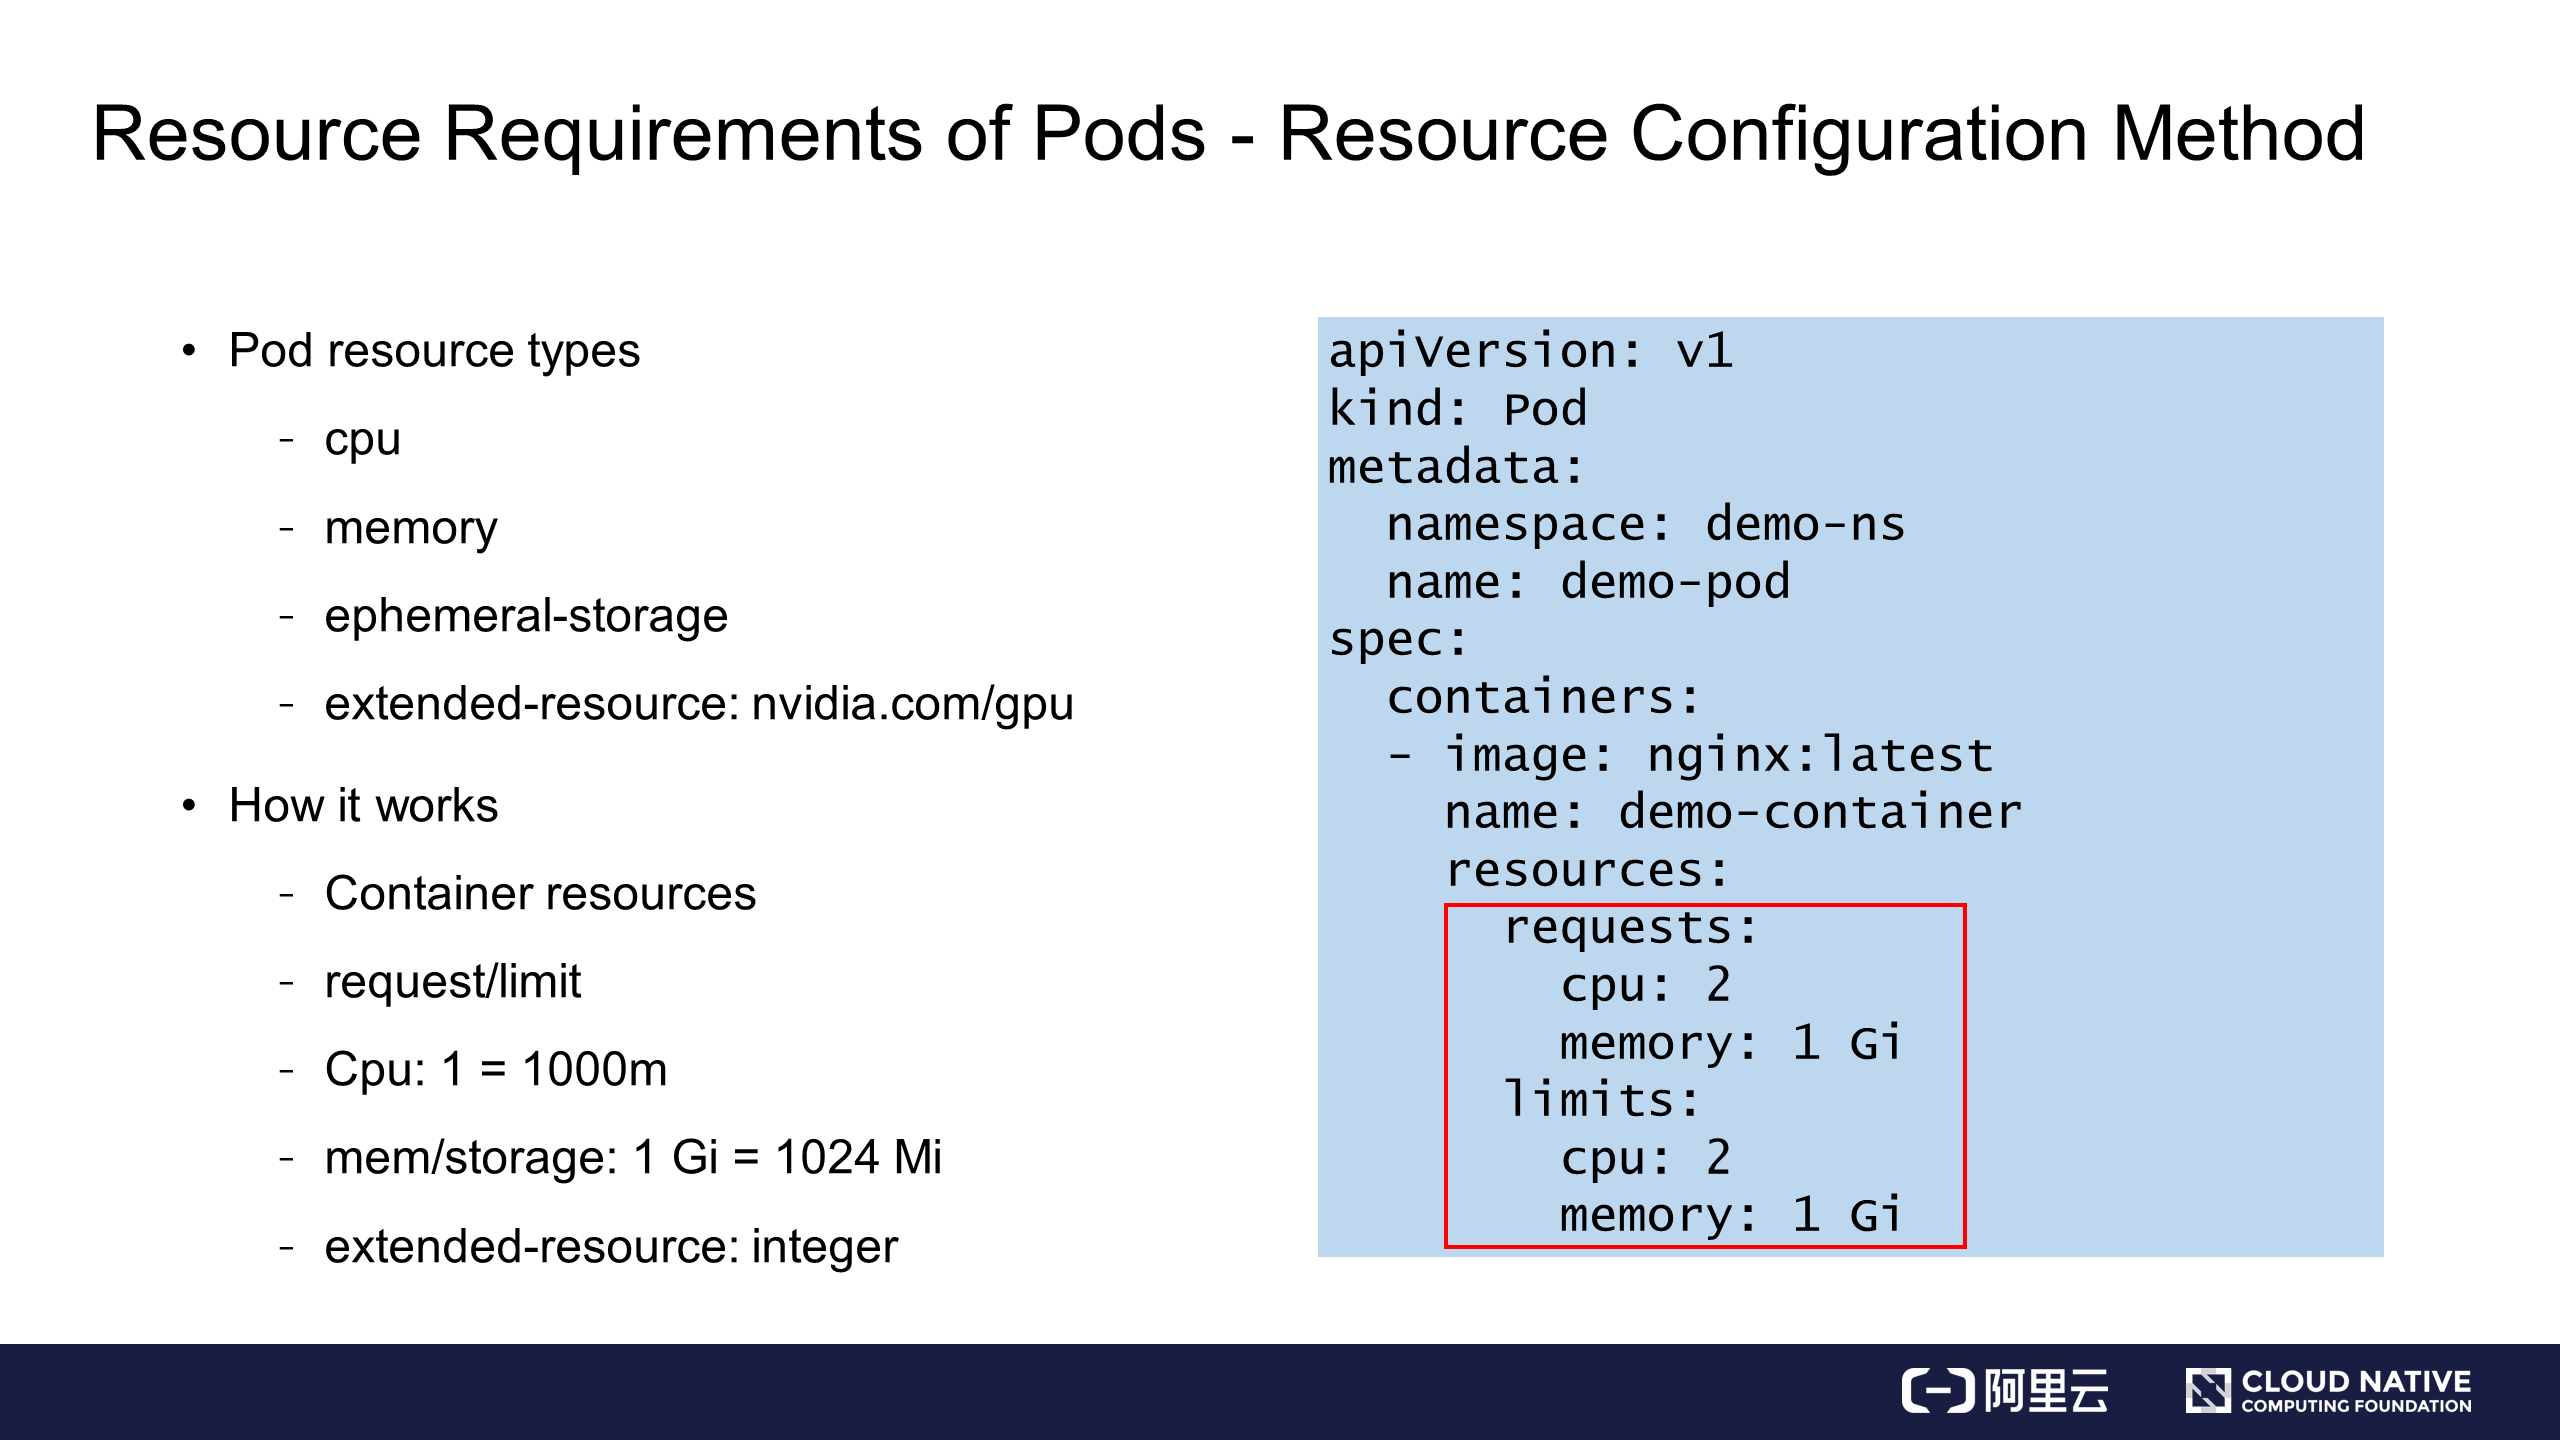
The preceding figure shows a demo of pod spec. The resources are actually specified in pod.spec, specifically, in containers.resources.
Resources contain two parts:
These two parts indicate the same thing in different ways. The requests parameter indicates the basic resource requirements of the pod, and the limits parameter indicates an upper limit on the available resources of the pod. The requests and limits parameters are implemented in a map structure, which can contain the keys and values of different resources.
Basic resources can be roughly classified into four categories
Regarding the CPU resources, in the preceding example, cpu is set to 2, indicating that two CPUs are requested. It can also be set to 2000m in decimal format. When the number of CPUs is a decimal, for example, 0.2, cpu can be set to 200m. The memory and storage resources are represented in binary format. As shown in the right part of the preceding figure, the requested memory space is 1 GB, which can also be represented as 1024mi to better reflect the demand for memory resources.
Kubernetes requires that the number of extension resources be an integer. For example, you can apply for one or two GPUs, but not 0.5 GPUs.
Now you know how to apply for basic resources.
The following section will detail the differences between requests and limits and how you can indicate QoS with requests/limits.
Kubernetes provides two ways to indicate pod resources: requests and limits.
It actually defines the pod elasticity for users. For example, if the number of CPUs for a request is set to 2 and that for a limit is set to 4, this means that at least two CPUs are expected to be always available and four CPUs can be used in idle times.
To better understand elasticity, we need to understand the concept of QoS. What is QoS? QoS is short for Quality of Service, which is a criterion used by Kubernetes to reflect the service quality of a pod in terms of resource capabilities. Kubernetes provides three QoS classes:
(1) Guaranteed, which is a high QoS class usually configured for pods that require resource assurance.
(2) Burstable, which is a medium QoS class usually configured for pods that require elasticity.
(3) BestEffort, which is a low QoS class usually configured for pods that do not require service quality assurance.
A disadvantage of Kubernetes lies in the fact that users cannot directly specify the QoS classes for their pods, which instead are automatically mapped based on the requests and limits.
In the example shown in the preceding figure, Kubernetes automatically adds a status carrying qosClass: Guaranteed after spec is submitted. You cannot define the QoS class when submitting spec. Therefore, this method is called the implicit QoS class method.
The following describes how to determine the expected QoS level based on the requests and limits.
Guaranteed Pod
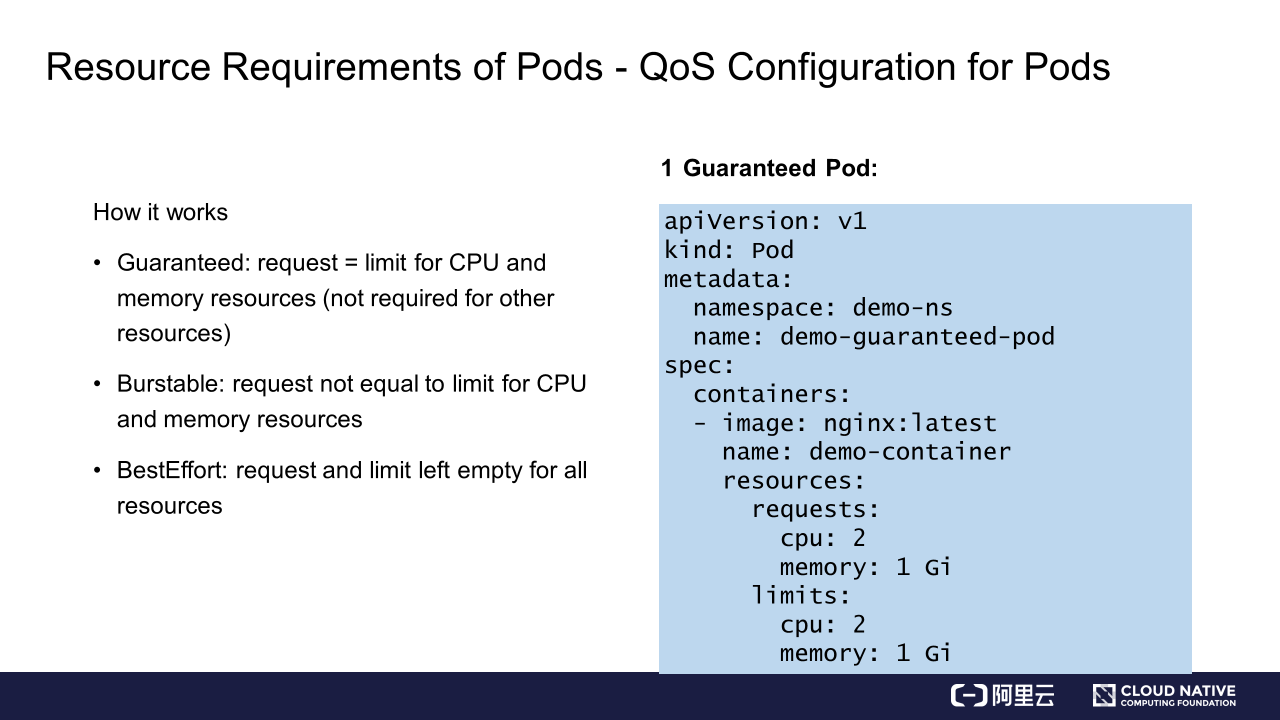
How to create a Guaranteed pod?
For creating a Guaranteed pod, Kubernetes requires that the requests for basic resources (including CPU and memory resources) be the same as the limits for them, while other resources can be different. Otherwise, you can only create a Burstable or BestEffort pod.
Burstable Pod
Any pod can be a Burstable pod, provided that the requests for CPU and memory resources are different from the corresponding limits.
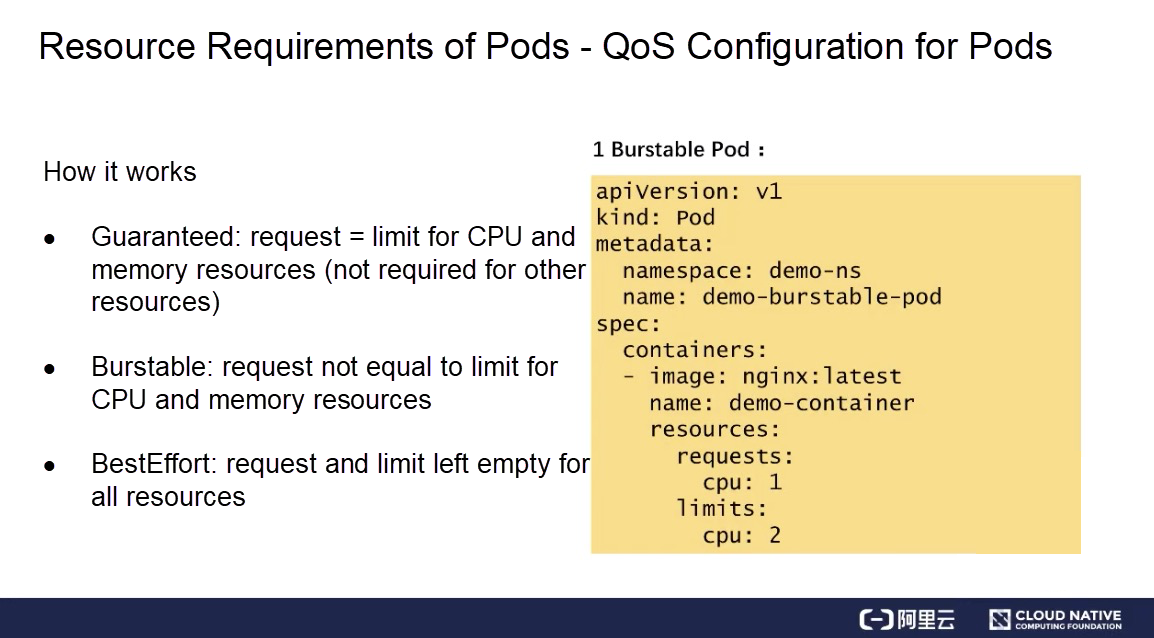
In the preceding example, you can set the CPU resources but leave the memory resources unspecified to obtain a Burstable pod.
BestEffort Pod
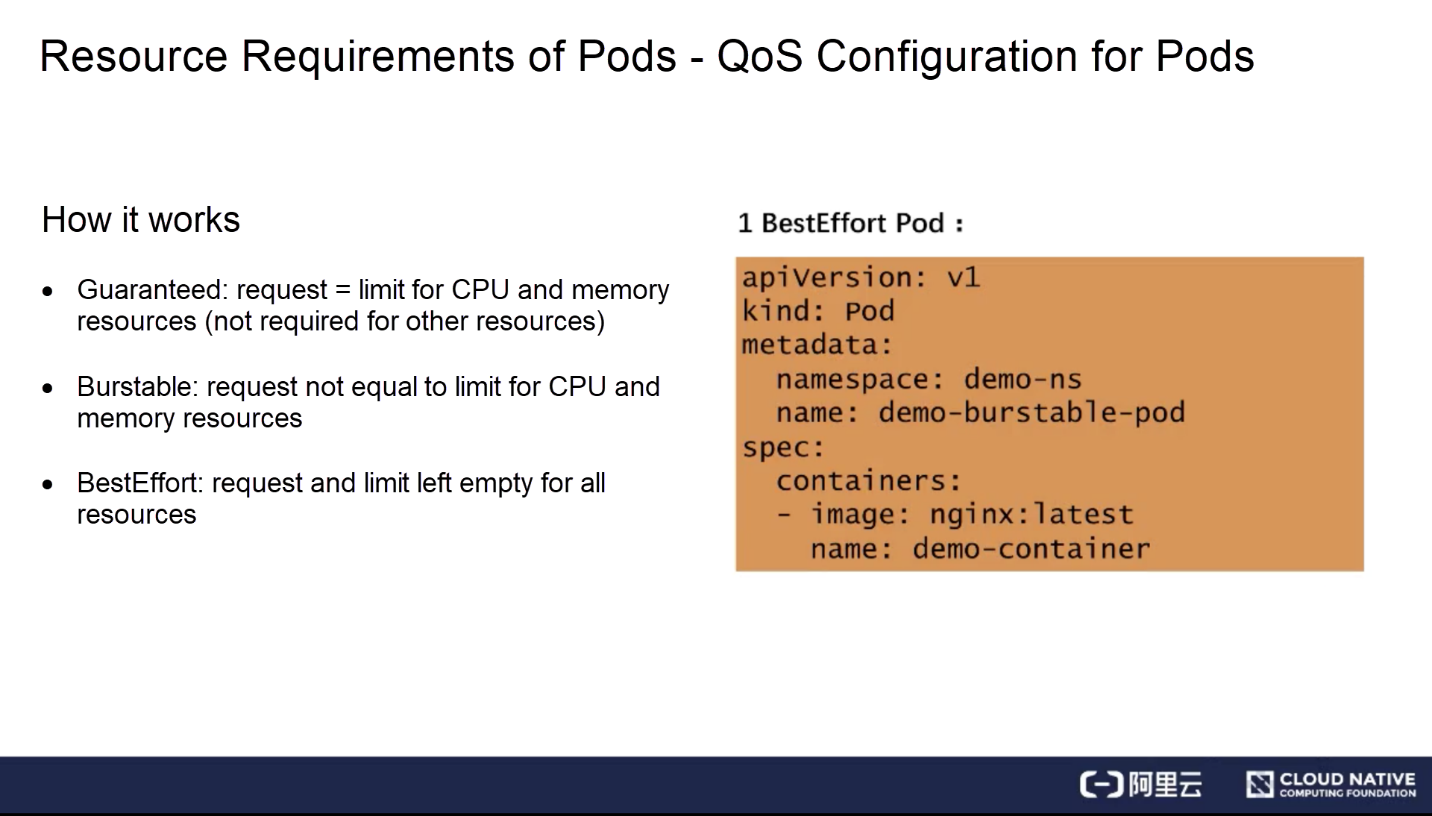
A BestEffort pod also conforms to strict restrictions. To create a BestEffort pod, you must leave the requests and limits for all resources unspecified.
In short, different pod QoS classes can be set based on different combinations of requests and limits.
This section describes the difference between QoS classes in terms of scheduling and underlying performance. Different QoS classes differ in scheduling and underlying performance. For example, in terms of the scheduling performance, the scheduler only uses requests for scheduling, regardless of what limits are set.
Different QoS classes differ even more significantly in underlying performance. For example, CPUs are weighted by request. Different QoS classes correspond to completely different requests. For example, for Burstable and BestEffort pods, the requests may be set to quite small values or left unspecified. In this case, the weight of the time slice is actually quite low. For example, the weight of a BestEffort pod may be only 2, while that of a Burstable or Guaranteed pod can be as high as several thousand.
In addition, when the cpu-manager-policy=static feature is enabled for the Kubelet, it will bind CPU cores to Guaranteed pods if the request for the Guaranteed QoS class is set to an integer, for example, 2. As shown in the following example, the Kubelet allocates CPU 0 and CPU 1 to the Guaranteed pod.
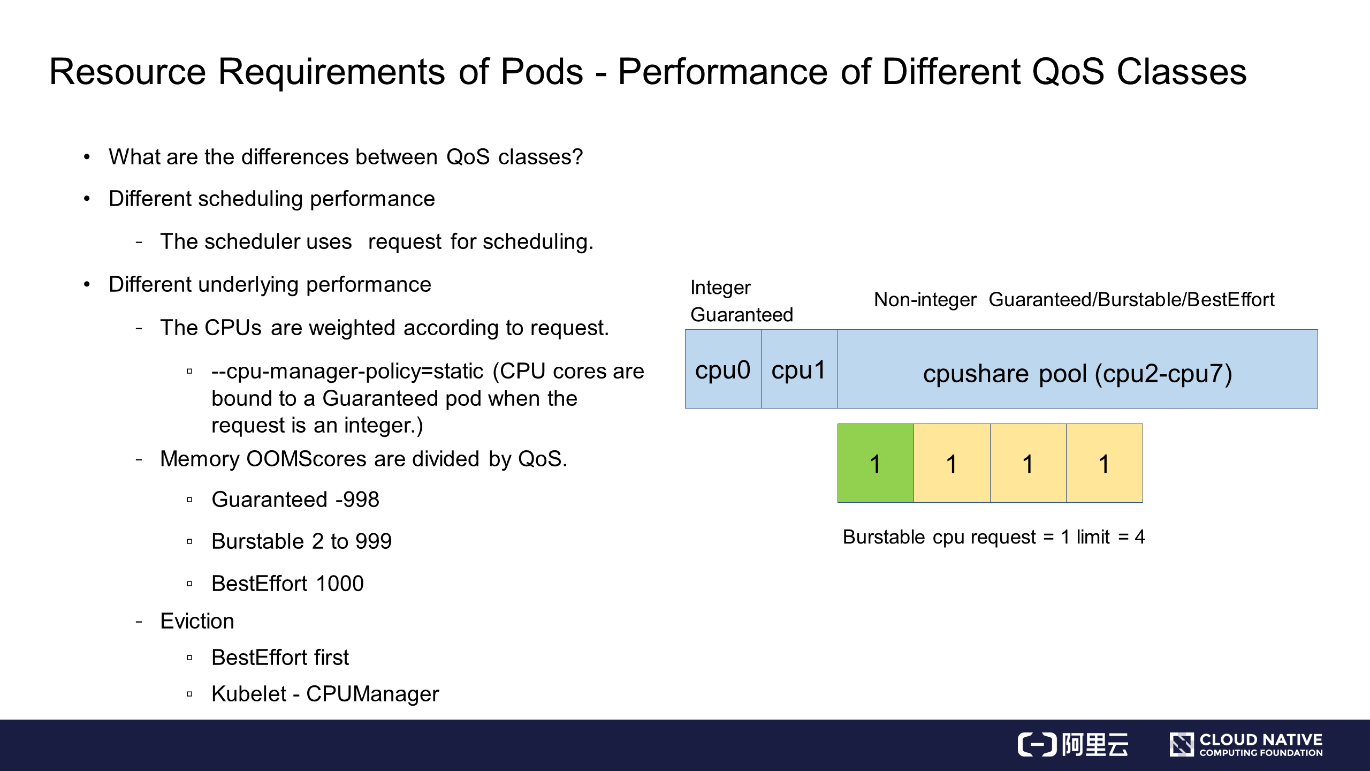
If the CPU requests for Guaranteed, Burstable, and BestEffort pods are set to non-integers, their CPUs will be placed together to form a CPU share pool. As shown in the preceding example, assuming that the node has eight cores and two of them have been bound to a Guaranteed pod whose CPU request is set to an integer, the remaining six cores, CPU 2 to CPU 7, are shared by the Guaranteed, Burstable, and BestEffort pods whose CPU requests are set to non-integers. Then, the pods use the six CPUs according to time slices divided based on different weights.
In addition, OOMScores are also divided for memory resources based on different QoS classes. For example, an OOMScore of -998 is configured for Guaranteed pods by default, an OOMScore of 2 to 999 is allocated to Burstable pods based on the ratio of the designed pod memory size to the node memory size, and an OOMScore of 1000 is allocated to BestEffort pods. The pod with the highest OOMScore will be killed first when OOM occurs on the physical machine.
Moreover, different QoS classes also handle pod evictions differently. For example, in the case of an eviction, a BestEffort pod will be evicted first. Therefore, different QoS classes result in quite different underlying performance. Therefore, during production, we must configure resource limits and requests based on different business requirements and attributes, so as to properly plan the QoS classes.
During production, if a cluster is submitted by multiple users or used by multiple businesses at the same time, the total submission amount of a business or a user must be limited so that all the resources of the entire cluster cannot be occupied by one business or user.
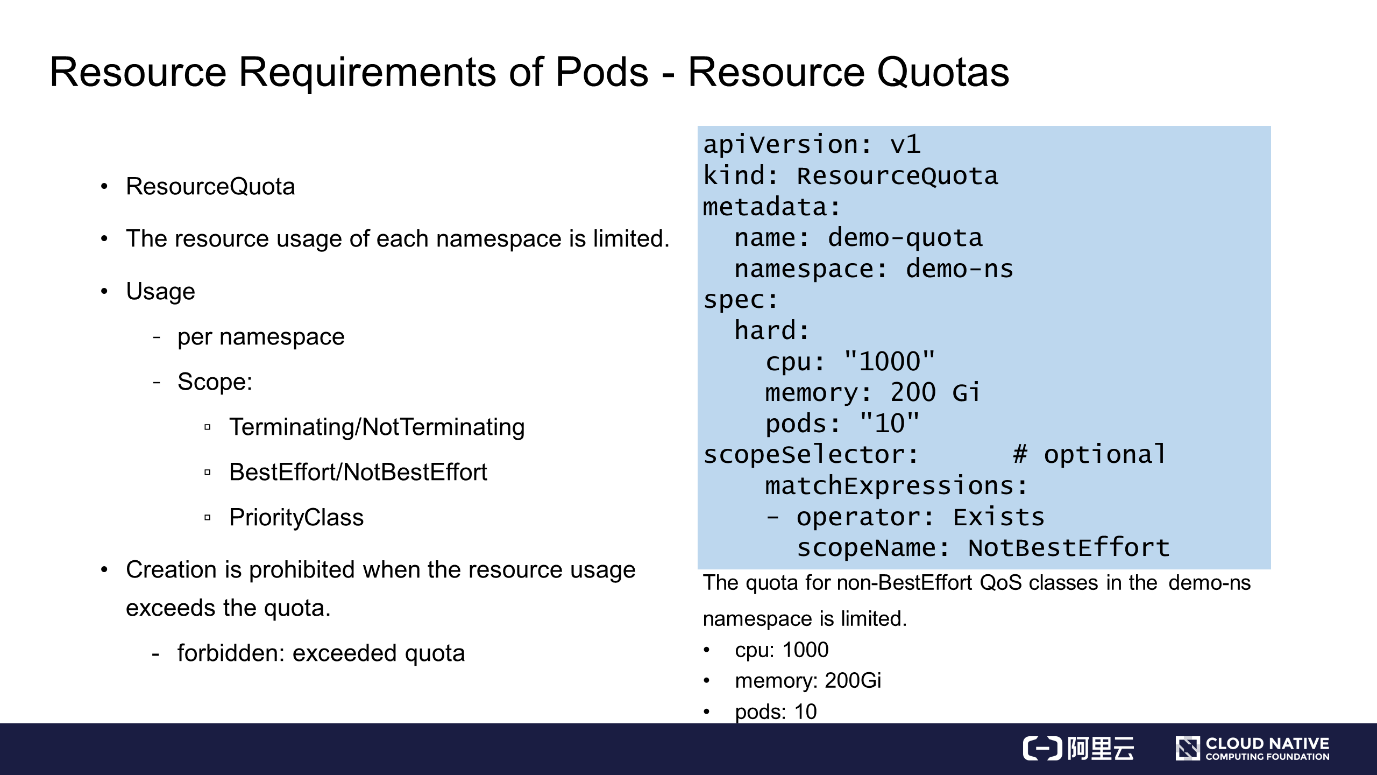
Kubernetes provides ResourceQuota to limit the usage of namespace resources.
Details are shown in the YAML file on the right of the preceding figure. The spec contains two parts: hard and scopeSelector. The settings of hard are similar to those of resources. You can configure basic resources here. However, you can also specify the number of pods here. In addition, scopeSelector provides a variety of indexing capabilities for ResourceQuota.
As shown in the preceding example, a non-BestEffort pod is found through indexing, and the CPU, memory, and pod limits are set to 1000, 200 GB, and 10 respectively.
scopeName can be set to NotBestEffort or a wider indexing range, including Terminating/Not Terminating, BestEffort/NotBestEffort, and PriorityClass.
After this type of resource quota is created for a cluster, if a user has overused the resources, the user will receive the forbidden 403 error message "exceeded quota" when submitting a pod spec. This prevents the user from submitting a pod spec for the overused resources.
However, the user can still submit a pod spec for other resources not included in the resource quota.
This is how to use ResourceQuota in Kubernetes. We can specify ResourceQuota to limit the resource usage of each namespace, so as to ensure the resource usage of other users.
The previous sections described how to use basic resources, that is, how to meet the resource requirements of pods. Here is a summary:
Next, we will look at the relational scheduling of pods. First comes pod-pod relational scheduling. In some application scenarios, a pod must be placed together with another pod, or cannot be placed together with another pod.
To adapt to these scenarios, Kubernetes provides two capabilities:
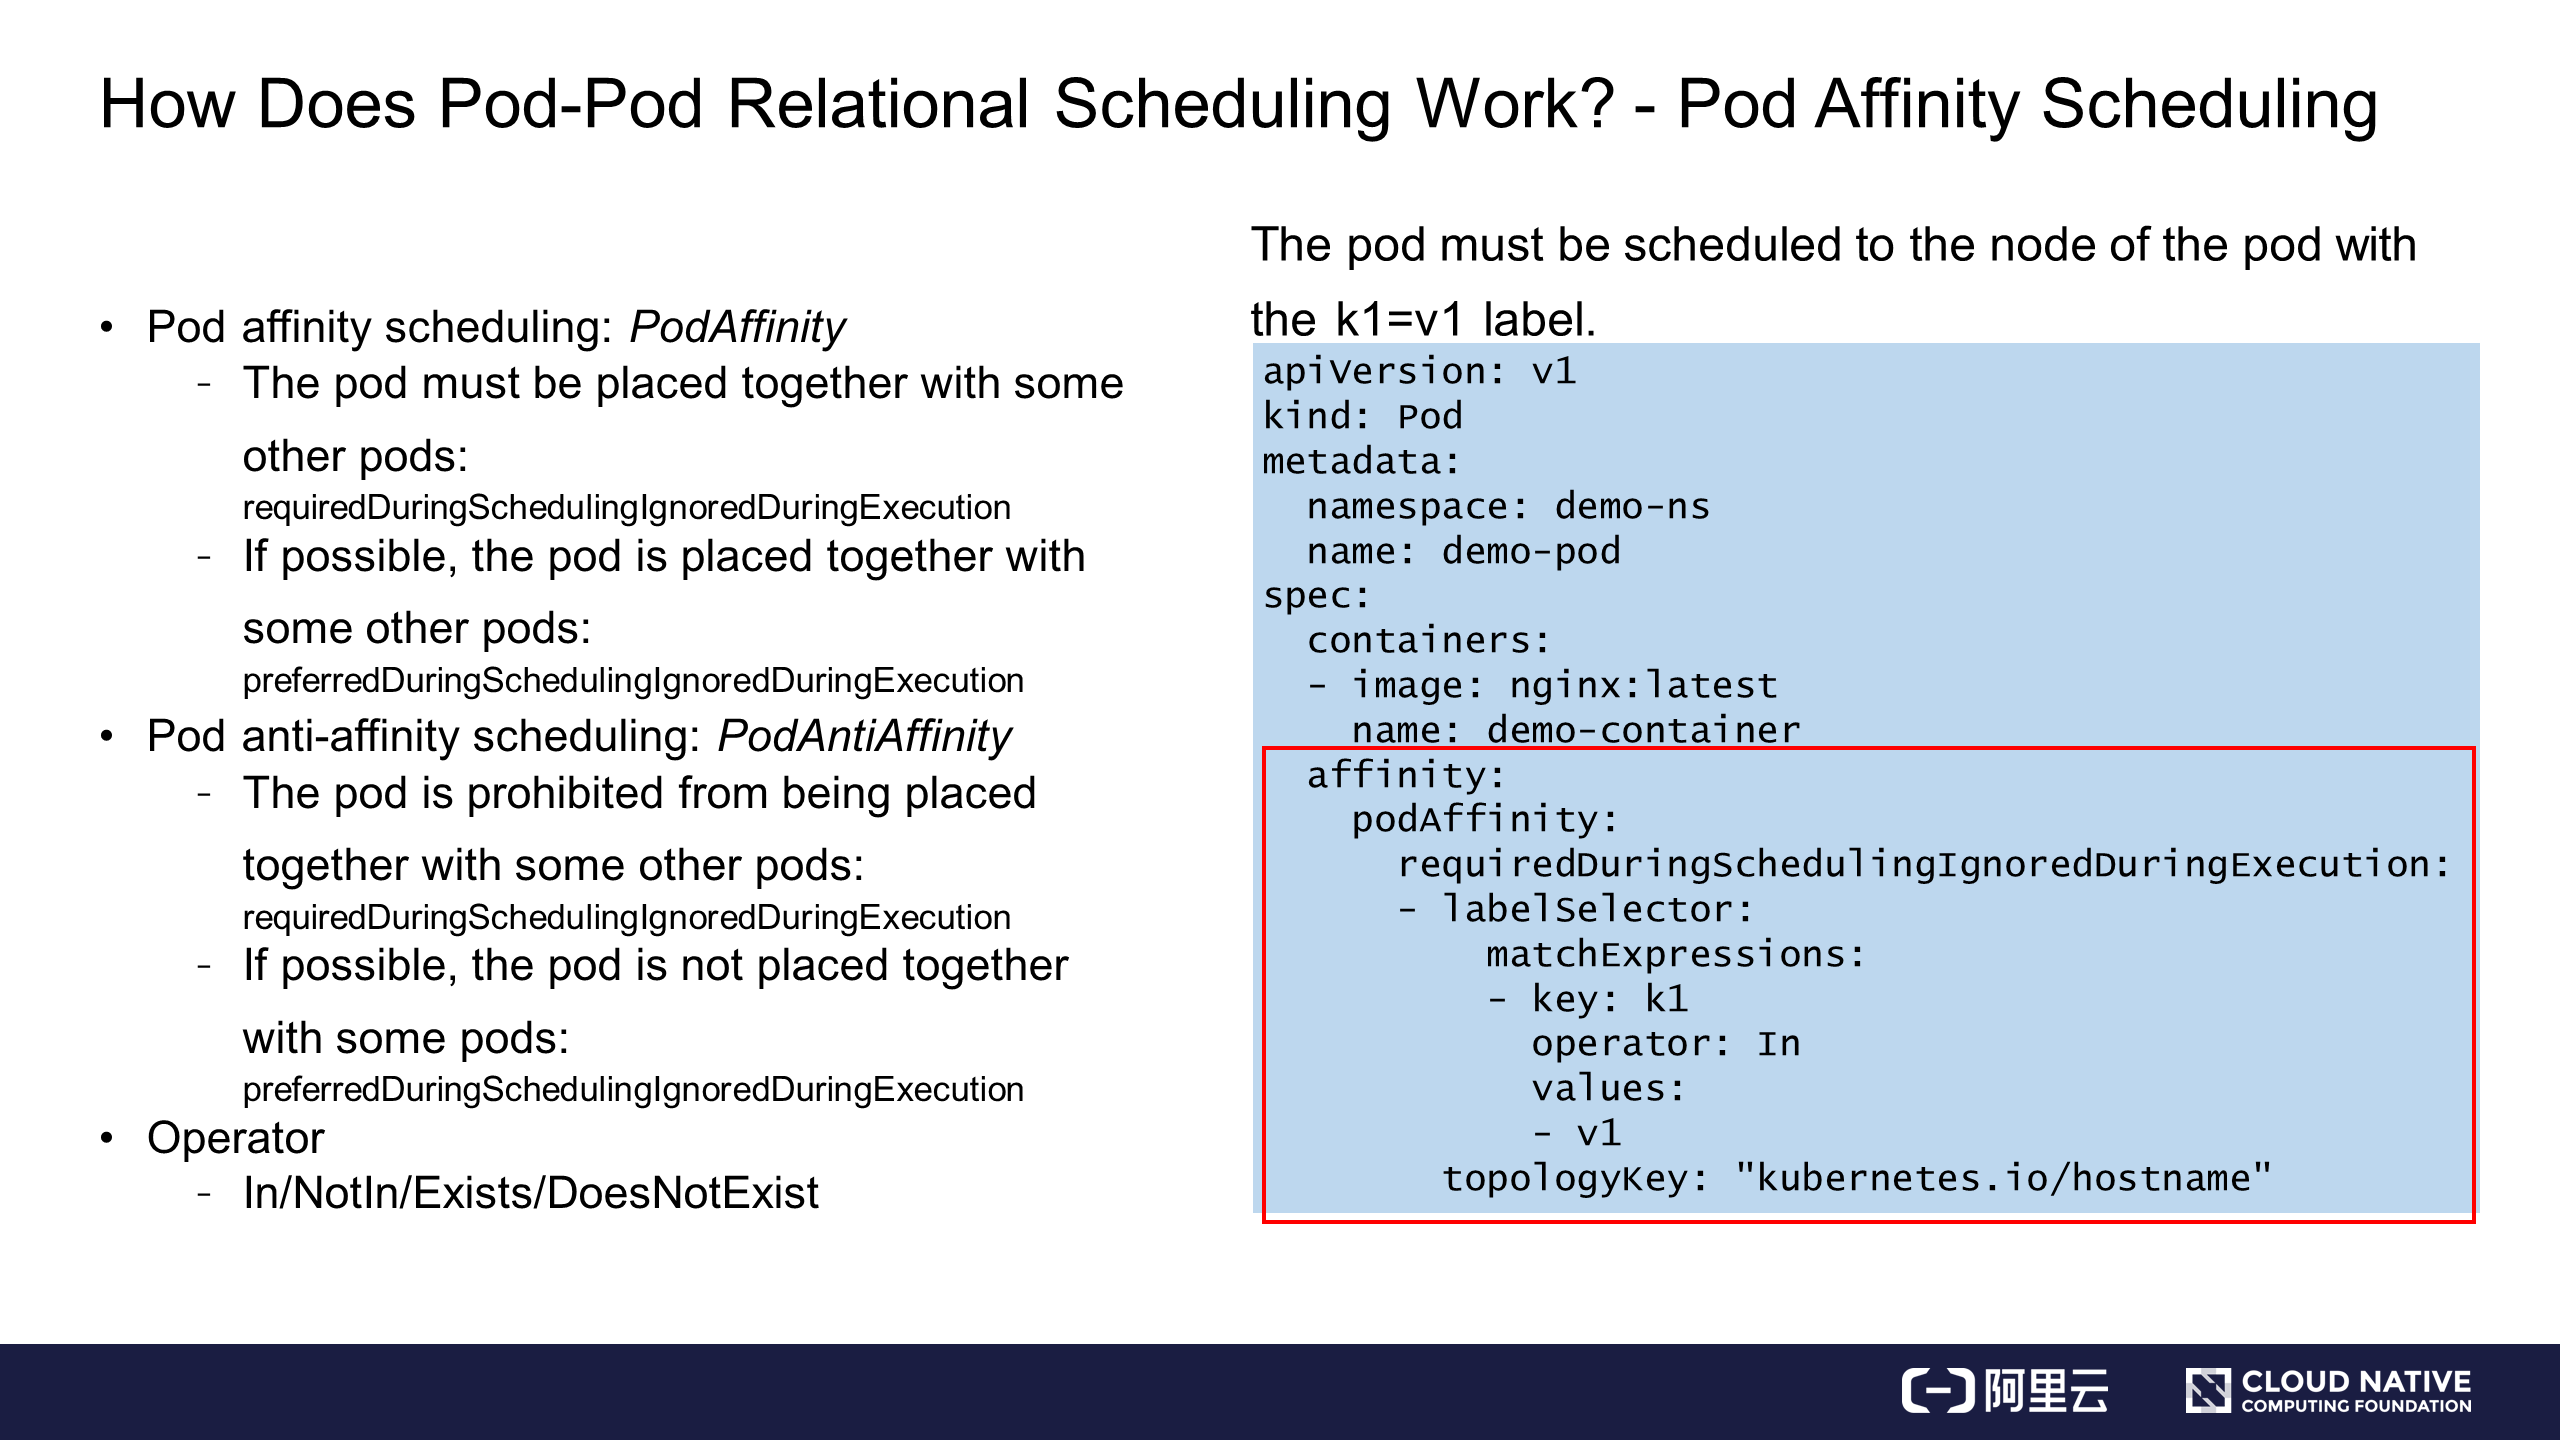
To place a pod together with another pod, you can enter the podAffinity field and required information as shown in the preceding example.
In this example, the pod must be scheduled to the node of the pod with the key: k1 label and the indexes are scattered by the node. Scheduling will succeed if the node of the pod with the key: k1 label can be found. However, scheduling will fail if the cluster does not contain such a node or the resources are insufficient. Such strict affinity scheduling is called required affinity scheduling.
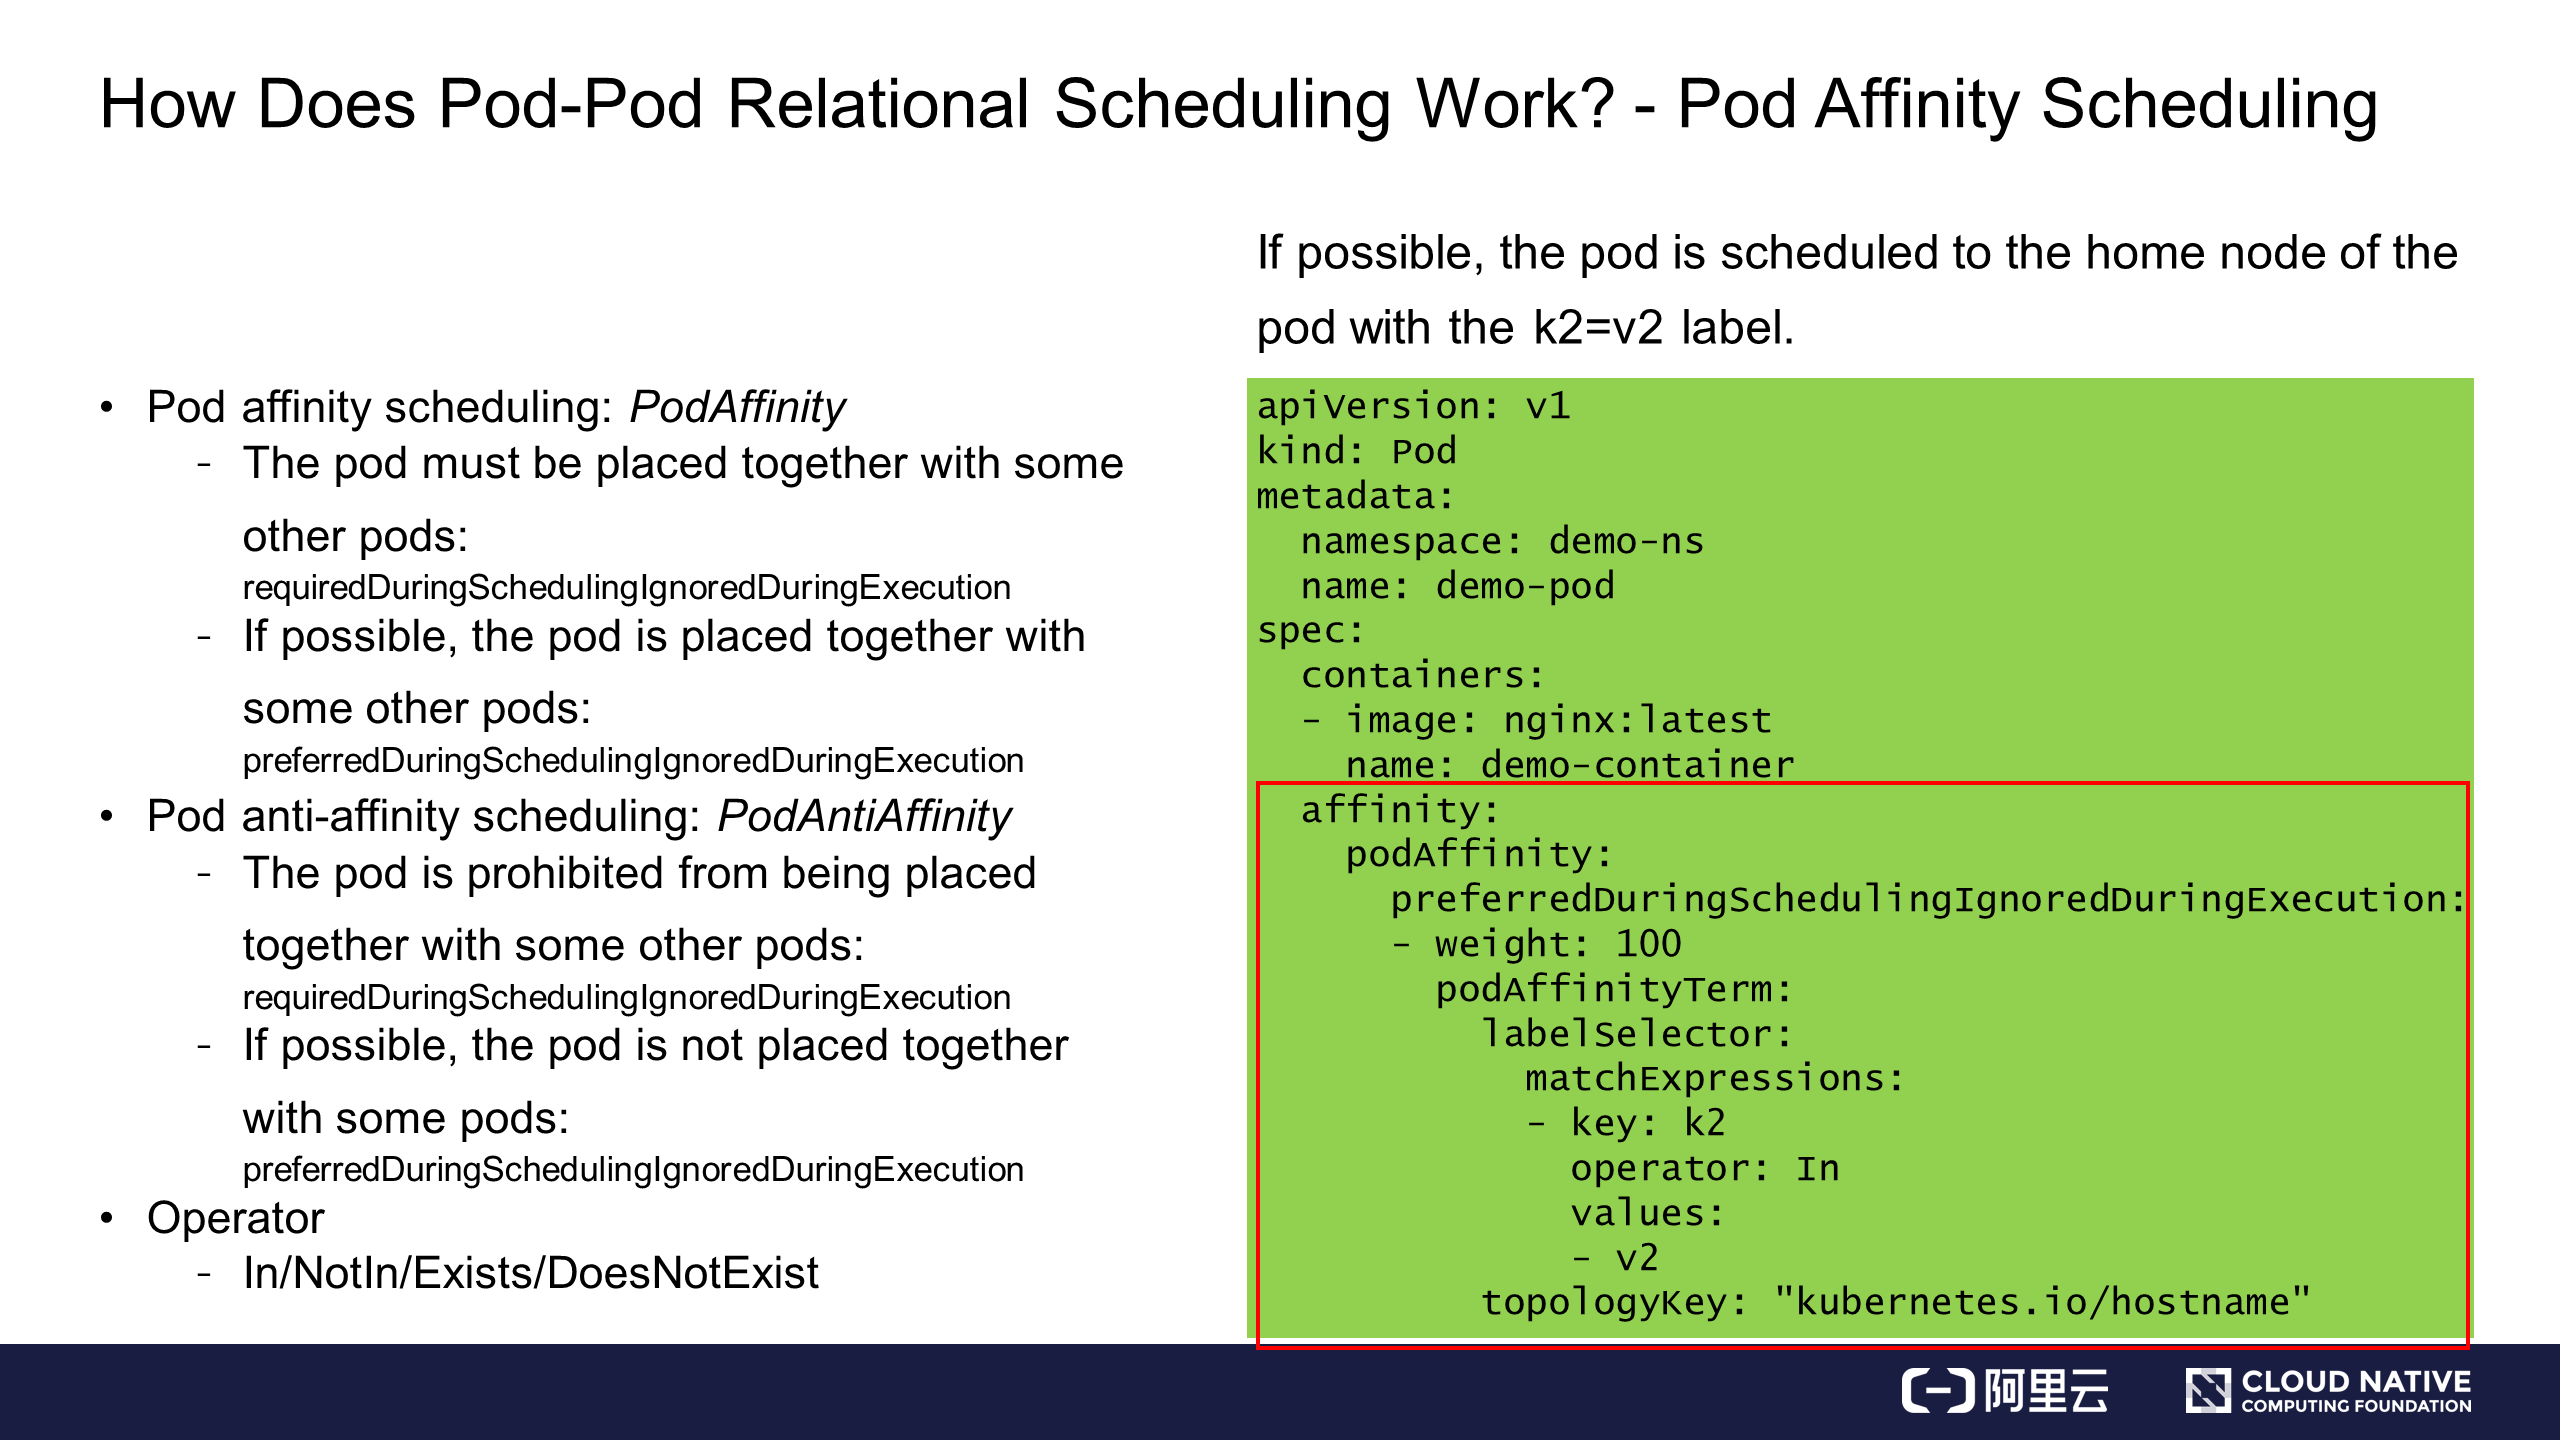
Some scenarios do not require a strict scheduling policy. In this case, you can replace the required information with preferred information to implement preferred affinity scheduling. This means the pod is preferentially scheduled to the node of the pod with the key: k2 label. In addition, the preferred information can contain multiple conditions. For example, you can set a weight of 100 for key: k2 and a weight of 10 for key: k1. In this case, the scheduler will preferentially schedule the pod to the node meeting the scheduling condition and with a higher weight.
Anti-affinity scheduling is similar to affinity scheduling. It has the opposite purpose but basically the same syntax. The only difference is that the podAffinity field is replaced with the podAntiAffinity field. Similarly, both required anti-affinity scheduling and preferred anti-affinity scheduling are provided.
Two examples are given here. In one example, scheduling the pod to the node of the pod with the key: k1 label is prohibited. In the other example, the pod is scheduled to the node of the pod with the key: k2 label through preferred anti-affinity scheduling.
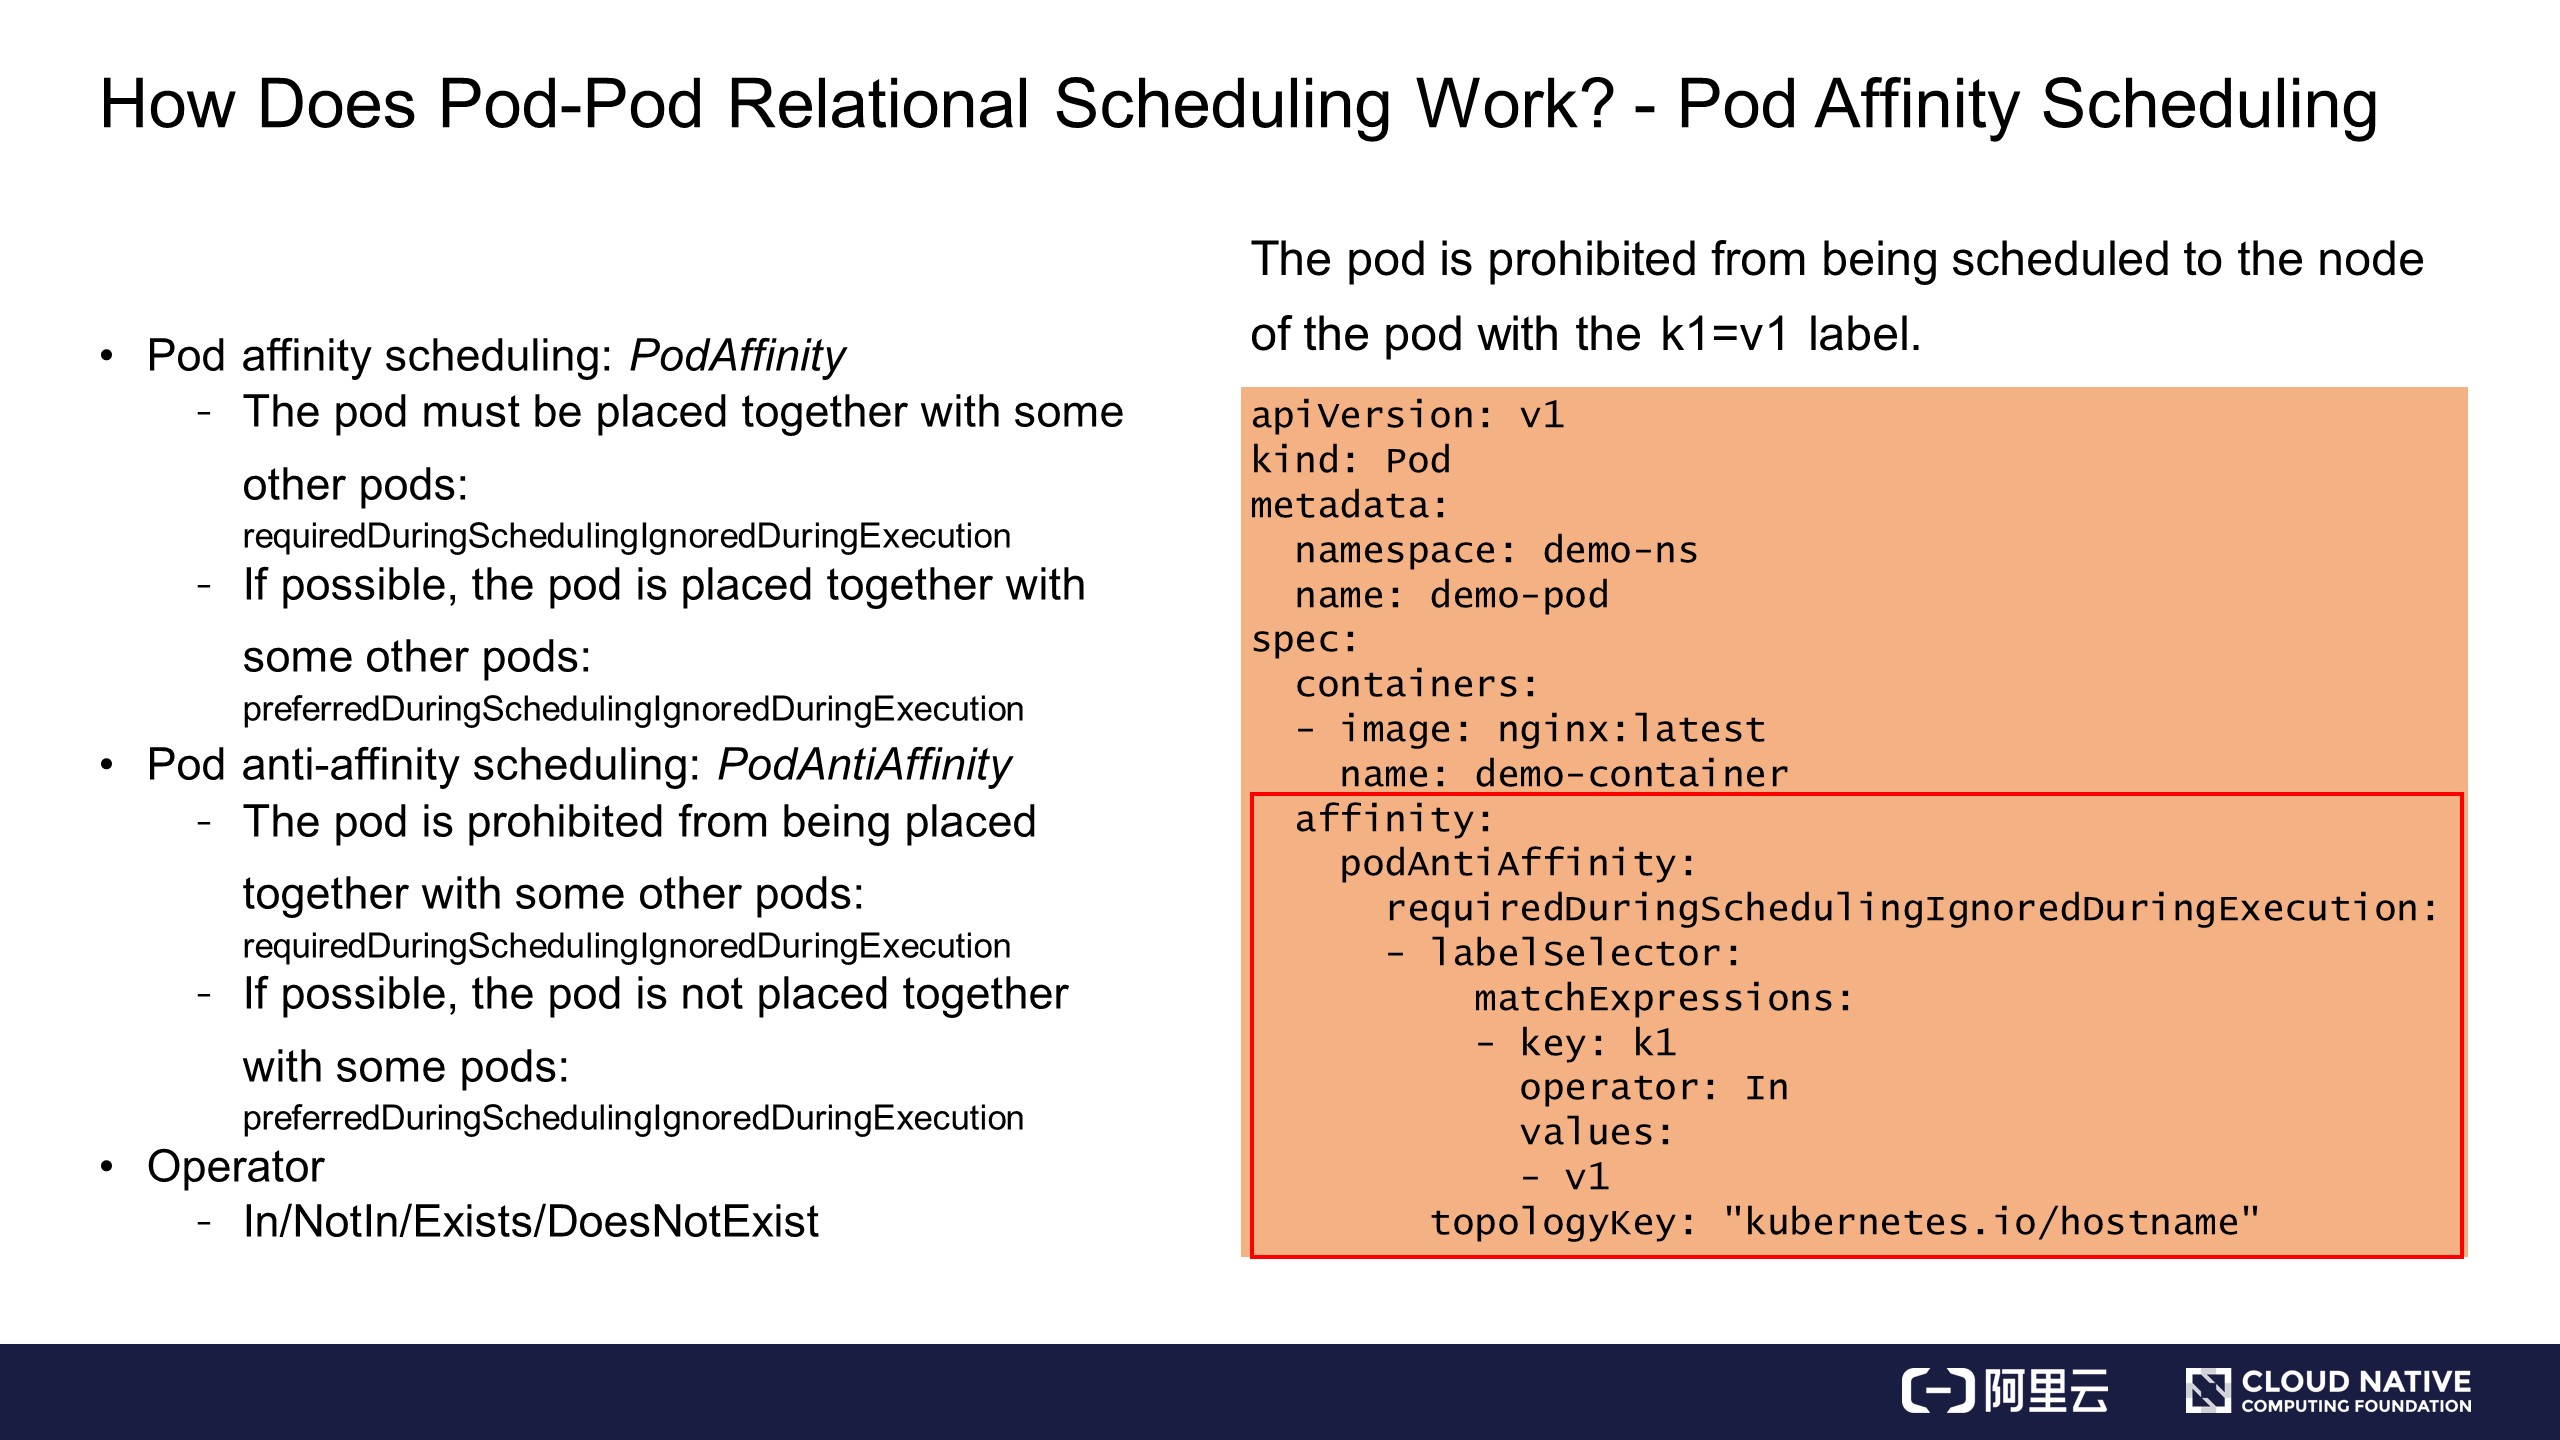
In addition to the In syntax, Kubernetes also provides a variety of operator syntax combinations, such as combinations of In, NotIn, Exists, and DoesNotExist. The In operator is used in the preceding example. In the example of required anti-affinity scheduling, scheduling the pod to the home node of the pod with the key: k1 label is prohibited.
The Exists operator can also be used to achieve the same function, possibly with a wider range than the In operator. If Operator is set to Exists, you do not need to specify values. In this case, the pod cannot be scheduled to the node of the pod with the key: k1 label, regardless of the values.
Now you know about relational scheduling between pods.
Pod-node relational scheduling is also called node affinity scheduling. Two scheduling methods are described here.
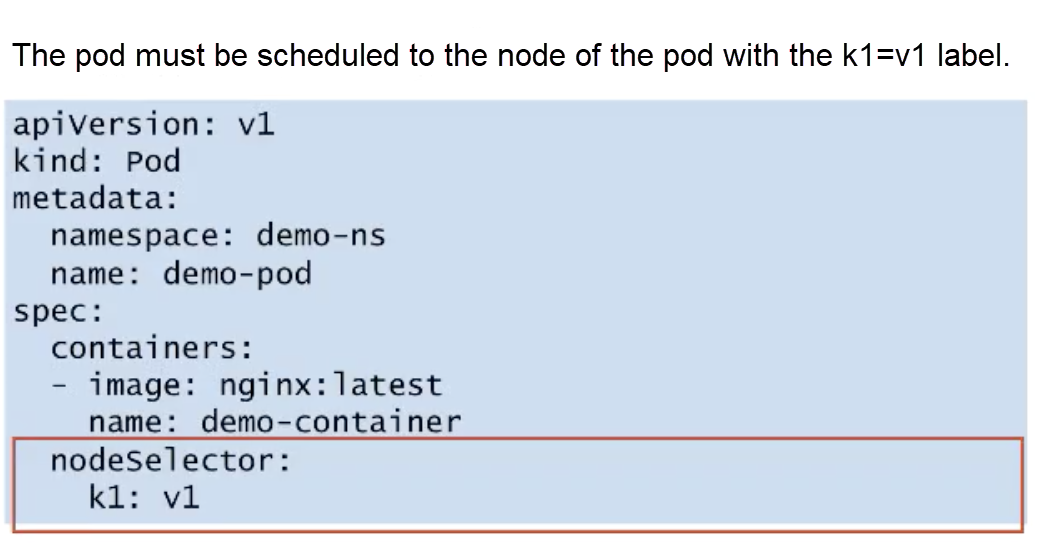
NodeSelector is a simple method for scheduling. For example, if a pod must be scheduled to a node with the k1: v1 label, you can specify a nodeSelector requirement in the pod spec. NodeSelector is essentially a map structure, which can directly contain the requirements for the node label, for example, k1: v1. In this way, the pod is forcibly scheduled to the node with the k1: v1 label.
NodeSelector is simple but it provides only required affinity scheduling. Therefore, Kubernetes provides a new method, NodeAffinity.
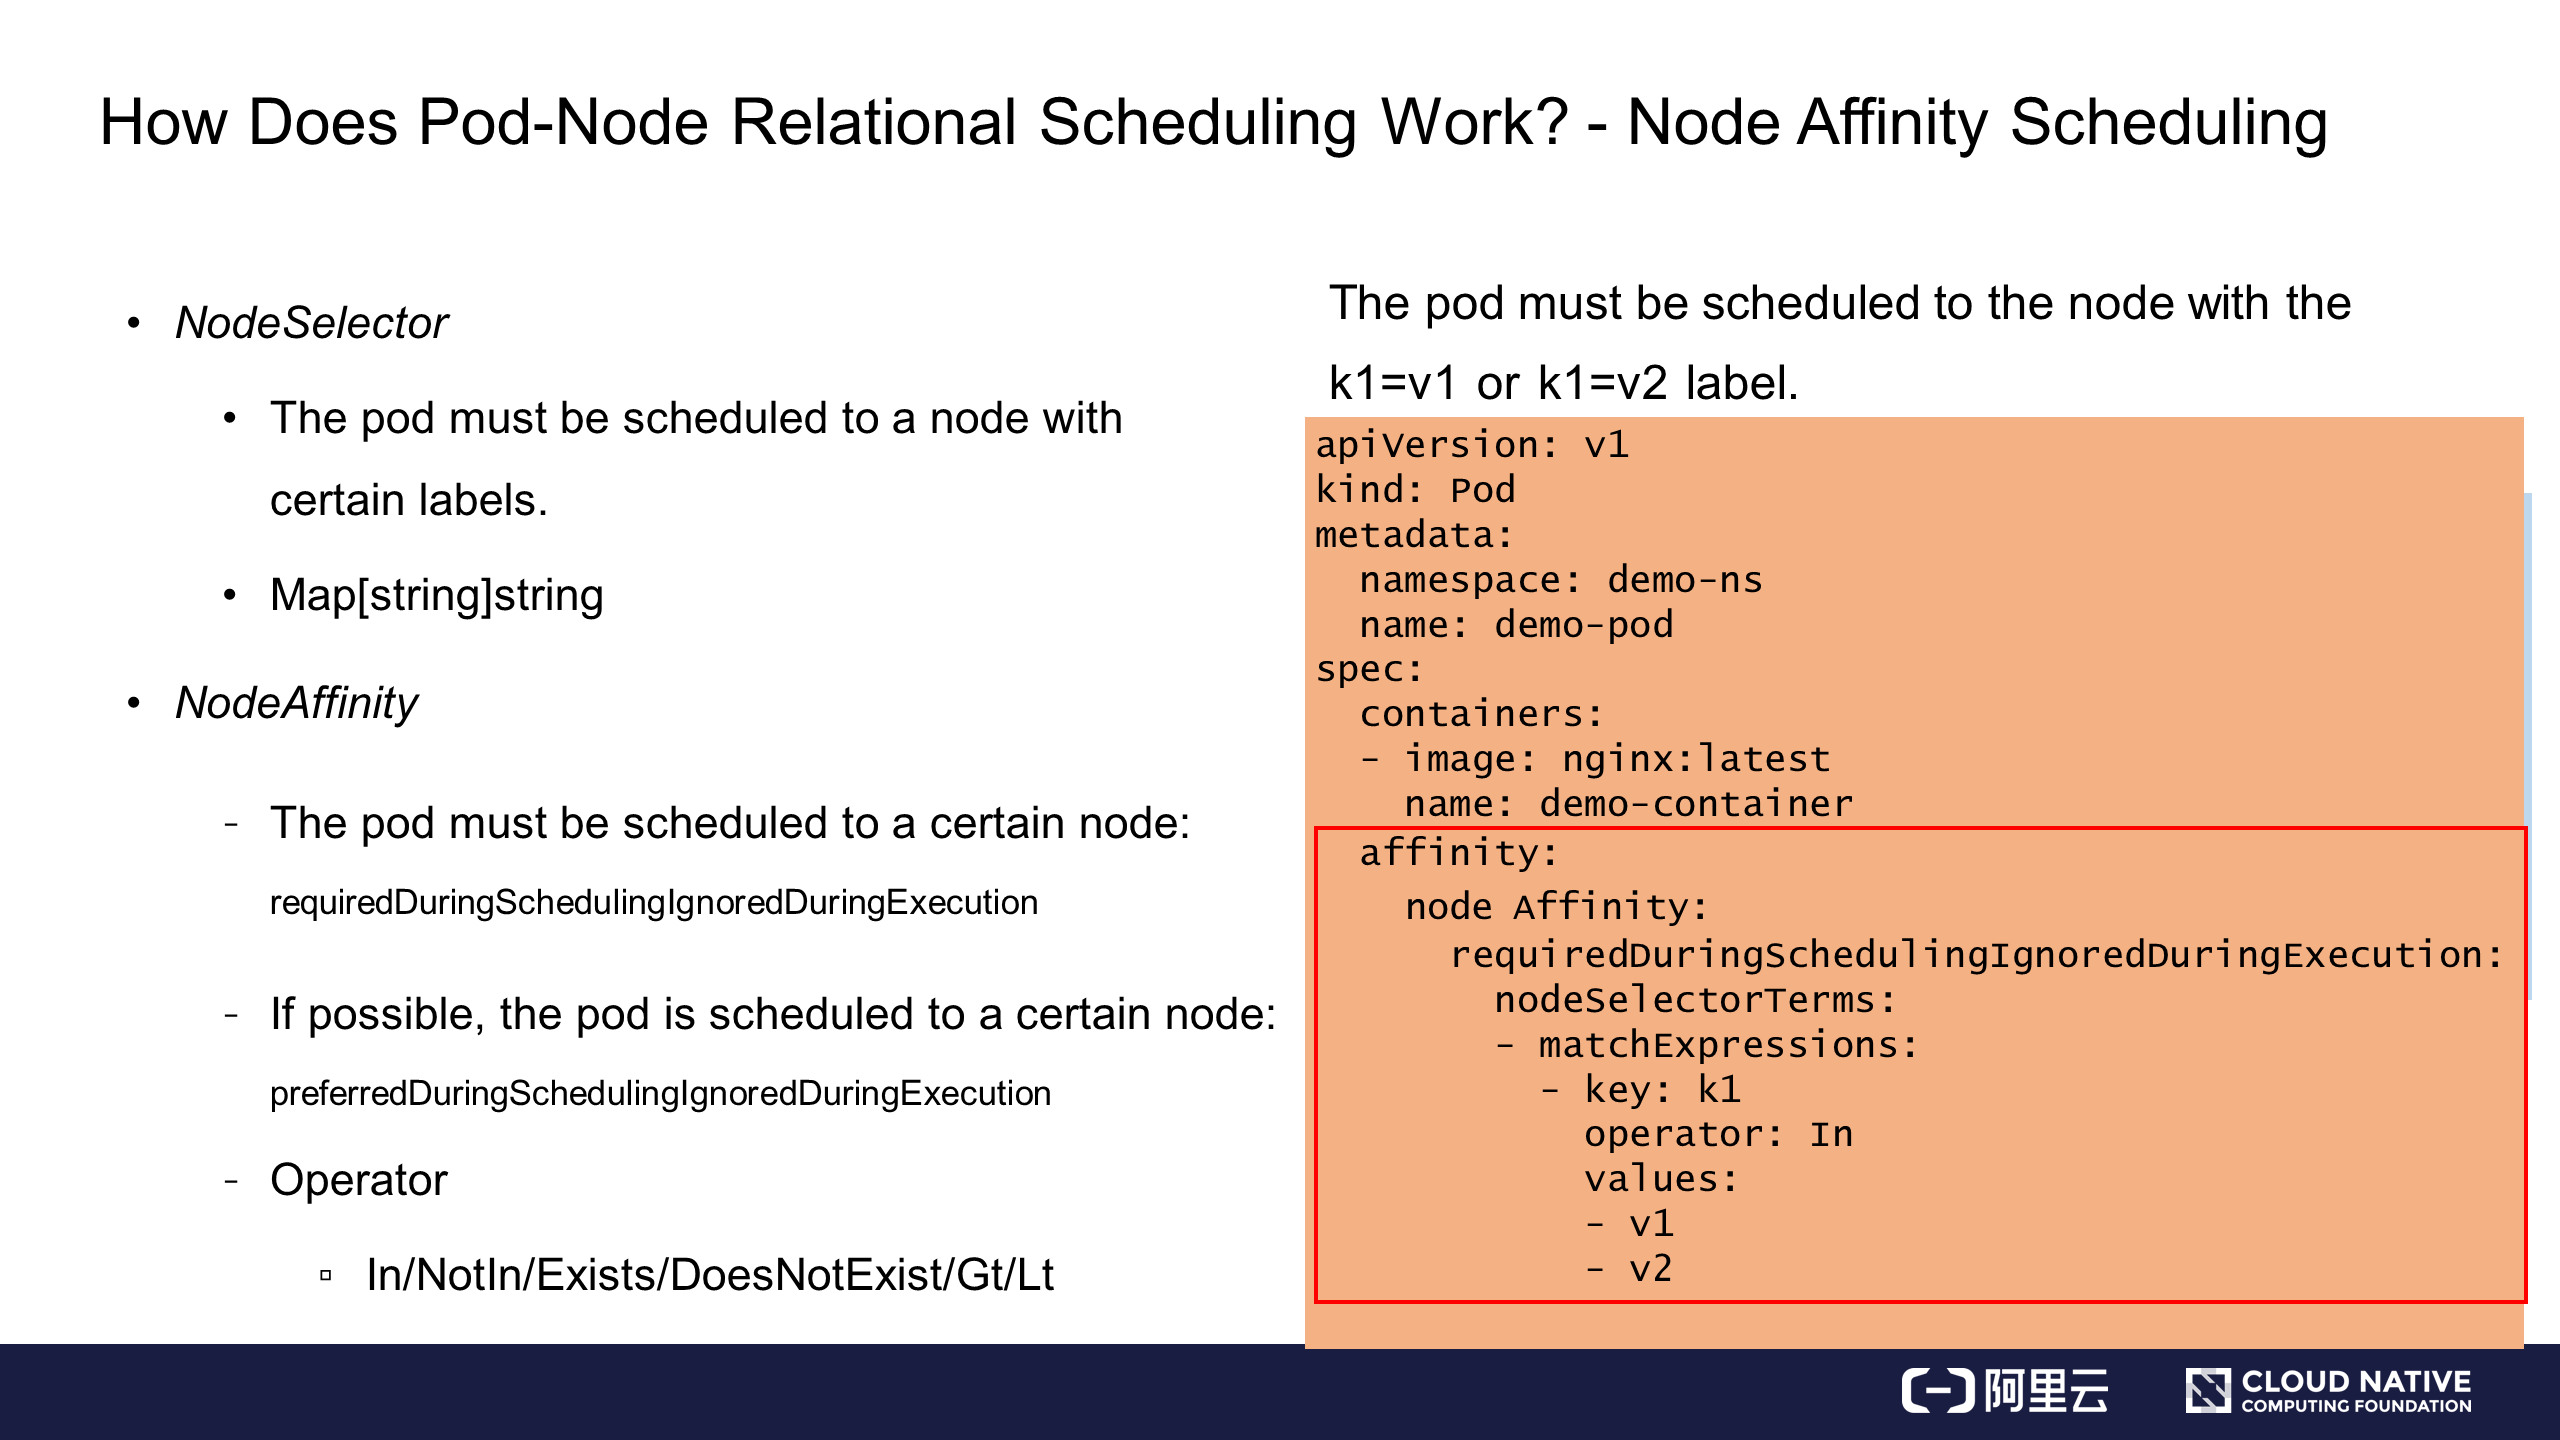
Similar to PodAffinity, NodeAffinity also provides two scheduling policies:
The basic syntax of NodeAffinity is similar to that of PodAffinity and PodAntiAffinity. NodeAffinity provides more operators than PodAffinity. Gt and Lt are added to allow value comparison. When Gt is used, values can only be set to numerals.
A third scheduling policy is to apply flags to nodes to prevent pods from being scheduled to certain nodes. Kubernetes defines these flags as taints, which literally means contamination.
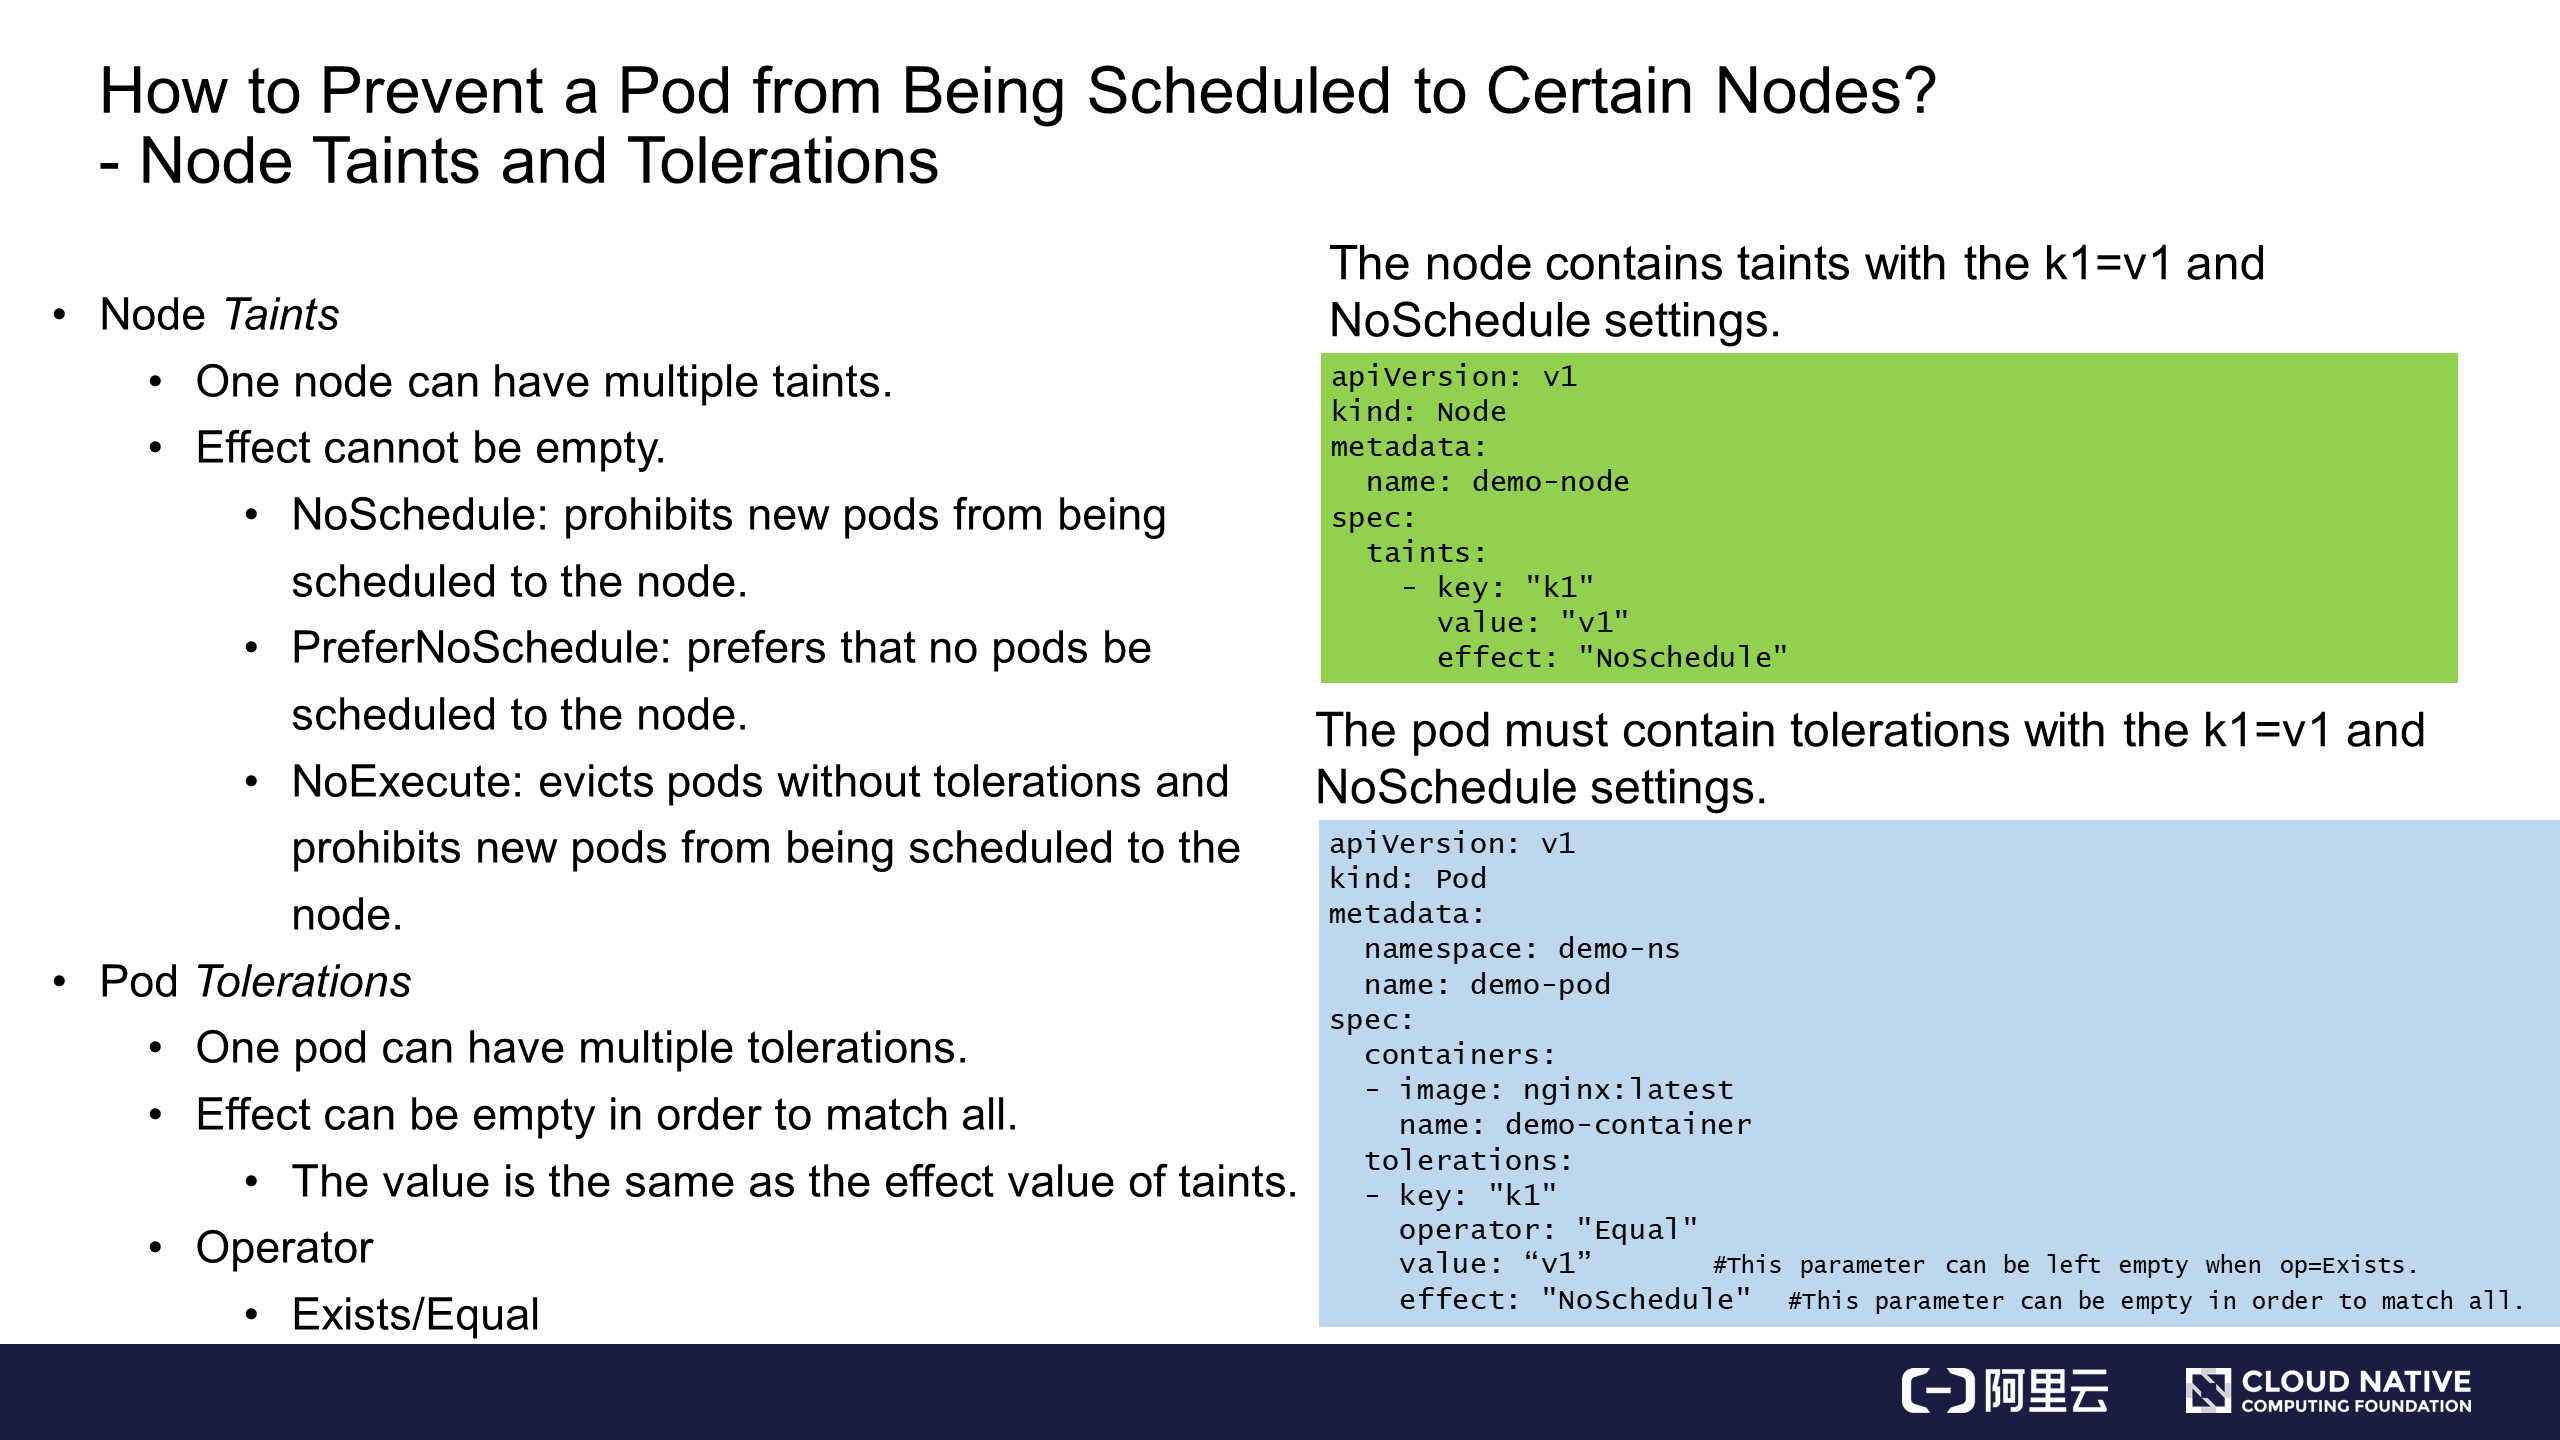
So how can we prevent a pod from being scheduled to certain nodes? For example, when a demo-node encounters an error, pod scheduling might need to be restricted on the node. In this case, you can apply a taint to the node. The taint contains key, value, and effect.
Currently, Kubernetes provides three taint actions:
(1) NoSchedule: prohibits new pods from being scheduled to the node.
(2) PreferNoSchedul: prefers that no pods are scheduled to the node.
(3) NoExecute: evicts pods without tolerations and prohibits new pods from being scheduled to the node. This policy is quite strict, so be careful when using it.
As shown in the green area in the preceding figure, k1=v1 is applied to the demo-node, and effect is set to NoSchedule. In this case, newly created pods without a toleration for this taint cannot be scheduled to the node.
However, we can also allow specific pods to be scheduled to tainted nodes. To do this, we apply tolerations to the pods. As shown in the blue area in the preceding figure, a toleration is specified in the pod spec and contains key, value, and effect. These three values must be exactly the same as those specified for taints.
The tolerations also contain operator, which can be set to Exists or Equal. Equal means that value must be specified, but Exists does not require a value setting, similar to NodeAffinity. When Exists is used, the toleration matches the taint provided that the keys are the same.
In the preceding example, a toleration is applied to the pod. Therefore, only a pod with the toleration can be scheduled to the node with taints, as shown in the green area. In this way, only specific pods can be scheduled to a node.
Let's summarize the special relationships between pods and nodes and their conditional scheduling.
In case of complementary or mutual exclusion between two pods, you can set the following parameters:
In case of affinity between a pod and a node, you can set the following parameters:
To prohibit some pods from being scheduled to failed nodes or those running special businesses, you can set the following parameters:
In addition to the basic scheduling capabilities already described, Kubernetes also provides advanced scheduling capabilities.
Priority-based scheduling and preemption involve the following concepts:
Based on the four characteristics of the scheduling process, how can we properly use a cluster? When the cluster resources are sufficient, you can properly use them by simply relying on the basic scheduling capabilities. However, if the cluster resources are insufficient, we made need to use more advanced capabilities. Two relevant policies are provided:
In practice, FIFO is actually unfair because it does not distinguish between high-priority and low-priority businesses. Therefore, the priority policy can better adapt to companies' regular business characteristics.
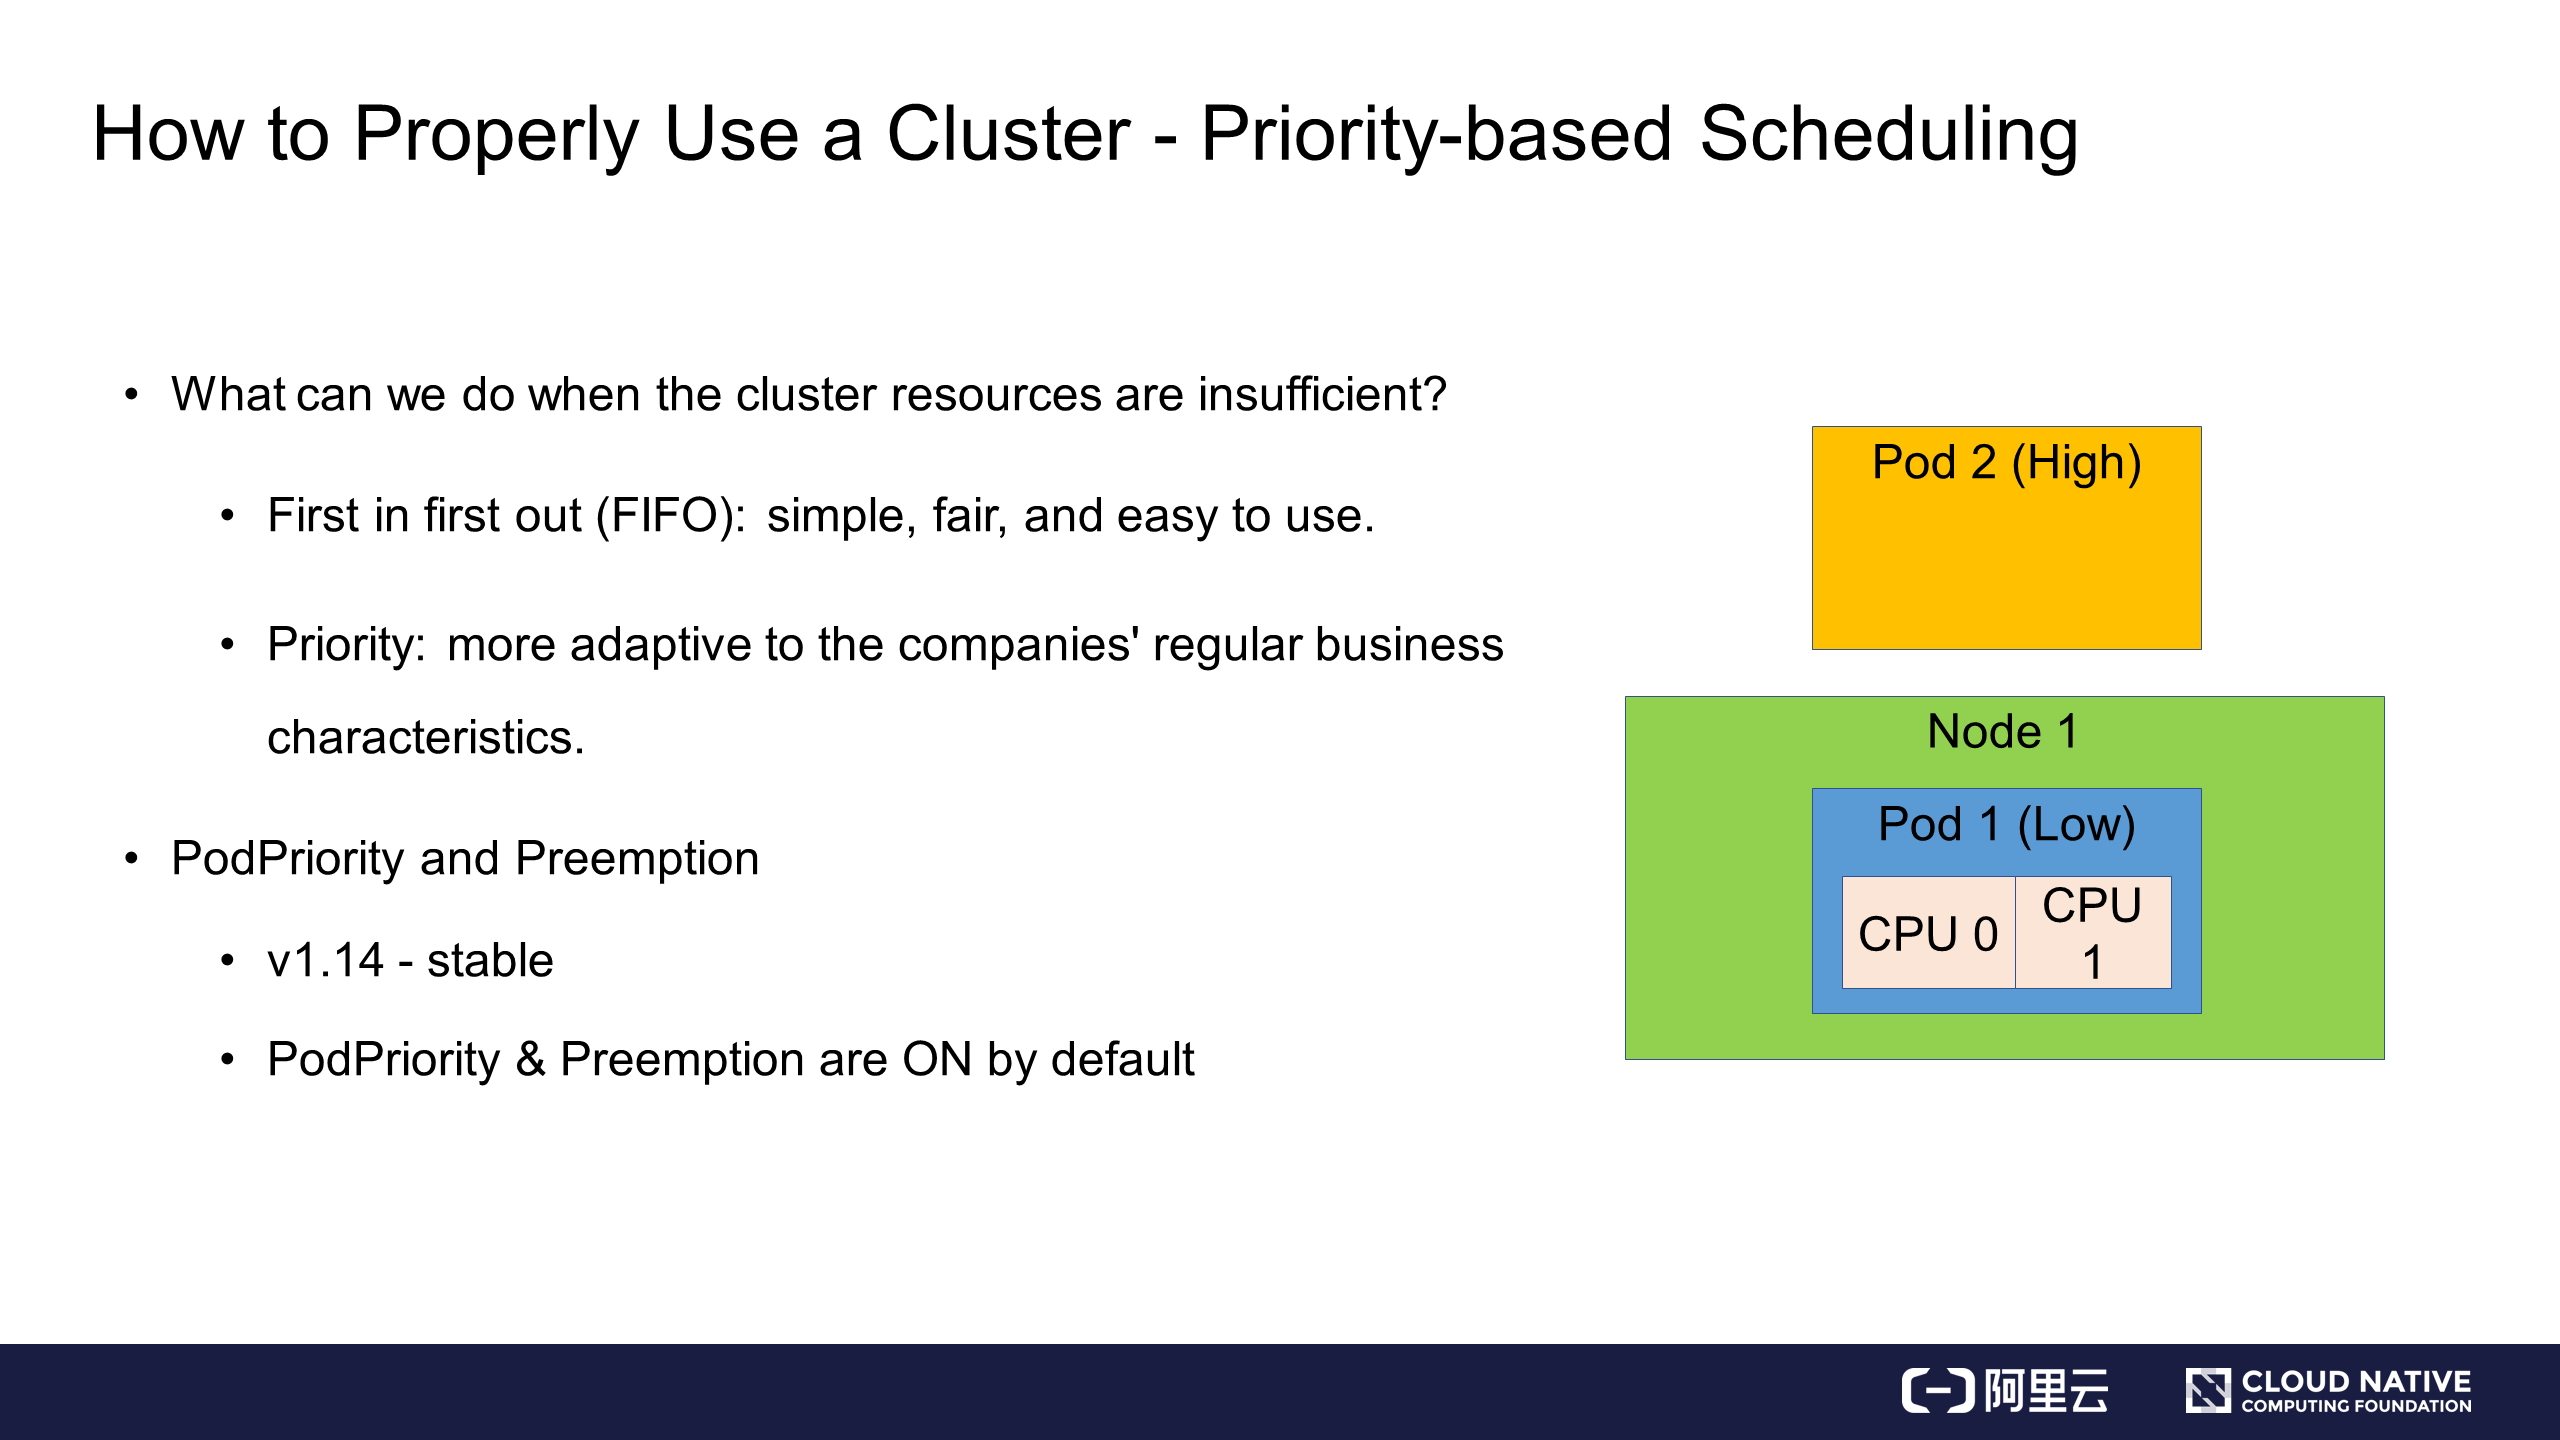
The following describes the concept of priority-based scheduling with respect to the priority policy. For example, assume a node containing two CPUs has been occupied by a pod. When a higher-priority pod is scheduled to the node, the lower-priority pod is expected to release the two CPUs for the higher-priority pod to use. Then, the lower-priority pod needs to return to the waiting queue or be resubmitted. This process is called priority-based preemptive scheduling.
In Kubernetes v1.14, the PodPriority and Preemption features are stable and enabled by default.
To implement priority-based scheduling, you need to create a priorityClass and configure a different priorityClassName for each pod.
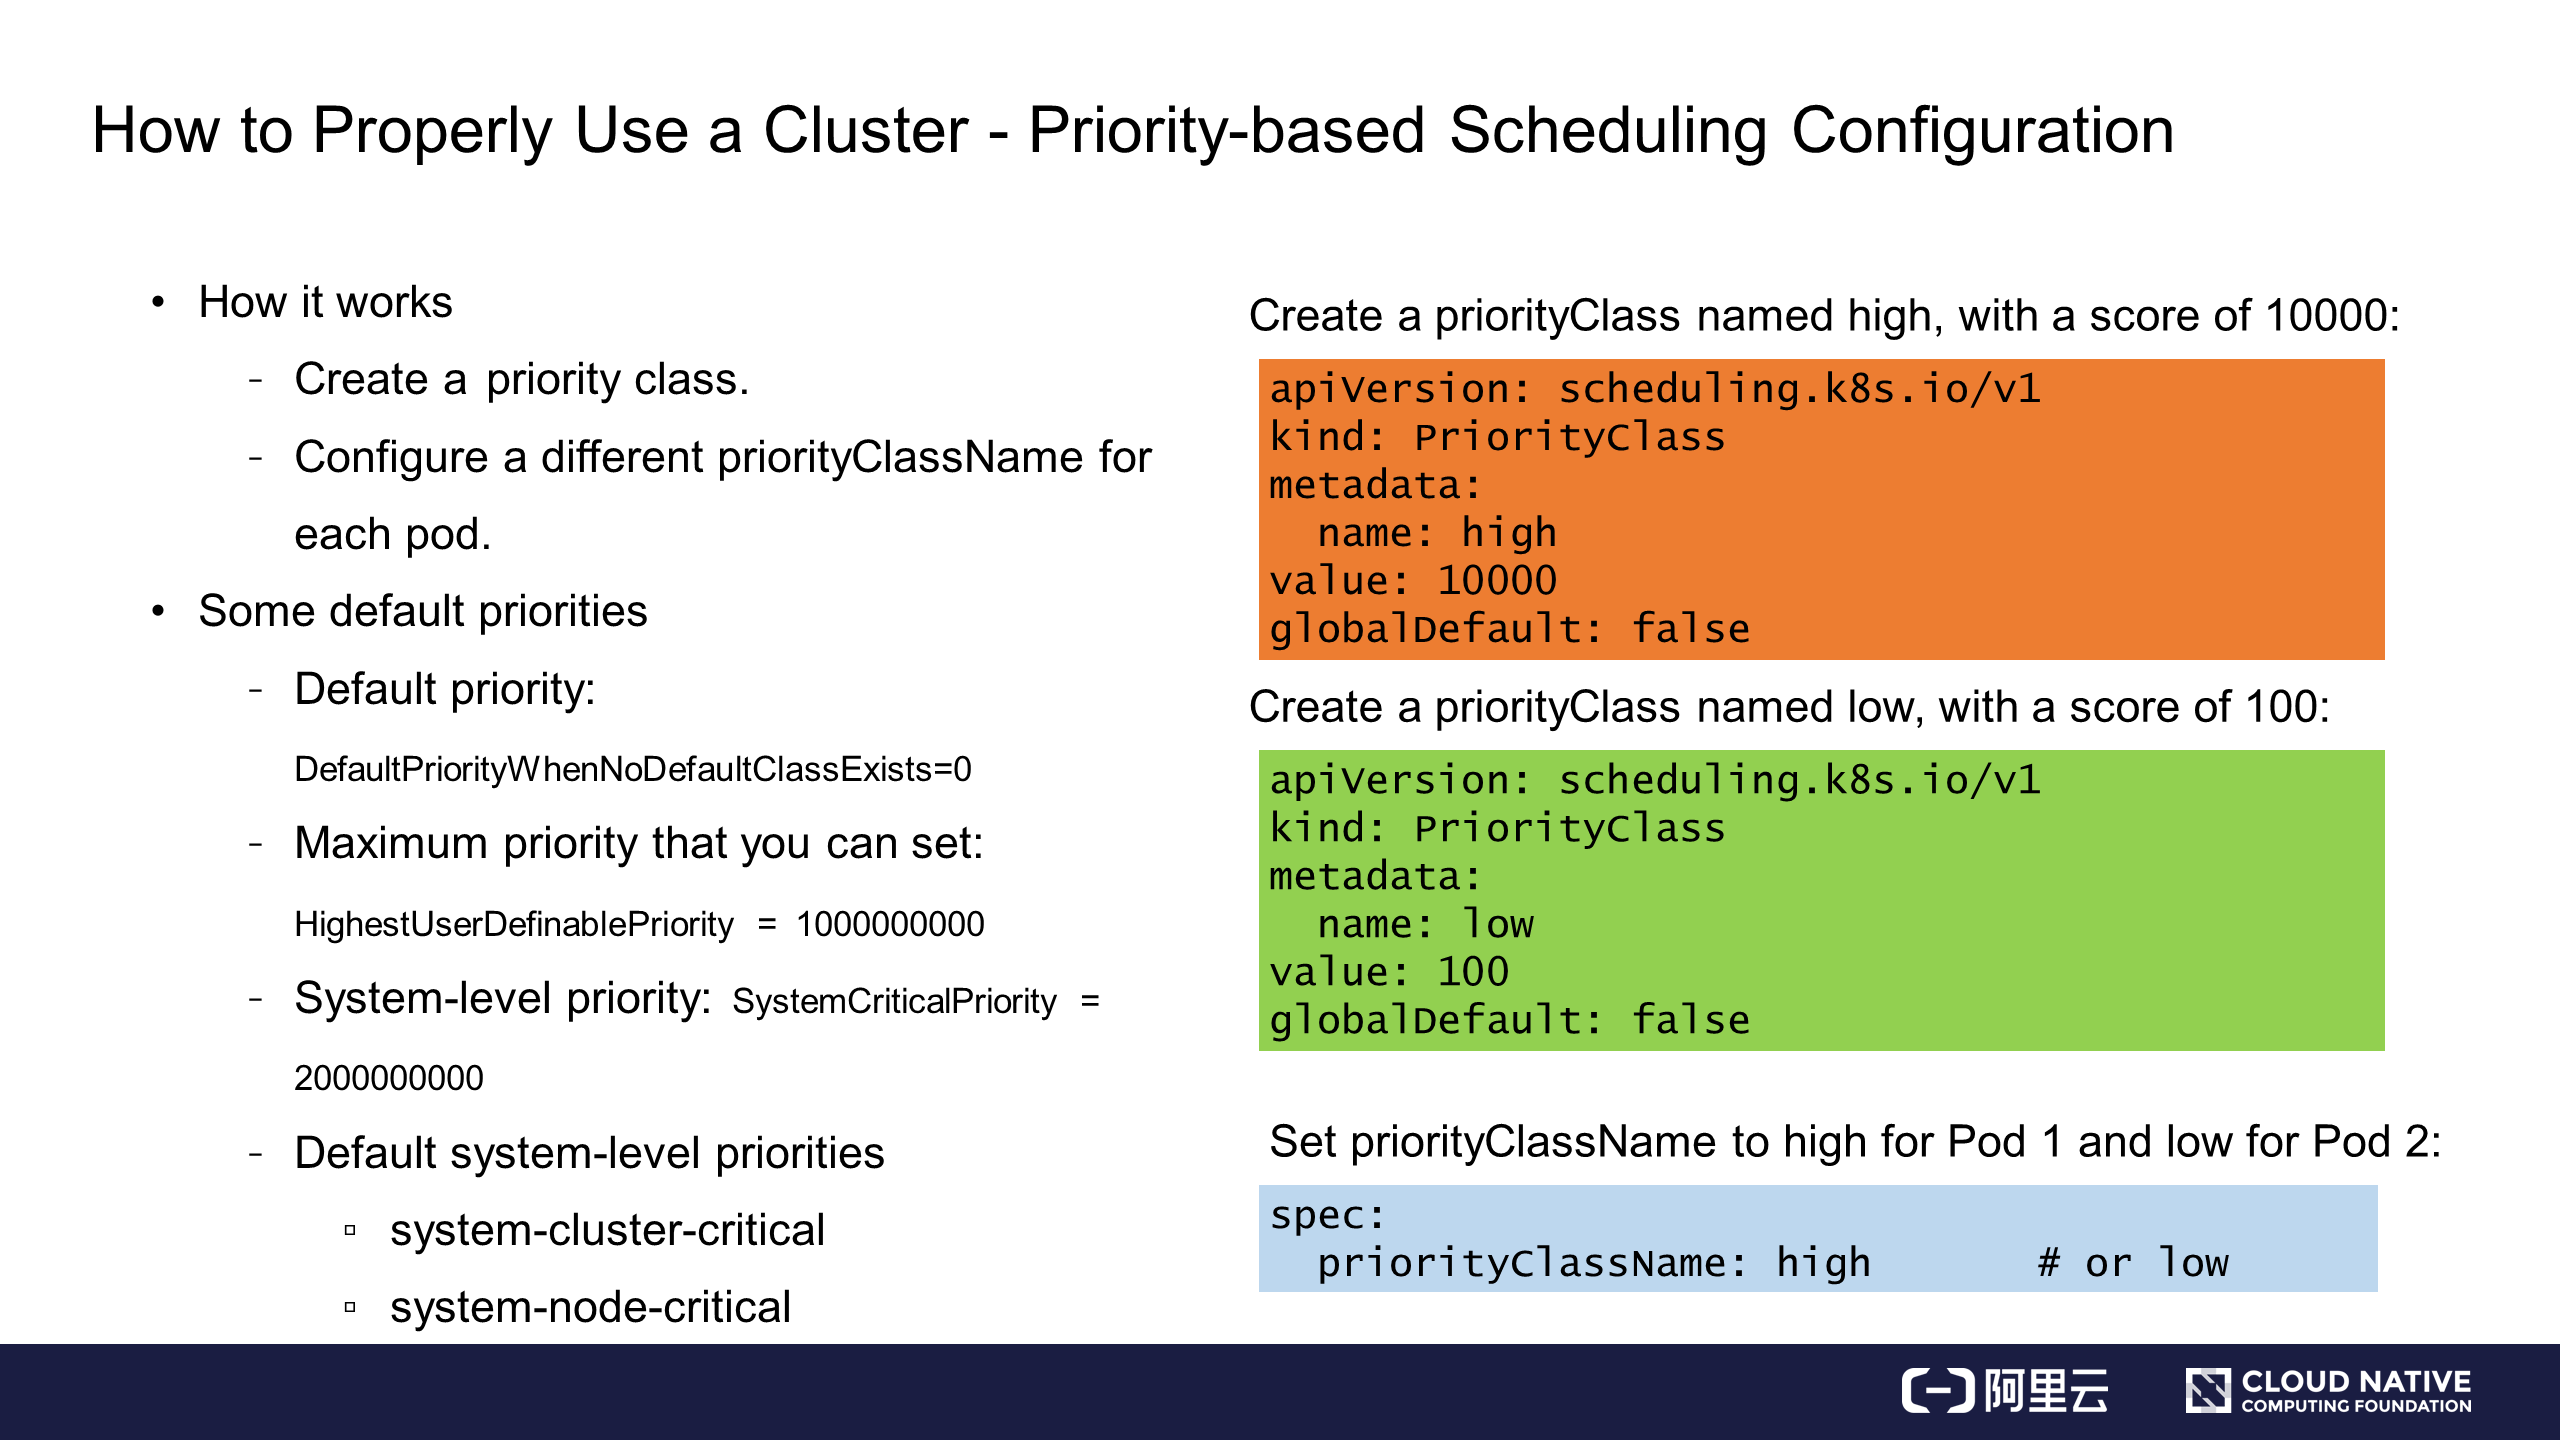
The following describes how to create a priorityClass. Two demos are defined in the right part of the preceding figure:
In the third part, priorityClassName is set to high for Pod 1 and low for Pod 2. As shown in the blue area, priorityClassName: high is added to the pod spec. After the pods and priorityClasses are configured, priorityClass scheduling is enabled for the cluster.
Kubernetes also provides default priority settings, such as DefaultpriorityWhenNoDefaultClassExistis. If this priority setting is not configured in the cluster, it will be set to 0 for all pods by default.
The maximum priority that you can set is HighestUserDefinablePriority = 10000000000 (1 billion), which is lower than the system-level priority: SystemCriticalPriority = 20000000000 (2 billion).
Two default system-level priorities are provided:
Now you understand priority-based scheduling in Kubernetes.
This section describes a simple priority-based scheduling process.
In this process, priority-based scheduling is triggered without preemptive scheduling.
For example, a high priority is configured for Pod 1 and a low priority is configured for Pod 2. Both Pod 1 and Pod 2 are submitted to the scheduling queue.
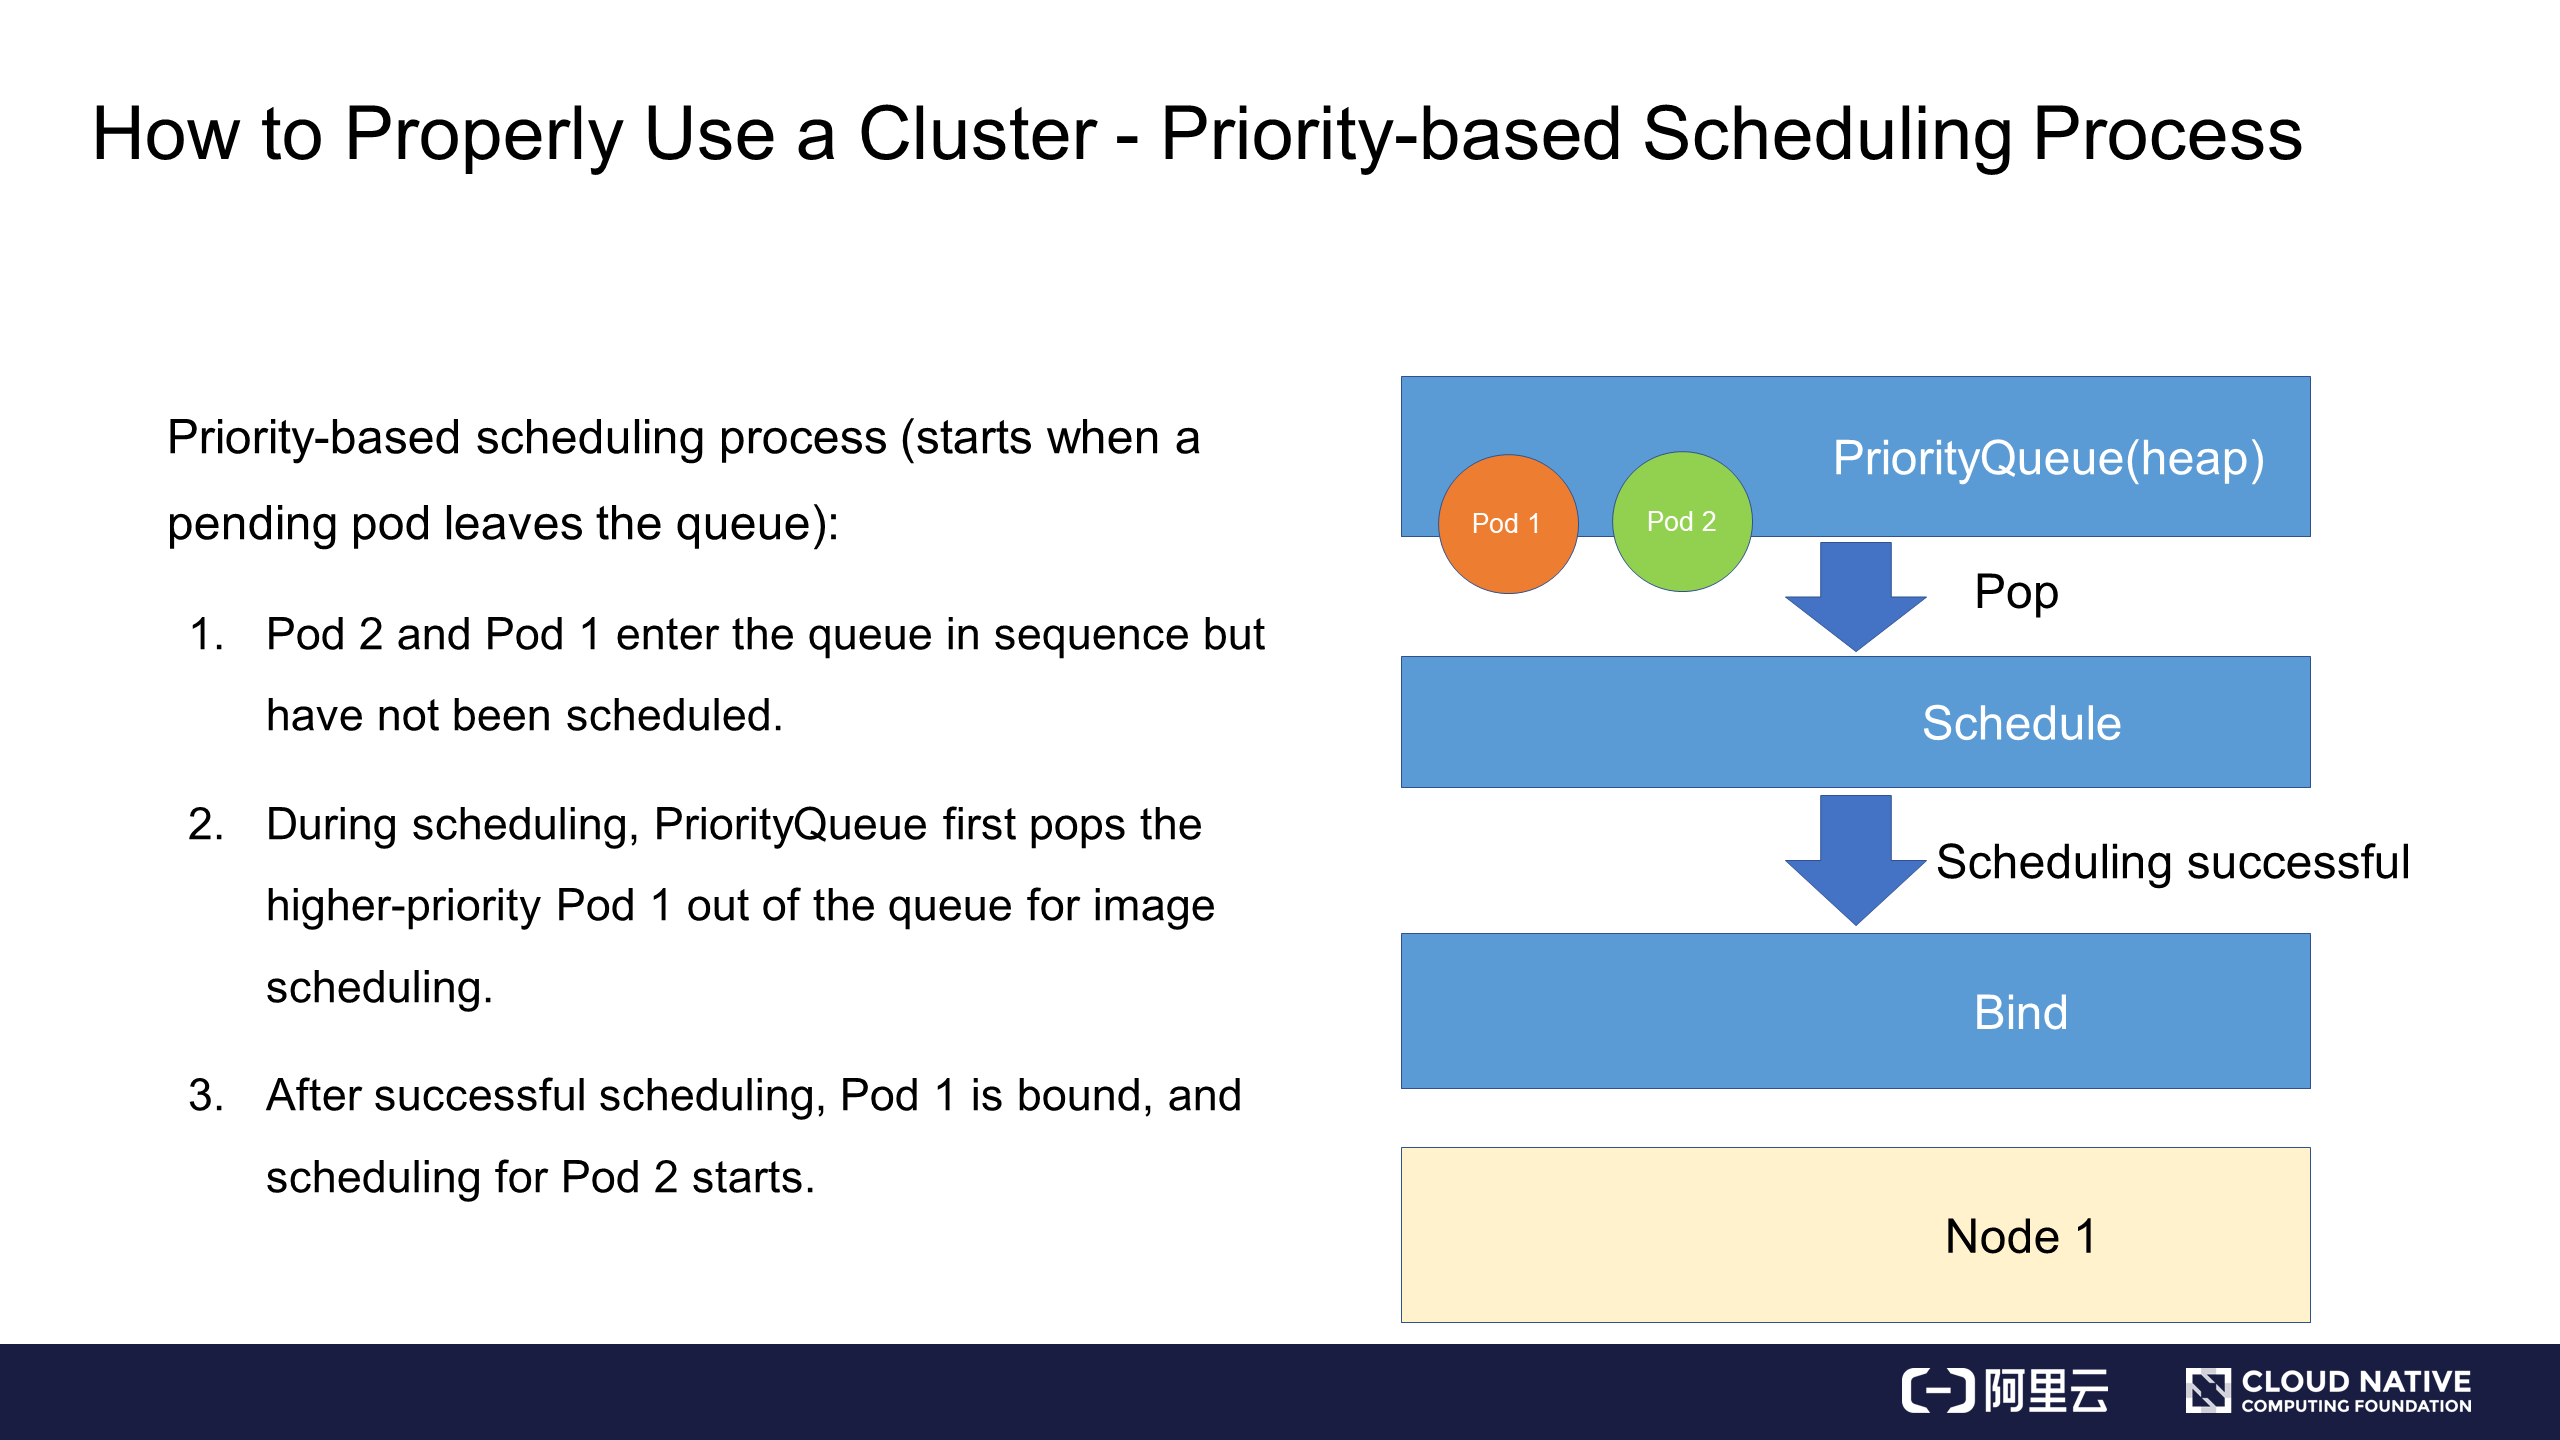
When processing the queue, the scheduler selects the higher-priority Pod 1 and binds it to Node 1.
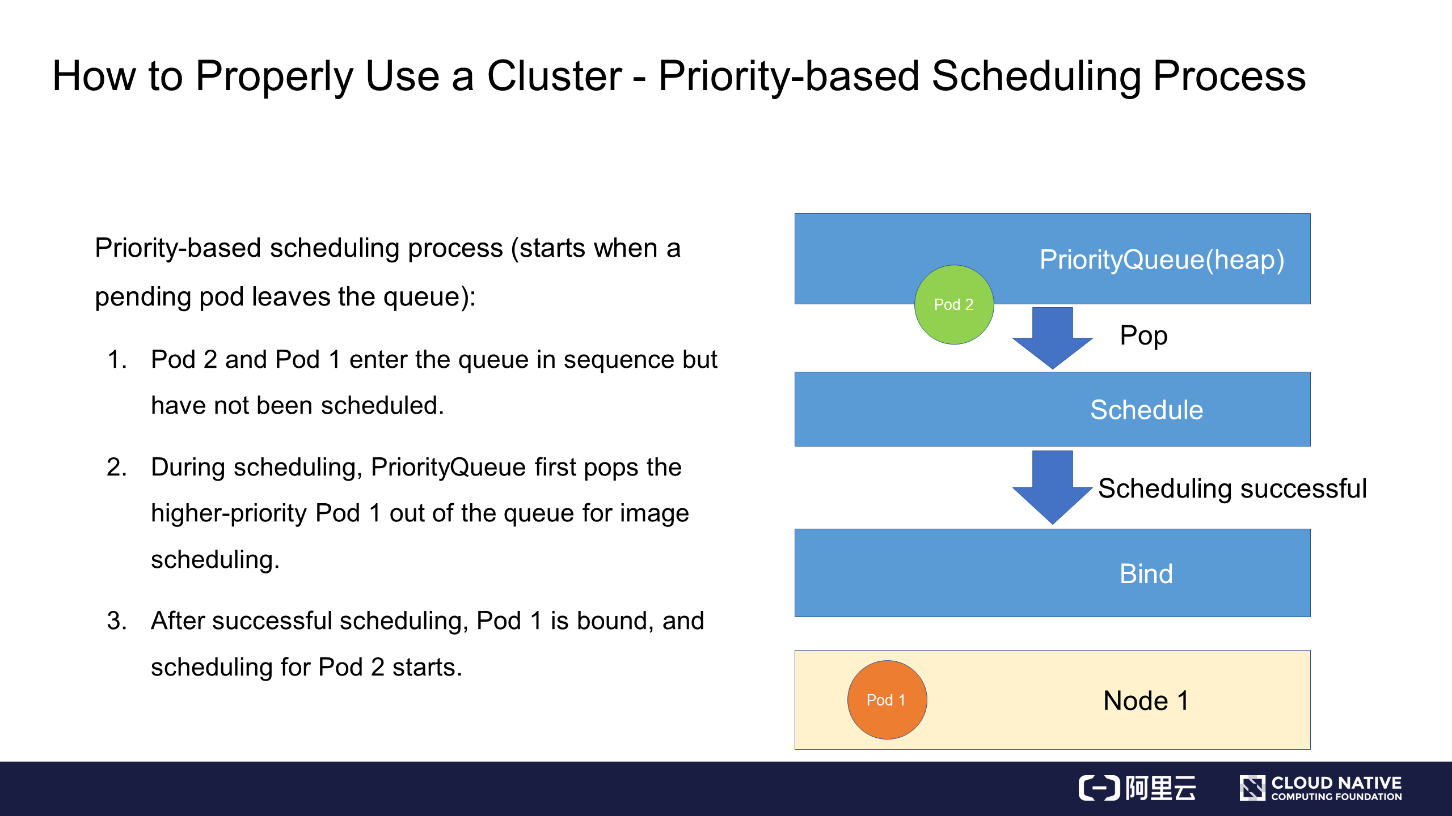
Then, the scheduler selects the lower-priority Pod 2 and binds it to Node 1 through the same process.
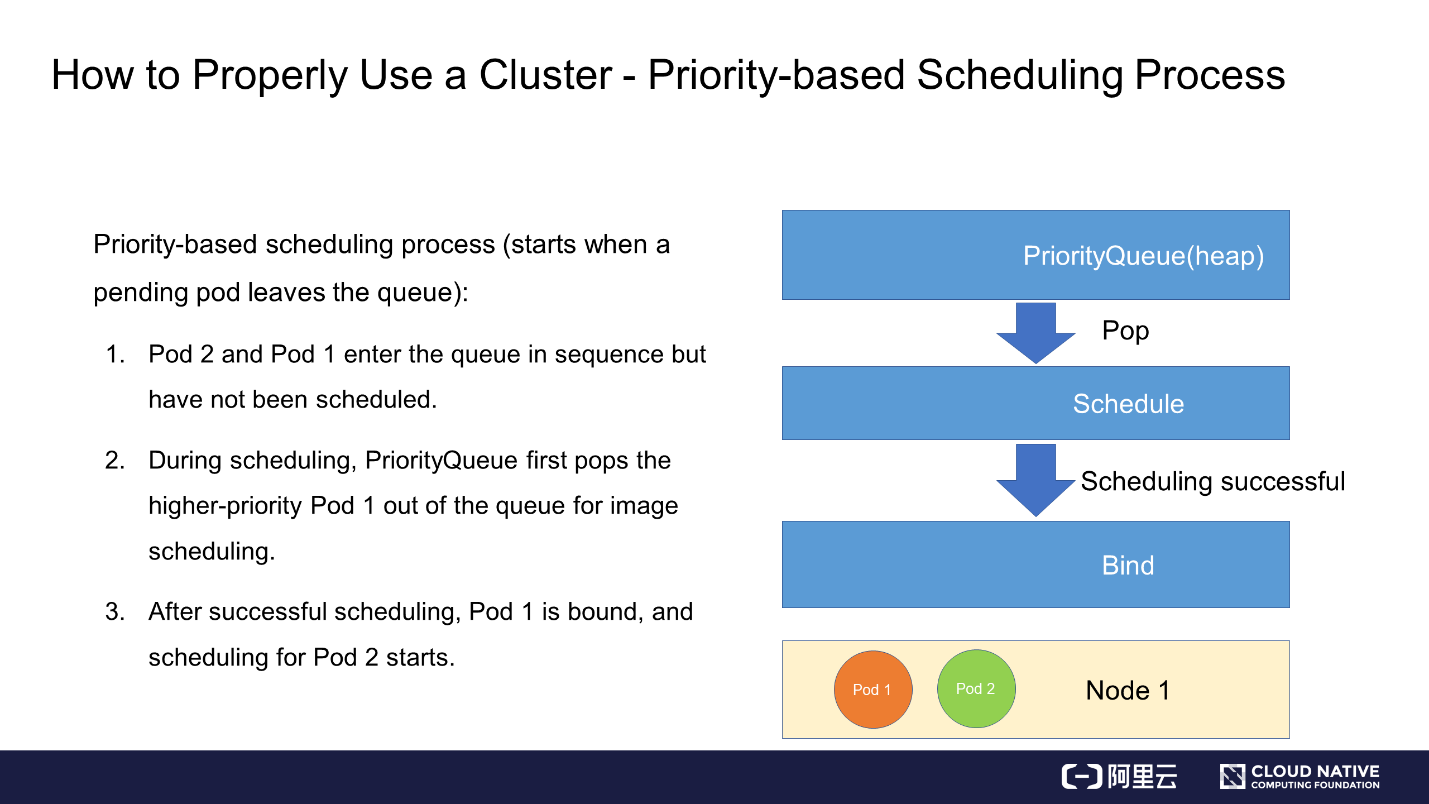
This completes a simple priority-based scheduling process.
Now, we will look at how to schedule high-priority pods when resources are insufficient.
This scenario is the same as that for priority-based scheduling, but we assume Pod 0 has occupied some resources on Node 1. Similarly, the higher-priority Pod 1 and lower-priority Pod 2 need to be scheduled.
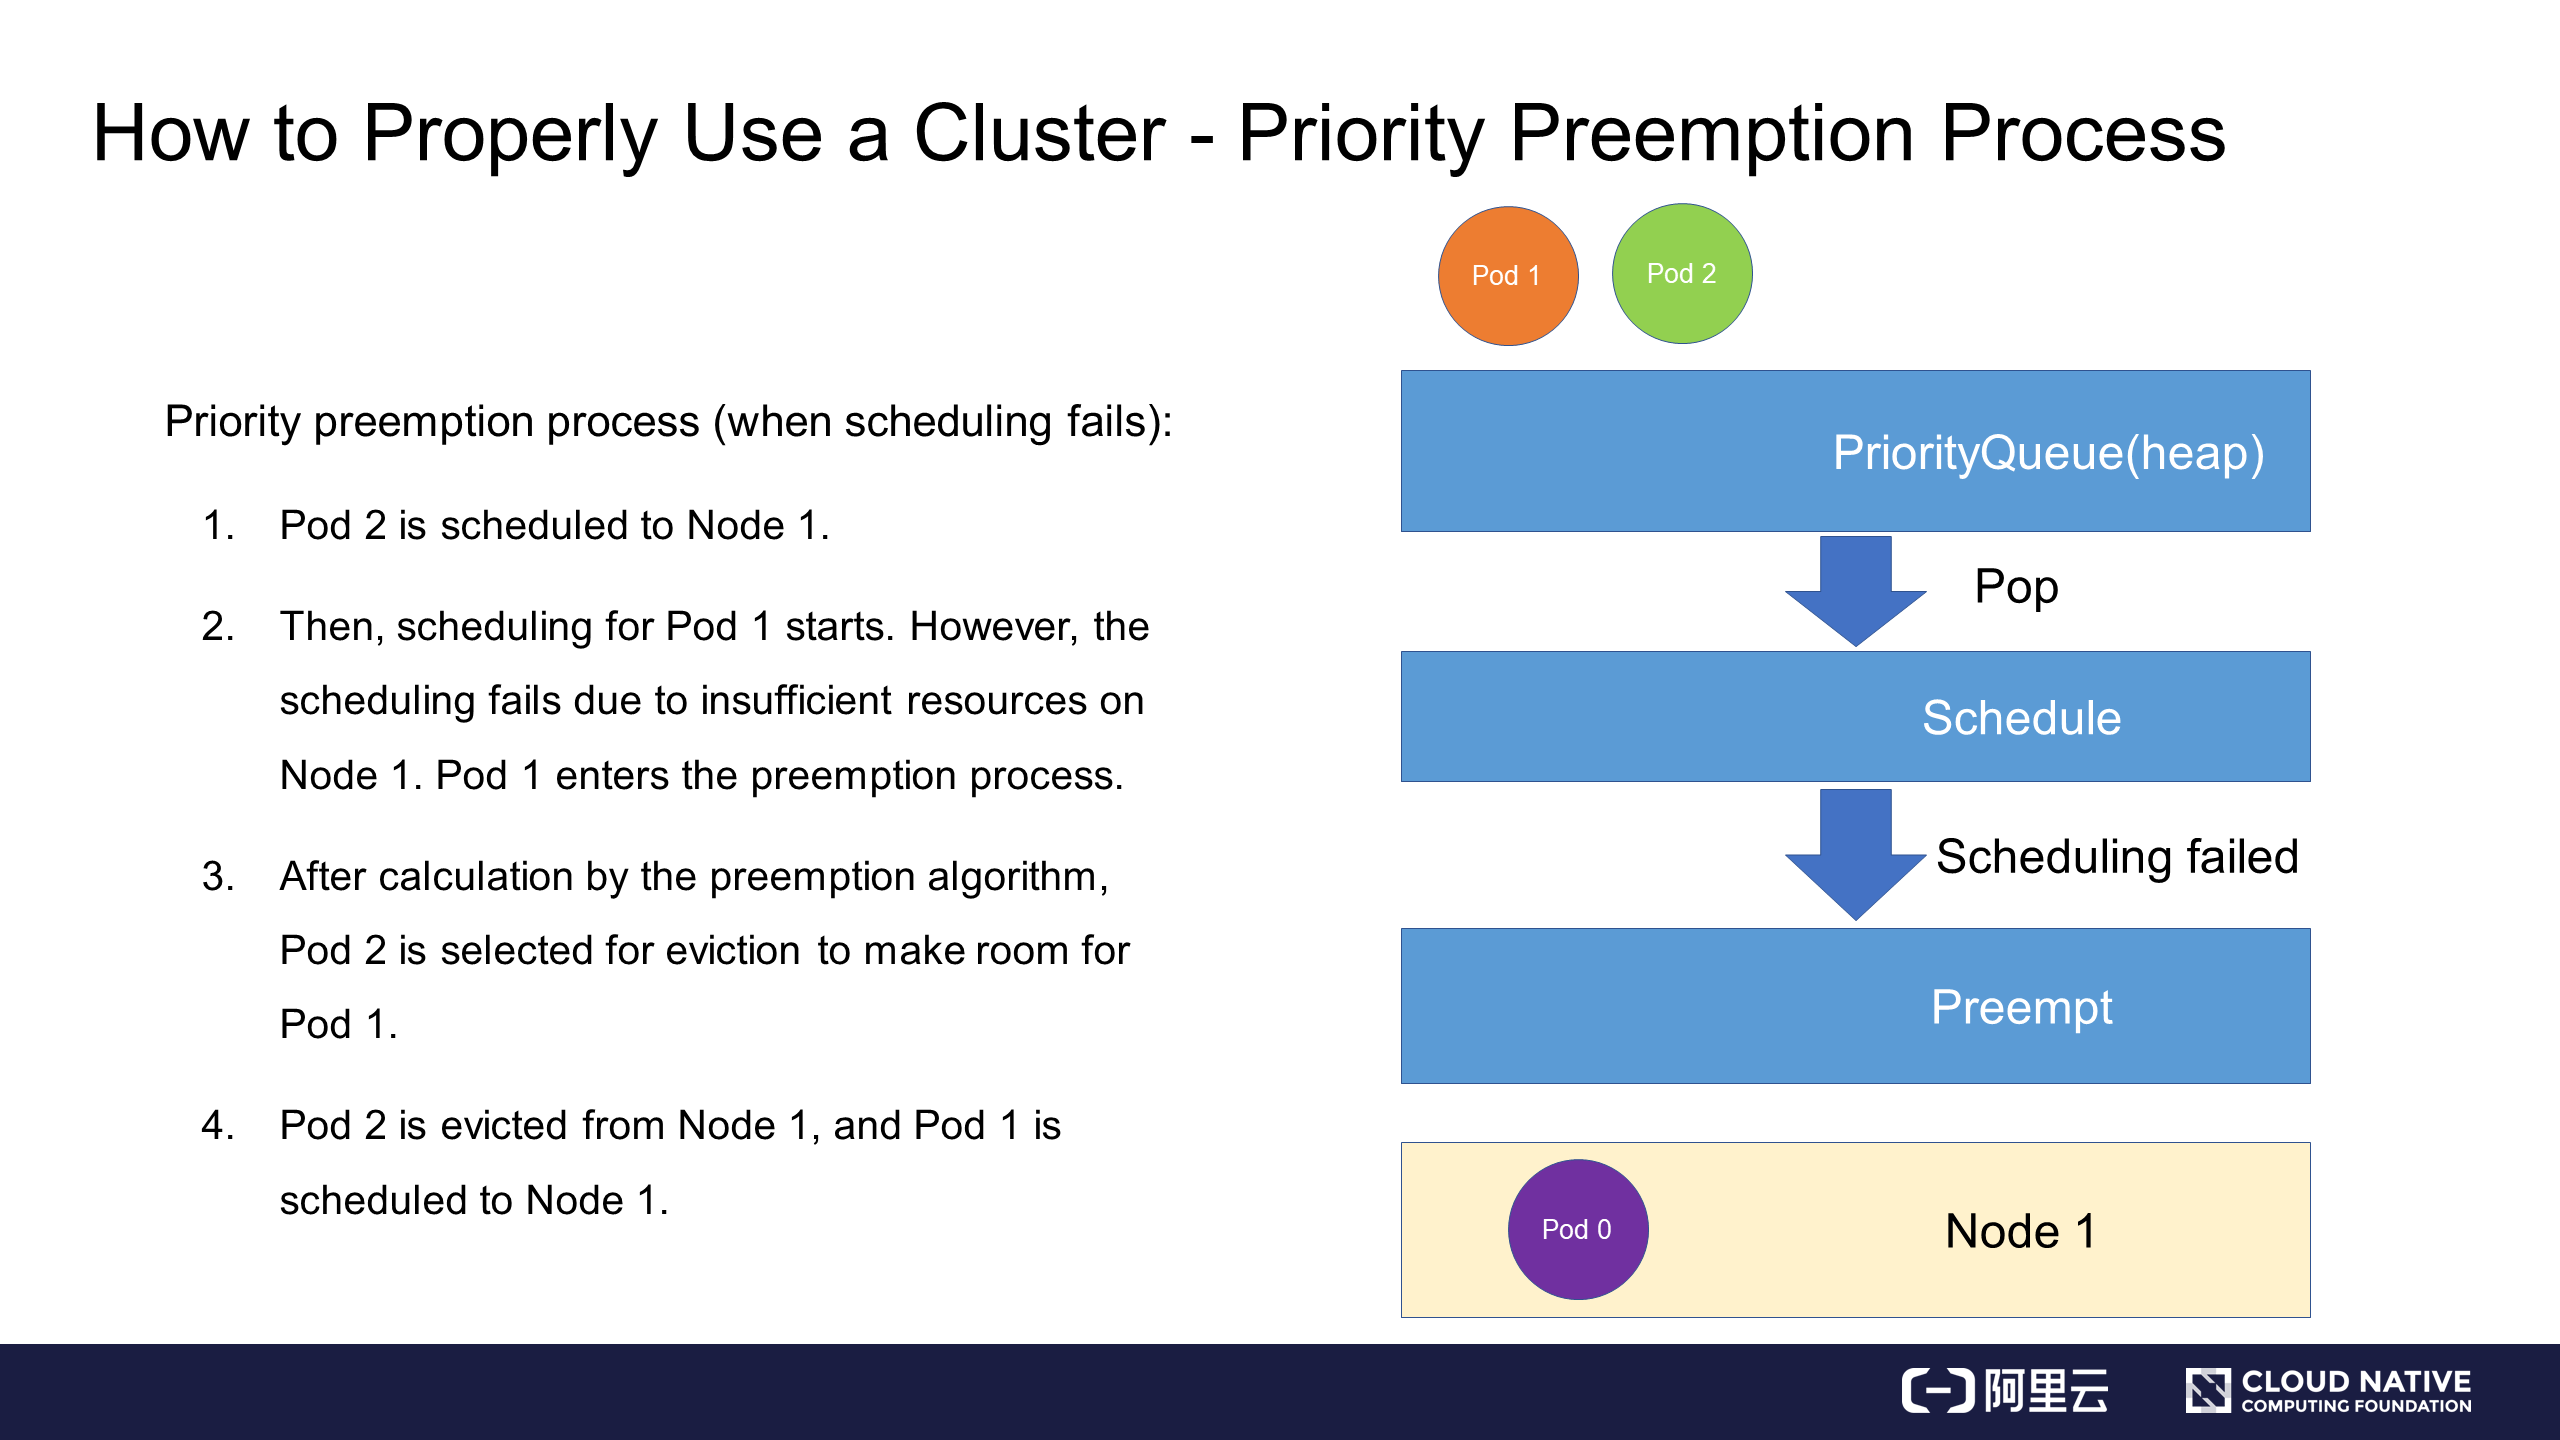
Assume that Pod 2 is first bound to Node 1 through a scheduling process.
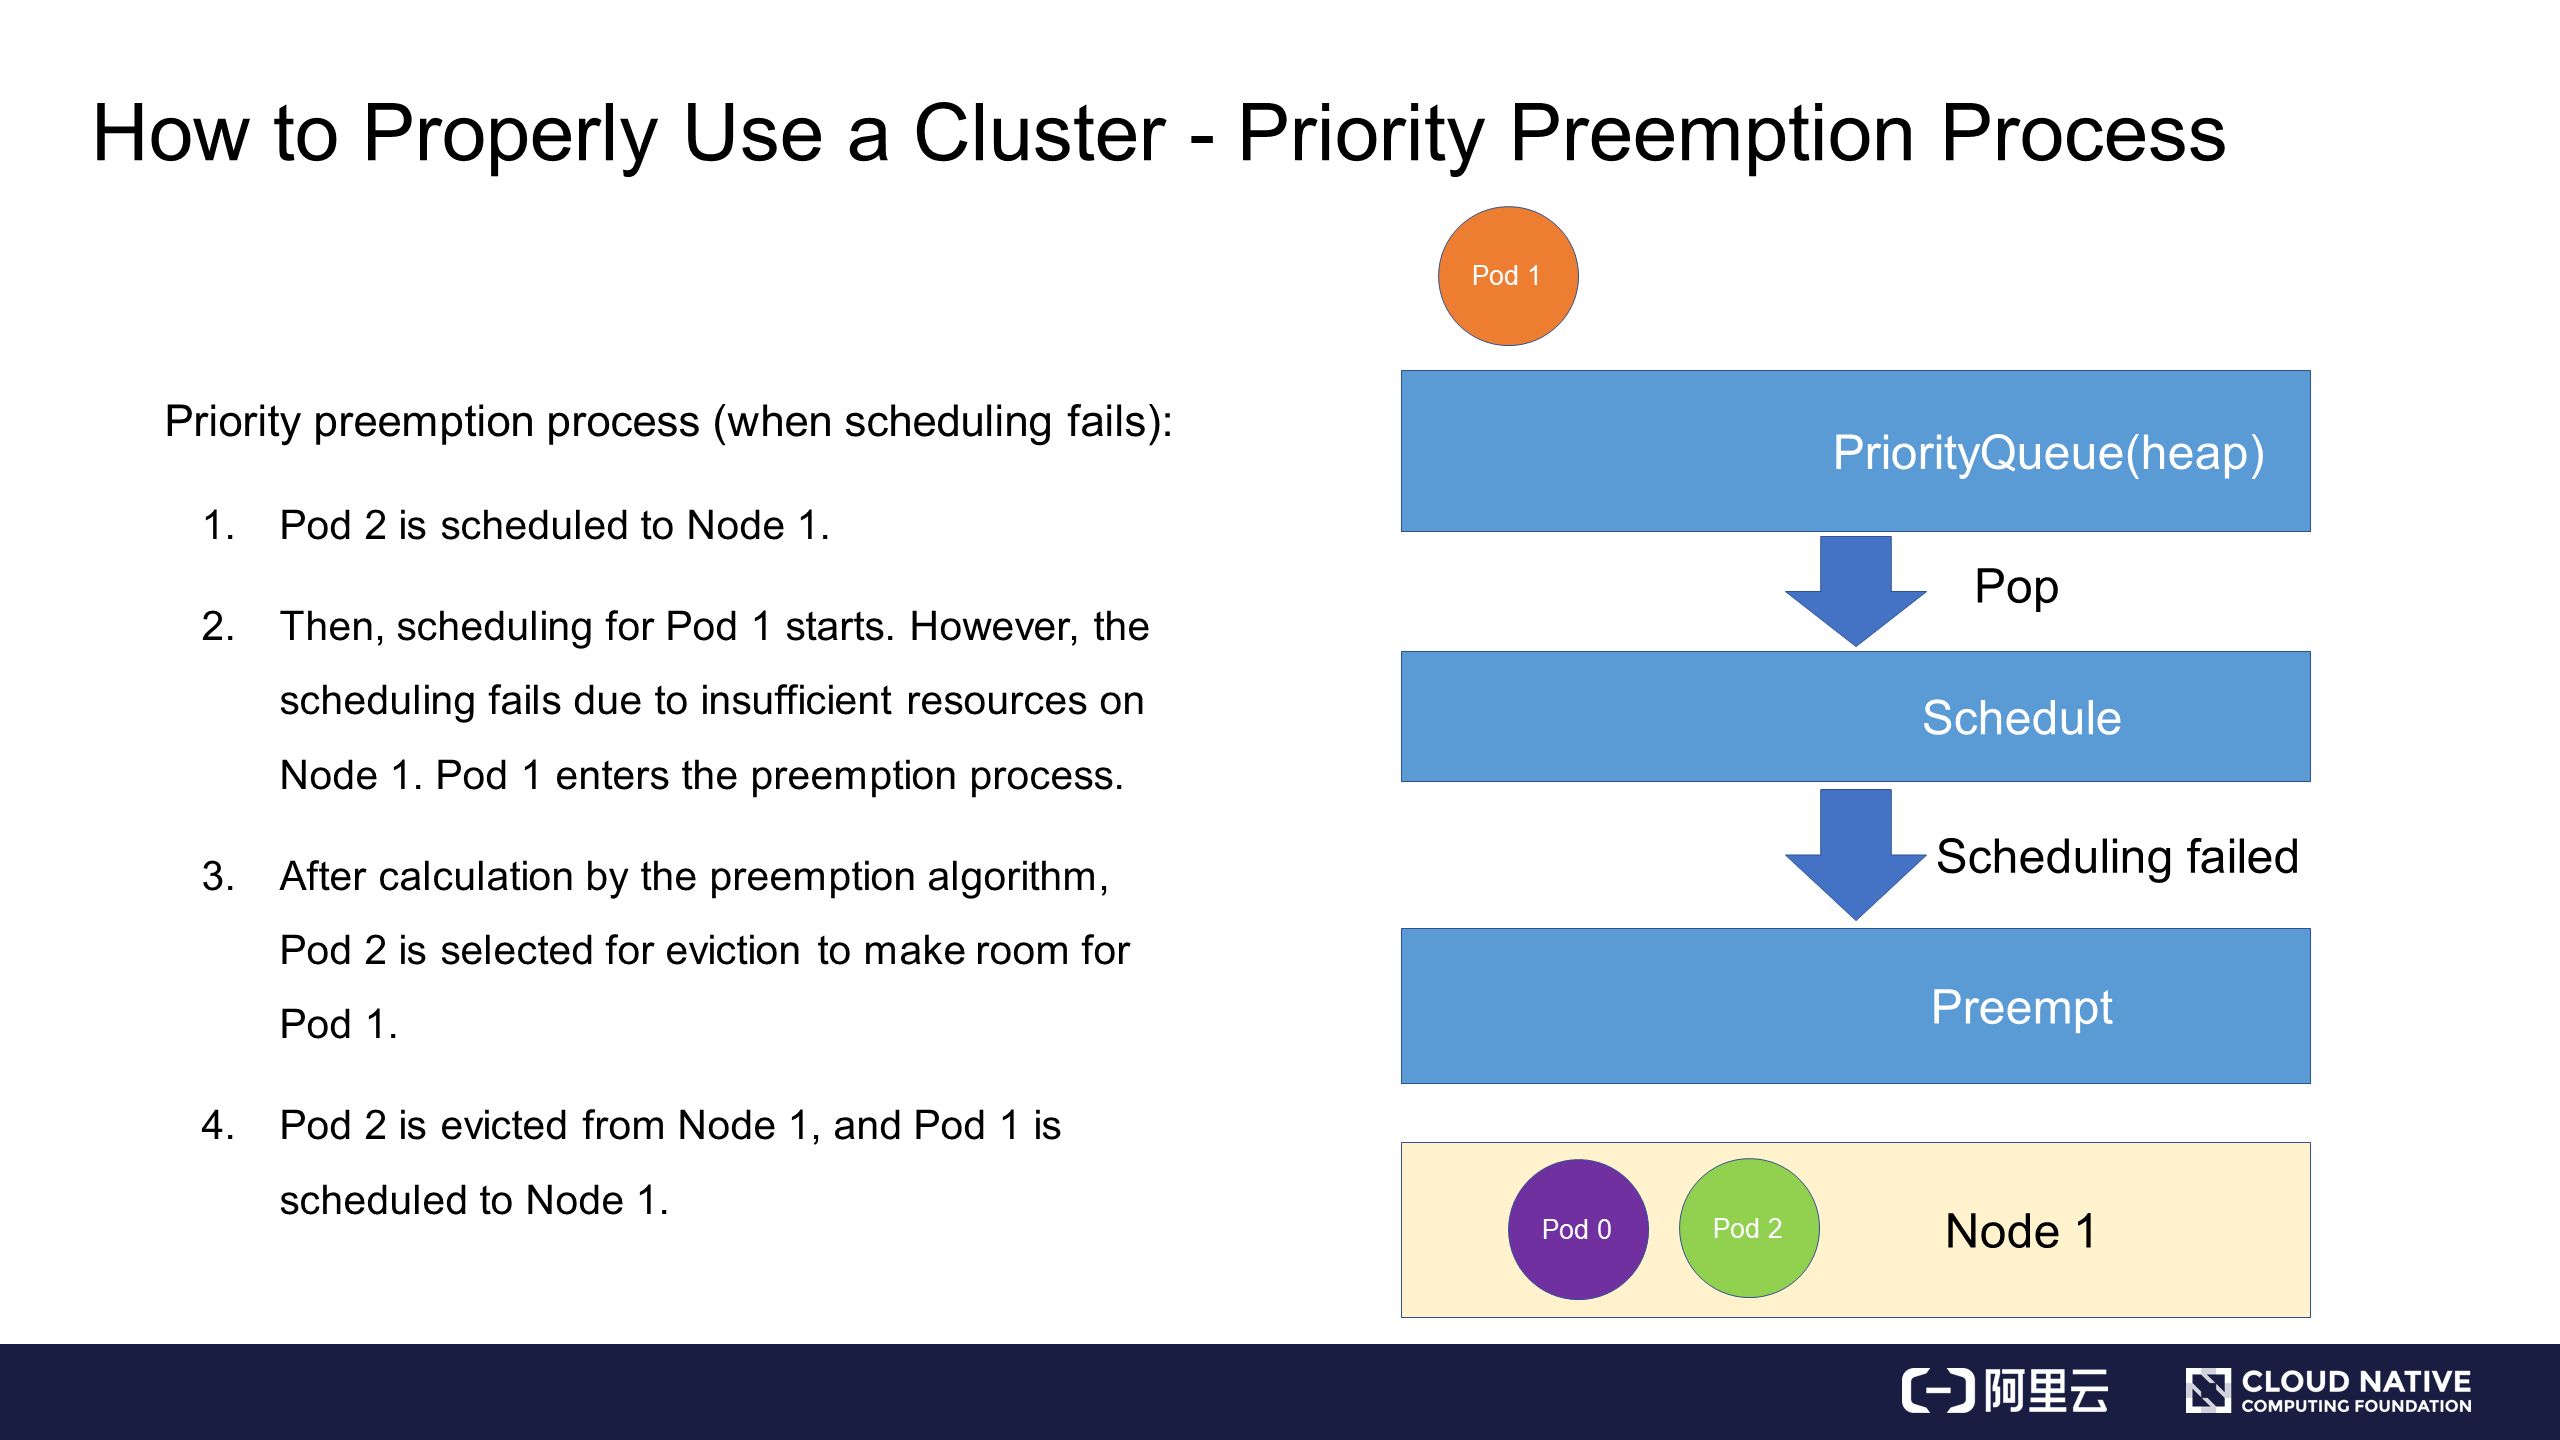
Then, the scheduler attempts to schedule Pod 1. However, scheduling fails because two pods already exist on Node 1 and the resources are insufficient.
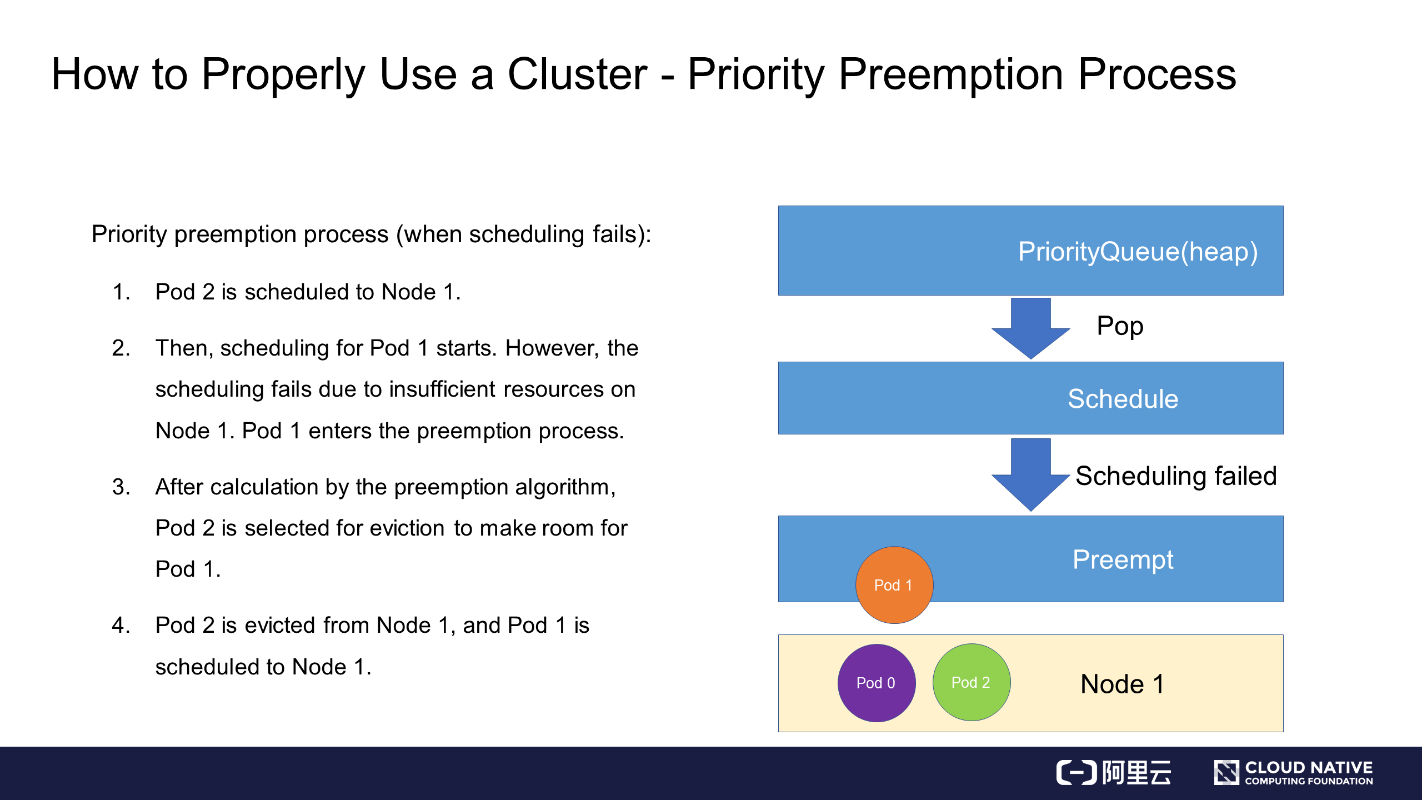
When scheduling fails, Pod 1 enters the preemption process, and the scheduler filters all nodes in the cluster to determine that Pod 2 is to be preempted. In this case, the scheduler removes Pod 2 from Node 1.
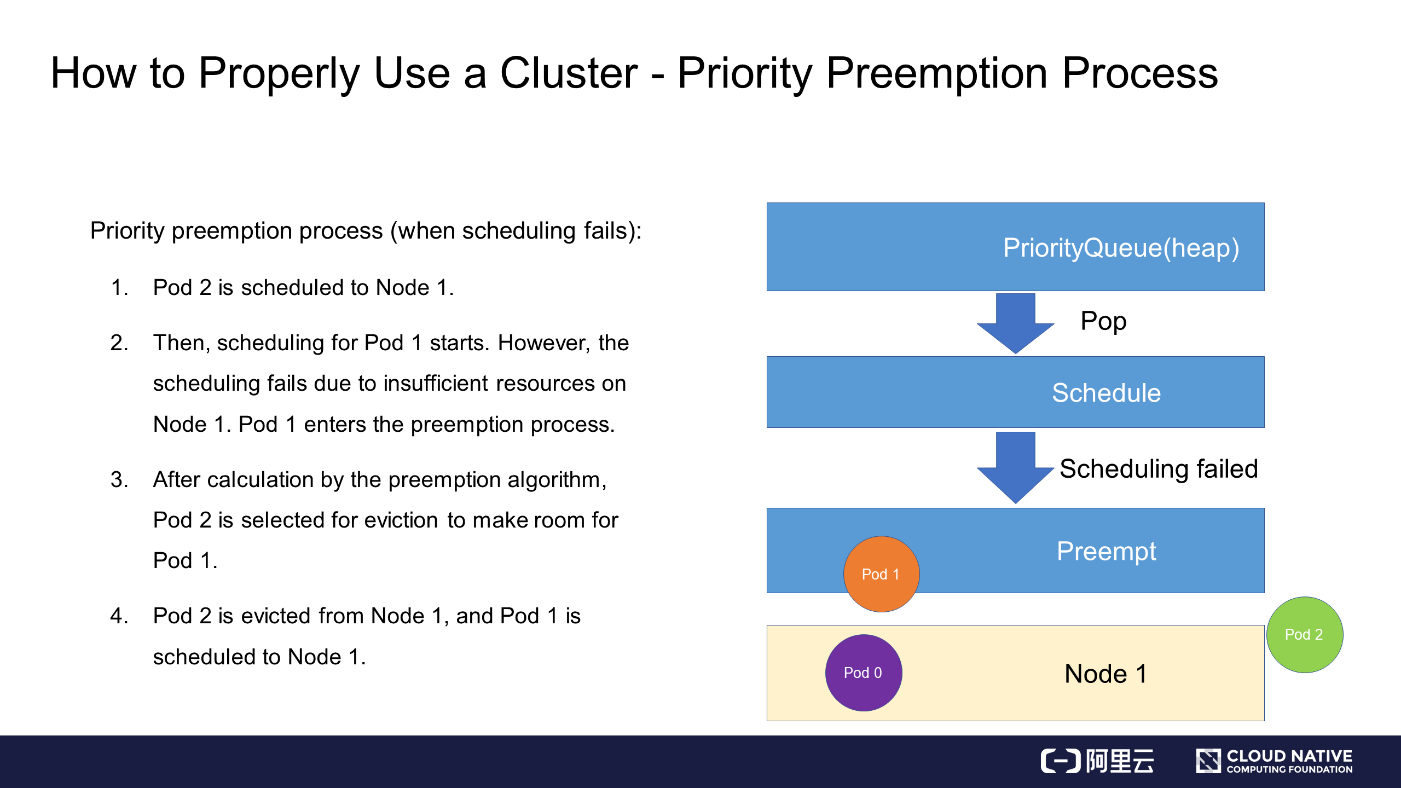
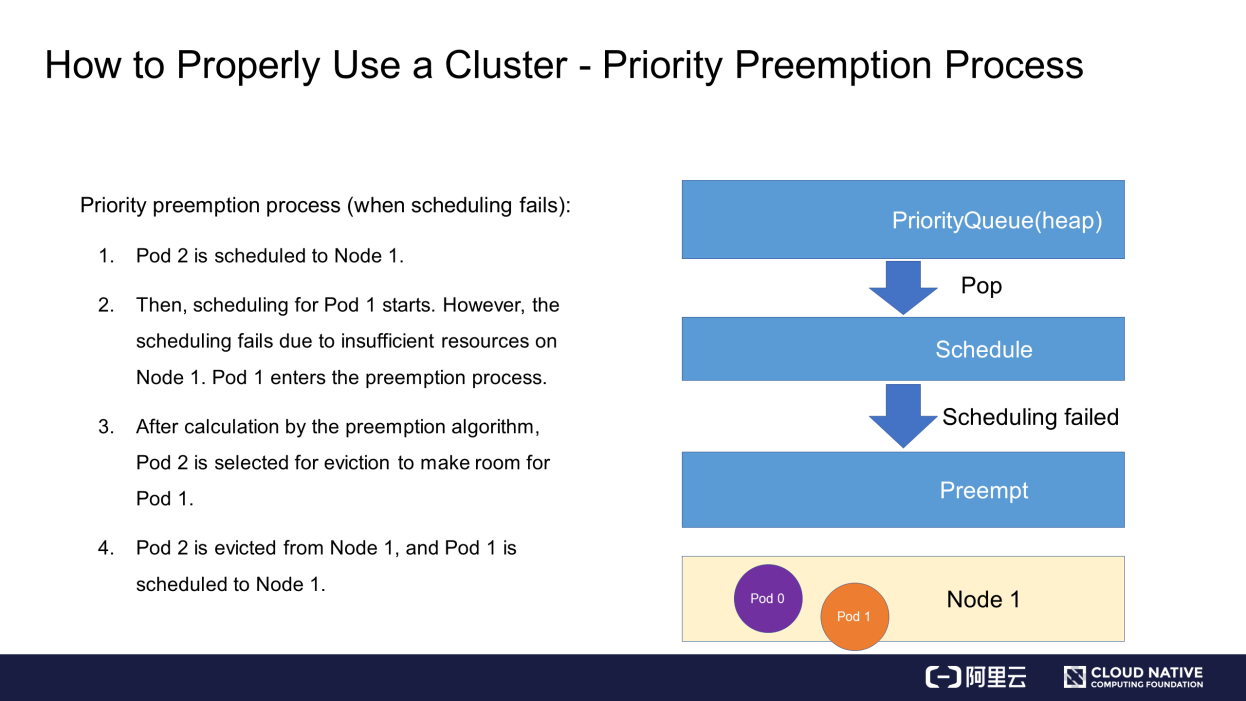
Then, the scheduler schedules Pod 1 to Node 1. This completes the preemptive scheduling process.
The following describes a specific preemption policy and process.
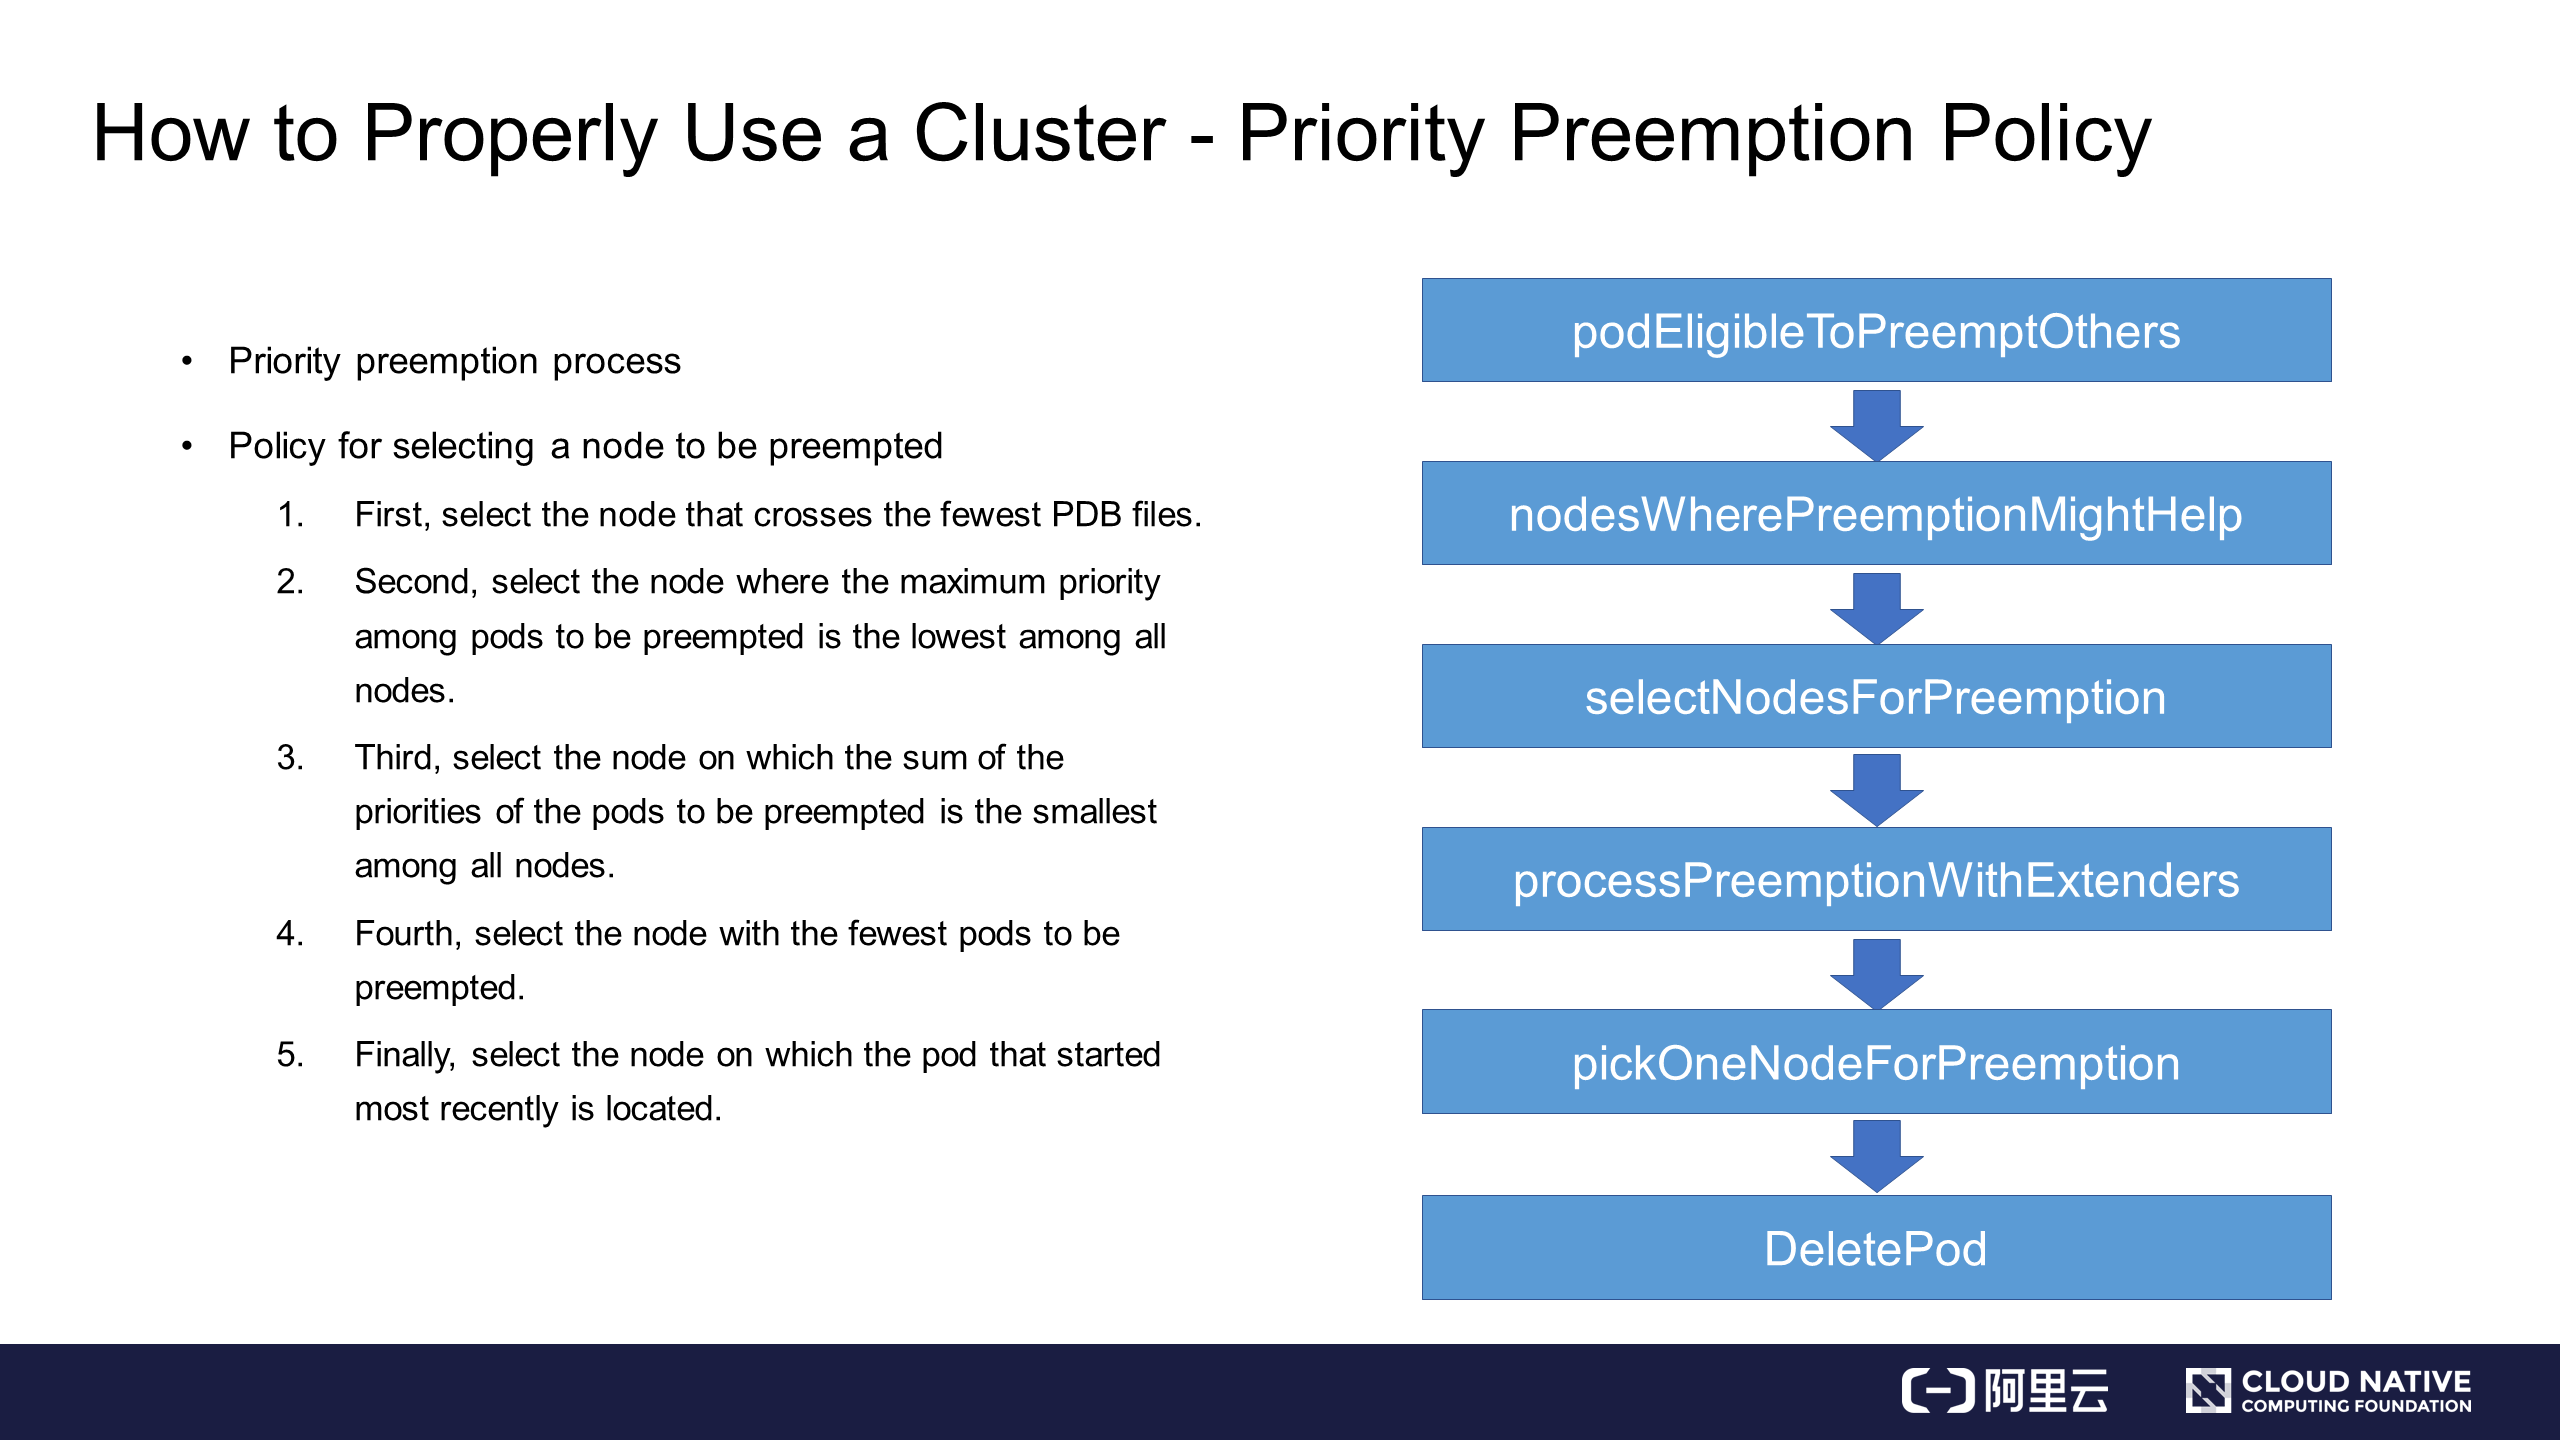
The right part of the preceding figure shows the entire preemptive scheduling process of the Kubernetes scheduler. First, when a pod enters the preemption process, the Kubernetes scheduler verifies its qualifications. The pod may have already gone through the preemption process once. If the pod is qualified for preemption, the Kubernetes scheduler filters all nodes to find the nodes meeting the preemption requirements and filters out other nodes.
Then, the Kubernetes scheduler selects one of the qualified nodes. During preemption, a scheduling task is simulated to remove a low-priority pod from the node and attempt to place the preempting pod on the node. After a number of nodes are selected through this process, the next process starts: ProcessPreemptionWithExtenders. This is an extension hook that allows you to add some node preemption policies. If no extension hook is set, no action is taken here.
The next process is PickOneNodeForPreemption, in which the most suitable node is selected from the selectNodeForPreemption list according to a certain policy. The policy is briefly described in the left part of the preceding figure:
After these five steps of serial filtering, the most suitable node is selected. Then, the pod or pods to be preempted are deleted from the node, thus completing the preemption process.
This section provides a brief description of the advanced scheduling policies for Kubernetes that we can use to properly schedule cluster resources when faced with insufficient resources. Let's review the operations:
Getting Started with Kubernetes | etcd Performance Optimization Practices
Getting Started with Kubernetes | Scheduling Process and Scheduler Algorithms

480 posts | 48 followers
FollowAlibaba Developer - June 17, 2020
Alibaba Developer - June 23, 2020
Alibaba Developer - June 16, 2020
Alibaba Developer - March 31, 2020
Alibaba Developer - February 26, 2020
Alibaba Developer - April 3, 2020

480 posts | 48 followers
Follow Container Service for Kubernetes
Alibaba Cloud Container Service for Kubernetes is a fully managed cloud container management service that supports native Kubernetes and integrates with other Alibaba Cloud products.
Learn More Cloud-Native Applications Management Solution
Accelerate and secure the development, deployment, and management of containerized applications cost-effectively.
Learn More ACK One
Provides a control plane to allow users to manage Kubernetes clusters that run based on different infrastructure resources
Learn More Resource Management
Organize and manage your resources in a hierarchical manner by using resource directories, folders, accounts, and resource groups.
Learn MoreMore Posts by Alibaba Cloud Native Community