ApsaraVideo VOD integrates media management, processing, and distribution. This guide helps you build a production-ready video-on-demand solution from scratch.
Before you begin
Log on to the ApsaraVideo VOD console and activate the service. Select a billing method: pay-as-you-go or resource plan. Billing overview.
ApsaraVideo VOD offers a free trial for new users.
Region selection
ApsaraVideo VOD services are isolated by region. Choose a nearby region to reduce latency. Supported features vary by region. Service regions.
Set up your VOD platform
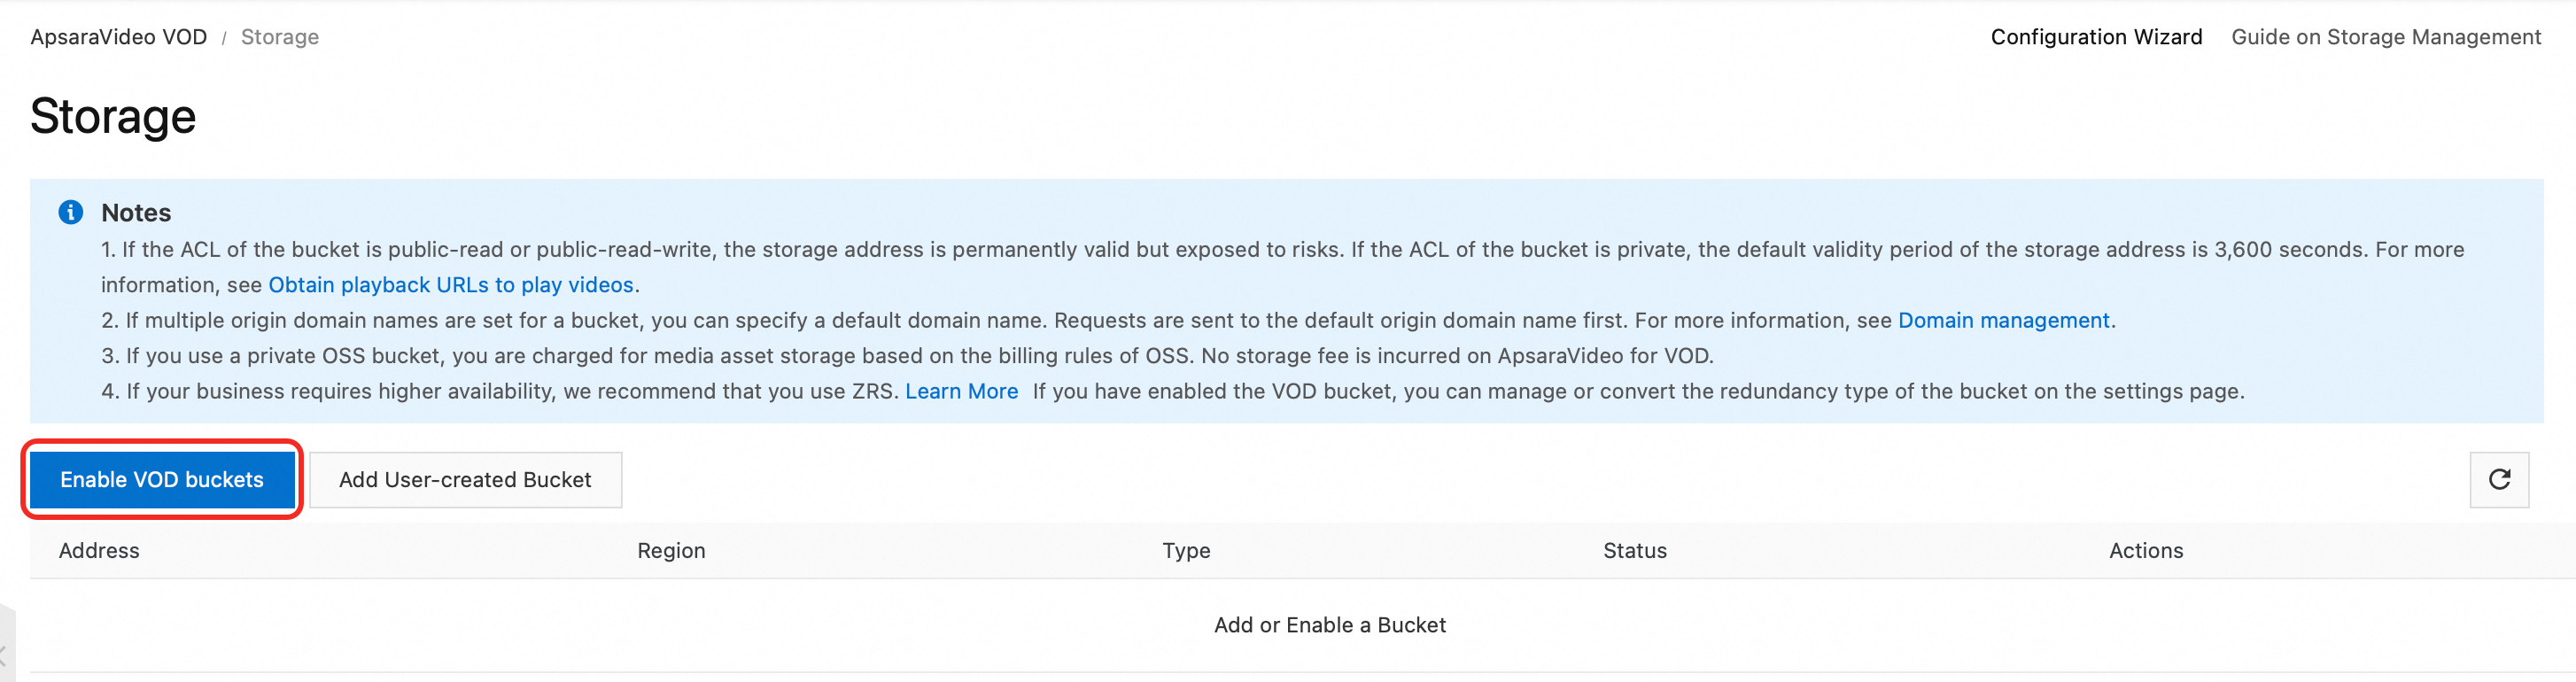
Step 1: Configure storage
-
Go to the Storage page in the ApsaraVideo VOD console and select your region from the top menu bar.
-
Click Enable VOD Bucket and select a redundancy type. Activation may take a moment. The storage address is available only after the status changes to Normal.
-
Zone-redundant storage (ZRS): Stores data across multiple zones in the same region for cross-zone fault tolerance.
-
Locally redundant storage (LRS): Stores data on multiple devices across separate facilities in a single zone for hardware fault tolerance.
-
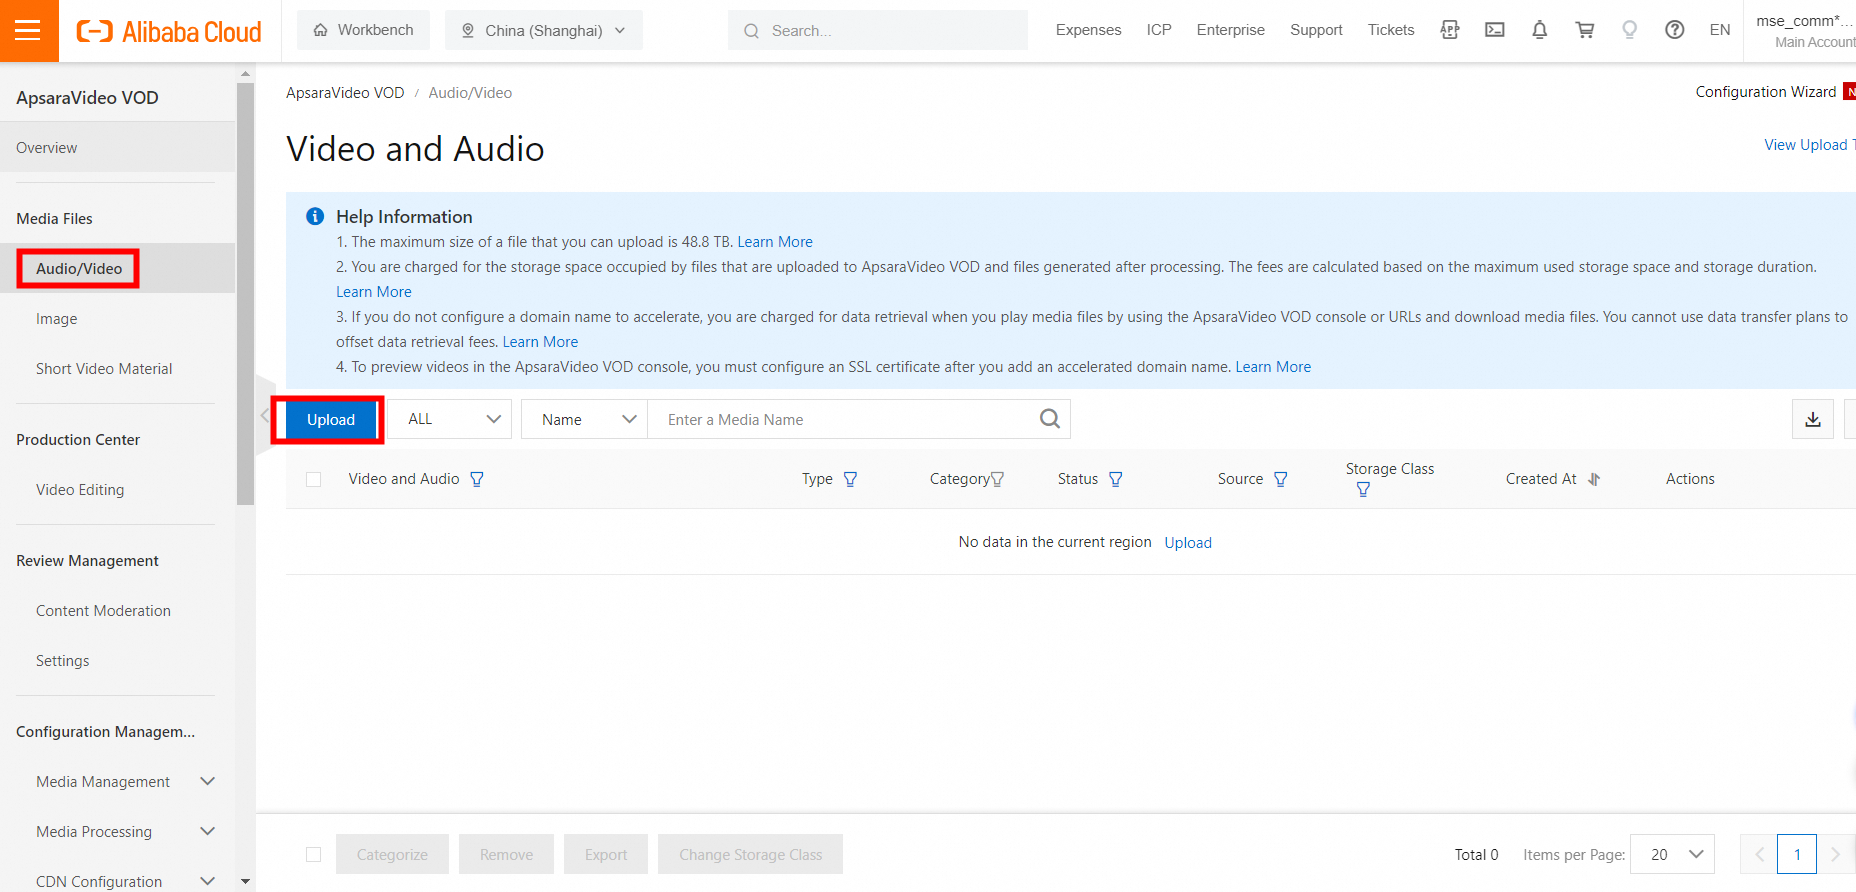
Step 2: Upload audio and video files
Configure a transcoding template group before uploading files. This automatically generates multi-definition outputs after upload, optimizing playback and saving bandwidth.
(Optional) Create a transcoding template group
Go to the Transcoding Template Groups page. Click Create Transcoding Template Group, configure the parameters, and save. Transcoding.

Choose an upload method
|
Method |
Best for |
Description |
|
SDK upload (Recommended) |
Production environments |
Backend calls an SDK to get an upload credential. The client uploads directly to ApsaraVideo VOD. Most secure and efficient. Overview of media upload. |
|
Console upload |
Small files or testing |
Upload from the Audio/Video page in the console. |
|
Batch upload from URLs |
Offline migration |
Pull files from URLs when files are not stored locally. See Batch upload by pulling from URLs. |
|
Windows client |
Batch uploading large files |
Upload using an SDK (Recommended)
The backend calls an SDK to obtain an upload credential. The client (browser or app) then uploads directly to ApsaraVideo VOD.
# Python example: The backend service obtains an upload credential and address.
from aliyunsdkvod.request.v20170321 import CreateUploadVideoRequest
from aliyunsdkcore.client import AcsClient
import json

# 1. Initialize the client.
# Replace the placeholders with your AccessKey ID, AccessKey secret, and region ID.
client = AcsClient('your-access-key-id', 'your-access-key-secret', 'cn-shanghai')

# 2. Create an API request and set the parameters.
request = CreateUploadVideoRequest.CreateUploadVideoRequest()
request.set_Title('My Test Video')
request.set_FileName('video_test.mp4')
# request.set_TemplateGroupId('your-transcode-template-group-id') # Optional. Specify a transcoding template.

# 3. Send the request and obtain the response.
response = client.do_action_with_exception(request)
response_data = json.loads(response)

# 4. Return UploadAddress and UploadAuth to the client.
upload_address = response_data['UploadAddress']
upload_auth = response_data['UploadAuth']
video_id = response_data['VideoId']

# After the client obtains the credential, use the upload SDK to upload the file.
Upload using the console
Go to the Audio/Video page in the ApsaraVideo VOD console. Click Upload, then click Add Media. Select a local file or drag the file to the upload area.
(Optional) Step 3: Configure an accelerated domain name
Streaming directly from a playback URL incurs storage outbound traffic charges. Configure an accelerated domain name to reduce costs — the acceleration fee is lower. Add an accelerated domain name.
Step 4: Play the media file
Option 1: Playback credential (Recommended)
Backend: obtain a playback credential
The backend calls an API to generate a time-limited playback credential (PlayAuth) for each request.
# Python example: Obtain a playback credential.
from aliyunsdkvod.request.v20170321 import GetVideoPlayAuthRequest

# The client has been initialized in the upload step.
request = GetVideoPlayAuthRequest.GetVideoPlayAuthRequest()
request.set_VideoId('your-video-id') # Replace the placeholder with the actual VideoId.
request.set_AuthInfoTimeout(3000)  # The validity period of the credential in seconds. In this example, the period is 50 minutes.

response = client.do_action_with_exception(request)
play_auth = json.loads(response)['PlayAuth']

# Return the obtained play_auth and video_id to the frontend.
Frontend: integrate the player
The frontend player uses the vid and playAuth obtained from the backend to initialize playback.
Web
<!-- Web player example -->
<div id="player-container"></div>
<script src="https://g.alicdn.com/de/prismplayer/2.15.2/aliplayer-min.js"></script>

<script>
  var player = new Aliplayer({
    id: 'player-container',
    width: '100%',
    height: '500px',
    vid: 'your-video-id',      // Obtained from the backend
    playauth: 'your-play-auth', // Obtained from the backend
    cover: 'https://your-domain.com/cover.jpg' // Thumbnail URL
  }, function (player) {
    console.log('The player is created.');
  });
</script>
Android
// 1. Create a player.
AliPlayer player = AliPlayerFactory.createAliPlayer(context);

// 2. Configure the playback source.
VidAuth vidAuth = new VidAuth();
vidAuth.setVid("your-video-id");
vidAuth.setPlayAuth("your-play-auth");
vidAuth.setRegion("cn-shanghai"); // Set the region.

// 3. Prepare for playback.
player.setDataSource(vidAuth);
player.prepare();
iOS
// 1. Create a player.
let player = AliPlayer()

// 2. Configure the playback source.
let vidAuth = AVPVidAuthSource()
vidAuth.vid = "your-video-id"
vidAuth.playAuth = "your-play-auth"
vidAuth.region = "cn-shanghai" // Set the region.

// 3. Prepare for playback.
player.setSource(vidAuth)
player.prepare()
Option 2: URL signing
URL signing appends a signature to the playback URL. Less secure than playback credentials, but useful when modifying the player is inconvenient. URL signing.
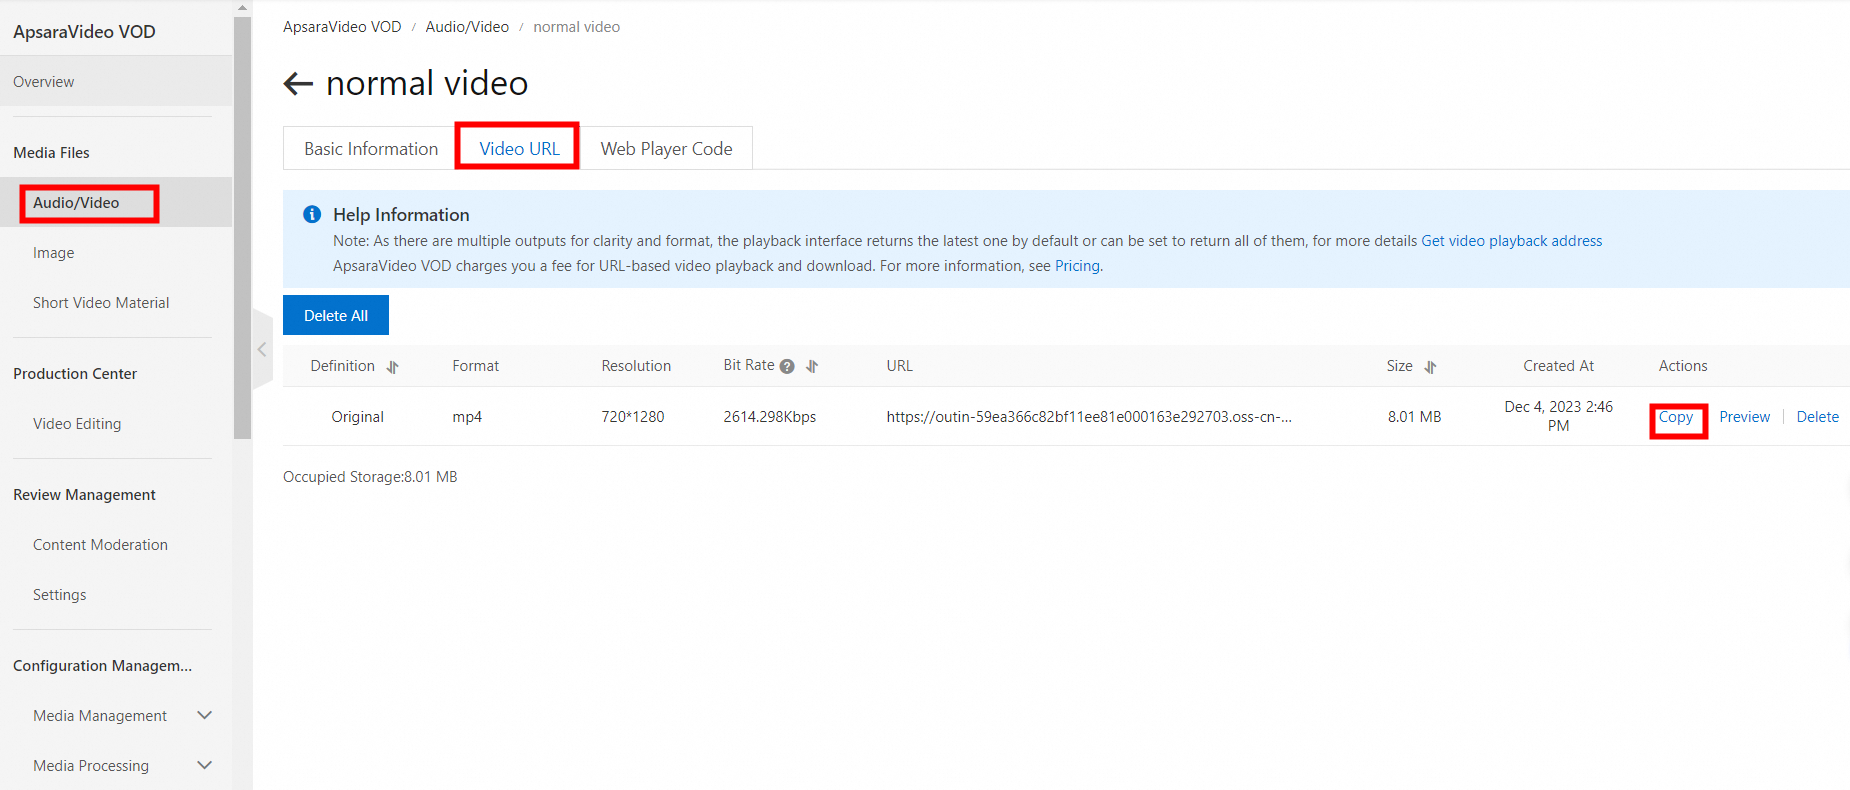
Option 3: Web player testing
For testing, use the demo web player.
-
Go to the Audio/Video page in the ApsaraVideo VOD console. In the Actions column of the target video, click Manage.
-
Select the Video URL tab. In the Actions column of the target definition, click Copy.
-
Paste the URL into the web player to play the video.
References
-
Transcoding: Automatically transcode videos on upload and generate multi-definition outputs.
-
Workflow: Automate post-upload processing: transcoding, snapshots, and watermarks.
-
Video editing: Perform professional video editing online or using an API or SDK.
-
Add an accelerated domain name: Speed up delivery and reduce traffic costs with CDN acceleration.
FAQ
How do I upload media files in batches?
Use a PC client, URL-based batch upload, or the upload SDK. Overview of media upload.
How do I migrate media files from OSS to ApsaraVideo VOD?
Two options:
-
Add your OSS bucket directly to ApsaraVideo VOD. Both of the following conditions must be met:
-
An OSS bucket of the Standard storage class exists in the destination region.
-
ApsaraVideo VOD is authorized to access your OSS resources on the RAM Quick Authorization page.
-
-
Prepare source file addresses and use an upload tool for migration. Overview of media upload.