Workflows let you customize media processing pipelines in the ApsaraVideo VOD console, combining tasks such as transcoding, snapshots, and automated review into reusable, automated sequences.
What is a workflow
A workflow automates and orchestrates media processing tasks. You build a custom pipeline in advance and apply it to your videos, providing an end-to-end media processing service that eliminates repetitive, complex API calls. Workflows also support conditional logic, allowing you to define a trigger condition for each node to build flexible, scenario-based pipelines.
Use cases
-
Serial processing: Review then transcode
This workflow first sends a video for automated review and then transcodes it after the review is complete. For more information, see Configuration examples.

-
Parallel processing: Review and transcode
This workflow sends an uploaded video for automated review and transcoding at the same time.

-
Parallel processing: Distribute source file and transcode
The source file is made available for playback while simultaneously being transcoded into other bitrates based on the transcoding node settings.

How it works
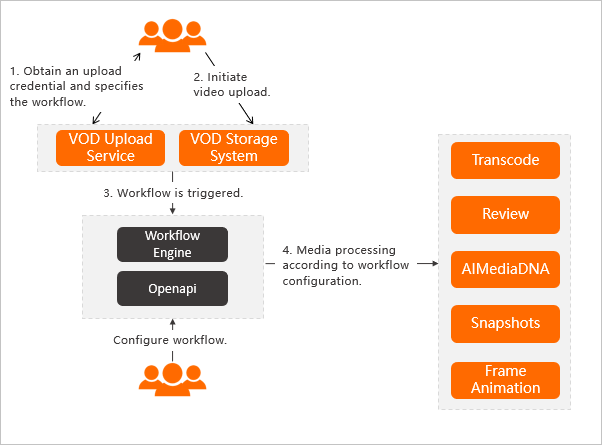
Prerequisite: You have configured a workflow in the console.
-
You request an upload credential and specify a workflow. The service returns the upload credential.
-
You upload the video.
-
After the upload is complete, the workflow starts automatically.
-
The ApsaraVideo VOD workflow engine automatically performs media processing and video AI tasks based on your workflow configuration.
Procedure
-
Create a workflow.
You can create workflows only in the ApsaraVideo VOD console.
-
Trigger a workflow processing task.
You can trigger a workflow either during or after a video upload.
Console
During upload
-
Log on to the ApsaraVideo VOD console.
-
In the left-side navigation pane, choose Media Files > Audio/Video, and then click Upload Audio/Video.
-
Click Add Audio/Video. Configure parameters such as the upload method and storage address. For the processing method, select Use Workflow and select your workflow.
For more information about supported formats and upload parameters, see Upload media files in the console.
-
After you add the media files, click Upload.
For an existing video
-
Log on to the ApsaraVideo VOD console.
-
In the left-side navigation pane, choose Media Files > Audio/Video.
-
Find the target audio or video in the list and click Processing in the Actions column.
-
Select Use Workflow and specify the workflow from the previous step. In the Media Processing dialog box that appears, select Process with Workflow for the processing type, and in the Workflow drop-down list, select the target workflow (for example, test).
-
Click OK.
API
During upload
NoteThe CreateUploadVideo operation only obtains an upload URL and credential and does not create basic media information. It does not upload the file. You must implement your own upload logic. For a complete example of how to upload files by using the API, see Upload media files by using the ApsaraVideo VOD API.
-
When you call the CreateUploadVideo or UploadMediaByURL operation to upload an audio or video file, set the
WorkflowIdparameter to your workflow ID. After the upload is complete, ApsaraVideo VOD automatically processes the file based on the specified workflow.
For an existing video
-
Call the SubmitWorkflowJob operation and set the
WorkflowIdparameter to your workflow ID. This immediately starts the workflow to process the specified audio or video file.
-
Configuration examples
Serial processing: Review then transcode
Configure a serial workflow that first reviews a video and then transcodes it only if it passes the review.
-
On the workflow editing page, click the + icon next to the Start node to add a new node. For this example, add an Automated Media Review node.
-
After the node is added, click its Edit icon and select a review template.
-
Click the + icon on the review node to add a transcoding node after it.
-
After the transcoding node is added, click its Edit icon to configure its trigger condition.
ImportantThis option defines the parent node status required to trigger the current node.
To transcode the video only after it passes the review, set the trigger condition to
Parent Node Approval Passed. This ensures that transcoding starts only after a successful review. Also, select a transcoding template group. The title of the edit dialog box is Media transcoding. In addition to the trigger condition, it includes two required fields: Node name and transcoding template group.The following table describes the available trigger conditions.
Scenario
Trigger condition
Description
Parent node is automated review
All Conditions
The current node is always triggered, regardless of the parent node's result.
Parent Node Approval Passed
The current node is triggered only if the parent review node succeeds.
Parent Node Audit Processing Failed
The current node is triggered only if the parent review node fails. This can occur if the source file is corrupted. This condition is not commonly used.
Parent Node Video Violation Blocking
The current node is triggered only if the review is complete and the video is automatically blocked for prohibited content. This is often used to transcode a blocked video into a lower resolution for manual review.
Parent node is transcoding
All Conditions
The current node is always triggered, regardless of the parent node's result.
Parent Node Transcoding Succeeded
The current node is triggered only if the parent transcoding node succeeds.
Parent Node Transcoding Failed
The current node is triggered only if the parent transcoding node fails. This condition is not commonly used.
-
After you finish building the workflow structure, click Confirm. The system generates a workflow ID. Record this ID for future use. On the Workflows page, you can view your workflows. The list includes the name, ID, and creation time. In the Actions column, you can click Details to view more information or click Delete to remove the workflow.
Parallel processing: Review and transcode
To run review and transcoding in parallel, add two separate child nodes to the Start node: one for automated review and one for transcoding.
You must click the Edit icon on each node to select the required templates, such as a review template or a transcoding template group.