SMC agentless migration transfers VMware VMs to Alibaba Cloud without installing agents on the guest OS, preserving server security and performance.
You can also use agent-based migration. Migrate servers to ECS.
Migration scenarios
Due to a change in its underlying technology, Server Migration Center (SMC) will no longer support migrating Windows servers to destination instances in Alibaba Cloud regions outside the Chinese mainland after 11:59 PM (UTC+8) on November 30, 2025. Before this date, you can still use SMC client 2.8.5 and earlier versions. For more information about the change and its impact, see Notice on SMC Discontinuing Support for Migrating Windows Servers to Destination Instances in Regions Outside the Chinese mainland.
(Recommended) Migrate a server to an Alibaba Cloud ECS custom image.
If you do not already have an ECS instance, you can migrate your server to a custom image. You can then use this image to create an ECS instance.
Migrate a server to an existing Alibaba Cloud ECS instance.
If you already have an Alibaba Cloud ECS instance with a configuration (including storage and operating system) compatible with the source server, you can migrate the source server to that instance.
WarningThe migration erases all existing data on the destination ECS instance. The data on the source server is not affected. Therefore, do not use this method if the destination instance contains important data.
Limitations
Environment requirements
OVA template environment requirements:
|
OVA template |
Connector configuration |
vCenter deployment |
Standalone ESXi deployment |
|
SMC VMware Connector 6.7 OVA |
|
|
|
|
SMC VMware Connector 8.0 OVA |
|
|
|
Supported operating systems
SMC auto-detects the source VM operating system. Verify with cat /proc/version (Linux) or systeminfo (Windows).
CentOS
Ubuntu
SUSE
OpenSUSE
Debian
RedHat
Other Linux
Windows Server 2003
Windows Server 2008
Windows Server 2012
Windows Server 2016
Windows Server 2019
Windows Server 2022
Disk size limits
Disks exceeding these limits must be transferred by other methods (such as cp or sftp):
-
System disk: The maximum supported capacity is 2 TiB.
-
Data disk: The maximum supported capacity is 32 TiB.
Role and permissions
-
If you use a vCenter user account, the associated role must have the following permissions on the ESXi host and the virtual machine:
-
Datastore > Browse datastore
-
Datastore > Low-level file operations
-
Host > Local operations > Create virtual machine
-
Virtual machine > Change Configuration > Acquire disk lease
-
Virtual machine > Change Configuration > Toggle disk change tracking
-
Virtual machine > Provisioning > Allow virtual machine download
-
Virtual machine > Provisioning > Allow disk access
-
Virtual machine > Provisioning > Allow read-only disk access
-
Virtual machine > Snapshot management > Create snapshot
-
Virtual machine > Snapshot management > Remove snapshot
-
-
An ESXi user account must have the Administrator role.
Migration fee
SMC is free. Minor charges apply for ECS resources used during migration (intermediate instances and cloud disks). SMC billing items.
Prerequisites
-
Complete the Pre-migration preparations.
-
To prevent data loss, back up important data to an image, snapshot, or external storage device.
-
When migrating a source server to an existing Alibaba Cloud ECS instance:
-
The source server and the target instance must run the same operating system: both must be Linux, or both must be Windows.
-
The target instance must have at least as many data disks as the source server. If the target instance does not meet this requirement, you must attach data disks.
-
Procedure
Step 1: Create a VMware agentless connector
SMC provides an OVA template to deploy the VMware agentless connector in your vCenter or ESXi environment.
-
OVF is an open standard for packaging virtual appliances. An OVA file bundles an OVF package (.ovf, .mf, .cert, .vmdk, and .iso files) into a single file.
-
VMware vSphere is a virtualization platform with two core components: ESXi (the hypervisor running VMs) and vCenter Server (centralized management for multiple ESXi hosts).
Download and decompress the OVA template
Click Download OVA template. In the Description section, download and decompress the OVA template for your version of VMware ESXi or vCenter.

Deploy the VMware agentless connector
Import the OVA template into your vCenter or standalone ESXi environment.
vCenter (Recommended)
Import the OVA template into your vCenter environment to deploy the connector. The following example uses vCenter 6.7:
-
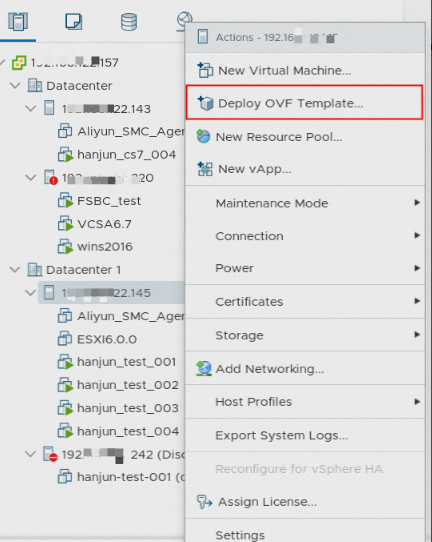
Log on to vCenter. Right-click a host and select Deploy OVF Template....
-
In the Deploy OVF Template wizard, follow the steps to create a virtual machine (VM).
-
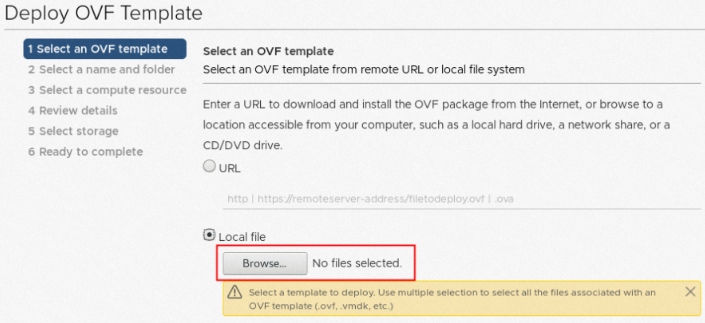
Select the OVA template and click NEXT.
Select Local file, click Browse..., and select the decompressed OVA template file.
-
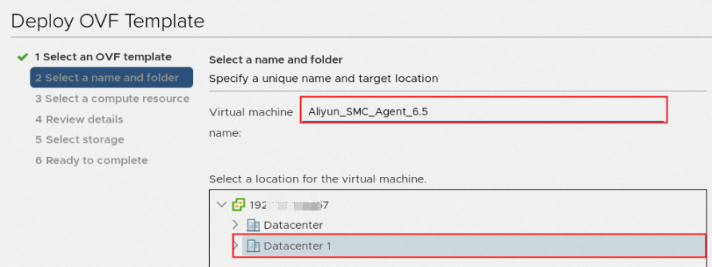
Specify a name and location for the VM, and then click NEXT.
Enter a name in the Virtual machine name field and select a location.
-
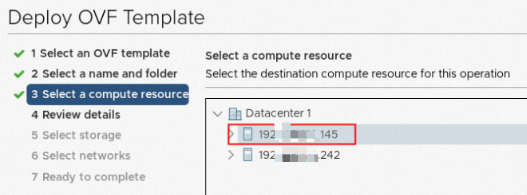
Select a compute resource and click NEXT.
-
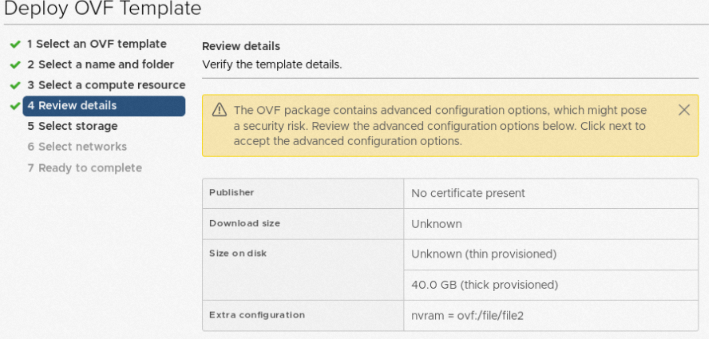
Verify the template details and click NEXT.
-
Select a storage location and click NEXT.

-
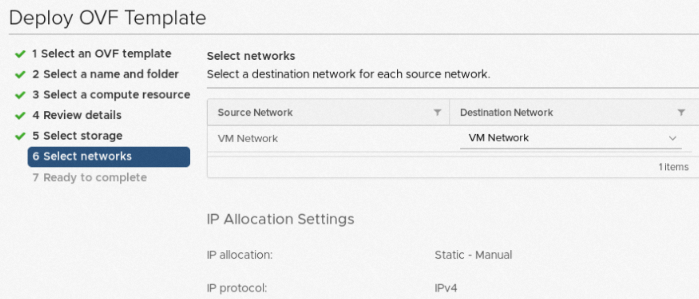
Select a network resource and click NEXT.
-
Review the configuration details and click FINISH.
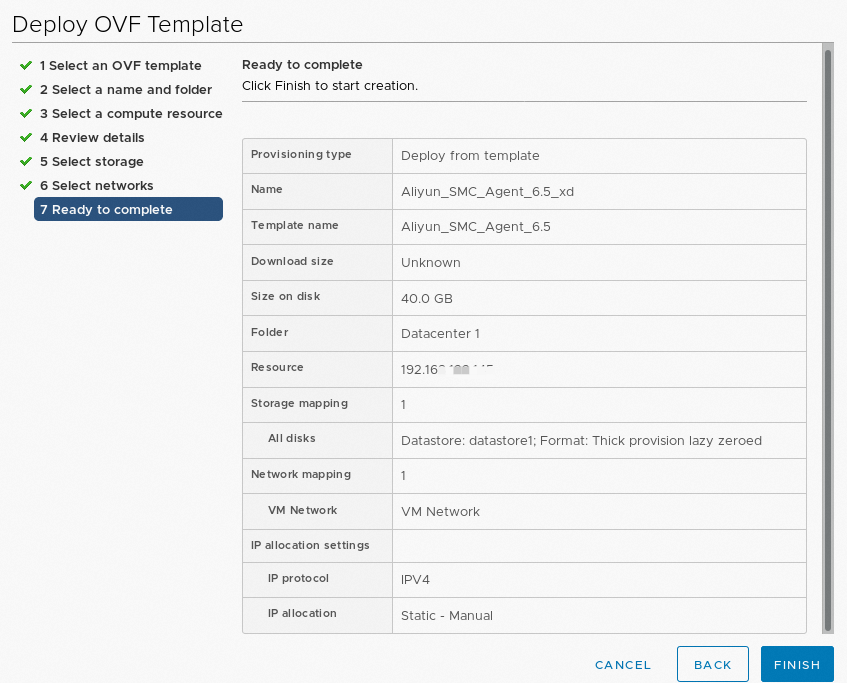
-
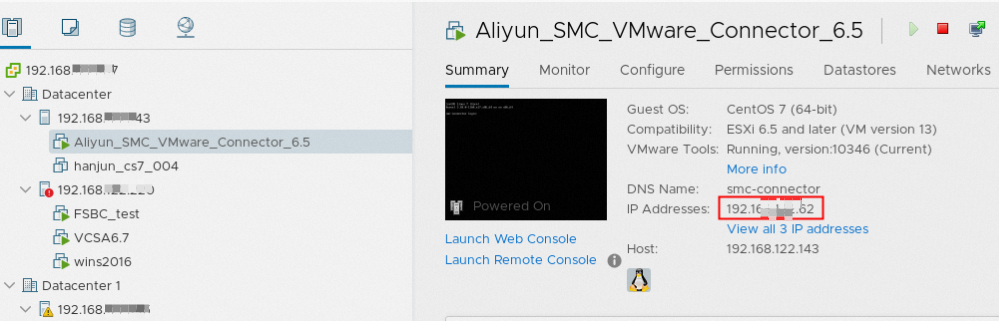
After the deployment is complete, right-click the VMware agentless connector and select Power > Power On.
-
Configure your network to allow the VMware agentless connector to connect to port 443 (default) of vCenter and port 902 (default) of the ESXi host that contains the virtual machine to be migrated.
-
On the Summary tab, find the IP address of the VMware agentless connector.
-
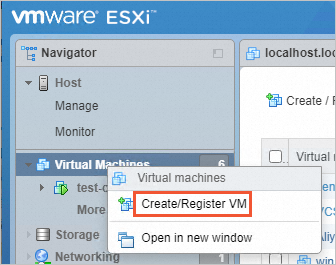
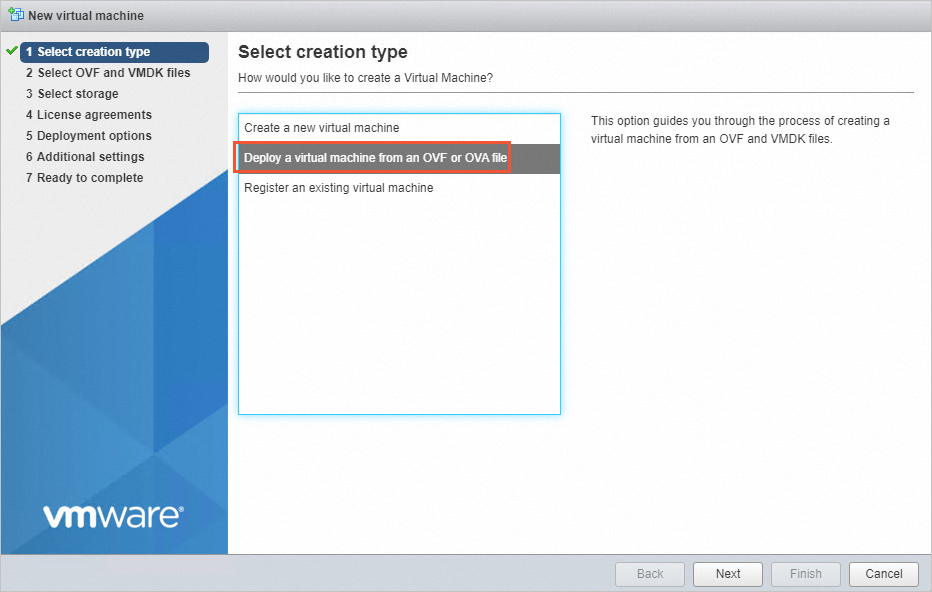
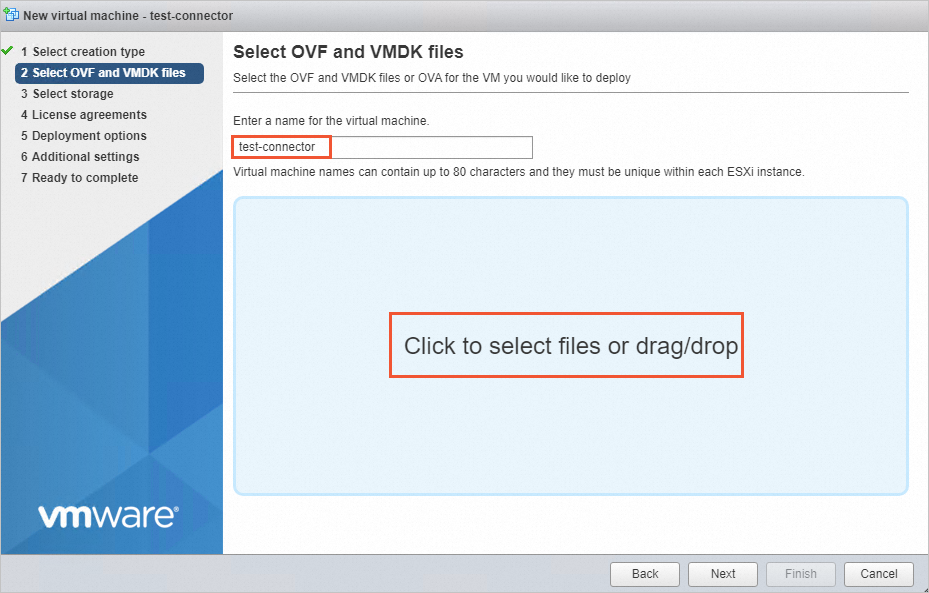
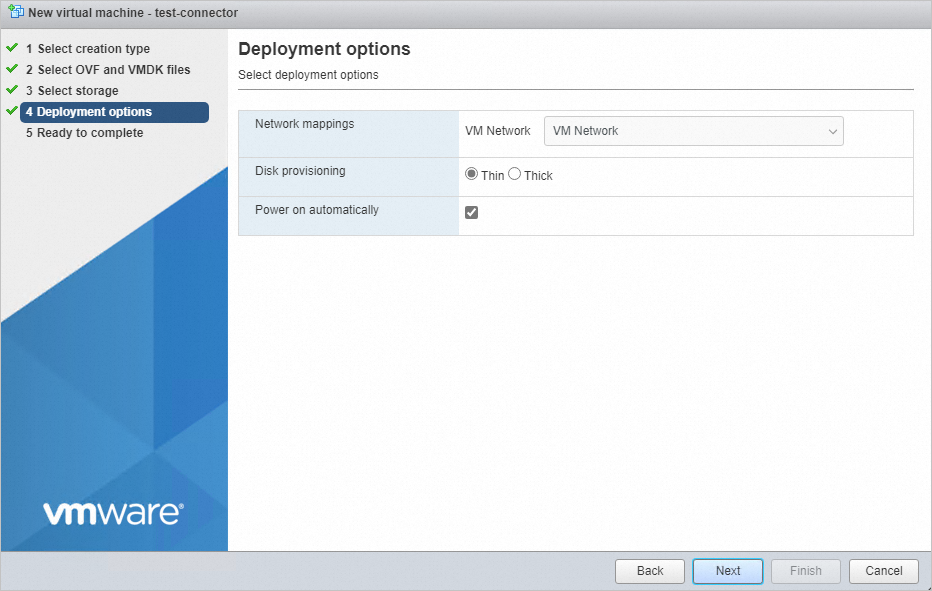
Standalone ESXi
Import the OVA template into your ESXi environment to deploy the connector. The following example uses ESXi 7.0:
-
Log in to VMware ESXi. Right-click Virtual Machines and click Create/Register VM.
-
On the Select Creation Type page, select Deploy a virtual machine from an OVF or OVA file and click Next.
-
On the Select OVF and VMDK files page, enter a name for the virtual machine, click Click to select files or drag and drop, select the downloaded OVA template file, and then click Next.
-
On the Select storage page, click Next.

-
On the Deployment options page, click Next.
-
On the Completing page, click Complete.
Wait for the deployment to finish. You can find the connector's IP address in the General Information section. By default, the connector uses DHCP. You can change the network configuration if necessary.

-
Configure your network to allow the VMware agentless connector to connect to ports 443 and 902 (default) of the ESXi host.
Step 2: Import the migration source
Log on to the connector, configure the VMs to migrate, and run the import command.
Add virtual machines
Use the configure.sh script to add VMs for migration. Each configured VM appears as a migration source in the SMC console.
-
A single connector can manage up to 10 migration sources at a time. If you configure more than 10 VMs, the connector queues the excess and imports them after current tasks complete.
-
The operating system type configured in VMware vCenter may be inaccurate. Verify the operating system type before proceeding.
-
Log on to the VMware agentless connector.
Example using SSH:
Default username:
root, password is empty by default.ssh root@<IP address of the VMware agentless connector>ImportantFor security reasons, change the password promptly.
-
Run the following command to check the time.
dateIf the time is incorrect, use the ntpdate command to calibrate it. This example uses the
0.asia.pool.ntp.orgtime server.ntpdate 0.asia.pool.ntp.org hwclock --systohcWarningIf the time is incorrect, the migration source import will fail.

-
Run the following commands to configure vCenter or ESXi and the virtual machines to migrate.
NoteThis step lists all hosts and VMs in the environment. If you already know the target host or VM name, skip this step and specify it directly. How to directly specify a host or virtual machine.
cd /root/smc
bash configure.sh
Enter the IP address, username, password, and port number (default: 443) of your vCenter or ESXi. Example output:
[root@localhost ~]# cd /root/smc
[root@localhost smc]# ./configure.sh
Please input vCenter/ESXi IP:192.168.XX.XX
Please input username:administr****@vsphere.local
Please input password:
Please input port number(default 443):443
After a successful connection, the tool displays a host list. Enter the ID of the host containing the VM to migrate (select a host marked with * in the Connected column).
Test to connect the vCenter/ESXi...
Connect success!
save to ./vmware_connect_config.json
========Aliyun SMC VMware Configure Tool 1.2========
Connect success!
 Getting host list progress:
 [>>>>>>>>>>>>>>>>>>>>>>>>>>>>>>>>>>>>>>>>>>>>>>>>>>>>>>100.00%]time:1.0s


Host List:
------------------------------------------------------------------------
ID      Name                              Version            Connected
1       192.168.XX.XX                     6.7.0                  *
2       192.168.XX.XX                     7.0.3                  *
------------------------------------------------------------------------
Please input the ID of Host(input 0 to exit):1
After you enter the host ID, the tool displays the VM list. Enter the ID of the VM to migrate (select a VM marked with * in the Connected column).
Test to connect 192.168.XX.XX
Connect success!
 Getting vm list progress:
 [>>>>>>>>>>>>>>>>>>>>>>>>>>>>>>>>>>>>>>>>>>>>>>>>>>100.00%]time:2.3s


VM List of 192.168.XX.XX:
------------------------------------------------------------------------
ID      Name                               Connected      CBT      Add
1080    test1                                  *
1084    win16bios                              *
1011    centos7-bios-2                         *
3008    centos7-uefi                           *
2001    centos-hw10                            *
------------------------------------------------------------------------
Please input the ID of VM to be migrated (input 0 to exit):1084
Select the VM architecture:
--------------------------------------------------------------
0    x86_64
1    i386
2    arm64
--------------------------------------------------------------
Please choose the architecture:0
If the operating system of the current virtual machine is not correctly identified, enter the number that corresponds to the operating system from the list provided. For example, enter 10.
------------------------------------------------------------------------
0	CentOS
1	Ubuntu
2	SUSE
3	OpenSUSE
4	Debian
5	RedHat
6	Others Linux
7	Windows Server 2003
8	Windows Server 2008
9	Windows Server 2012
10	Windows Server 2016
11	Windows Server 2019
12	Windows Server 2022
------------------------------------------------------------------------
Current OS [Apple macOS 10.14 (64-bit)] is invalid, please choose the OS of VM:10
An asterisk (
*) in theAddcolumn indicates that the virtual machine is successfully added.VM List of 192.168.XX.XX: -------------------------------------------------------------- ID Name Connected CBT Add 481 TEST_CLONE_1 * 389 win16bios * * 338 hanjun_test_001 * 386 Aliyun_SMC_Agent_6.5 * 393 win16uefi -------------------------------------------------------------- Please input the ID of VM to be migrated (input 0 to exit):0Note-
To migrate multiple virtual machines from the same host, continue entering the IDs of the virtual machines.
-
After you finish adding virtual machines from the current host, enter 0 to return to the host list. You can then select another host to add more virtual machines. To exit the configuration, enter 0 at the host list prompt.
-
(Optional) Configure the virtual machines
Use vmware_migrate_config.json to verify and modify VM properties (OS, disks, migration status).
-
Run the following command to view the generated vmware_connect_config.json and vmware_migrate_config.json files.
llThe command output is similar to the following.
[root@localhost smc]# ll total 5588 drwxrwxrwx. 4 root root 239 Oct 17 17:27 Check -rwxrwxrwx. 1 root root 6884 Oct 14 15:54 client_data -rwxrwxrwx. 1 root root 151 Oct 14 17:47 configure.sh drwxrwxrwx. 2 root root 72 Nov 1 01:15 dist -rwxrwxrwx. 1 root root 38878 Oct 14 15:54 EULA drwxrwxrwx. 2 root root 4096 Oct 17 17:27 Excludes -rwxrwxrwx. 1 root root 5633792 Oct 31 19:43 go2aliyun_client -rwxrwxrwx. 1 root root 146 Oct 14 15:54 user_config.json -rw-r--r--. 1 root root 263 Nov 10 18:05 vmware_connect_config.json -rw-r--r--. 1 root root 18406 Nov 10 18:07 vmware_migrate_config.json -
Verify that the properties of the virtual machine, such as the operating system, disks, and migration status, are correct.
vim vmware_migrate_config.jsonThe
vmware_migrate_config.jsonfile is a JSON object keyed by Moref ID (a unique VMware vSphere identifier). Each value contains the VM's properties:"1": { "vm_name": "centos7-bios-main", "moref_id": "1", "uuid": "1:525794aa-d3e9-2332-5d78-78a6e6d6d4f3:564dfd2b-91ab-1cae-2bef-cda625472b28", "cores": 2, "memory": 4.0, "boot_mode": "bios", "vdisk_num": 3, "host": "localhost.localdomain", "cpu_info": "Intel(R) Xeon(R) Platinum 8269CY CPU @ 2.50GHz", "virt_type": "VMware7,1", "host_id": "ddbd4d56-f407-f342-a8fa-2edd5424b34e", "CBT_enabled": true, "power_state": false, "connect_state": true, "mac": "unavailable", "tools_state": false, "ipv4": null, "guestOS": "CentOS 7 (64-bit)", "host_name": null, "disk": [ { "key": 2000, "uuid": "6000C296-2b4b-5c40-2d8b-dfbc757641a2", "capacity": 20971520, "file_name": "[datastore1] centos7-bios/centos7-bios-000009.vmdk", "change_id": "52 fc 41 38 48 e7 cc cc-cd af c1 f8 44 f3 0d e9/21", "system_disk": true, "migrate": true }, { "key": 2002, "uuid": "6000C294-4055-f564-1190-e365396eb0a6", "capacity": 22020096, "file_name": "[datastore1] centos7-bios/centos7-bios_2-000009.vmdk", "change_id": "52 74 c8 ba 23 f6 cd 8b-2c c5 94 40 cd b1 f5 e9/21", "system_disk": false, "migrate": true }, { "key": 2003, "uuid": "6000C296-24cf-80d2-e692-67a938ad036c", "capacity": 24117248, "file_name": "[datastore1] centos7-bios/centos7-bios_3-000009.vmdk", "change_id": "52 6a de 0a 18 b4 2a 63-46 54 19 ad 07 88 bd 16/21", "system_disk": false, "migrate": true } ], "architecture": "x86_64", "platform": "CentOS", "migrate": true, "hardware_version": 19, "host_version": "7.0.3", "snapshot_state": true -
Configure the properties of the virtual machine, such as the operating system, disks, and migration status. You may need to edit the following parameters:
-
platform: The operating system type of the virtual machine. If the auto-detected type is incorrect, set it manually. Only the following operating system types are supported:
CentOS Ubuntu SUSE OpenSUSE Debian RedHat Others Linux Windows Server 2003 Windows Server 2008 Windows Server 2012 Windows Server 2016 Windows Server 2019 Windows Server 2022 -
-
disk: The list of disks for the virtual machine, in an array format.
-
The system disk is the first disk by default, and its corresponding
system_diskvalue istrue. If the system disk of the virtual machine is not the first disk, you must change thesystem_diskvalue of the actual system disk totrueand thesystem_diskvalue of all other data disks tofalse. -
By default, the
migrateparameter for all disks is set totrue, which indicates that the disk is to be migrated. To exclude a data disk from migration, set itsmigratevalue tofalse.
-
-
migrate: Whether to migrate the virtual machine.
-
For virtual machines that you have added, the
migrateparameter is set totrueby default, which indicates that the virtual machine is to be migrated. -
To migrate a virtual machine whose
migratevalue isfalse, change themigratevalue totrueand manually configure theplatformandarchitectureparameters. -
For the architecture parameter, valid values are
x86_64,i386, andarm64.
-
Import the migration source
Run the SMC client on the connector to import the VMware VM information to the SMC console.
-
Accidental snapshot deletion
While the SMC client is running, do not manually shut down, restart, create, or delete snapshots of the VMware virtual machine to migrate. If you create or delete snapshots on the virtual machine, the migration may fail. If the migration fails for this reason, run the ./dist/migrate_configure command in the SMC client home directory /root/smc to retrieve the virtual machine configuration again. Then, run the
./go2aliyun_client --reruncommand to restart the SMC client. -
Manually delete residual snapshots
During the synchronization phase of a migration task, the SMC client automatically creates a snapshot for the VMware virtual machine to migrate. The snapshot is named in the
smc_MigrationTaskID_CurrentTimeformat, for example,smc_j-bp1ho******4_2025-07-02-17:05:43. The client automatically deletes the snapshot after synchronization is complete. If you manually delete the migration task before synchronization is complete, residual snapshots may remain. To resolve this, follow these steps:-
Step 1: Manually delete the snapshot
In the vCenter or ESXi management interface, manually delete the snapshot. Right-click the virtual machine, choose Snapshots > Manage Snapshots, select the snapshot, and then click DELETE.
-
Step 2: Run the following commands to retrieve the virtual machine configuration again in the SMC client home directory and restart the SMC client.
cd /root/smc
./dist/migrate_configure    # Retrieve the virtual machine configuration again.
./go2aliyun_client --rerun   # Restart the SMC client.
-
-
Go to the VMware Agentless Migration page in the SMC console.
-
On the Agentless Migration of VMware VMs page, click Import Source Servers.
-
On the Import Migration Source page, configure the parameters.
Parameters:
Parameter
Description
Migration Source Type
VMware VM.
Import Method
The Use Server Migration Connector to Import VMware VM option is selected by default and cannot be changed.
Description
Follow the instructions to import the migration source.
-
Obtain an activation code.
-
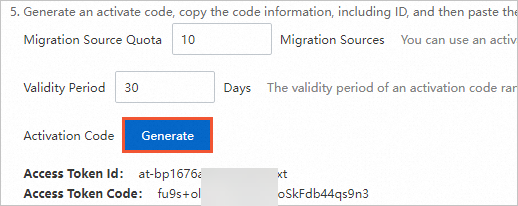
(Recommended) Obtain an activation code: An SMC activation code, also known as an Access Token, consists of an Access Token ID and an Access Token Code. If you do not have an activation code, click Generate in the Description section of the SMC console and copy the activation code.
-
Log on to the VMware agentless connector and run the following commands in sequence to import the migration source.
chmod +x ./go2aliyun_client
./go2aliyun_client
Enter the activation code as prompted. The following command output is used as an example. When the message
Import Source Server [s-bp14zd35128xgjdbh****] Successfully!appears, the migration source is imported successfully.Note-
Run the
./go2aliyun_client --helpcommand to obtain help information. -
If importing the migration source fails due to an incorrect activation code, you can re-import it. Example command:
./go2aliyun_client --accesstokenid=at-****** --accesstokencode=yK******9I. -
You can also activate the SMC client with an AccessKey pair (AccessKey ID + AccessKey secret). If you have not created one, see Create an AccessKey pair. Example command:
./go2aliyun_client --accessid=****** --secretkey=******9I.
-
-
On the VMware Agentless Migration page in the SMC console, view the status of the migration source in the Real-time Migration Status column.
If the status is Migration SourceOnline, the import was successful.
-
If the status is anything else, the import failed. Troubleshoot the issue using the following methods and then import the migration source again.
-
Resolve the issue based on the error message in the console or by checking the log files in the SMC client directory. By default, the SMC client is installed in the /root/smc/ directory.
For information about common issues and solutions, see SMC FAQ and Troubleshooting.
-
-
Step 3: Create a migration task
Create and start a migration task in the SMC console. SMC supports migrating VMware servers to the following Destination Type:
-
(Recommended) ECS Image: This option creates a custom image from the source server. You can then use this image to create an ECS instance.
-
ECS Instance: Use this option to migrate a VMware VM directly to an ECS instance. This is suitable for a new ECS instance or an existing one whose data can be overwritten. The source VM and target ECS instance must have compatible configurations, including the number and size of disks, the operating system, and other settings.
WarningThis migration method clears all original data on the target ECS instance. The data on the source server is not affected. Do not use this migration method if the ECS instance contains important data.
-
Go to the VMware Agentless Migration page in the SMC console.
-
In the Actions column of the migration source that you want to manage, click Start Migration.
-
Configure the parameters and click Start Migration.
-
Configure basic parameters.
Parameter
Description
Destination Type
Select a destination type based on your migration scenario:
ECS Image
Converts the source server into a custom image. You can then use this custom image to create an ECS instance and complete the migration.
The following parameters are available:
Destination Region: The Alibaba Cloud region where the custom image will be created. This parameter is required. Regions and zones.
Image name prefix: The prefix of the custom image name that SMC generates for the migration source.
ECS Instance
Migrates the source server to an existing ECS instance. The source server's storage, operating system, and other configurations must be compatible with the destination instance.
The following parameters are available:
Destination Region: The Alibaba Cloud region where the destination ECS instance is located. This parameter is required. Regions and zones.
Destination Instance: Select an ECS instance to be the destination.
Execution Method
How the migration task is executed:
Migrate Now: Starts the migration immediately after you create the migration job. By default, Migrate Now is selected.
Migrate Later: Schedules the migration job to start automatically at a specified time.
NoteThe earliest you can schedule the job is 10 minutes from the current time.
Create Only: Creates the migration job but does not start it. You must manually start it later by clicking Start Migration Job in the Actions column.
Automatic Incremental Synchronization
Enables automatic, incremental data synchronization from the source server to Alibaba Cloud. By default, this feature is disabled.
NoteIf you choose to migrate to a Destination Instance, this feature is not supported.
-
If you enable this switch, you must configure the following parameters:
-
Synchronization Interval: The interval at which the incremental migration job automatically runs.
Maximum Reserved Images: The maximum number of images that the incremental migration job retains.
The migration task runs periodically to synchronize incremental data to Alibaba Cloud. Agentless incremental migration for VMware VMs.
-
Network Type
Select the network for transferring migration data to the intermediate instance. By default, data is transferred over the public network. The intermediate instance is created in the selected Virtual Private Cloud (VPC) and vSwitch and is assigned a public IP address.
Public Network (Default)
Migration data is transferred to the intermediate instance over the public network. This mode requires the source server to have public internet access. You can choose whether to specify a Virtual Private Cloud (VPC) and vSwitch.
Specify a VPC and vSwitch: The migration job creates an intermediate instance in the VPC and vSwitch that you specify.
Do not specify a VPC and vSwitch: The migration job creates an intermediate instance in a new VPC and vSwitch that are automatically created by the system.
VPC
Migration data is transferred to the intermediate instance over a private connection within a VPC. This mode requires you to connect the source server to the Alibaba Cloud VPC and specify a VPC and vSwitch.
NoteIf you can directly access a VPC in an Alibaba Cloud region from an on-premises data center (IDC), virtual machine (VM) environment, or cloud host, we recommend that you use this method. Private network transfer is faster and more stable than public network transfer, improving migration efficiency. You can connect the source server to the cloud VPC by using a VPN gateway, an Express Connect circuit, or a Smart Access Gateway. For more information, see Connect a VPC to a data center or another cloud.
The private IPv4 address of the destination instance
If you need to change the private IP address of the destination instance, you can manually specify a private IP address. This parameter appears only when Destination Type is set to ECS Instance.
Remain unchanged.: The private IP address of the Destination Instance remains unchanged.
Manual: Allows you to enter an IP address from the available CIDR block of the vSwitch to which the Destination Instance belongs. If the source IP address is within the vSwitch's CIDR block, you can change the destination instance's IP address to match the source IP address.
If the destination instance and the migration source are in the same CIDR block, enter the private IP address of the migration source.
If the destination instance and the migration source are in different CIDR blocks, you must first change the VPC of the destination instance to match the CIDR block of the migration source, and then enter the private IP address of the migration source.
-
Configure disk parameters:
Parameter
Description
Destination Disk Size (GiB)
Defines the disk structure for the target ECS instance.
ImportantAgentless migration for VMware VMs does not support disk shrinking. To shrink disks, switch to agent-based migration.
System disk
The size (in GiB) of the system disk for the target ECS instance. The value must be between 20 and 2,048, and larger than the source system disk.
Data disk
Data Disk: The size of data disk N of the target ECS instance after migration, in GiB. The value can range from 20 to 32,768.
-
The variable
<N>indicates the data disk number. -
The target data disk must be larger than the corresponding source data disk. For example, a 500 GiB source disk requires a target disk larger than 500 GiB.
NoteIf your migration source has no data disks or the data disks are not mounted, the Data Disk setting is not displayed. Why is the Data Disk setting not displayed on the Create Migration Task page?.
-
-
(Conditionally required) If you need to configure advanced settings, such as the network type and compression ratio, click Advanced Settings. The parameters are described in the following table.
Parameter
Description
Migration Job Name
The name of the migration task.
Job Description
Enter a description for the migration task.
Transmission Speed Limit
Limits the data transfer speed, in Mbit/s. If Compression Ratio is set to a value greater than 0, the actual network transfer speed for the compressed data is lower than the speed displayed in Real-time Migration Status.
Compression Ratio
Sets the data compression level for migration.
In environments with limited bandwidth, a higher compression ratio can increase data transfer speed.
In environments with high bandwidth, we recommend that you do not compress data to reduce CPU usage on the source server.
Valid values: 0 to 10. The default value is 7. A value of 0 indicates that data is not compressed.
Checksum Verification
This feature is disabled by default. Enabling it enhances data consistency checks but may decrease transfer speed.
SSL-encrypted transmission
The default value is Auto-Select. SSL encryption for data transfer improves security and data integrity.
License Type
Select a license type.
Alibaba Cloud (Default): Only Microsoft Windows Server licenses are supported. After migration, you are charged a license fee when you create an ECS instance from the image in the China (Hong Kong) region or other regions outside the Chinese mainland. The instance is automatically activated. The actual fee is displayed when you create the instance.
BYOL: BYOL is supported for operating systems such as Microsoft Windows, Red Hat Enterprise Linux, and SUSE Linux Enterprise Server. After migration, no license fee is charged when you create an ECS instance from the image. You must activate the instance by using your own license.
NoteIf you have an existing ECS instance, you can purchase software licenses, such as for Red Hat Enterprise Linux and SUSE Linux Enterprise Server, for the instance. Purchase software licenses for an ECS instance.
Transmission Mode
-
Automatic: Default. Selects the best available transmission mode.
-
LAN: Uses LAN transmission. Requires that the connector VM can access the source VM's ESXi host over the LAN.
-
LAN-Free: Uses storage area network (SAN) transmission. Requires that the connector VM and the source VM are on the same ESXi host.
Image Check
The image check feature verifies whether an image is valid and can be used to create a fully functional ECS instance. You can use this feature when you create server migration and agentless VMware migration jobs.
The image check feature helps you quickly identify potential issues with the image or instance after migration and provides solutions to ensure compliance with Alibaba Cloud standards, which increases the instance startup success rate.
Tag
Add tags (key-value pairs) to the migration job for easier searching and management. Use tags to manage migration sources and jobs. Implement fine-grained permission management by using tags.
NoteYou can add a maximum of 20 tags to a single migration job.
Intermediate Instance Type
Select an instance type for the intermediate instance based on your requirements. This parameter appears only when Destination Type is set to ECS Image.
If you specify this parameter, the system uses the selected instance type to create the intermediate instance. If the specified instance type is out of stock, the migration job fails to be created.
If you do not specify an instance type, the system attempts to create the intermediate instance by using a default sequence of instance types.
ImportantTo prevent migration errors, do not stop, start, restart, or release the intermediate instance during the migration. After the migration is complete, the instance is automatically released.
Report diagnostic logs
Automatically uploads SMC client logs to the SMC server for diagnostic analysis. This helps troubleshoot issues if a migration error occurs. This feature is enabled by default.
SMC client logs are typically stored in the
/root/smc/Logsdirectory.
-
-
In the dialog box that appears, read the notes and click Got It.
-
On the VMware Agentless Migration page, view the real-time status of the migration.
Data transmission time depends on source data size and network bandwidth. Wait for the task to finish.
When the migration task status is Synchronizing, you can click Pause Migration Job in the Actions column to pause the task.
(Optional) View migration details.
To view details, click a migration source ID in the Migration Source ID/Name column.
Verify the migration result
If you set Destination Type to ECS Image:
After a successful migration, Alibaba Cloud creates a custom image. You can scroll to the right and click View Report in the Migration Deliverables column to view image detection results. View image detection results.

Manual verification (Recommended)
In the Actions column, click Create Instance. You are redirected to the instance creation page in the ECS console, where the custom image is preselected. For more information about how to create an ECS instance, see Create an instance from a custom image or shared image.

Automatic verification
NoteTo use this feature, the instance must have Cloud Assistant installed, and its operating system must support the agent. For more information, see Install Cloud Assistant Agent.
This feature uses the OOS template
ACS-SMC-CreateAndVerifyInstanceprovided by Alibaba Cloud to automatically verify that the image generated by the migration job can be used to successfully create and start an ECS instance.In the Actions column, click Verify Migration Result.

In the dialog box that appears, review the verification process and click Verify Now.
You can also click Customize Verification Parameters to manually configure verification parameters.
In the Verify Migration Result column, view the verification result.
Verified: The migration was successful. You can click View Report to view the verification results.
Not Verified: The verification failed. You can click View Cause to view the error details and troubleshoot the issue.
You can also click the
 icon in the Actions column and then click View Verification Records in OOS Console to view the execution history of the OOS template.
If you set Destination Type to ECS Instance, you can click View Destination Instance in the Actions column to view the destination ECS instance.
After the server is migrated, perform the following steps to ensure that your services run correctly:
Verify the data to ensure its integrity and correctness. How do I check the system after migrating a Linux server or How do I check the system after migrating a Windows server.
If applications and services on the source server are not configured to automatically start, you must manually start them after the migration.
The IP address changes after the migration. If your services depend on IP address configurations, you must modify settings such as domain name resolution and ICP filing after the migration.
If a domain name is mapped to the source server, remap it to the new public IP address. Add a website resolution.
To retain the original private IP address, you can modify the private IP address of the destination instance.
If the destination is an ECS Image: When you create an ECS instance, specify a private IP address. For more information, see Specify the primary private IPv4 address for the primary ENI when you create an ECS instance.
If the destination is an ECS Instance: If you did not modify the private IPv4 address in the advanced configuration of the migration settings step, you can modify it. For more information, see Modify the primary private IPv4 address of the primary ENI for an existing instance.
Clean up resources
Migrate to an image
During the migration, SMC creates a temporary pay-as-you-go intermediate instance named No_Delete_SMC_Transition_Instance in your destination Alibaba Cloud account to facilitate the migration. The migration result determines whether you need to manually release the instance:
Successful migration: SMC automatically releases the intermediate instance. No manual cleanup is required.
Migration error: The intermediate instance is not released and continues to incur charges. To avoid unnecessary charges, you can release the instance in one of the following ways:
If you no longer need the migration task, click the migration source ID. In the Actions column for the migration task, click Cancel Migration Job to delete the migration task and automatically clean up the intermediate instance.
Manually release the intermediate instance.
Migrate to a destination instance
During the migration, SMC creates a temporary pay-as-you-go intermediate disk named SMC_Temp_Disk and attaches it to the destination instance to facilitate the migration. The migration result determines whether you need to manually release the intermediate disk:
Successful migration: SMC automatically releases the intermediate disk. No manual cleanup is required.
Migration error: The intermediate disk is not released and continues to incur charges. To avoid unnecessary charges, you can release the disk in one of the following ways:
If you no longer need the migration task, click the migration source ID. In the Actions column for the migration task, click Cancel Migration Job to delete the migration task and automatically clean up the intermediate disk.
Manually release the intermediate disk.
References
-
Incremental migration
After the first full migration, perform incremental migrations at custom intervals to synchronize data and reduce final cutover downtime. Agentless incremental migration for VMware VMs.
-
ECS server migration guide
Alibaba Cloud supports various server migration methods: on-premises physical machines, third-party cloud servers, and cross-account ECS instance migrations. ECS server migration guide.
-
SMC also provides the following migration capabilities:
-
The SMC client is a migration tool that runs on the source server during agent-based migration. SMC client user guide.