You can use Server Migration Center (SMC) to migrate servers from physical servers, local virtual machines (VMware, Xen, KVM, and Hyper-V), other cloud providers (AWS, Azure, Google Cloud, and Tencent Cloud), and ECS directly into Alibaba Cloud Edge Node Service images. You can then use these ENS images to efficiently create ENS instances.
Use case
Directly migrate a server into an ENS image.
If you have not purchased an Alibaba Cloud Edge Node Service instance, you can migrate your server to become an Alibaba Cloud Edge Node Service image, and then use the ENS image to manually create an ENS instance.
This approach is more efficient than manual migration because it eliminates the need to create an ECS custom image, export the ECS image, and import the ENS image.
Migration overview
An ENS instance is the smallest compute unit that Edge Node Service provides. During migration, SMC converts the source server into an Alibaba Cloud Edge Node Service image. You can then use this image in the Edge Node Service console to create an ENS instance and complete the migration.
The following diagram illustrates the migration workflow and the services involved.
Install the SMC client on the source server.
Configure the migration settings and start the migration. SMC automatically creates an ECS custom image, exports it to an intermediate OSS Bucket, and then imports the image as an ENS image.
In the Edge Node Service console, create an ENS instance from the ENS image to complete the migration.
Edge Node Service (ENS) is built on carrier edge nodes and networks. It provides on-demand, elastic, and distributed computing resources that are close to end users and offer global coverage. By processing data closer to end users, ENS optimizes response times, reduces the load on central servers, and lowers overall costs. This helps you deploy applications to carrier-side edge nodes, reducing compute latency and costs.
Object Storage Service (OSS) is a massive, secure, cost-effective, and highly reliable cloud storage service. During migration, generated ECS custom images are stored in and transferred via an OSS Bucket.
Limitations
To use this feature, you must activate ENS.
This feature relies on the custom image export feature of ECS and the image import feature of ENS. The following limitations apply:
You can only migrate servers that run a Linux operating system. You cannot create ENS images from servers that run a Windows Server operating system.
A server can have a maximum of four data disks, and each data disk cannot exceed 500 GiB in size.
The only supported regions for importing ENS images are China (Beijing) and Singapore.
Only x86-based server instance types are supported.
The maximum size for an image imported to ENS is 1 TiB, which is the total compressed size of the system disk and all data disks.
For more limitations, see Limits on exporting ECS custom images and Notes on importing ENS custom images.
Migration costs
SMC is free to use, but you are charged for the Alibaba Cloud ECS resources used during migration, such as a migration intermediate instance. For billing details, see SMC Billing Items.
Object Storage Service (OSS) costs: SMC saves an ECS custom image generated during migration to an OSS bucket.
Exporting a custom image incurs charges for OSS storage and outbound data transfer. For more information, see Object Storage Service Billing Overview.
Image exports call the OSS API, which incurs request charges. For more information, see OSS API request costs.
Edge Node Service (ENS): Importing an ENS image and creating an ENS instance incur charges. For billing details, see ENS Billing Items Overview.
How it works
The SMC service consists of an SMC client and a console. The SMC service lets you easily migrate a server into an Edge Node Service (ENS) image. The migration process is as follows:
Download and install the SMC client on the source server. (If you import a migration source by using the CLI or automatic import in the console, the system automatically downloads and installs the SMC client.)
Run the SMC client on the source server. The SMC client registers the source server and reports its information to the SMC service using the SMC service domain name.
The SMC service creates a temporary intermediate instance and opens ports 8080 and 8703 in the security group.
The SMC client connects to the intermediate instance on port 8080. It then transfers the cloud disk data to the intermediate instance's data disks via port 8703.
The SMC service creates an ECS custom image from the data on the intermediate instance's cloud disks and uploads the image to your specified Object Storage Service (OSS) bucket.
The SMC service imports the ECS image to Edge Node Service to create an ENS image.
Go to the Edge Node Service console and use the ENS image to create an ENS instance. This completes the migration.
Migration impact
Before you begin, review the migration impacts in the table below.
Affected item | Description |
Intermediate instance | Do not interfere with the intermediate instance. To prevent migration failure, do not stop, start, restart, or release the intermediate instance, or change its billing method during the migration. After the migration is complete, the intermediate instance is automatically released. Note
For more information, see How SMC works. |
Intermediate image | Do not interfere with the intermediate image. To prevent migration failure, SMC generates a temporary ECS image in the intermediate region during the migration. Do not perform any operations on this image. The intermediate image is automatically deleted after the task is completed or deleted. |
Transit bucket | The temporary ECS image generated during the migration is uploaded to your specified OSS Bucket, temporarily consuming storage space. This space is automatically released when the task is completed or deleted. |
Underlying hardware | Changes to the underlying hardware after migration can invalidate application licenses bound to specific hardware. Verify that your licenses remain valid after the migration. |
Prerequisites
Server Migration Center (SMC) is activated. If you are using SMC for the first time, you need to grant the required permissions, prepare the migration network, and back up your data. For more information, see Preparation before migration.
Object Storage Service (OSS) is activated and an OSS Bucket is created. The temporary ECS image generated during the migration will be stored in your OSS Bucket. If you are using OSS for the first time, you need to grant the required permissions, prepare the migration network, and back up your data. For more information, see Preparation before migration.
Edge Node Service (ENS) is activated. After the migration is complete, SMC imports the ECS custom image as an ENS image. You can then use this image to create edge node ENS instances.
Migration operations
Before using this feature for the first time, grant ECS access to OSS resources. The OSS bucket is used to store intermediate images. Follow the prompts in the SMC console to complete the authorization.
Step 1: Import a migration source
A migration source is a server from an on-premises data center (IDC), a VM, or a cloud host on another cloud platform.
CLI (Recommended)
The source server must have public network access. If a firewall is enabled on the source server, see SMC endpoints to obtain the SMC domain names and ports, and add them to the firewall allowlist.
If your source server cannot access the public network or you want to use private network transfer to improve migration efficiency, see Private network transfer migration.
-
Go to the Edge Node Migration page in the SMC console.
On the Edge node migration page, click Import the migration source.
Configure the following parameters and copy the activation code command. The following table describes the parameters.
Parameter
Description
Migration Source Type
Select a type based on your source server:
Physical servers/VMs/Cloud servers of other cloud platforms.
ECS Instance
Import Method
Select Use CLI to Import Server.
Migration Source Quota
The number of migration sources that can be activated by using the activation code. Valid values: 1 to 1,000. Default value: 200.
Validity Period
The validity period of the activation code. Valid values: 1 to 90 days. Default value: 90 days.
Activation Code
Generate and copy the activation code command:
Click Generate.
Click the Linux shell tab.
Click Copy to copy the activation code command.
Log in to the source server, then run the copied command as an administrator to import the migration source.
Log on to the Linux source server.
Run the copied command as an administrator to import the migration source.

A response message similar to
Import Source Server [s-bp18x8751kgz2oyh****] Successfully!indicates a successful import.
On the Edge node migration page of the SMC console, check the status of the migration source in the Real-time Migration Status column.
If the status of the migration source is Migration source online, the migration source was imported successfully.
Any other status indicates a failed import. Troubleshoot the issue using the following methods and then re-import the migration source.
Troubleshoot the issue using the error message in the console or by checking the log files in the SMC client directory. The default installation directory of the SMC client is /smc.
For common issues and solutions, see SMC FAQ and Troubleshooting.
Console
The source server (ECS instance) must have public network access.
The source server must be in the Running state, and Cloud Assistant must be available. For more information, see Check the Cloud Assistant status and handle exceptions.
If you use a RAM user to import a migration source, you must manage the permissions of the RAM user:
Grant the AliyunECSReadOnlyAccess permission for read-only access to ECS.
Grant the AliyunECSAssistantFullAccess permission to manage Cloud Assistant.
-
Go to the Edge Node Migration page in the SMC console.
On the Edge node migration page, click Import the migration source.
Configure the parameters based on the Migration source type.
Parameter
Description
Migration Source Type
Select ECS Instance.
Import Method
Select Import through Console.
Region
From the drop-down list, select the region where the source server is located.
Instance
Search for and select the ECS instances to migrate in the specified region by instance ID, name, or IP address. You can select and import multiple instances in bulk.
Tag (Optional)
Add tags to the migration task to make it easier to find and manage. For more information, see Manage migration sources and migration tasks by using tags and Implement fine-grained access control by using tags.
You can add a maximum of 20 tags to a migration task.
Resource Group (Optional)
To group and manage migration resources by business department or project, create a resource group.
After you configure the parameters, click Import.
SMC automatically uses Cloud Assistant to run the import command. The import process takes about 3 to 10 minutes.
On the Edge node migration page of the SMC console, check the status of the migration source in the Real-time Migration Status column.
If the status of the migration source is Migration source online, the migration source was imported successfully.
Any other status indicates a failed import. Troubleshoot the issue using the following methods and then re-import the migration source.
Troubleshoot the issue using the error message in the console or by checking the log files in the SMC client directory. The default installation directory of the SMC client is /smc.
For common issues and solutions, see SMC FAQ and Troubleshooting.
SMC client
For more information about the SMC client, see SMC client user guide.
The SMC client must run on the source server. By default, public network access is enabled. If the source server is behind a firewall, see What are the SMC endpoints? to obtain the SMC endpoints and ports, and then add them to your firewall allowlist.
If your source server cannot access the public network or you want to use a private network for a faster migration, see private network migration.
-
Go to the Edge Node Migration page in the SMC console.
On the Edge node migration page, click Import the migration source.
On the Import Source Servers page, configure the parameters described in the following table.
Parameter
Description
Migration Source Type
Physical servers/VMs/Cloud servers of other cloud platforms.
Import Method
Select Use Client to Import Server.
You must manually download and install the SMC client on the source server.
Description
In the Description section, follow the prompts to download, install, and activate the SMC client that matches the operating system (Linux or Windows) and architecture (32-bit or 64-bit) of your source server.
Click Generate and copy the activation code.
You must enter the activation code when you install the client.
Import the migration source.
ImportantDo not close the SMC client during the migration. Otherwise, the migration source will disconnect from the SMC console, causing the migration to fail.
Use a remote connection tool that supports file transfers, such as WinSCP, to upload the SMC client to the Linux source server, or use the command in the Description section to download the SMC client directly on the source server.
Remotely connect to the Linux source server and decompress the SMC client package.
This example uses the
Linux 64-bit General-purpose Edition. If you use a different version of the SMC client, replace the package name in the command with the actual name of the downloaded file.tar -zxvf go2aliyun_client.tar.gzNoteThe Linux 64-bit ARM Edition supports the g6r general-purpose and c6r compute-optimized instance families. For more information about instance families, see Enterprise-level Arm-based compute instance families.
(Optional) Filter and exclude files or directories that you do not want to migrate as needed.
ImportantIf you enable block replication, you cannot exclude files or directories from the migration.
Obtain an activation code or an AccessKey pair.
(Recommended) Obtain an activation code: In the Description section of the SMC console, click Generate and copy the activation code.
Obtain an AccessKey pair: An AccessKey pair for an Alibaba Cloud account consists of an AccessKey ID and an AccessKey secret. If you do not have an AccessKey pair, create one. For more information, see Create an AccessKey pair.
In the SMC client folder, run the following commands to start the SMC client.
This example uses the
go2aliyun_client2.6.5_linux_x86_64directory. The directory name varies by client version. Replace it with the name of the folder you downloaded and decompressed.cd go2aliyun_client2.6.5_linux_x86_64 sudo chmod +x go2aliyun_client sudo ./go2aliyun_clientEnter the activation code or AccessKey pair as prompted. This example uses an activation code:

After you enter the activation code or AccessKey pair, the following prompts may appear:
If the source server does not have a snapshot driver installed, the SMC client will prompt you to install one. You can choose whether to install the snapshot driver based on your needs.
If you enable block replication when you create the migration task, enter
yesto automatically install the snapshot driver.If you do not enable block replication when you create the migration task, enter
no.
ImportantIf the snapshot driver fails to install, do not enable block replication when creating the migration task. Otherwise, the migration will fail.

Most mainstream source systems have rsync installed by default. If it is not installed, the SMC client will prompt you to install it. Enter
yesto proceed, as shown in the following figure.
If SELinux is enabled on the source system, the SMC client prompts you to disable it. Enter
yesto automatically disable SELinux, as shown in the following figure.
A response message similar to
Import Source Server [s-bp11npxndknsycqj****] Successfully!indicates that the migration source is successfully imported.NoteIf the import fails, you can troubleshoot the issue based on the response message, and then run the following commands to abort the operation and then try importing the migration source again. For more information about common issues and solutions, see SMC FAQ and Troubleshoot errors.
sudo ./go2aliyun_client --abort
sudo ./go2aliyun_client
On the Edge node migration page of the SMC console, check the status of the migration source in the Real-time Migration Status column.
If the status of the migration source is Migration source online, the migration source was imported successfully.
Any other status indicates a failed import. Troubleshoot the issue using the following methods and then re-import the migration source.
Troubleshoot the issue using the error message in the console or by checking the log files in the SMC client directory. The default installation directory of the SMC client is /smc.
For common issues and solutions, see SMC FAQ and Troubleshooting.
Step 2: Configure migration
-
In the Actions column of the migration source that you want to manage, click Start Migration.
Configure the parameters and click Start Migration.
Configure basic parameters.
Parameter
Description
Image storage region
The region where the final ENS image is stored after the migration is complete.
Image name prefix
The prefix for the ENS image name. This helps identify the image.
Transit region
During the migration, a temporary ECS image is created in this region. Do not interact with this intermediate image, which is automatically deleted after the task is completed or deleted.
Transit bucket (OSS Bucket)
Select an OSS bucket in the same region as the custom image.
The temporary ECS image created during migration is uploaded to this OSS bucket. The storage space used by the image is automatically released after the task is completed or deleted.
Network Type
Select the network for transferring data to the intermediate instance. By default, the public network is used. The intermediate instance is created in the selected Virtual Private Cloud (VPC) and vSwitch, and is assigned a public IP address.
Public Network (Default)
Migration data is transferred to the intermediate instance over the public network. To use this mode, the source server must have access to the public network. Choose whether to specify a Virtual Private Cloud (VPC) and a vSwitch based on your requirements.
Specify a VPC and a vSwitch: The migration task creates an intermediate instance in the specified VPC and vSwitch.
Do not specify a VPC and a vSwitch: The migration task creates an intermediate instance in a new VPC and vSwitch that are automatically created by the system.
VPC
Migration data is transferred to the intermediate instance over the VPC's internal network. To use this mode, you must connect the source server to the Alibaba Cloud VPC and specify a VPC and a vSwitch.
NoteWe recommend that you use this method if you can directly access a Virtual Private Cloud (VPC) in an Alibaba Cloud region from an on-premises data center (IDC), VM environment, or cloud host. Private network transfer provides faster and more stable data transfer than the public network, improving migration efficiency. You can use a VPN Gateway, Express Connect, or Smart Access Gateway to connect the source server to the VPC. For more information, see Connect a VPC to an on-premises data center or another cloud.
Parameter
Description
Migration Job Name
The name of the migration task.
Job Description
Enter a description for the migration task.
Modify Disk Partition
Choose whether to adjust the disk partition structure. This feature is supported only by SMC client V2.8.0 and later. For more information about the SMC client, see SMC client user guide.
Disabled: The disk information of the source instance is not displayed. The system automatically reads the disk information and generates a disk layout. After migration, the destination disk partition structure matches the generated layout by default.
Enabled: The disk information of the source instance is displayed. The system automatically reads the disk information and generates a disk layout. You can adjust the destination disk partition structure, including partition size and order, transfer method, and whether to enable LVM.
Disks
System Disk: The size of the destination system disk, in GiB. The value must be in the range of 20 to 2,048.
The destination system disk size must be larger than the actual used space of the source system disk. For example, if the source system disk is 400 GiB in size and has 100 GiB of used space, the destination system disk size must be greater than 100 GiB.
NoteThe default value is the size of the source system disk. If you do not need to reduce the system disk capacity, we recommend that you do not specify a value smaller than the default value.
Data Disk<N>: The size of the destination data disk after migration, in GiB. The value must be in the range of 1 to 32,768.
The variable
<N>indicates the data disk number. If you migrate to a destination instance, N is the data disk ID.The destination data disk size must be larger than the actual used space of the source data disk. For example, if the source data disk is 500 GiB in size and has 100 GiB of used space, the destination data disk size must be greater than 100 GiB.
If no mount points exist on the Data Disk or all mount points are set not to be migrated, the data disk is not migrated.
LVM: Logical Volume Manager (LVM) is a flexible disk management framework for Linux that allows for dynamic resizing of disk space.
You can choose whether to enable LVM based on your needs. If LVM is enabled, the destination disk is automatically rebuilt with an LVM structure.
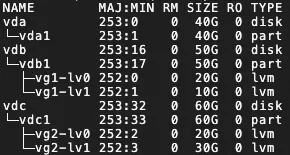
For each destination disk with LVM enabled, the system creates one physical volume (PV) and its corresponding volume group (VG). On this volume group, a number of logical volumes (LVs) corresponding to the number of mount points are created. The volume group name defaults to vgX (where X is the disk sequence number), and the logical volume name defaults to lvX (where X is the logical volume sequence number). Example:
 Important
LVM is not supported in the following cases:
The migration source runs a Windows operating system.
The system disk has no boot partition.
After LVM is enabled, the feature does not take effect in the following scenarios:
The migration source does not support lvm2 or the lvm2 package is not installed.
The migration source is a Debian system with a kernel version of 3.x or earlier and has a disk with an XFS file system mounted.
Mount points
Migrate: Choose whether to migrate the mount point based on your business needs.
Enable Block Replication: This option is visible only for SMC client versions earlier than V3.2.0. Using block replication improves the stability of the migration transfer speed and ensures consistency with the source partition structure, but the partition size cannot be modified. SMC determines whether to support block replication based on the status of the source disk partitions.
If the migration source does not support enabling Block Replication for a partition, this switch is disabled. The default file replication is used, and the partition size can be modified.
If the migration source supports enabling Block Replication for a partition, block replication is enabled by default to perform partition-level disk migration.
NoteIf the migration source runs a Windows operating system, block replication is enabled by default and cannot be disabled.
If LVM is enabled on the disk and the partition size is not a multiple of 4 MiB, block replication does not take effect, and file replication is used for data transfer.
Set Partition Size: When block replication is disabled, you can set the partition size as needed, but the sum of the partition sizes cannot exceed the size of the disk.
Windows operating systems: You cannot adjust the partition size.
Linux operating systems: You can adjust the partition size as needed, but the sum of the partition sizes cannot exceed the size of the disk.
For SMC client versions earlier than 3.2.0, block replication must be disabled.
NoteIf the disk sizes of the destination instance do not match the source disks, the task cannot be created. In this case, the system automatically adjusts the mount point positions to meet the disk size requirements. If the requirements are still not met after the adjustment, troubleshoot the issue based on the prompts on the page.
You can also manually drag the mount point positions to meet the disk size requirements. However, you cannot drag boot or system partitions. Perform the following steps:
Hover the pointer over the
 icon in front of the mount point.
Drag the mount point to another disk.
Transmission Speed Limit
Limits the actual network transfer speed, in Mbit/s. If Compression Ratio is set to a value greater than 0, the actual network transfer speed (for compressed data) is lower than the speed displayed in the Real-time Migration Status column.
Compression Ratio
The level of data compression during migration. Set the compression ratio based on your needs.
In environments with limited bandwidth, using a high compression ratio can increase data transfer speed.
In environments with high bandwidth, we recommend that you do not compress data to reduce CPU consumption on the source server.
Valid values: 0 to 10. Default value: 7. A value of 0 means that data is not compressed.
Checksum Verification
Disabled by default. Enabling this feature enhances data consistency checks but may reduce transfer speed.
SSL-Encrypted Transmission
By default, Auto is selected. Using Secure Sockets Layer (SSL) encryption to transfer data can improve data security and ensure data integrity.
License Type
Select a license type.
Alibaba Cloud (Default): Currently, only Microsoft Windows Server licenses are provided. After migration, if you use the image to create an ECS instance in the China (Hong Kong) region or an overseas region, an image license fee is charged and the license is automatically activated. The actual fee is subject to the information displayed when you create the instance.
BYOL (BYOL): Bring Your Own License (BYOL) migration to the cloud currently supports Microsoft, Red Hat Enterprise Linux, and SUSE Linux Enterprise Server. After the migration, no license fee is charged when you create an ECS instance from the image. You must use your own license for activation.
NoteIf you have an existing ECS instance, Alibaba Cloud allows you to quickly purchase software licenses, such as Red Hat Enterprise Linux and SUSE Linux Enterprise Server, for the instance. For more information, see Purchase a software license for an ECS instance.
Tag
Bind tags (key-value pairs) to the migration task to facilitate querying and management. For more information, see Use tags to manage migration sources and tasks and Implement fine-grained access control by using tags.
NoteYou can bind a maximum of 20 tags to a single migration task.
Intermediate Instance Type
You can select an instance type for the intermediate instance based on your requirements.
If you specify an instance type and it is out of stock, the migration task cannot be created.
If you do not specify an instance type, the system selects an instance type in a specific order to create the intermediate instance.
ImportantTo prevent migration errors, do not stop, start, restart, or release the intermediate instance during the migration. The instance is automatically released after the migration is complete.
Report diagnostic logs
Automatically uploads SMC client logs to the SMC server for error diagnosis and analysis. This helps locate issues when migration errors occur. This feature is enabled by default.
SMC client logs are typically saved in the
/smc/go2aliyun_client*/Logsdirectory of the installation path.In the dialog box that appears, read the migration notice carefully, and then click Got It.
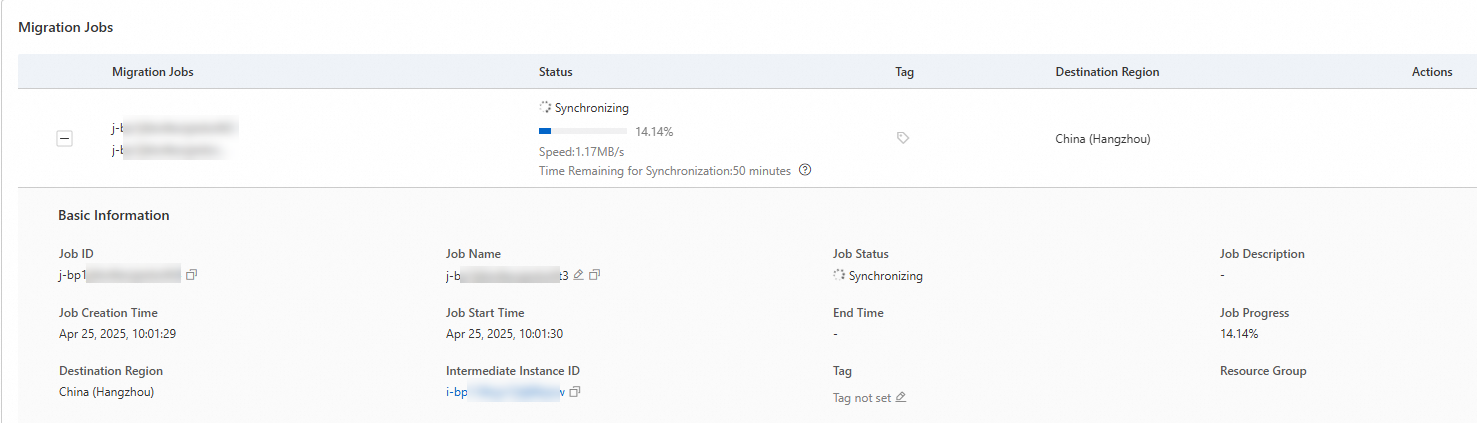
On the Edge node migration page, monitor the real-time status of the migration.
The time required for data transfer depends on factors such as the amount of source data and network bandwidth. Wait for the migration task to complete.
 Note
NoteSpeed: The amount of migration data transferred per second (i.e., the transfer speed of data before compression). If the Compression Ratio is set to a value greater than 0 when you create a migration task, the displayed speed is greater than the actual network transfer speed (i.e., the transfer speed of data after compression).
Time Remaining for Synchronization: Remaining synchronization time = (Total data volume - Transferred data volume) / Speed.
If the transfer speed is too slow to meet your schedule, consider temporarily increasing the fixed bandwidth of the source and destination servers. For more information, see Estimate migration time and test transfer speed.
Error handling
If the Real-time Migration Status is Error, the migration failed. Troubleshoot the issue, then retry the migration:
In the Actions column, click Troubleshoot Errors and resolve the issue based on the provided error code and message. For more information, see SMC FAQ and Troubleshooting.
After resolving the issue, click Retry Migration Job in the Actions column. The migration task resumes from where it left off.
ImportantIf the intermediate instance was released, restart the migration. For instructions, see What do I do if the intermediate instance is accidentally released?
Create an ENS instance with an ENS image
When the Real-time Migration Status changes to Completed, the migration is successful and an Alibaba Cloud ENS image has been created.

Go to the Edge Node Service console and create an ENS instance from an ENS image. Select the ENS image generated from this migration.
Clean up resources
ECS image
During migration, SMC creates a temporary pay-as-you-go intermediate instance named No_Delete_SMC_Transition_Instance in your destination Alibaba Cloud account to assist with the migration. Whether you need to perform manual cleanup depends on the migration's outcome:
Migration succeeded: The intermediate instance is automatically released. No manual cleanup is required.
Migration failed: The intermediate instance remains associated with the migration task and continues to incur charges. To avoid charges, release it in one of the following ways:
If you no longer need the migration task, click the migration source ID. In the Actions column for the migration task, click Cancel Migration Job. This action deletes the migration task and automatically releases the intermediate instance.
Manually release the intermediate instance.
ECS instance
During migration, SMC creates a temporary pay-as-you-go intermediate cloud disk named SMC_Temp_Disk and attaches it to the destination instance to assist with the migration. Whether you need to perform manual cleanup depends on the migration's outcome:
Migration succeeded: The intermediate cloud disk is automatically released. No manual cleanup is required.
Migration failed: The intermediate cloud disk remains associated with the migration task and continues to incur charges. To avoid charges, release it in one of the following ways:
If you no longer need the migration task, click the migration source ID. In the Actions column for the migration task, click Cancel Migration Job. This action deletes the migration task and automatically releases the intermediate cloud disk.
Manually release the intermediate cloud disk.