If your on-premises data center, VM environment, or cloud host can access an Alibaba Cloud Virtual Private Cloud (VPC), use the private transfer feature of Server Migration Center (SMC) for faster, more stable migration than over the public network.
Scenarios
Scenario 1: The source server has no public network access, but the data center has a public egress.
Connect the source server to a VPC through VPN Gateway, Express Connect, or Smart Access Gateway. Then configure a proxy server for the source server to access SMC and migrate over a private network.
Scenario 2: The source server has public network access, but migration speed is limited.
Connect the source server to a VPC through VPN Gateway, Express Connect, or Smart Access Gateway, then select private transfer when creating the SMC migration job.
Migration process
The following figure shows the private transfer migration process.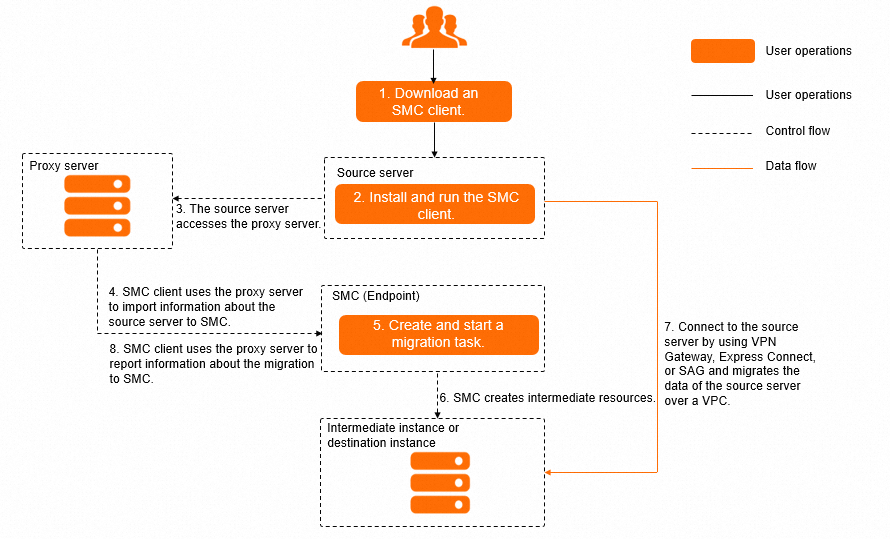
Download the SMC client and install it on the source server.
Run the SMC client on the source server and use a proxy server (Forward proxies) to import the migration source to the SMC console.
In the SMC console, create and start a migration job that uses private transfer.
SMC creates resources based on the migration job and uses the VPC connected via Express Connect to migrate data from the source server to Alibaba Cloud.
During migration, the proxy server relays instructions from SMC to the client. If an error occurs, SMC stops the migration and sends the error log to the client through the proxy server.
Forward proxies
A forward proxy sits between a client and a server. When a client lacks public network access, it sends requests through the proxy, which forwards them to the target server and returns the responses.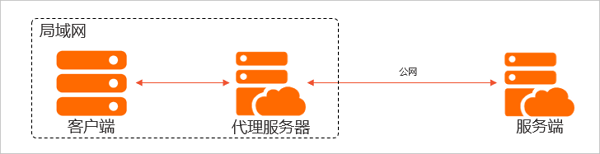
Benefits of a forward proxy:
Allows clients to access resources on the public network.
Caches frequently accessed public data for faster subsequent requests.
Authorizes client access to enhance security.
Hides client information when accessing public resources and logs client access.
Prerequisites
Your on-premises data center is connected to an Alibaba Cloud VPC through VPN Gateway, Express Connect, or Smart Access Gateway. Connect a VPC to a data center or another cloud.
Ports 8703 and 8080 are open on your data center firewall for data transfer between the migration source and the intermediate instance.
The source server and proxy server can communicate with each other, and the proxy server can access the public network.
Procedure
Create a proxy server and open port 3128.
(Recommended) Create an ECS instance running CentOS 7 or later. Create an instance by using the custom launch wizard.
By default, ECS instances can access SMC private endpoints. Verify the following endpoints are accessible:
https://.axt.aliyun.com. For example, the endpoint for the China (Hangzhou) region is https://cn-hangzhou.axt.aliyun.com.
https://smc.vpc-proxy.aliyuncs.com.
Create a non-Alibaba Cloud server to use as the proxy server.
Ensure the proxy server can access the following SMC public endpoints: https://smc.aliyuncs.com.
Install Squid on a server in the VPC with a private connection.
Connect to the Linux server using a remote connection tool such as WinSCP.
This example uses a server running CentOS 7.9.
Run the following commands to disable the firewall.
systemctl stop firewalld
setenforce 0
Run the following command to install Squid.
yum -y install squidCheck whether
/etc/squid/squid.confcontains a rule that allows access from the source server CIDR block.cat /etc/squid/squid.conf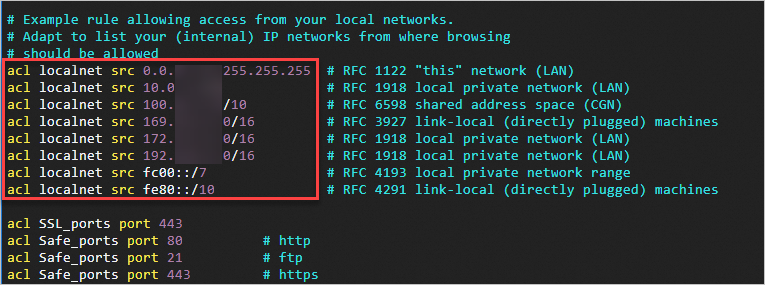
If it does, proceed to the next step.
If it does not, perform the following steps:
Run the following command to edit the Squid configuration file:
vim /etc/squid/squid.confPress
iand add the required CIDR block. For example, addacl localnet src 0.0.0.0/0to allow all IP addresses.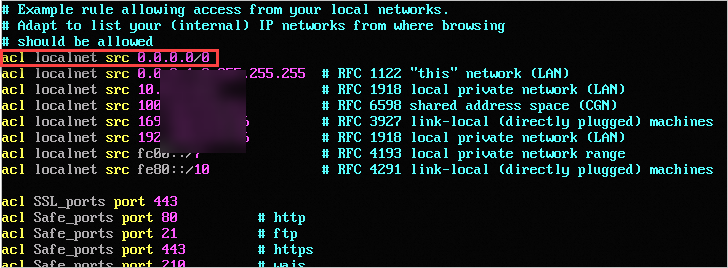 Important
Squid uses port 3128 by default. To change the port, modify
http_port 3128in the configuration.Press
Esc, enter:wq, and press Enter to save and exit.
Start and enable Squid.
systemctl start squid
systemctl enable squid
Import a migration source by using the SMC client. Import a migration source by using the SMC client.
After downloading and decompressing the SMC client, configure the proxy server in the client configuration file before importing the migration source. To configure the proxy on a Linux system:
In the
go2aliyun_clientdirectory (or/root/smcfor the VMware agentless connector), open theclient_datafile.This example uses an SMC client for a generic 64-bit Linux distribution.
cd go2aliyun_client_linux_x86_64 # If you use the VMware agentless connector, switch to the /root/smc directory.
vim client_data
Find the
proxyconfiguration item.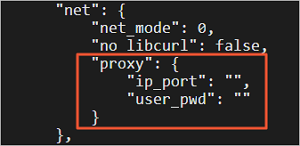
Set
ip_portto the IP address and port of the proxy server.Sample configuration:
"proxy": {
    "ip_port": "172.168.XX.XX:3128",
    "user_pwd": ""
}
Press Esc, enter
:wq, and press Enter to save and exit.(Optional) If the proxy server is an ECS instance without a public IP address, specify the SMC private endpoint.
./go2aliyun_client --rerun --useaxt=cn-hangzhouReplace
cn-hangzhouwith the region ID of the proxy server.
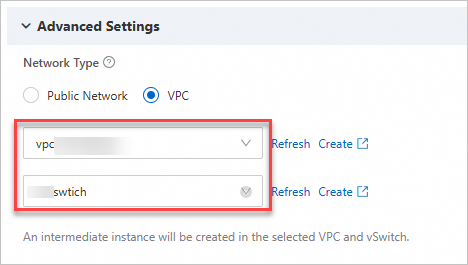
Create and start a migration job in the SMC console. Step 2: Configure a migration job.
When configuring the migration job, set Network Type to VPC, and configure the VPC and vSwitch that have a private connection.