This guide explains how to add your website to Edge Security Acceleration (ESA) using NS setup or CNAME setup. Once added, you can manage your website, accelerate content delivery, run code at the edge, and enable comprehensive security protection.
Before you begin
You will need:
A registered domain name ready to add to ESA.
Step 1: Add your website
Before configuring your website, add its root domain to ESA.
In the ESA console, choose Websites and click Add Website.
On the Enter Website page, enter your website's root domain (for example,
example.com), and click Next.
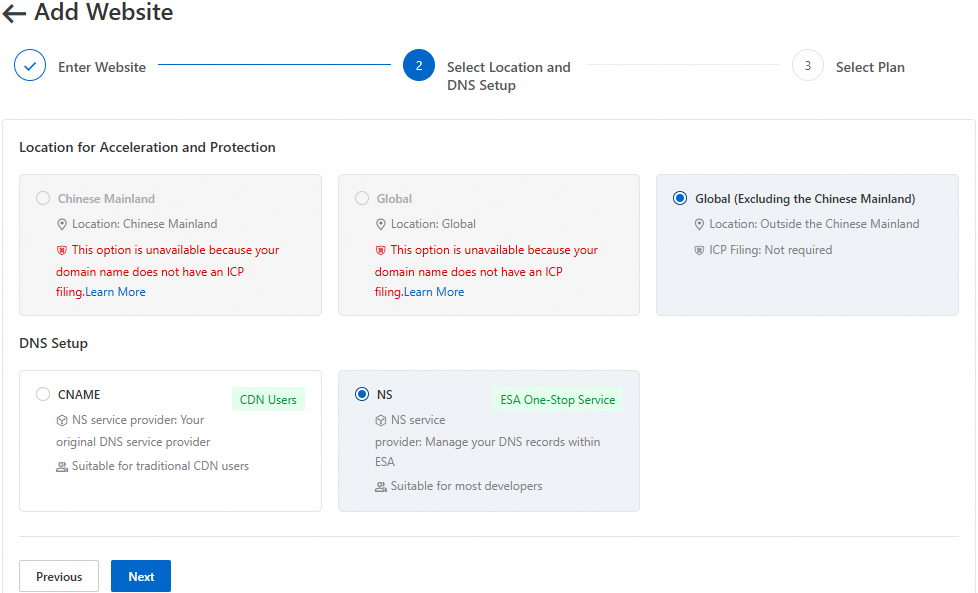
On the Select Location and DNS Setup page, select an acceleration region and a setup method, and then click Next.
Select an acceleration region
ESA assigns points of presence (POPs) based on your selected region to provide security and acceleration services to users in that area.
Acceleration region
Description
Chinese mainland
ESA assigns POPs in the Chinese mainland to provide security and acceleration for your website. If you choose this region, your domain name must have an ICP filing.
Global
ESA assigns POPs worldwide to provide global security and acceleration for your website. If you choose this region, your domain name must have an ICP filing.
Global (Excluding the Chinese mainland)
ESA assigns POPs outside the Chinese mainland to provide security and acceleration for your website. If you choose this region, your domain name does not need an ICP filing.
Select a setup method
ESA offers two setup methods:
NS setupandCNAME setup. The following table helps you choose the right one.Setup method
Description
Use cases
Advantages
NS setup
Fully delegates your domain's DNS resolution to ESA for integrated management.
New domains with no existing DNS records.
First-time users of CDN or acceleration services.
Need for all-in-one DNS hosting and traffic management.
Centralized management of DNS resolution through ESA.
Supports smart routing and global traffic scheduling.
Simplifies operations and improves security and acceleration.
CNAME setup
Your existing DNS provider handles DNS resolution, while ESA provides acceleration and centralized management.
Familiar with traditional CDN-like products.
Need to add only a some of your services to ESA while keeping your existing DNS setup.
Flexible setup without affecting your current DNS configuration.
Allows acceleration for specific subdomains.
On the Select Plan page, select a plan by purchasing a New Plans or assigning a Purchased Plans. Follow the console instructions to complete the purchase.
New plans
On the New Plans tab, select a suitable plan based on your needs.

Purchased plans
If you have an existing plan, you can select it from the Purchased Plans tab to assign it to your website.

Step 2: Enable protection
Configure ESA's security features to protect your website. These features include SSL certificate management for data-in-transit encryption, Anti-DDoS to defend against flood attacks, and a Web Application Firewall (WAF) to protect web applications. Together, these features create a secure and reliable web environment.
Encrypt data in transit
Encryption of data in transit is critical for securing network communications. It prevents sensitive data from being intercepted or tampered with during transmission. ESA provides a comprehensive security solution between clients and your origin server, ensuring data safety at every step.
ESA enables SSL/TLS encryption by default. You can apply for and configure an SSL certificate to prevent interruptions to your HTTPS services.
Additionally, you can enable mutual TLS authentication at the edge through ESA. This establishes a two-way authentication mechanism between clients and ESA POPs, ensuring that only authorized clients can access your server. This mutual authentication enhances in-transit data security and prevents unauthorized access and malicious attacks.
With these multi-layered security measures, your data is protected from various network threats during transmission, safeguarding your services.
Protect against anomalous access
Protecting against anomalous access is a vital part of website security, defending against malicious attacks and ensuring the stability and availability of your website. ESA provides multiple security measures to keep your services safe.

ESA's native WAF capabilities, combined with predefined and custom rules, intelligently filter client traffic. This ensures that only legitimate traffic reaches your server, which reduces potential security risks. You can also enable abuse prevention based on your needs to effectively prevent resource abuse and ensure service stability and security.
During operation, ESA uses its security analytics and Event Analysis modules to collect and analyze client request data in real time to identify anomalous behavior. In conjunction with WAF custom rules, you can flexibly configure various protective actions such as blocking, JavaScript Challenge, and redirects to precisely counter different types of attacks.
Furthermore, ESA enables basic Anti-DDoS protection by default. This effectively mitigates large-scale DDoS attacks and CC attacks, ensuring your website remains stable even under high-traffic attacks.
With these multi-layered protection measures, ESA not only identifies and blocks anomalous access but also provides robust security against complex attacks, comprehensively safeguarding your website.
Step 3: Improve website performance
ESA improves website speed and performance with features like custom image transformation, resource optimization, and IPv6 support, enhancing the user experience.
Configure caching
Configure website cache policies or create cache rules to store resource files on ESA's edge POPs. When a user requests a file, the edge POP serves the file directly, which avoids long-haul back-to-origin requests and speeds up content delivery.
Optimize resource access performance
By enabling and optimizing website settings, ESA significantly improves application performance. Specifically, ESA uses multiple advanced technologies to comprehensively optimize resources, including custom image transformation, resource minification, and transport protocol upgrades. These optimizations improve site access speed from multiple dimensions, allowing you to retrieve required resources faster and enhancing the overall user experience.
Custom image transformation: Automatically adjusts the size and format of images based on the user's device and screen size to reduce unnecessary data transmission.
Resource minification: Compresses and optimizes static resources, and removes redundant code and unnecessary data to reduce the size of resource files.
Transport protocol upgrades: Supports the latest transport protocols, such as HTTP/2 and HTTP/3, to improve data transmission efficiency and reduce latency.
Optimize network performance
To further improve network transmission speed, ESA provides four levels of network optimization configurations to enhance overall network performance, from protocol support to communication methods.
IPv6 protocol support: Fully compatible with the IPv6 protocol to improve the utilization of network address resources and optimize network connectivity efficiency.
Low-latency communication with WebSocket: Uses the WebSocket protocol for real-time communication to reduce data transmission latency and improve the response speed of real-time applications.
Efficient service interaction with gRPC: Provides low-latency, high-throughput service interaction based on the efficient communication mechanism of gRPC. This is suitable for scenarios with high performance requirements.
Intelligent traffic shaping to prevent overload: Uses intelligent traffic shaping and load balancing technologies to avoid network congestion and overload, which ensures stable network transmission speed even in high-concurrency scenarios.
Step 4: Verify and activate your website
Adding a website does not automatically enable its acceleration or protection. Activate it to use ESA's services.
Test your accelerated domain locally
If your domain hosts live services, test the accelerated domain locally before activation. This ensures a smooth DNS transition without interrupting your existing services.
NS setup
For a website connected using the NS setup, how can I verify that the service is normal before officially enabling the website?
If you want to perform an online service verification test before you officially switch the service to ESA, you can test different records:
DNS-only records: You can run the
digcommand for your record and specify the NS record assigned to you by ESA (@ESA-assigned-NS-record). This retrieves the DNS resolution from the specified ESA NS server. Then, check whether the resolved record value is the same as the one you configured in ESA. Example command:dig DNS-only-record @ESA-assigned-NS: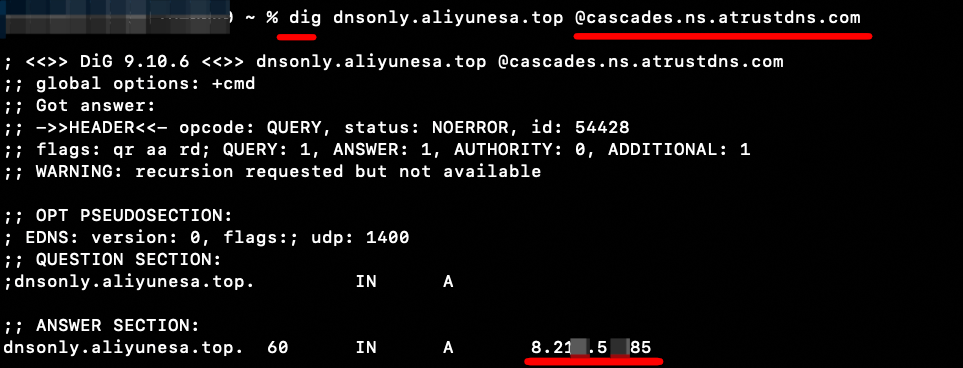
You can obtain the NS record assigned to you by ESA from the website overview in the console:

Proxied records: Pre-testing is not supported.
CNAME setup
Activate your website
For NS setup
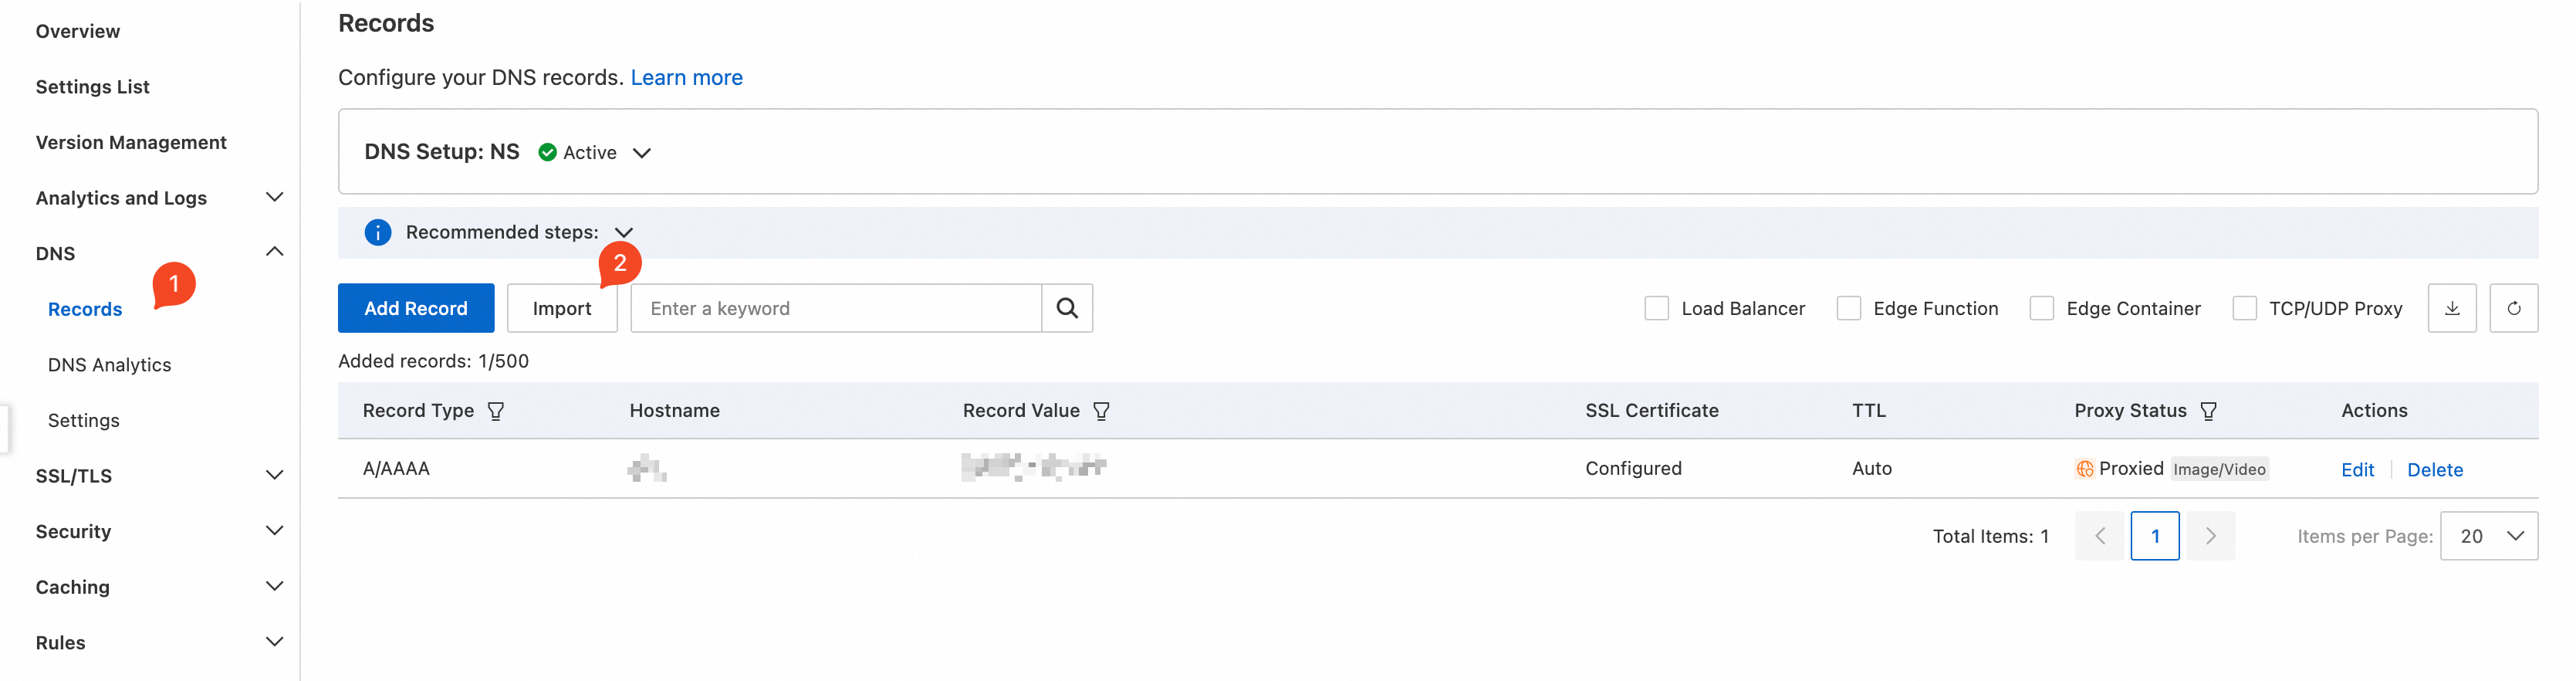
Step 1: Add DNS records
To prevent service interruptions, import your existing DNS records to ESA before changing your nameservers.
Batch import multiple DNS records (Recommended)
Go to Records and click Import.
On the Import from File page, upload your DNS records file.
If you want to migrate DNS records from Cloudflare, Alibaba Cloud DNS, or Tencent Cloud DNSPod to ESA, first export the DNS records file from your original DNS provider, and then follow these steps to upload it:
Select Cloudflare, Alibaba Cloud DNS, or Tencent Cloud DNSPod as needed, and then click Select File.
Select the DNS records file and upload it to ESA.
To use an ESA template to manually fill in and import DNS records, follow these steps:
Select Template Import and click Download Template.
In the template file, modify the DNS records according to the template format and save the file.
Click Select File, choose the saved template, and upload it.
On the Import page, review and adjust the record configurations. By default, ESA only provides DNS resolution for imported records. In the Proxy Status column, you can enable the ESA proxy for records that require acceleration.

After adjusting the DNS records, click OK. The records will appear on the Records page, indicating a successful import.

Manually add a single record
Go to and click Add Record.

In the dialog box that appears, add the DNS record details, and then click Next.
Select the appropriate type for your service, and then click OK.

When adding a DNS record, if the subdomain uses a non-standard port (not 80 or 443), choose the appropriate configuration method based on one of the following scenarios:
All subdomains use the same non-standard port: If all subdomains access the origin server through the same non-standard port, you can customize the back-to-origin port by configuring the back-to-origin protocol and port.
Subdomains use different non-standard ports: If different subdomains access the origin server through different non-standard ports, you can use back-to-origin protocol and port rules to customize different ports for different subdomains.
Step 2: Change your nameservers and activate your website
After adding your DNS records, you need to change your website's original nameservers to ESA's nameservers.
In the left-side navigation pane, click Overview. Click
 to copy the NS values provided by ESA.
Follow the instructions in the console to go to your DNS provider and change the nameservers. The console provides guides for changing nameservers with common cloud DNS providers.

Below are guides for changing DNS settings for other DNS providers. If your provider is not listed, please consult their documentation.
Configuration examples for other DNS providers:
GoDaddy
Log in to the GoDaddy console.
Select My Products > Manage All, and then select the target domain.
Under Additional Settings, click Manage DNS. Under Nameservers, click Change Nameservers.

Select Enter my own nameservers (advanced), enter the nameservers assigned to you by Edge Security Acceleration (ESA), and click Save.
After saving, wait for the nameserver changes to take effect.
Namecheap
Log in to the Namecheap console.
On the Domain page, change the nameservers.

Name.com
Log in to the Name.com console.
Go to the manage nameservers page.

Google Domains
Log in to the Google Domains console.
Click DNS Nameservers > Update Nameservers.

Click Confirm.
After changing the nameservers, click Verify Nameserver. It may take from a few minutes to 48 hours for the changes to propagate. If verification fails, wait a moment and try again, or wait for the system to detect the change automatically. You will receive an email and an in-site message when your website is activated.
For CNAME setup
Step 1: Verify domain ownership
When adding a domain to ESA for the first time, verify its ownership to activate the service. You only need to do this once per root domain.
In the left-side navigation pane, select Overview. Click
to copy the TXT record provided by ESA. 
Follow the instructions in the console to go to your DNS provider. Add a new TXT record with the information you copied. The console provides guides for adding records with common cloud DNS providers.

Below are guides for other DNS providers. If your provider is not listed, please consult their documentation.
Cloudflare
If your DNS provider is Cloudflare, follow these steps to add a TXT record.
Log in to the Cloudflare console.
Go to the DNS page, click Add Record, and add a TXT record.

Click Save to finish.
GCP
If your DNS provider is GCP, follow these steps to add a TXT record.
Log in to the GCP console.
Go to the DNS page, click Add Record, and add a TXT record.

Click Save to finish.
AWS
If your DNS provider is AWS, follow these steps to add a TXT record.
Log in to the AWS console.
Go to the DNS page, click Add Record, and add a TXT record.

Click Save to finish.
Dyn
If your DNS provider is Dyn, follow these steps to add a TXT record.
Log in to the Dyn console.
Go to the DNS page, click Add Record, and add a TXT record.

Click Create Record to finish.
Return to the ESA console and click Verify to complete the verification.
NoteIt may take from a few minutes to several hours for the record to take effect. If verification fails, please wait a moment and try again.
Step 2: Add an accelerated domain
After verifying domain ownership, you can enable ESA's proxy acceleration service for your subdomain in two steps.
Get the CNAME record value from ESA
You need to add a DNS record in ESA that includes the subdomain prefix and origin server address to obtain a CNAME record value.
In the left-side navigation pane, select DNS > Records.
On the Records page, add DNS records manually or by batch import to get the CNAME record value provided by ESA.
Manually add a single record
On the Records page, click Add Record.
On the Add Record page, fill in the corresponding information.
Click Next, select the appropriate type for your service, and the record will be added.
After the record is added, follow the console instructions and click
 to copy the CNAME record value provided by ESA, which points to the edge POP.
Batch import multiple DNS records
On the Records page, click Import.
On the Import page, upload your DNS records file.
If you want to migrate DNS records from Cloudflare, Alibaba Cloud DNS, or Tencent Cloud DNSPod to ESA, first export the DNS records file from your original DNS provider, and then follow these steps to upload it:
Select Cloudflare, Alibaba Cloud DNS, or Tencent Cloud DNSPod as needed, and then click Select File.
Select the DNS records file and upload it to ESA.
To use an ESA template to manually fill in and import DNS records, follow these steps:
Select Import From Template and click Download Template.
In the template file, modify the DNS records according to the template format and save the file.
Click Select File, choose the saved template, and upload it.
On the Import page, review and adjust the record configurations, and then click OK.

After a successful import, go to the DNS records list and click
 in the CNAME column to copy the CNAME record value.
NoteWhen adding a DNS record, if the subdomain uses a non-standard port (not 80 or 443), choose the appropriate configuration method based on one of the following scenarios:
All subdomains use the same non-standard port: If all subdomains access the origin server through the same non-standard port, you can customize the back-to-origin port by configuring the back-to-origin protocol and port.
Subdomains use different non-standard ports: If different subdomains access the origin server through different non-standard ports, you can use back-to-origin protocol and port rules to customize different ports for different subdomains.
Add the CNAME record in your DNS provider's console
Since your domain's DNS resolution is managed by a third-party DNS provider, add the corresponding CNAME record in your DNS provider's console after obtaining the CNAME value from ESA. When a user requests the accelerated domain, the request will be resolved by the DNS provider to the corresponding ESA edge POP, thus receiving the acceleration service.
Follow the same steps used for adding the domain ownership verification record. Go to your DNS provider's console and add a CNAME record with the information you copied.
Return to the ESA console, select , and confirm that the CNAME Status for the newly added record shows Configured.
 Note
NoteIt may take from a few minutes to several hours for the DNS record to take effect. If verification fails, please wait a moment and try again.
Step 5: Verify acceleration
After your website is added to ESA, client requests are automatically routed to the nearest ESA POP. Check the IP address to verify that acceleration is active.
Method 1: Use browser developer tools
Choose a DNS record with proxy acceleration enabled for this test. Records without proxy acceleration do not pass through ESA edge POPs and are not suitable for this method.
In a browser, access a resource on your website, for example,
https://api.example.com/test.txt. Open the developer tools in the browser and check the IP address to which the request is routed.
Use an IP lookup tool to check if the IP address belongs to ESA. If the IP address belongs to ESA, your website is being accelerated.

Method 2: Use the command line
Choose a DNS record with proxy acceleration enabled for this test.
DNS records without proxy acceleration do not pass through ESA edge POPs and are not suitable for this method.
Windows
Open the Command Prompt application.
Enter
nslookup -type=A your.domain.com(for example,nslookup -type=A test.example.com) to get the resolved IP address.
Use an IP lookup tool to check if the IP address belongs to ESA. If the IP address belongs to ESA, your website is being accelerated.

Linux, macOS
Open the Terminal application.
Enter
dig your.domain.com(for example,dig test.example.com) to get the resolved IP address.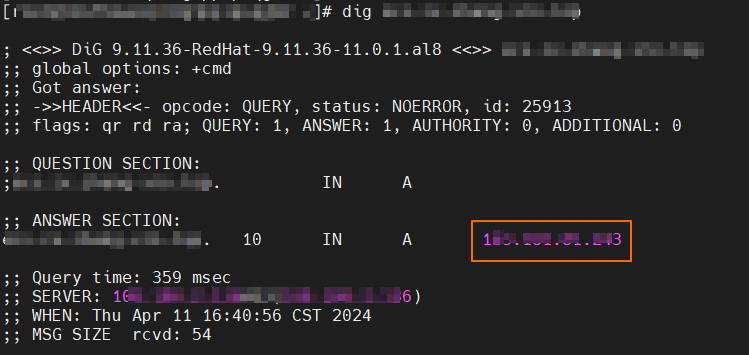
Use an IP lookup tool to check if the IP address belongs to ESA. If the IP address belongs to ESA, your website is being accelerated.
Method 3: Check instant logs
Instant logs are not supported on the Entrance plan. If you are on the Entrance plan, you can use Method 1 or 2 to verify, or upgrade your plan and use Method 3.
In the ESA console, go to Websites, and click the target website in the Website column.
In the left-side navigation pane, go to Analytics and Logs > Instant Logs, and click Start Monitoring to collect logs.
If logs appear, it means your website is being accelerated by ESA.

Learn more
ESA offers other features to help you manage your website, including caching, edge computing, rules, Analytics and Logs, and traffic management.
Edge computing
ESA provides an efficient, flexible, and low-latency edge computing solution through its Functions and Pages, Edge Container, and Edge Storage products.
Functions and Pages is an all-in-one full-stack development platform. By deeply integrating Git workflows, a global edge network, and an intelligent build system, it provides an end-to-end deployment solution from code commit to global distribution. The platform supports various application scenarios, including static websites, Single-Page Applications (SPAs), Server-Side Rendering (SSR) applications, and Edge Functions, meeting diverse deployment needs from personal projects to enterprise-level complex architectures.
Edge Container is a highly elastic and easy-to-maintain computing resource deployed on edge POPs, centered around container applications. Through global deployment and proximity-based scheduling, it simplifies protocol handling and significantly reduces response latency.
Edge Storage is a Key-Value edge storage service. When combined with Edge Functions, it allows for quick reading of data from edge storage on the same POP, enabling the deployment of lightweight BaaS services, API gateway services, and more.
Custom rules
Based on your business needs, you can use a consistent basic syntax and configuration logic to create and deploy conditional rules across different product features (such as caching, redirects, compression, back-to-origin, and WAF). This gives you flexible, precise control over how policies are executed, leading to more efficient management.
Analytics and Logs
As ESA processes your service requests, it generates real-time traffic data and detailed log records. Use this data to optimize resources, troubleshoot issues, create monitoring metrics, and analyze connection quality.
Traffic management
ESA's edge POPs monitor and intelligently regulate data flow in real time. By optimizing traffic distribution strategies and balancing the load across multiple origin servers, they significantly reduce link latency while enhancing the availability and stability of your services.