Use Data Integration to stream change data capture (CDC) events from an Oracle table to Tablestore in real time. This guide walks you through creating and running a single-table real-time synchronization task, end to end.
What this task type supports
Before you start, confirm that this task type meets your requirements:
| Capability | Supported | Notes |
|---|---|---|
| INSERT/UPDATE/DELETE synchronization | Yes | CDC-based |
| DDL synchronization (ALTER TABLE) | Yes | Configurable DDL handling rules |
| Data filtering | Yes | Filter rows before writing to Tablestore |
| Data masking | Yes | Mask sensitive fields in transit |
| JSON parsing | Yes | Parse JSON column values inline |
| Field value editing | Yes | Rename or derive fields during sync |
| Simulated test run | Yes | Validate the full pipeline before going live |
Prerequisites
Before you begin, make sure you have:
-
A serverless resource group or an exclusive resource group for Data Integration
-
Oracle and Tablestore data sources created in Data Integration. See Create a data source for Data Integration
-
Network connectivity established between the resource group and both data sources. See Network connectivity solutions
The Tablestore table must exist before you start. Create it in the Tablestore console if it doesn't already exist.
Create and configure the synchronization task
Step 1: Select a synchronization task type
-
Log on to the DataWorks console. In the top navigation bar, select your region.
-
In the left-side navigation pane, choose Data Integration > Data Integration. Select your workspace from the drop-down list and click Go to Data Integration.
-
In the left-side navigation pane, click Synchronization Task, then click Create Synchronization Task.
-
Configure the following basic settings:
Field Value Source And Destination Oracle→TablestoreNew Task Name Enter a name for the task Synchronization Type Single Table Realtime
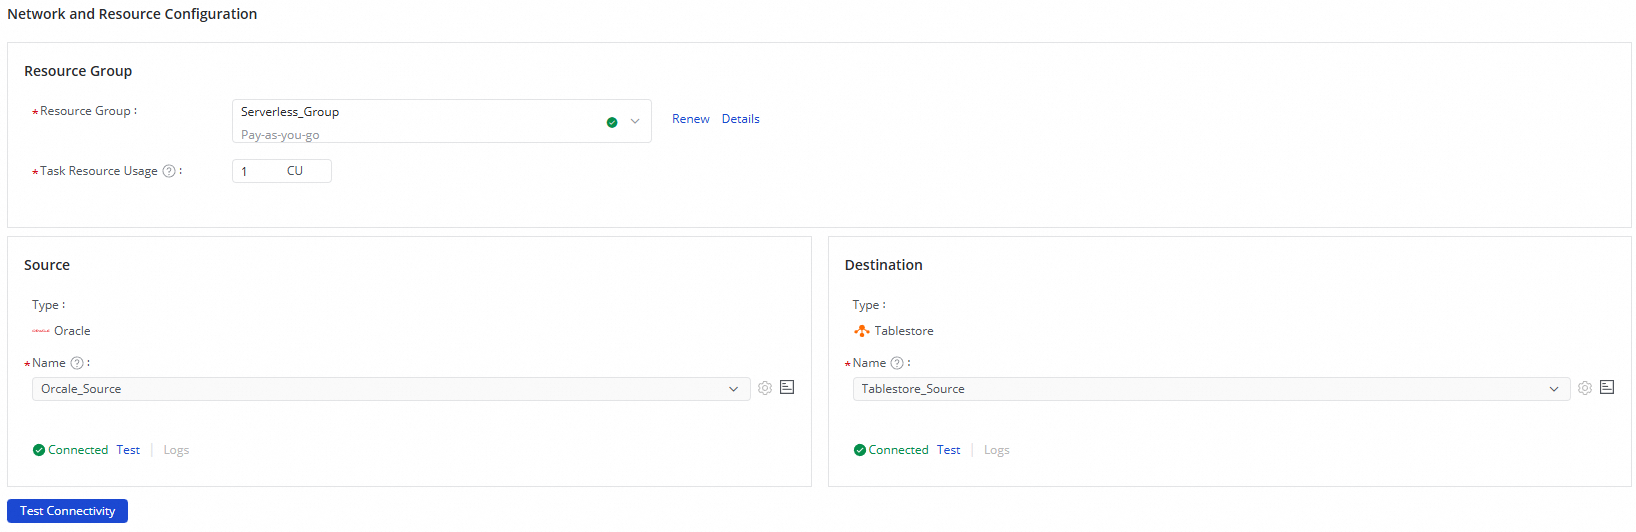
Step 2: Configure network and resources
-
In the Network And Resource Configuration section, select the resource group for the task. Optionally, allocate compute units (CUs) under Task Resource Usage.
-
For Source Data Source, select your Oracle data source. For Destination Data Source, select your Tablestore data source.
-
Click Test Connectivity to verify that both connections succeed.
-
Click Next.
Step 3: Configure the synchronization link
This step covers four parts: the Oracle source, optional data processing nodes, the Tablestore destination, and field mappings.
Configure the Oracle source
-
At the top of the page, click the
Oracledata source to open Oracle Source Information.
-
Select the schema and source table to synchronize.
-
Click Data Sampling in the upper-right corner. In the Preview Data Output dialog, set Sampled Data Records and click Start Collection to preview a sample of the data. This sample feeds into any downstream data processing nodes you configure.
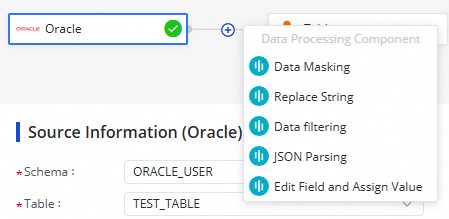
Configure data processing nodes (optional)
Click the ![]() icon to add processing steps between the source and destination. The following methods are supported:
icon to add processing steps between the source and destination. The following methods are supported:
Arrange the methods in the order you want them applied. At runtime, data is processed in the sequence you specify.
After configuring a node, click Preview Data Output in the upper-right corner, then click Re-obtain Output Of Ancestor Node to simulate the output at that point in the pipeline.
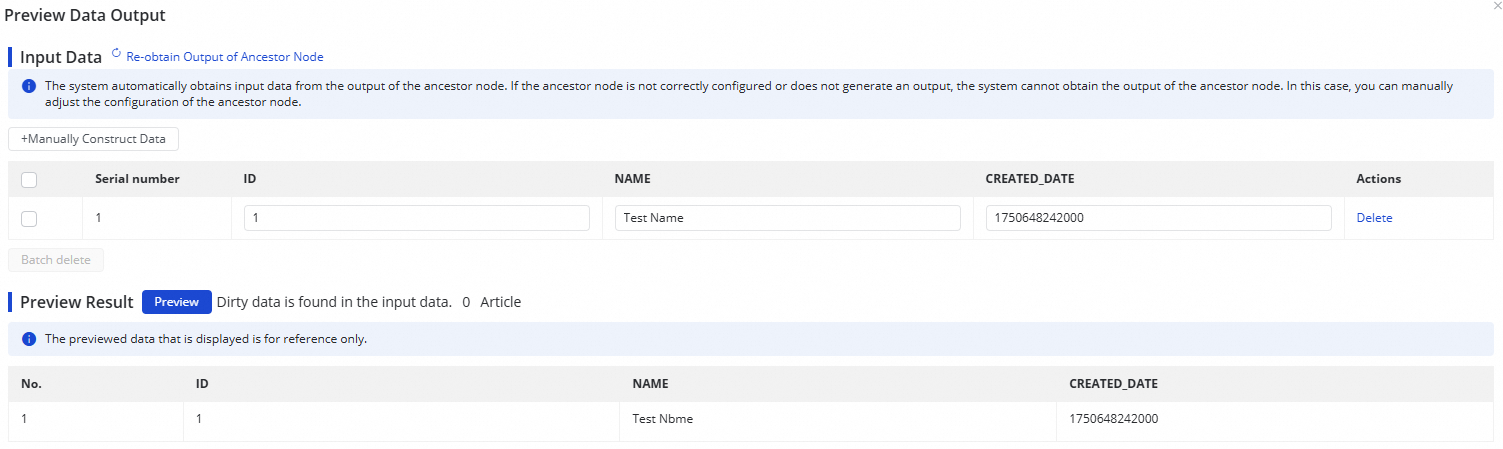
Data output preview requires Data Sampling to be completed first on the Oracle source.
Configure the Tablestore destination
-
At the top of the page, click the
Tablestoredata destination to open Tablestore Destination Information.
-
Select the Tablestore table to write data to.
-
Select a Data Update Mode:
Mode Behavior When to use replaceOverwrites the entire row with incoming data When you want full-row consistency with the source updateUpdates only the columns that have changed When you want to preserve Tablestore-side columns not present in Oracle -
Configure field mappings in the Field Mappings section on the right. Either click Batch Add All Source Fields As Attribute Fields to map all fields at once, or click Add Attribute Field in the Output Field section and use Same-name Mapping, Same-row Mapping, or Clear Mapping to set up mappings manually.
Step 4: Configure alert rules
Set up alerts to catch synchronization failures before they cause latency in downstream systems.
-
Click Configure Alert Rule in the upper-right corner to open the Alert Rule Configurations for Real-time Synchronization Subnode panel.
-
Click Add Alert Rule. In the dialog, configure the alert parameters.
-
Enable or disable individual alert rules as needed. Specify different recipients for different severity levels.
The alert rules configured here apply to the real-time synchronization subtask generated by this task. After the task is running, go to the Real-time Synchronization Task page to modify subtask-level alert rules. See Run and manage real-time synchronization tasks.
Step 5: Configure advanced parameters
-
Click Configure Advanced Parameters in the upper-right corner.
-
In the Configure Advanced Parameters panel, adjust the values as needed.
Understand what each parameter controls before changing it. Incorrect values can cause unexpected errors or data quality issues.
Step 6: Configure DDL capabilities
If DDL operations (such as ALTER TABLE) may occur on the Oracle source during synchronization, configure how the task handles those changes.
Click Configure DDL Capability in the upper-right corner and define your DDL handling rules. See Configure rules to process DDL messages.
Step 7: Configure resource groups
Click Configure Resource Group in the upper-right corner to view or change the resource groups assigned to this task.
Step 8: Run a test
Before going live, validate the full pipeline with sampled data.
-
Click Perform Simulated Running in the upper-right corner.
-
In the dialog, set Start At and Sampled Data Records.
-
Click Start Collection to pull sample data from the Oracle source.
-
Click Preview to push the sampled data through the pipeline to Tablestore.
If any configuration is invalid, the system reports the error immediately so you can catch and fix issues before starting the actual task.
Step 9: Start the synchronization task
-
Click Complete at the bottom of the page to save the configuration.
-
On the Data Integration > Synchronization Task page, find the task and click Start in the Operation column.
-
Click the task Name or ID in the Tasks section to view the detailed run log.
Monitor and manage the task
View task status
After the task starts, go to the Synchronization Task page to monitor all tasks in the workspace.

From the Actions column, Start or Stop the task. From the More menu, Edit or View the task configuration.
For running tasks, check Running Details for a status summary, or click a details area for full execution information.
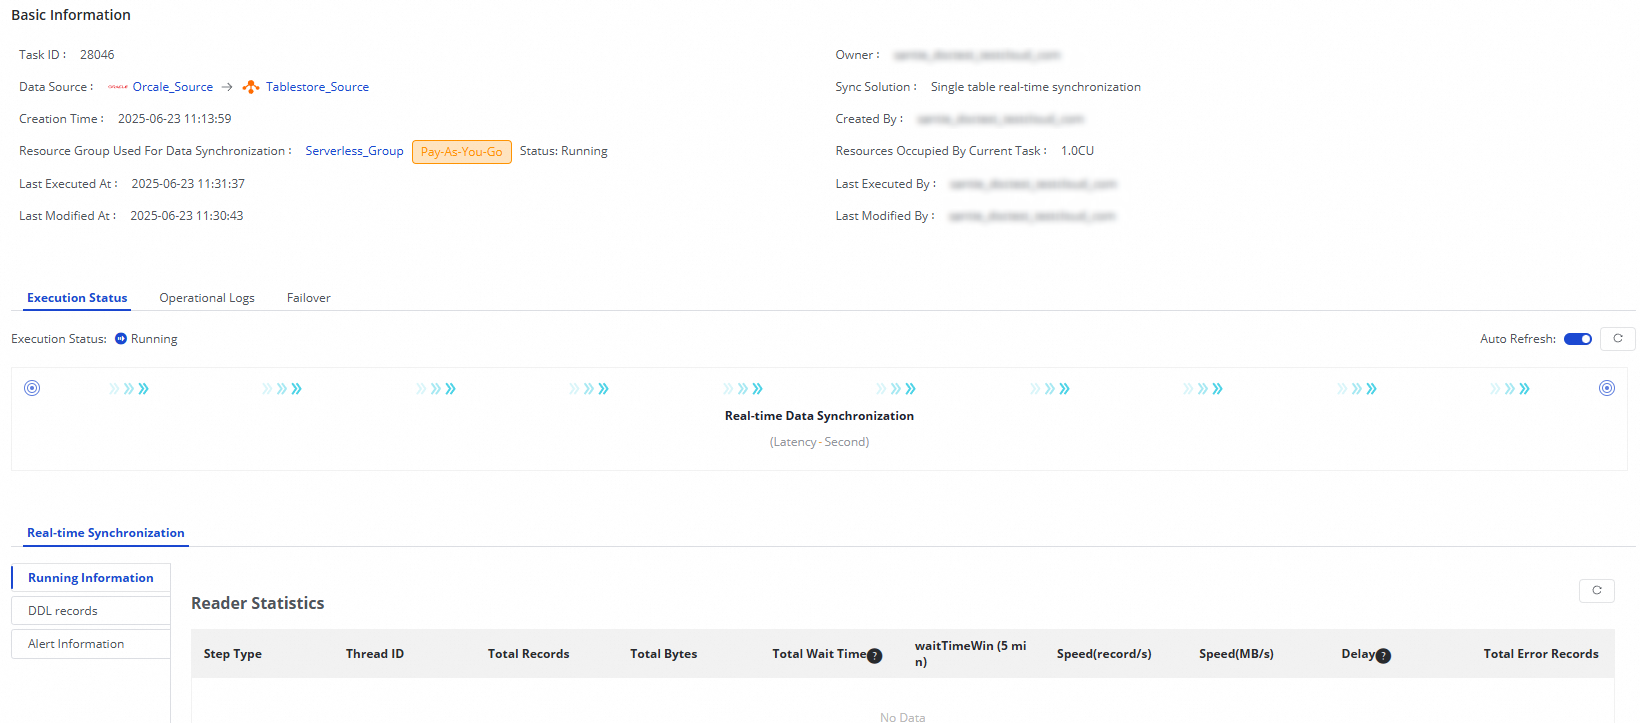
The Oracle-to-Tablestore synchronization task includes a Real-time Data Synchronization subtask. From the subtask view, you can see running information, DDL records, and alert information.
Rerun the task
Use Rerun when you need to propagate configuration changes — such as updates to the field list, destination table fields, or table name — to the destination. Data that was already synchronized and hasn't changed is not re-synchronized.
-
To rerun with the current configuration, click Rerun in the Operation column.
-
To apply updated configurations, modify the task, click Complete, then click Apply Updates in the Operation column.