In a DataWorks Data Integration single-table real-time synchronization task, you can use the JSON parsing component to parse JSON data from the source into corresponding table data.
Create and configure a JSON parsing component
Step 1: Configure a Data Integration task
-
Create a data source. For more information, see Data source management.
-
Create a Data Integration task. For more information, see Configure a single-table real-time synchronization task.
NoteFor single-table real-time Data Integration tasks, you can add a data processing component between the source and destination components. For more information, see Supported data sources and synchronization solutions.
Step 2: Add a JSON parsing component
In the single-table real-time synchronization task, turn on the Data Processing switch, click +Add Node, and then add the JSON Parsing component.
Enter a name and description for the node, and then configure the JSON parsing component.
ImportantTo get the JSON data structure, you must first complete Data Sampling in the source data component (such as Kafka).
Add fixed JSON parsing fields
Get formatted JSON data.
JSON source
Description
Illustration
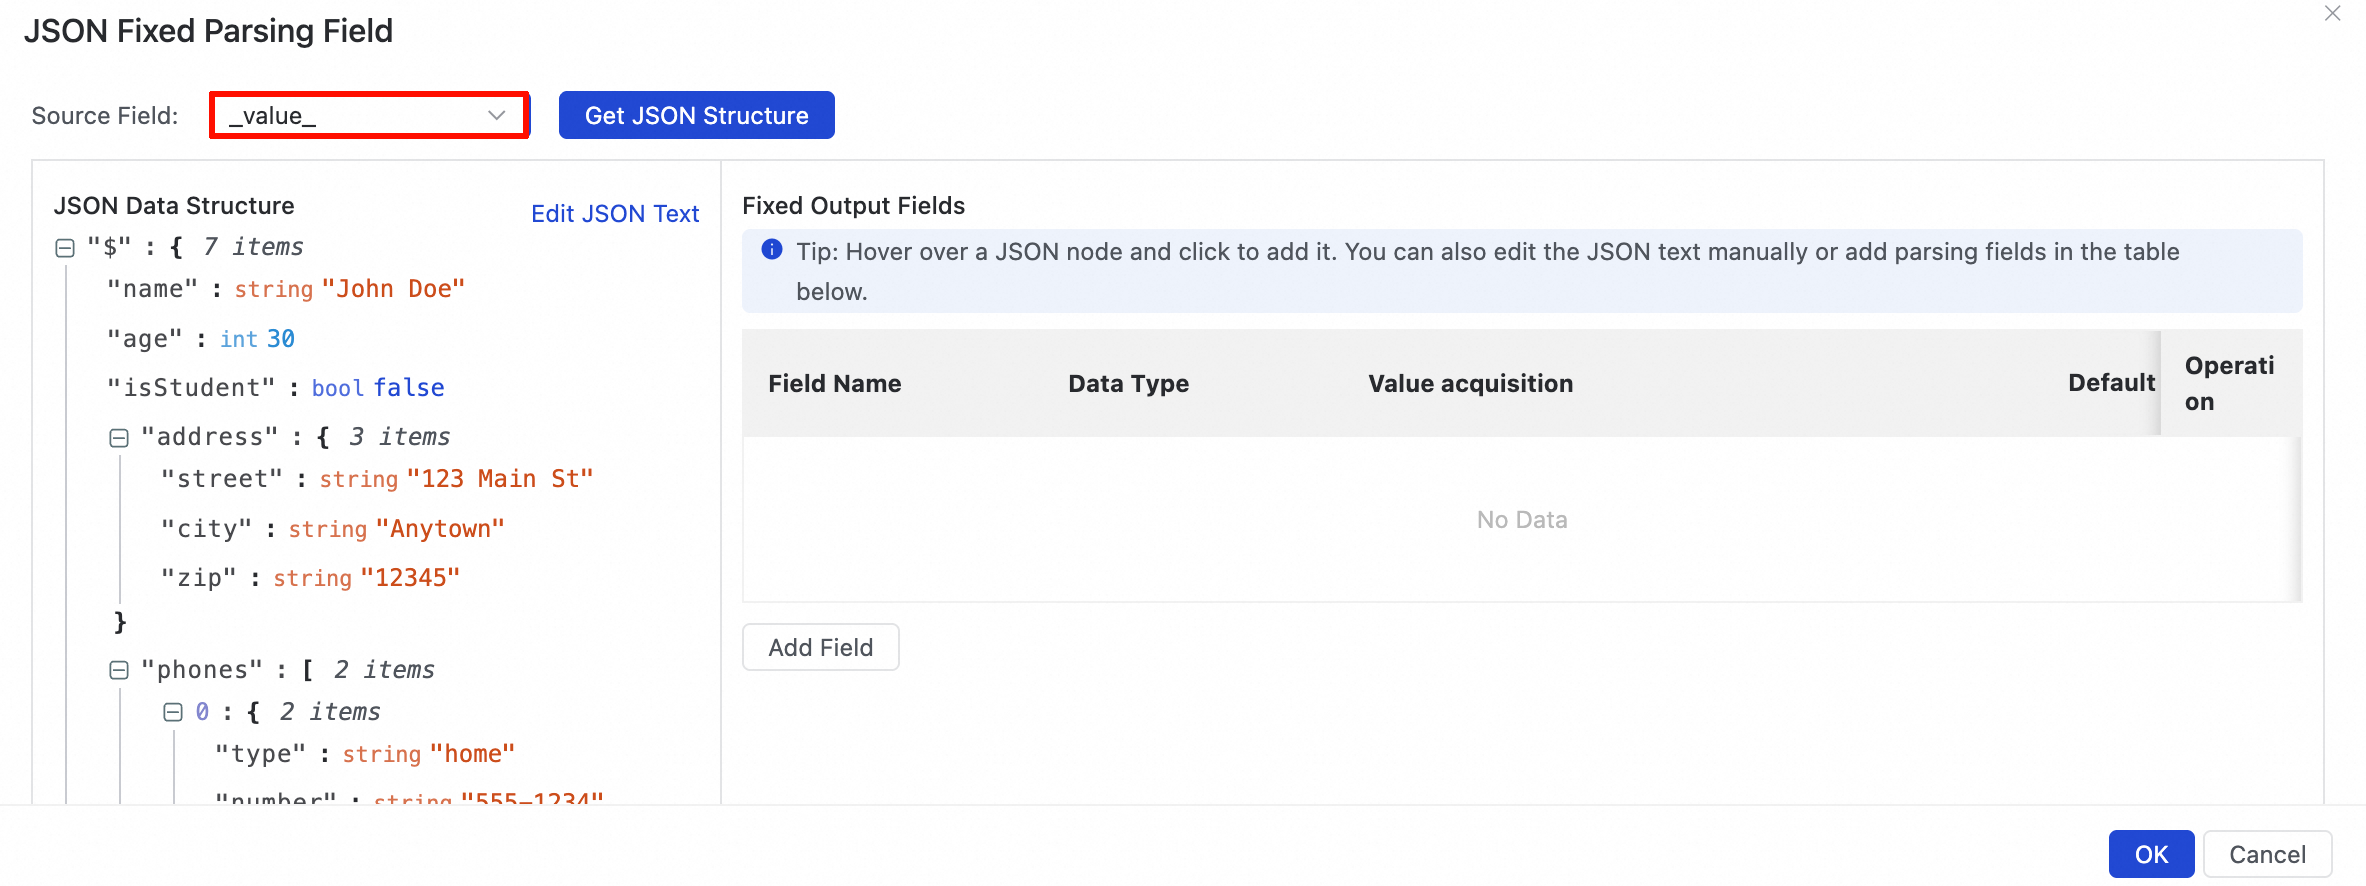
Get JSON data from data sampling
After performing data sampling, click Add Fixed Parsing Field. In the JSON Fixed Parsing Field dialog box, select a source field and click Get JSON Structure to retrieve the JSON structure.
Get manually entered JSON data
If you have not performed data sampling or the source data is empty, you can manually edit the fields:
Click the Edit JSON Text button to enter edit mode. In the Edit JSON Text window, manually enter the JSON content, and then click Back to Selection to select fields.

In the JSON Data Structure view, click the
 icon to select a leaf node. A corresponding parsing rule is automatically added to the Fixed Output Fields section.
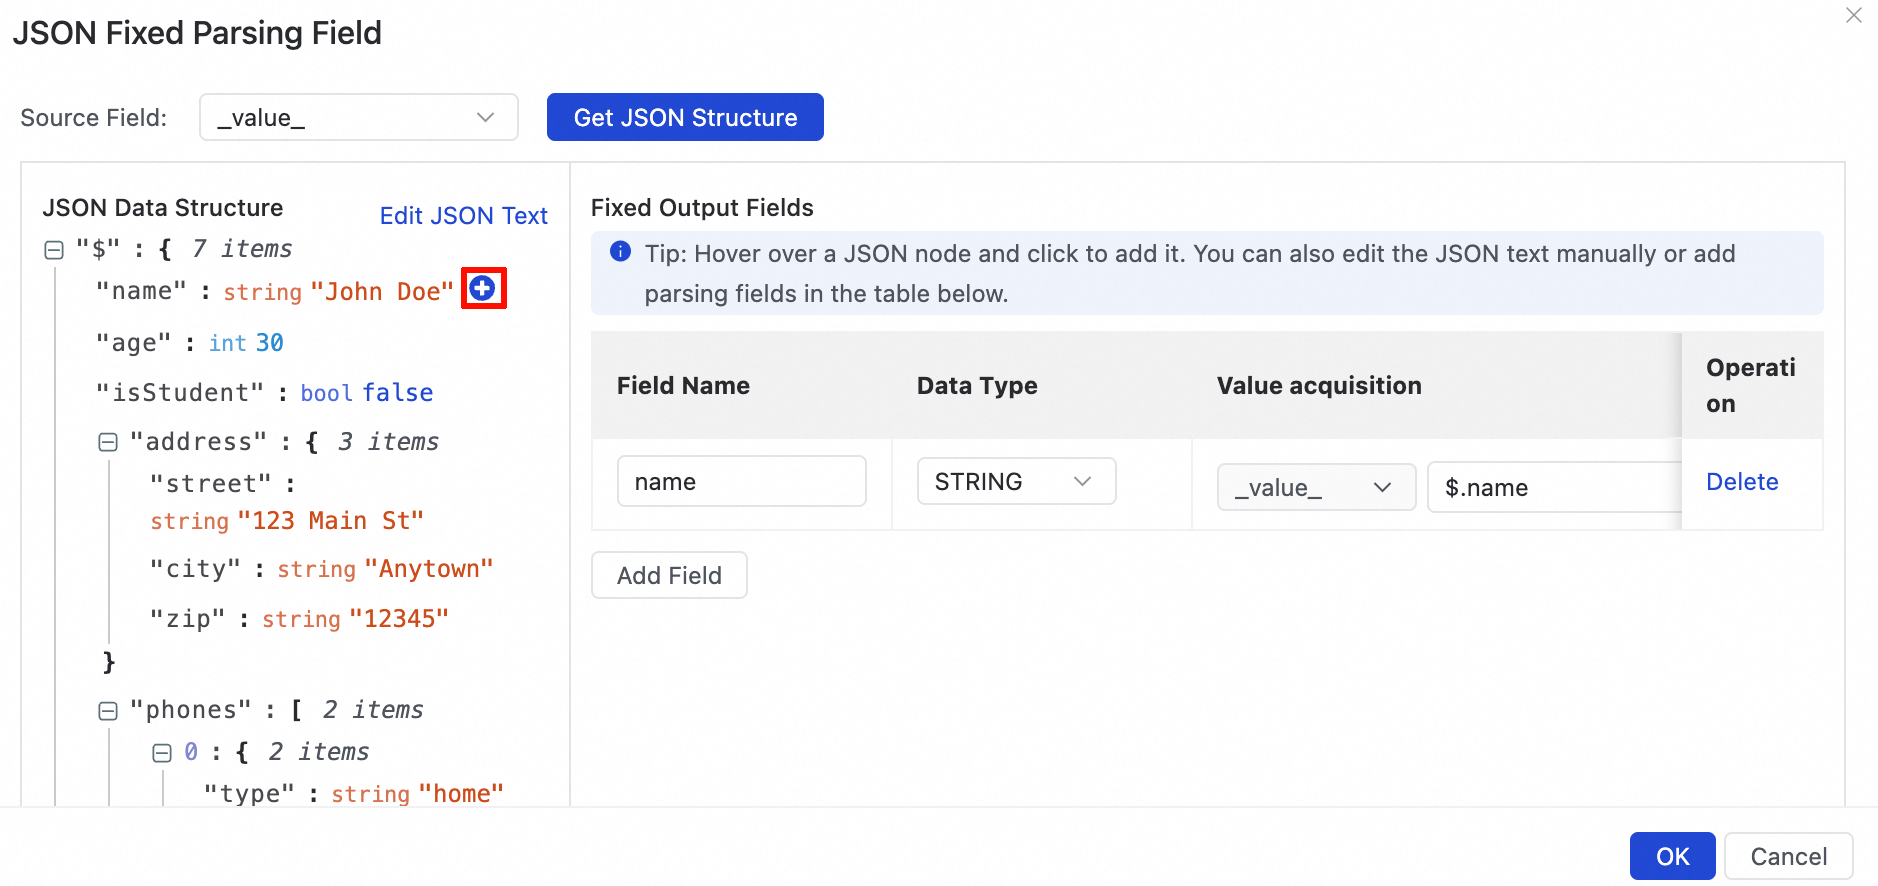
Example table generated by parsing a leaf node in JSON.


In the JSON Data Structure view, select the target field to parse. If you select a JSON object, for example by clicking the
icon next to the address field, a dialog box appears. You can then choose one of the following parsing methods:Add each key-value pair in the JSON object as a separate field. The key is used as the field name and is assigned its corresponding value.
Add the entire JSON object as a single field. The value is the JSON string of the object.
Option
Illustration
Parsing result
Select Add each key-value pair in the JSON object as a separate field, where the key is the field name and the value is its corresponding value.
This parses the object into three fields:
street,city, andzip, each assigned its corresponding value.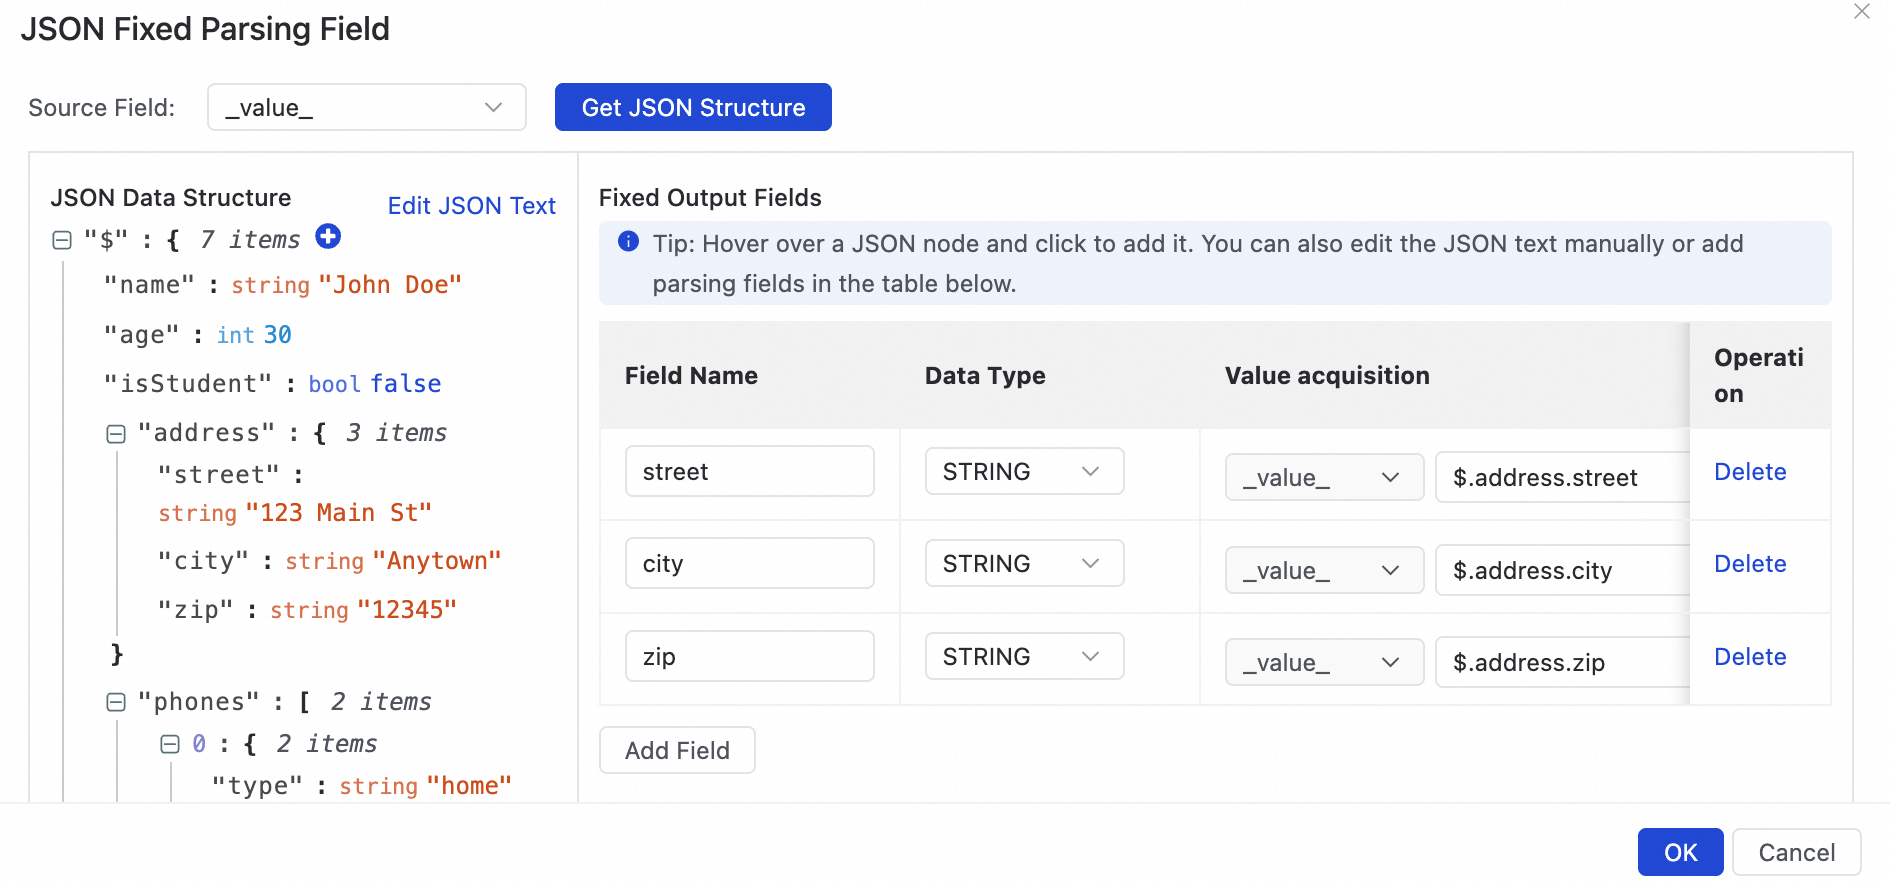

Select Add the entire JSON object as a single field with the value being the object's json string.
This parses the entire address object into a single data record. The value of this field is a JSON string containing the
street,city, andzipkeys.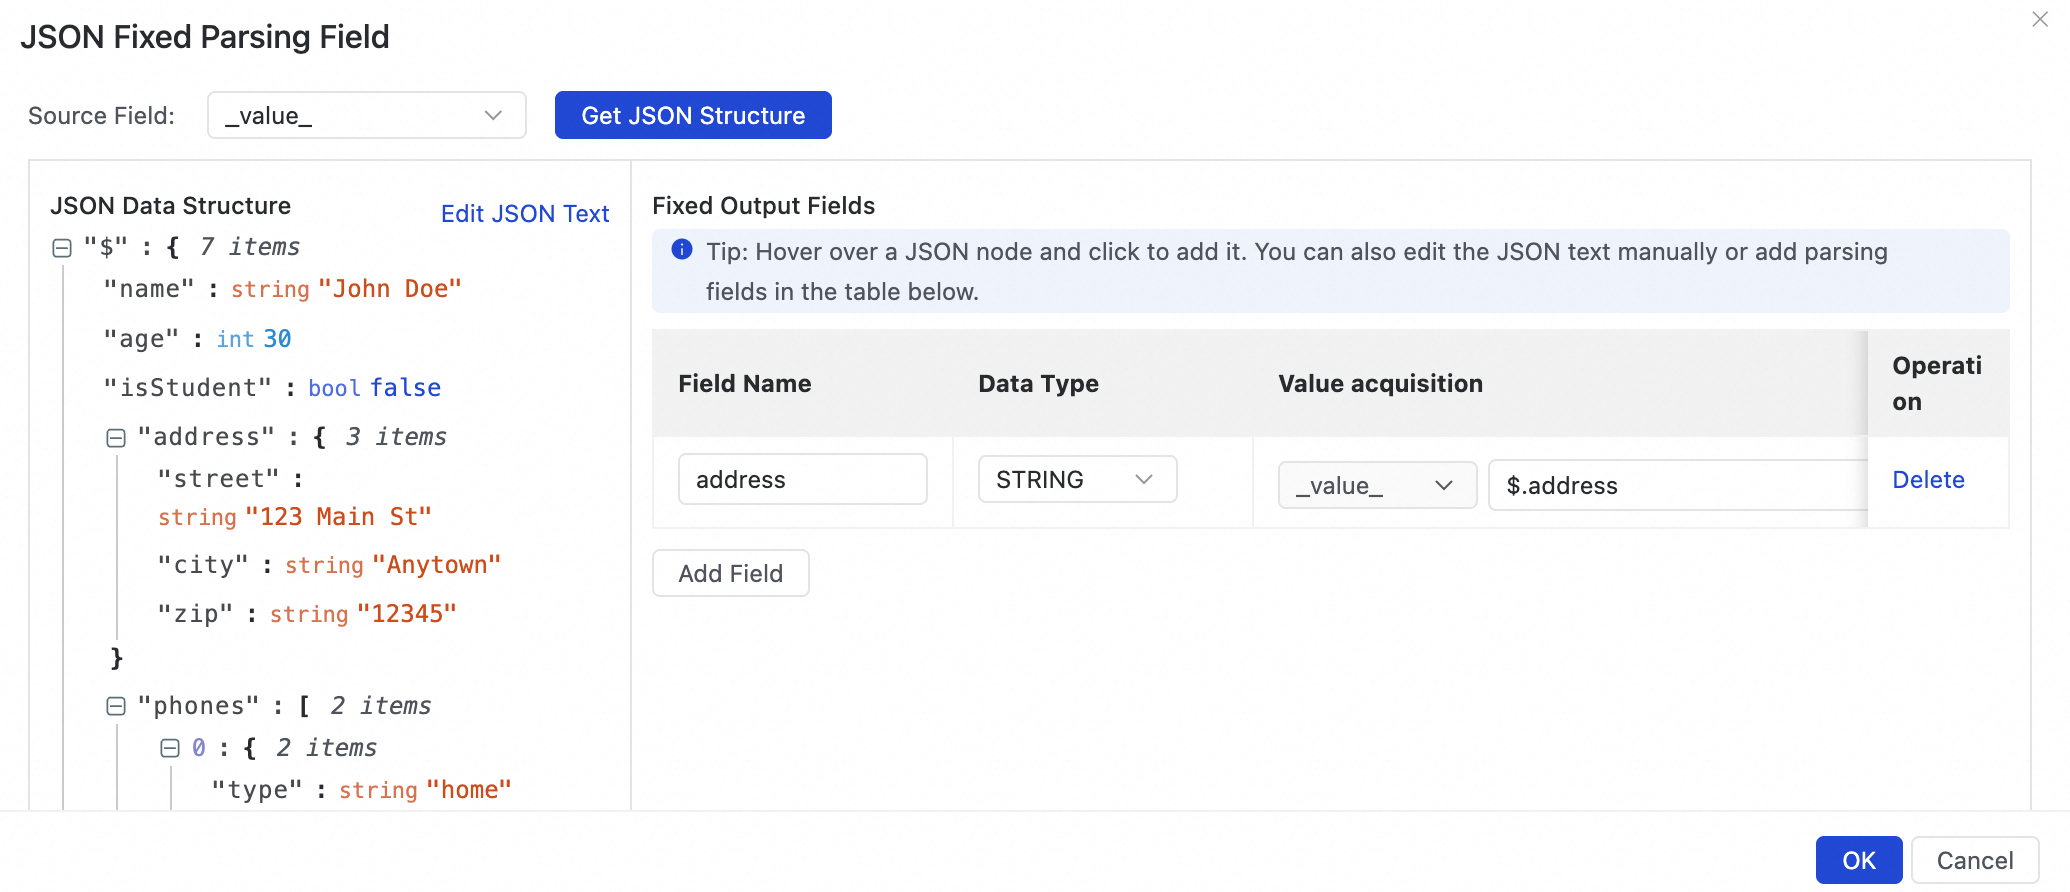

In the JSON Data Structure view, select the target field to parse. If you select a JSON array, a dialog box appears. You can choose one of the following parsing methods:
Add the array as a multi-row output.
Add the entire array as a single field. The value is the JSON string of the array.
Option
Illustration
Parsing result
For the JSON in the illustration, click the
icon next to the array field and select Add array as multi-row output in the dialog box.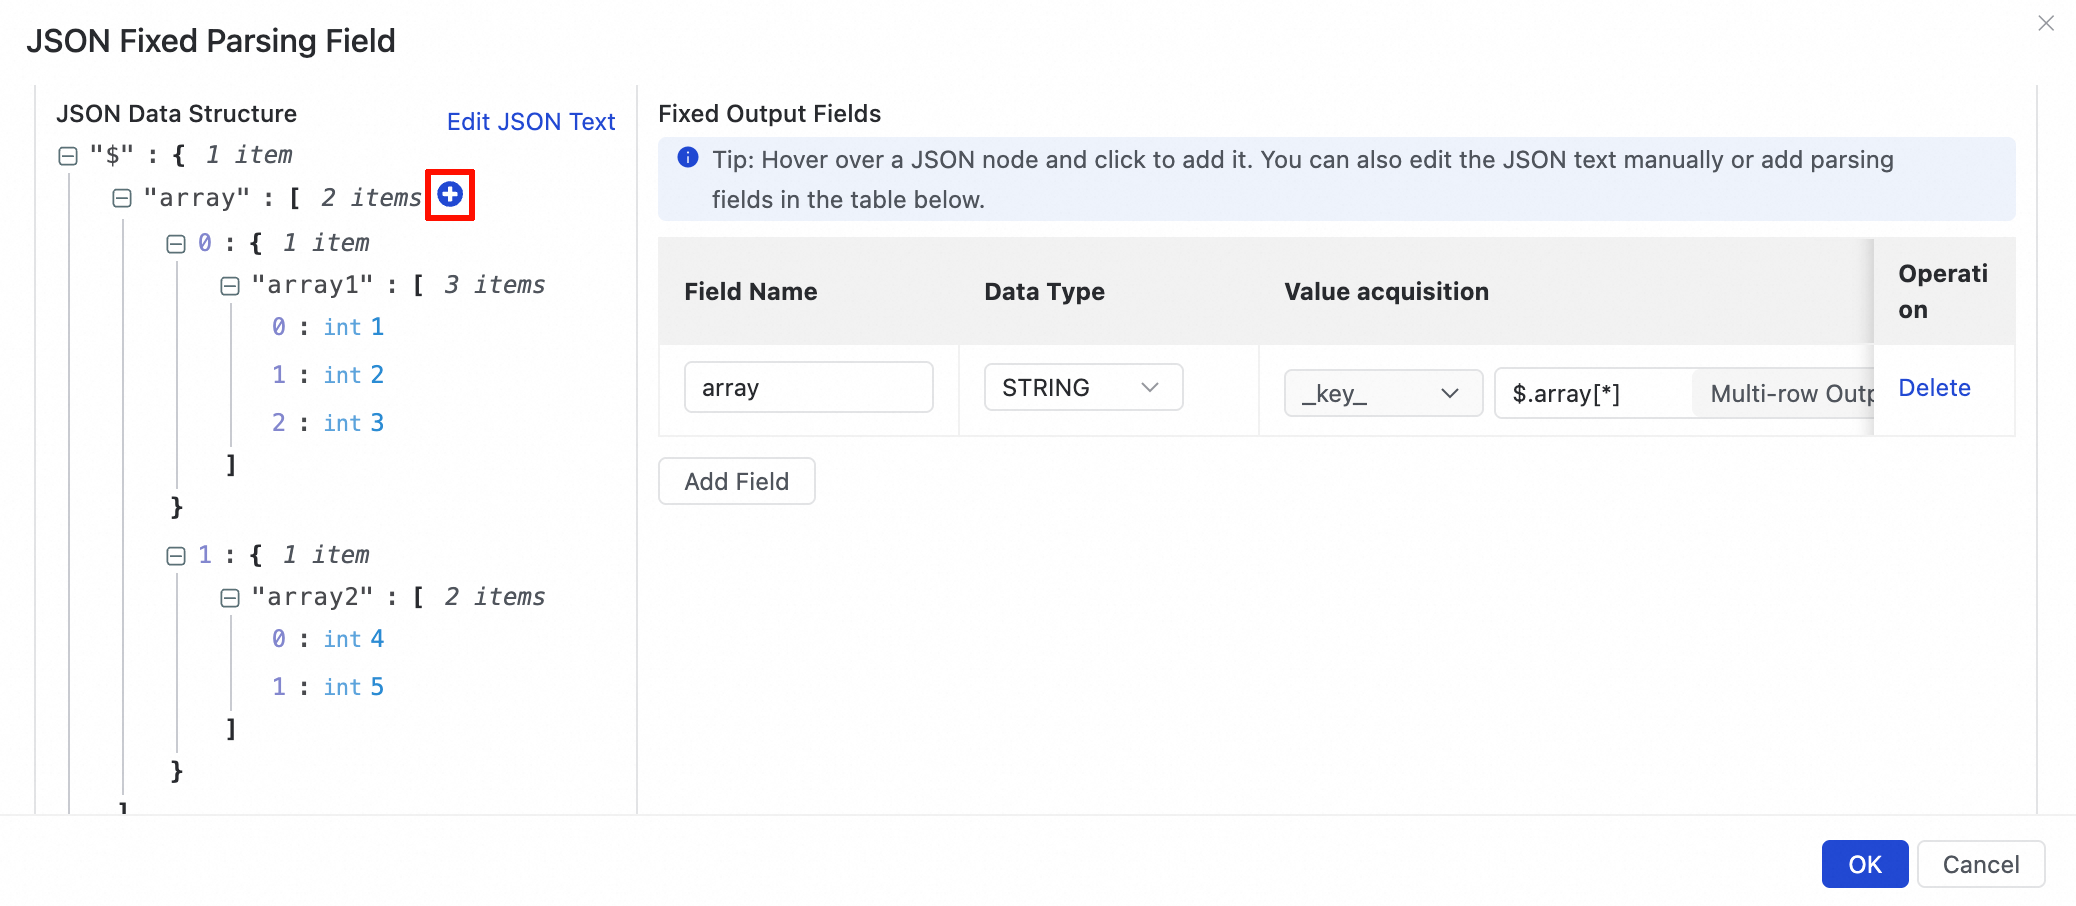

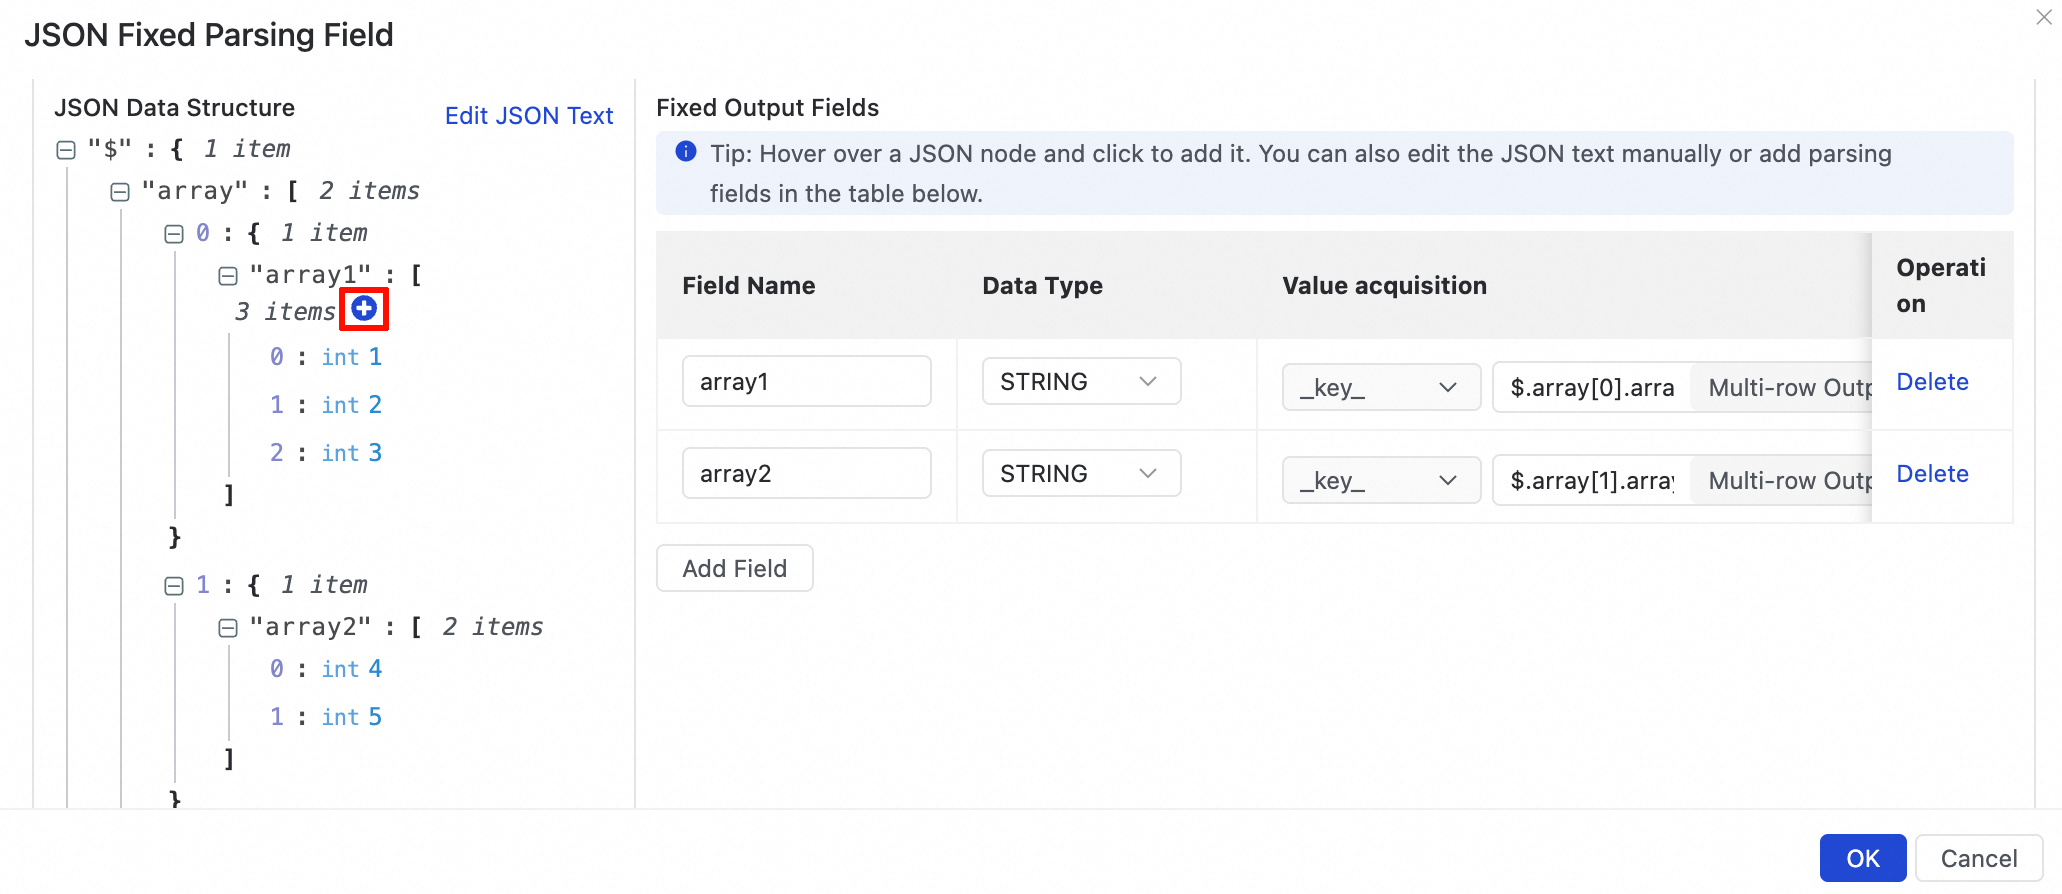
For the JSON in the illustration, click the
icon next to the array1 and array2 fields and select Add array as multi-row output in the dialog box.NoteIf an array contains objects, and a value within an object is also an array, this nested array is not parsed.

For the JSON in the illustration, click the
icon next to the array field and select Add the entire array as a single field, with the value being the array's json string.

Manually click Add Field. When you cannot retrieve upstream field values and have not uploaded JSON content via the Edit JSON Text button, you can manually define a fixed-field parsing rule by editing the value content. The parameters for manually adding a field are as follows:
Parameter
Description
Field
The name of the new field after parsing. Downstream nodes use this name to reference the field.
Value acquisition
Specifies the JSON parsing path. The syntax is as follows:
$: The root node..: A child node.[]:[number]indicates an array index, which starts from 0.[*]: Expands an array into a multi-row output. Each element is combined with the other fields in the record to form a new row that is sent to downstream nodes.
NoteA JSON field name in a JSON parsing path can contain only letters, digits, hyphens (-), and underscores (_).
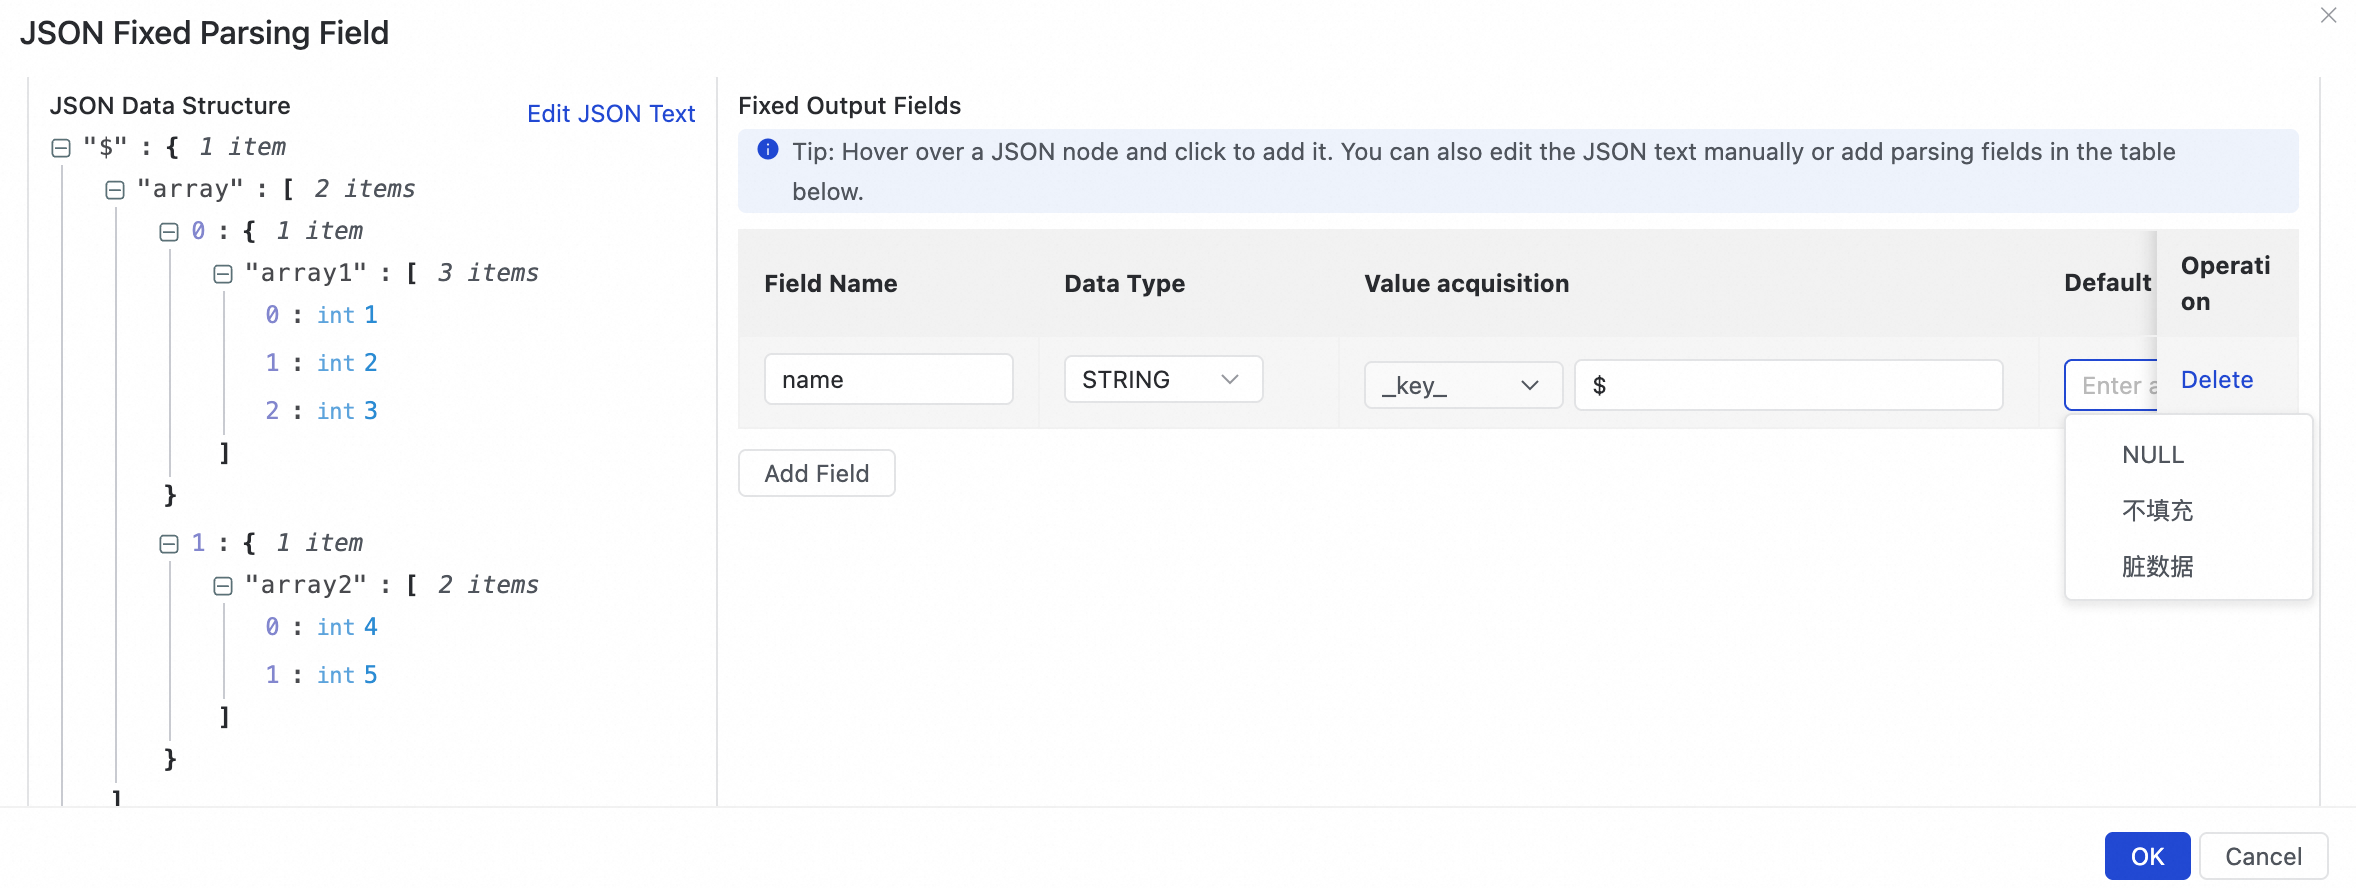
Default
The default value to use when the specified JSON path does not exist. This can occur, for example, if fields in an upstream table have changed.
NULL: The field is assigned the NULL value.
Do Not Fill: The field is not populated. If the corresponding field in the destination table has a default value, that value is used.
Dirty Data: Marks the record as dirty data. The system then handles it based on the task's dirty data tolerance settings, which may include stopping the task.
Manually enter a constant: Uses the constant that you specify as the field's value.
Add dynamic JSON parsing fields
In the formatted JSON content, select the target JSON object field for dynamic parsing. The system automatically adds the parsing configuration for each field within the JSON object to the fixed output fields.
When you configure dynamic JSON object parsing, during the actual run of the synchronization task, every field of each JSON object at the specified path is added to the record as STRING type using its original JSON field name and value, and then output to downstream nodes. This way, when the structure of the specified JSON object changes or new fields are added during synchronization, the system can automatically detect and output them to downstream nodes.
Get formatted JSON data
JSON source
Description
Illustration
Get JSON data from data sampling
After data sampling, click Add Dynamic Parsing Field. In the Add Dynamic Output Field for JSON Parsing dialog box, select a source field and click Get JSON Structure to retrieve the JSON structure.
Get manually entered JSON data
If you have not performed data sampling or the source data is empty, you can manually edit the fields:
Click the Edit JSON Text button to enter edit mode. In the Edit JSON Text window, manually enter the JSON content, and then click Back to Selection to select fields.
Dynamically parse JSON objects
Configuration:

Assume a new field c3 is added to the dynamic object. The following table compares the parsing results.
_value_(STRING)
c1(STRING)
c2(STRING)
c3(STRING)
{ "dynamic": { "c1": 2, "c2": ["a1","b1"] } }2["a1","b1"]Do Not Fill
{ "dynamic": { "c1": 2, "c2": ["a1","b1"], "c3": {"name": "jack"} } }2["a1","b1"]{"name": "jack"}
Manually add a field
Manually adding a field means: when you cannot retrieve upstream child field values and have not uploaded JSON content via the Edit JSON Text button, you manually define a fixed-field parsing rule and customize the dynamic-field parsing rule by editing the value content:
Parameter
Description
Specify JSON Object
Specifies the JSON object parsing path. The parsing syntax is as follows:
$: The root node..: A child node.[]: [number] indicates an array index, which starts from 0.
Note: A JSON field name in a JSON parsing path can contain only letters, digits, hyphens (-), and underscores (_).
Default
Specifies the default behavior when the specified JSON parsing path cannot be parsed or the corresponding field does not exist.
Ignore: Dynamic resolution is not performed.Dirty data: This data is counted in the dirty data statistics of a synchronization task, and the dirty data tolerance configuration determines whether the task exits abnormally.
Policy when the field name conflicts with an existing field.
When dynamic JSON fields are expanded by key-value pairs, only the first level is expanded. If a subsequently expanded field has the same name as an existing field, you must select a policy. The available policies are as follows:
Overwrite: Replaces the value of the existing field with the value of the new field.
Discard: Keeps the value of the existing field and discards the value of the new field.
Error: The task reports an error and stops.
Next steps
After you finish configuring Data Source and JSON Parsing, click Output Preview to view the output data of the current node and verify that it meets your requirements.