Real-time log ingestion from multiple sources — such as Kafka and LogHub — into cloud object storage is a common requirement for data lake architectures. Data Integration enables you to synchronize data from a Single Log Service (SLS) Logstore to an OSS-HDFS data lake in real time, with support for Hudi, Paimon, and Iceberg write formats and optional inline data transformations.
Prerequisites
Before you begin, ensure that you have:
A serverless resource group or an exclusive resource group for Data Integration purchased
A Simple Log Service data source and an OSS-HDFS data source created — see Create a data source for Data Integration
Network connections between the resource group and the data sources established — see Network connectivity solutions
Create and configure a real-time sync task
The following steps walk you through creating a synchronization task that reads from an SLS Logstore and writes to an OSS-HDFS destination. The configuration flow has nine steps: select the task type, configure network and resources, configure the synchronization link (source, data processing, and destination), set alert rules, set advanced parameters, configure DDL handling, assign resource groups, run a simulated test, and start the task.
Step 1: Select a synchronization task type
Log on to the DataWorks console. In the top navigation bar, select the region. In the left-side navigation pane, choose Data Integration > Data Integration. Select the workspace from the drop-down list and click Go to Data Integration.
In the left-side navigation pane, click Synchronization Task, then click Create Synchronization Task. Configure the following settings:
Setting Value Source And Destination LogHub→OSS-HDFSNew Node Name A name you specify for the task Synchronization Method Single Logstore Realtime Sync
Step 2: Configure network settings and resources
In the Network And Resource Configuration section, select a Resource Group for the synchronization task. Allocate compute units (CUs) under Task Resource Usage as needed.
For Source, select the
LogHubdata source. For Destination, select theOSS-HDFSdata source. Click Test Connectivity.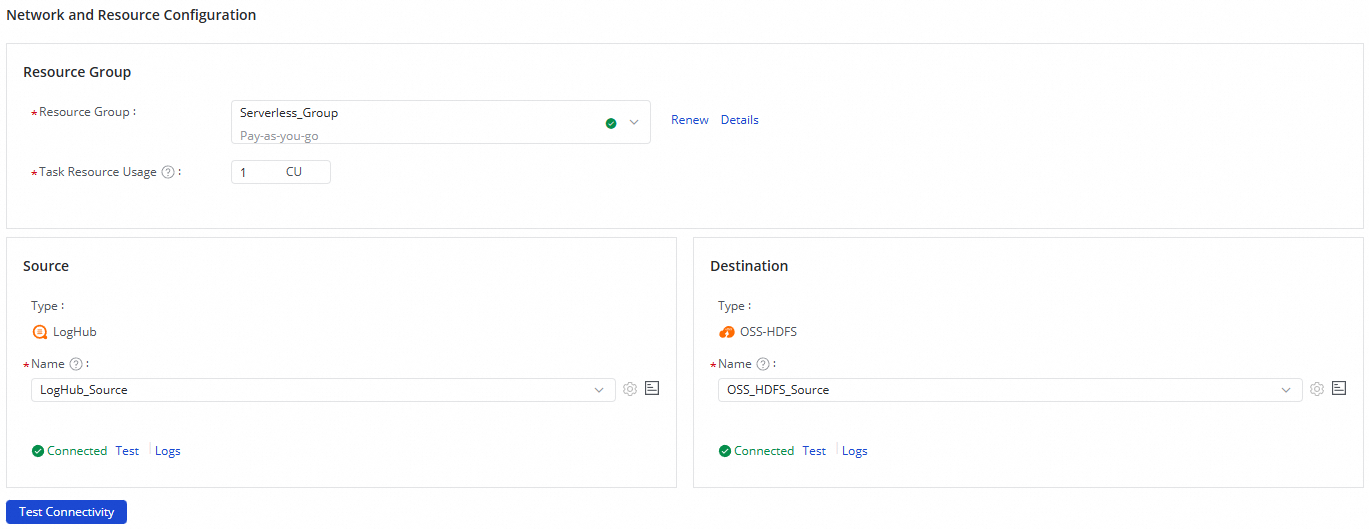
After connectivity is confirmed, click Next.
Step 3: Configure the synchronization link
Configure the SLS source
In the wizard at the top of the page, click SLS to open SLS Source Information.

In the SLS Source Information section, select the Logstore to synchronize data from.
Click Data Sampling in the upper-right corner. Specify the Start Time and Sampled Data Records parameters, then click Start Collection. The system collects sample data from the Logstore for use in data preview and visual configuration of downstream processing nodes.
The system automatically loads data from the Logstore and generates field names in the Output Field Configuration section. Adjust Data Type, delete fields, or click Manually Add Output Fields as needed.
NoteIf an output field does not exist in the SLS data source, NULL is written to the destination.
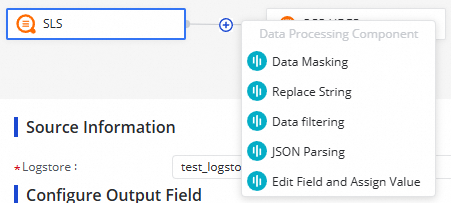
Edit data processing nodes
Data processing nodes let you transform data between the source and destination. The following methods are supported:
| Method | Description |
|---|---|
| Data Masking | Mask sensitive field values before writing to the destination |
| Replace String | Find and replace string values in a field |
| Data filtering | Filter records based on field conditions |
| JSON Parsing | Parse JSON-formatted fields into structured columns |
| Edit Field and Assign Value | Add or modify field values |
Click the ![]() icon to add a processing method. Arrange methods in the order you want them applied — data is processed in the order you specify when the task runs.
icon to add a processing method. Arrange methods in the order you want them applied — data is processed in the order you specify when the task runs.
After configuring a processing node, click Preview Data Output in the upper-right corner, then click Retrieve Upstream Output Again to simulate the result after sample data passes through the current node.
Preview Data Output requires completed data sampling from the SLS source. Complete Data Sampling in the SLS source form before using this feature.
Configure OSS-HDFS destination information
In the wizard at the top of the page, click OSS-HDFS to open OSS-HDFS Destination Information.

Configure the destination settings:
NoteCross-region metadatabase and metatable creation is not supported.
Setting Description Write Format Select Hudi, Paimon, or Iceberg Select Metadatabase Auto-build Location If Data Lake Formation (DLF) is activated for your account, the system can automatically create metadatabases and metatables in DLF when synchronizing data Storage Path Selection Select the OSS path where synchronized data will be stored Destination Database Select an existing database, or select Create Database and specify a Database Name to create a new DLF metadatabase Destination Table Select Auto Create Table or Use Existing Table, then enter or select a Table Name (Optional) If you selected Auto Create Table, click Edit Table Schema to modify the destination table schema. Click Re-generate Table Schema Based on Output Column of Ancestor Node to regenerate the schema from upstream output columns. Select a column to configure it as the primary key.
Review the field mappings between source and destination. The system maps fields automatically using the Map Fields with Same Name principle. Modify mappings as needed:
One source field can map to multiple destination fields.
Multiple source fields cannot map to the same destination field.
Source fields with no mapped destination field are not synchronized.
Step 4: Configure alert rules
In the upper-right corner of the page, click Configure Alert Rule to open the Alert Rule Configurations for Real-time Synchronization Subnode panel.
Click Add Alert Rule. In the dialog box, configure the alert parameters.
NoteThese alert rules apply to the real-time synchronization subtask generated by this task. After completing the task configuration, you can modify alert rules on the Real-time Synchronization Task page. For more information, see Run and manage real-time synchronization tasks.
Enable or disable rules as needed. Set different alert recipients based on alert severity.
Step 5: Configure advanced parameters
In the upper-right corner of the configuration page, click Configure Advanced Parameters.
In the Configure Advanced Parameters panel, modify parameter values as needed.
NoteUnderstand each parameter's meaning before changing its value to avoid unexpected errors or data quality issues.
Step 6: Configure DDL capabilities
DDL operations may be performed on the source. Click Configure DDL Capability in the upper-right corner to configure rules for processing DDL messages from the source.
For more information, see Configure rules to process DDL messages.
Step 7: Configure resource groups
Click Configure Resource Group in the upper-right corner to view and change the resource groups used to run the synchronization task.
Step 8: Run a simulated test
Run a simulated test to verify the task configuration before going live. The system synchronizes sampled data to the destination table and reports errors or dirty data in real time if configuration issues are detected.
Click Perform Simulated Running in the upper-right corner of the configuration page.
In the dialog box, configure the sampling parameters:
Parameter Description Start At Start time for data sampling from the SLS Logstore Sampled Data Records Number of records to sample Click Start Collection to sample data from the source.
Click Preview to synchronize the sampled data to the destination table and review the result.
Step 9: Start the synchronization task
Click Complete at the bottom of the page to save the task configuration.
On the Data Integration > Synchronization Task page, find the task and click Start in the Operation column.
Click the task Name or ID in the Tasks section to view the detailed execution process.
Manage the synchronization task
View running status
After the task starts, go to the Synchronization Task page to view all tasks in the workspace and their basic information.

In the Actions column, click Start or Stop to control the task. Select More to Edit, View, or perform other operations.
In the Execution Overview column, view the running status of a started task. Click the overview area for execution details.
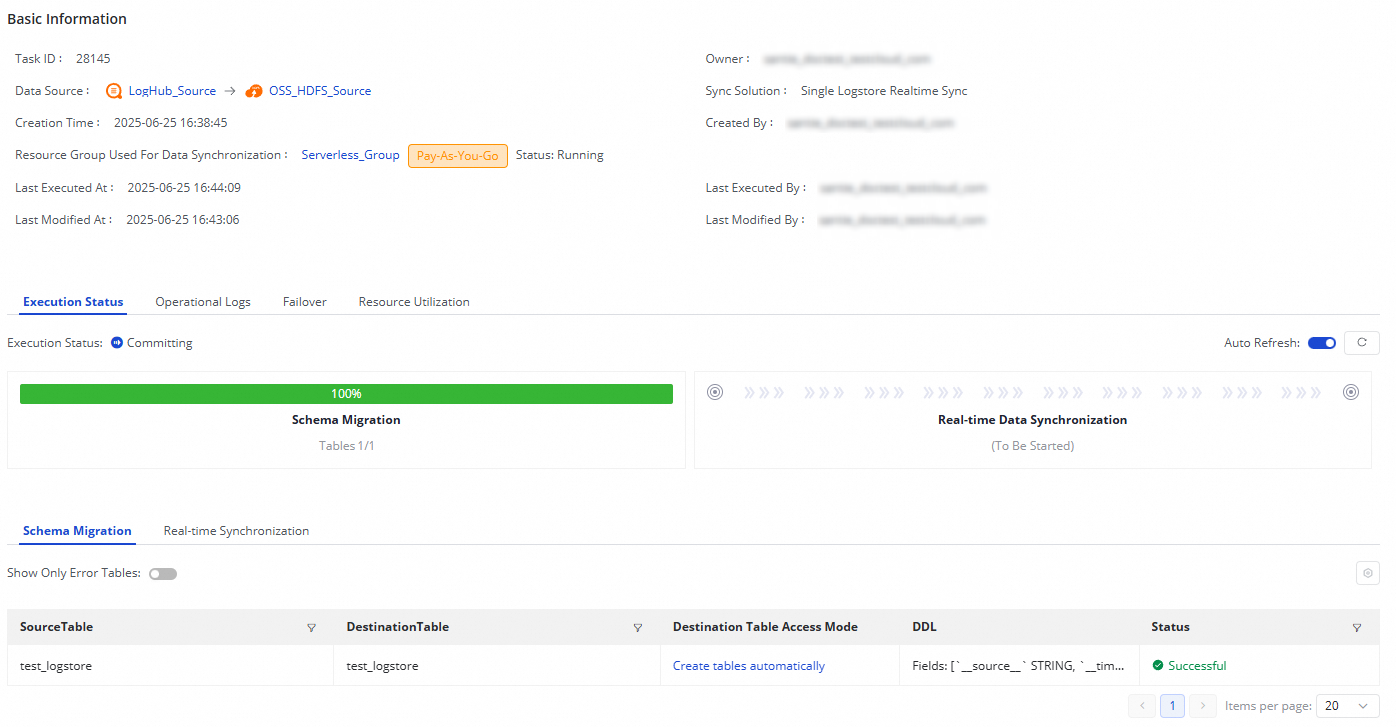
The SLS-to-OSS-HDFS synchronization task has two stages:
| Stage | Description |
|---|---|
| Schema Migration | Shows whether the destination table is newly created or an existing table. For new tables, the DDL statement used to create the table is displayed. |
| Real-time Data Synchronization | Shows real-time synchronization statistics, DDL records, and alert information. |
Rerun the synchronization task
If you need to modify synchronized fields, destination table fields, or table names, click Rerun in the Operation column to synchronize the changes to the destination. Data in already-synchronized, unmodified tables is not re-synchronized.
Click Rerun directly (without changing the task configuration) to rerun the task with current settings.
Modify the task configuration and click Complete, then click Apply Updates in the Operation column to rerun the task with the updated settings.
Limitations
Cross-region metadatabase and metatable creation in Data Lake Formation (DLF) is not supported.
Multiple source fields cannot map to the same destination field.
The Preview Data Output feature requires data sampling to be completed in the SLS source form first.
Alert rules configured during task setup apply to the real-time synchronization subtask. Modify them after task creation on the Real-time Synchronization Task page.