Data Integration supports real-time synchronization from single tables in sources such as DataHub, Kafka, and LogHub to MaxCompute. This guide walks you through creating and running a Single Logstore Realtime Sync task to synchronize real-time data from a LogHub (SLS) logstore to MaxCompute in the DataWorks console.
Prerequisites
Before you begin, make sure you have:
-
A Serverless resource group or an exclusive resource group for Data Integration. See Serverless resource group and Exclusive resource group for Data Integration.
-
A LogHub (SLS) data source and a MaxCompute data source. See Data Source Configuration.
-
Network connectivity between the resource group and both data sources. See Overview of network connection solutions.
Limitations
Syncing source data to MaxCompute foreign tables is not supported.
Create and configure a sync task
The creation wizard consists of eight steps. Steps 4, 5, and 6 are optional and can be revisited after the task is saved.
Step 1: Select a sync task type
-
Log on to the DataWorks console. In the top navigation bar, select the desired region. In the left-side navigation pane, choose Data Integration > Data Integration. On the page that appears, select your workspace from the drop-down list and click Go to Data Integration.
-
In the navigation pane, click Synchronization Task. At the top of the page, click Create Synchronization Task and configure the following:
-
Source:
LogHub -
Destination:
MaxCompute -
Task Name: Enter a name for the sync task.
-
Task Type:
Single Logstore Realtime Sync
-
Step 2: Configure network and resources
-
In the Network and Resource Configuration section, select a Resource Group for the sync task. For Task Resource Usage, allocate CUs (Compute Units) based on your requirements.
-
Set Source to your LogHub (SLS) data source and Destination to your MaxCompute data source, then click Test Connectivity.
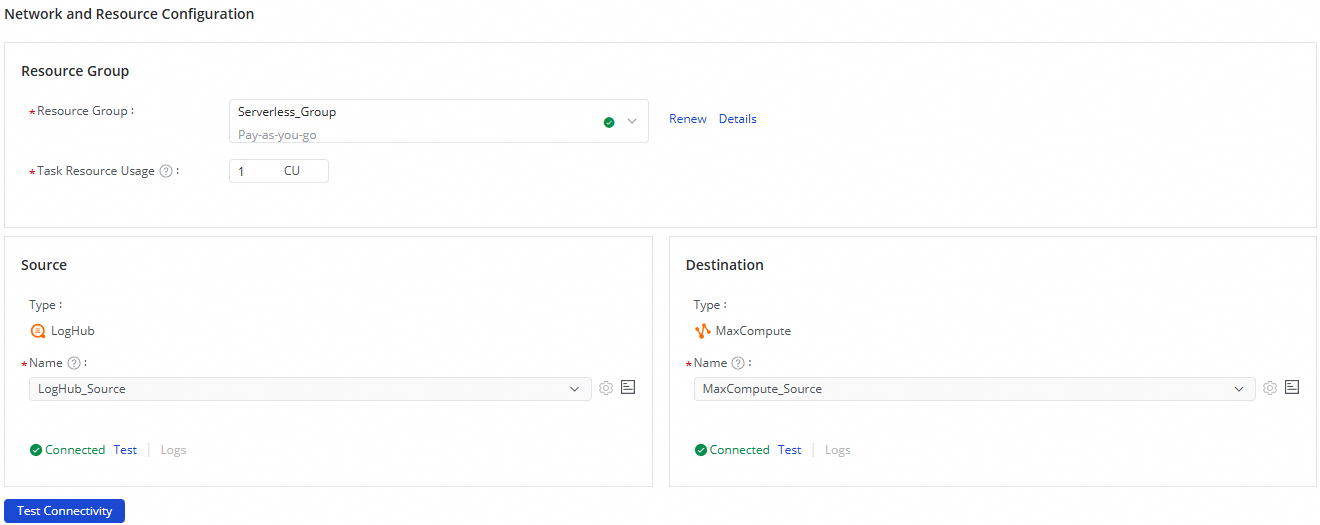
-
After confirming both data sources are connected, click Next.
Step 3: Configure the synchronization link
The sync link consists of three parts: the SLS source, optional data processing nodes, and the MaxCompute destination. Configure each in sequence.
Configure the SLS source
Click the SLS source at the top of the page to open the Source Information panel.

-
In the Source Information section, select the logstore to synchronize.
-
In the upper-right corner, click Data Sampling. Specify the Start Time and Sampled Data Records, then click Start Collection. This samples data from the logstore and generates a preview for configuring downstream nodes.
-
After you select a logstore, its fields are automatically loaded into the Configure Output Field section. Adjust Data Type, remove fields using Delete, or add new ones with Add Output Field as needed.
If a configured field does not exist in SLS, its value is output as NULL to the downstream node.
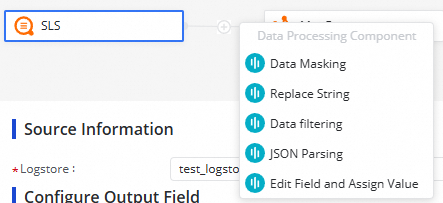
Add data processing nodes (optional)
Click the ![]() icon to insert data processing nodes between the source and destination. The following methods are available:
icon to insert data processing nodes between the source and destination. The following methods are available:
| Method | When to use |
|---|---|
| Data Masking | Anonymize sensitive fields before writing to the destination |
| Replace String | Find and replace string values in a field |
| Data Filtering | Filter out records that don't match specified conditions |
| JSON Parsing | Extract fields from a JSON-formatted column |
| Edit Field and Assign Value | Add derived columns or overwrite field values |
Arrange the nodes in the order you want data processed. At runtime, data flows through the nodes in the order you specify.
To verify a node's output, click Preview Data Output in the upper-right corner, then click Re-obtain Output of Ancestor Node to simulate the output from the sampled log data.
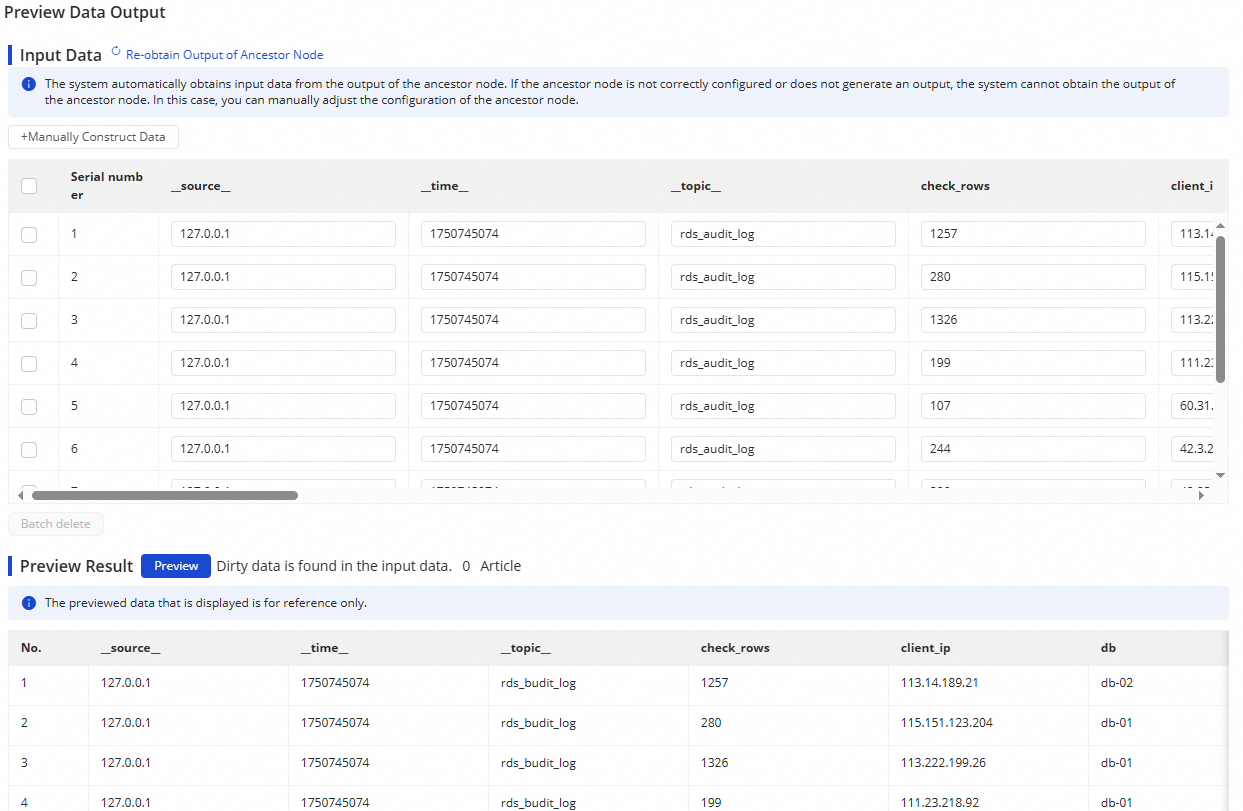
The data output preview requires Data Sampling to be completed on the SLS source. Complete data sampling first if the preview is unavailable.
Configure the MaxCompute destination
Click the MaxCompute destination at the top of the page to open the Destination Information panel.

-
In the Destination Information area, choose how to create the destination table:
-
Create tables automatically: A table is created with the same name as the source table. Change the name if needed.
-
Use Existing Table: Select an existing table from the drop-down list.
-
-
(Optional) Edit the destination table schema. If you selected Create tables automatically, click Edit Table Schema to customize the schema. Click Re-generate Table Schema Based on Output Column of Ancestor Node to populate the schema from the upstream node's output columns. Select a column and mark it as the primary key.
The destination table must have a primary key. The task configuration cannot be saved without one.
-
Review field mappings. After completing the destination configuration, the system maps fields by name automatically (Map Fields with Same Name). Adjust the mappings as needed. One source field can map to multiple destination fields, but multiple source fields cannot map to the same destination field. Unmapped source fields are not synchronized.
-
Select a partition method:
-
Automatic Time-based Partitioning: Partitions data by time automatically.
-
Dynamic Partitioning By Field Value: Partitions data based on the value of a specified field.
-
Step 4: Configure alert rules (optional)
Configure alert rules before starting the task. When alerting is set up from the beginning, detecting and diagnosing delivery failures is significantly easier.
Set up alert rules to get notified when the sync task encounters issues that could cause data latency.
-
In the upper-right corner of the configuration page, click Configure Alert Rule to open the Alert Rule Configurations for Real-time Synchronization Subnode panel.
-
Click Add Alert Rule and configure the alert parameters.
Alert rules configured here apply to the real-time synchronization subtask generated by this sync task. After the sync task is saved, you can also modify alert rules from the Real-time Synchronization Task page. See Run and manage real-time synchronization tasks.
-
Enable or disable alert rules as needed. Assign different alert recipients based on severity level.
Step 5: Configure advanced parameters (optional)
Click Configure Advanced Parameters in the upper-right corner to view and modify advanced configuration values.
Understand the effect of each parameter before changing its value to avoid unexpected errors or data quality issues.
Step 6: Review resource group settings (optional)
Click Configure Resource Group in the upper-right corner to view or change the resource groups assigned to this sync task.
Step 7: Run a simulated test
Before starting the task, run a simulated test to validate your configuration against sampled data.
-
Click Perform Simulated Running in the upper-right corner.
-
In the dialog box, set the Start At time and Sampled Data Records count, then click Start Collection to sample data from the source.
-
Click Preview to push the sampled data through to the destination table.
If specific configurations of the synchronization task are invalid, an exception occurs during the test run, or dirty data is generated, the system reports an error in real time. This helps you check the configurations of the synchronization task and determine whether expected results can be obtained at the earliest opportunity.
Step 8: Start the sync task
-
After completing all configuration, click Complete at the bottom of the page.
-
Go to Data Integration > Synchronization Task. Find the task you created and click Start in the Operation column.
-
Click the task Name or ID in the Tasks section to view the detailed execution progress.
Monitor and manage sync tasks
View task running status
After creating the sync task, monitor its status from the Synchronization Task page.

Use the Actions column to Start or Stop the task. Click More for additional operations, including Edit and View.
The Execution Overview section shows the running status. Click a task to view execution details.
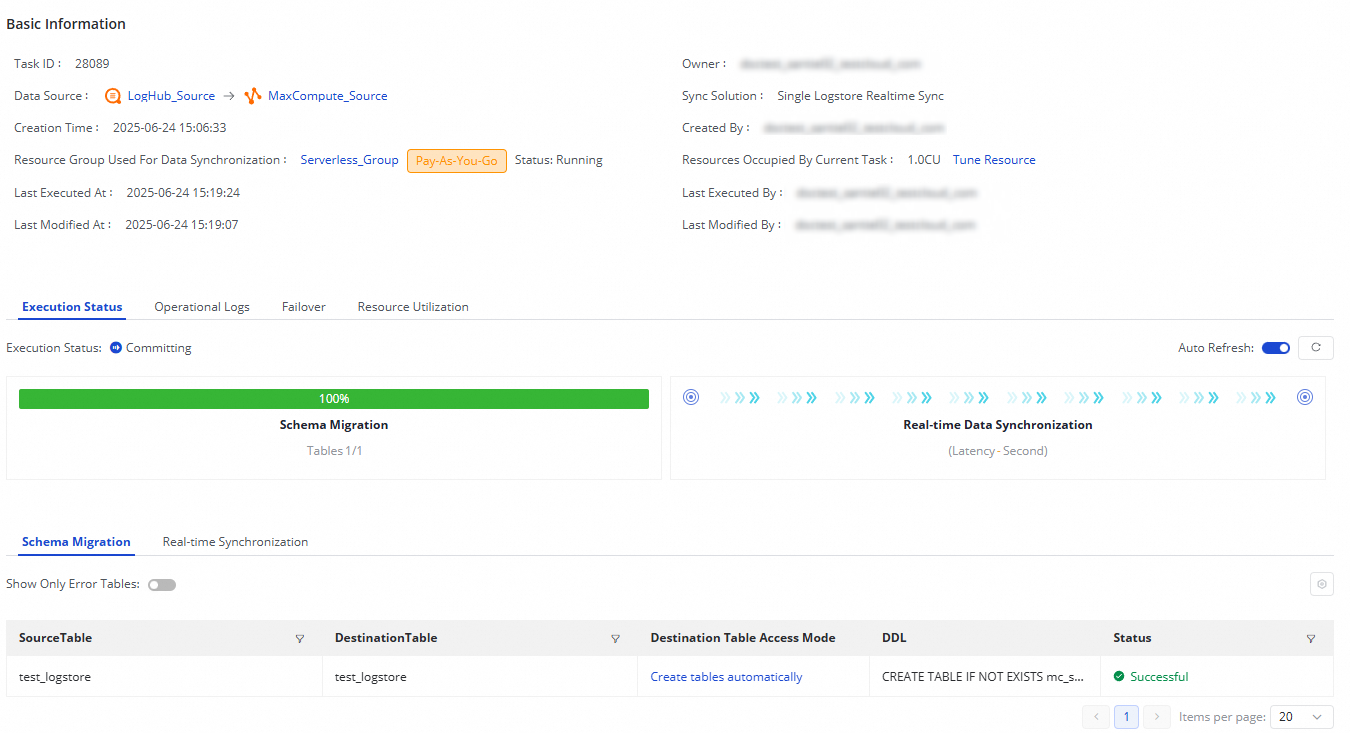
Each LogHub (SLS) to MaxCompute sync task runs through two stages:
-
Schema Migration: Confirms whether an existing table is used or a new one is created. If automatic table creation is selected, the Data Definition Language (DDL) statement for the table is shown here.
-
Real-time Data Synchronization: Displays performance statistics, real-time runtime information, DDL records, and alert details.
Rerun a sync task
Rerun a sync task when you need to modify the synchronized fields, destination table fields, or table name. The system syncs only the changes — already-synchronized data that hasn't changed is not re-processed.
Two rerun methods are available:
-
Rerun without changes: Click Rerun in the Operation column to rerun the task with its current configuration.
-
Rerun after changes: Modify the task configuration and click Complete. Then click Apply Updates in the Operation column to rerun with the updated configuration.