This topic demonstrates how to use Data Integration to synchronize data in real time from a Kafka source to an OSS data lake.
Limitations
The Kafka version must be between 0.10.2 and 2.2.0 (inclusive).
Prerequisites
Purchase a serverless resource group or an exclusive resource group for Data Integration.
Create a Kafka data source and an OSS data source. For more information, see Data source configuration.
Establish network connectivity between the resource group and the data sources. For more information, see Overview of network connectivity solutions.
Procedure
1. Select the sync task type
Go to the Data Integration page.
Log on to the DataWorks console. In the top navigation bar, select the desired region. In the left-side navigation pane, choose . On the page that appears, select the desired workspace from the drop-down list and click Go to Data Integration.
In the left-side navigation pane, click Synchronization Task. At the top of the page, click Create Synchronization Task and configure the following basic information.
Source and destination:
Kafka→OSSNew Node Name: Enter a custom name for the synchronization task.
Synchronization Method:
single-table real-time.
2. Configure network and resources
In the Network and Resource Configuration section, select the Resource Group for the synchronization task. You can allocate a specific number of Compute Units (CUs) for the Task Resource Usage.
For Source Information, select your
Kafkadata source. For Destination, select yourOSSdata source. Then, click Test Connectivity.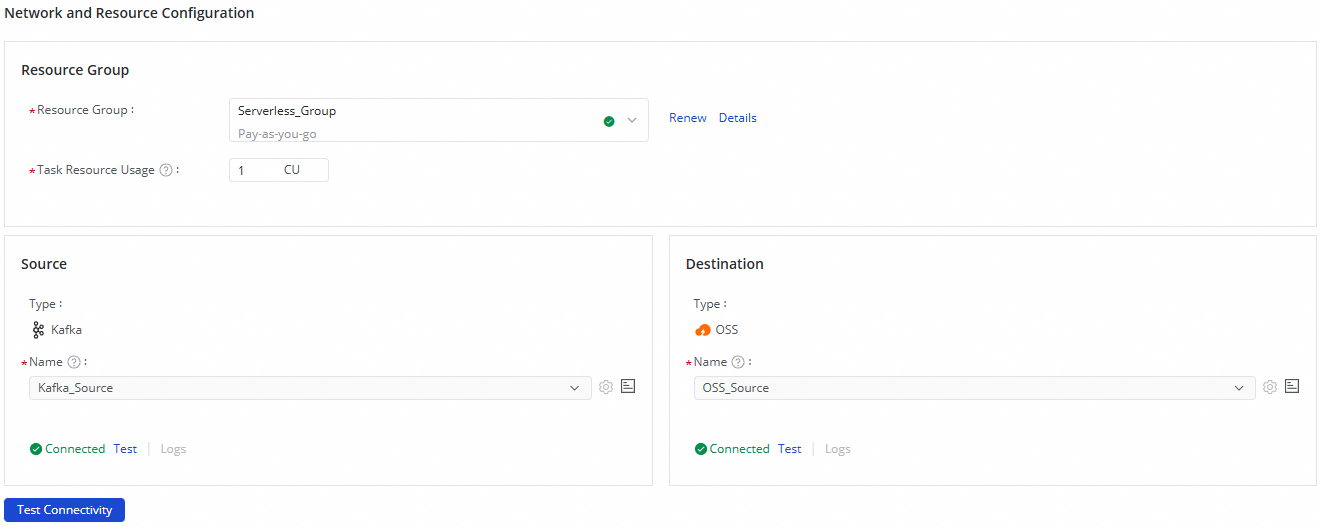
After both connections test successfully, click Next.
3. Configure the sync pipeline
1. Configure the Kafka source
At the top of the page, click the Kafka source node to configure the Source Information.

In the Source Information section, select the Kafka topic that you want to synchronize.
You can use the default values generated when the task is created, or modify them as needed.
In the upper-right corner, click Data Sampling.
In the dialog box that appears, specify the Start Time and Number of Sample Records, and then click the Start Sampling button to sample data from the specified Kafka topic. You can also preview the data in the topic, which provides input for the data preview and visualization configuration of subsequent data processing nodes.
In the Output Field Configuration section, select the fields that you want to synchronize.
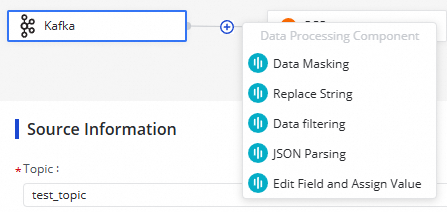
2. Configure data processing nodes
Click the  icon to add a data processing method. Five data processing methods are available: data masking, string replacement, data filtering, JSON parsing, and field editing and assignment. You can arrange these methods in any order. When the task runs, it processes data sequentially in the configured order.
After configuring a data processing node, you can click Output Preview in the upper-right corner. In the dialog box, click Retrieve Upstream Output to preview how the current node processes the sampled data from the Kafka topic.
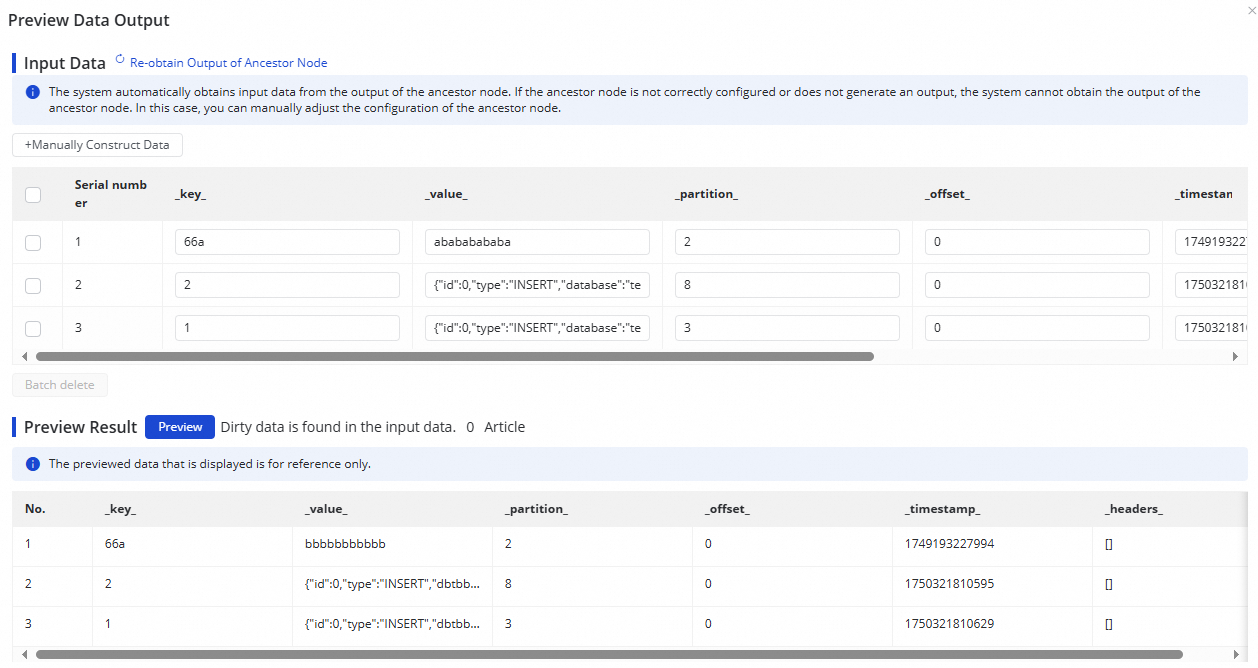
The data output preview depends on Data Sampling from the Kafka source. Before previewing the output, you must first sample the data in the Kafka source configuration form.
3. Configure the OSS destination
At the top of the page, click the OSS destination node to configure the OSS destination information.

In the OSS destination information section, configure the basic information for writing data to OSS.
Write Format: The supported formats are Hudi, Paimon, and Iceberg.
Location for Creating Metadatabase: If Data Lake Formation (DLF) is enabled for your account, the system can automatically create the corresponding metadatabase and metatables in DLF when data is synchronized into the data lake.
NoteCross-region metadatabase creation is not supported.
Select Storage Path: Select the path in OSS where the data is stored after ingestion.
Target Database: Select the destination database for the data. You can also select Create Database to create a DLF metadatabase. If you do, you must specify a Database Name.
Destination Table: Specify whether to write data to a new table by selecting Create tables automatically or to an existing table by selecting Use Existing Table.
Table Name: Enter or select the name of the destination table in OSS.
(Optional) Edit the table structure.
When you select Create tables automatically, click the Edit Table Schema button to edit the target table structure in the dialog box. You can also click Regenerate Schema from Upstream Node to automatically generate the table structure from the upstream node's output columns. In the generated structure, you can select a column to set as the primary key.
-
Configure field mapping.
The system automatically generates mappings between upstream columns and target columns based on the The same name mapping principle. You can adjust these mappings as needed. A single upstream column can be mapped to multiple target columns, but multiple upstream columns cannot be mapped to a single target column. If an upstream column is not mapped to a target column, its data will not be written to the target table.
4. Alerts
To prevent task errors from causing delays in business data synchronization, you can set an alert policy for the synchronization task.
-
Click Alert Settings in the upper-right corner of the page to open the Alert Rule Configurations for Real-time Synchronization Subnode settings page.
-
Click Add Alert Rule to configure an alert rule.
NoteThe alert rules you define here apply to the real-time synchronization subtasks that this task generates. After you configure the task, you can view and modify the alert rules for these subtasks on the Run and manage real-time synchronization tasks page.
-
Manage alert rules.
For existing alert rules, you can use the toggle switch to enable or disable them. You can also send alerts to different recipients based on the alert level.
5. Advanced settings
The synchronization task provides several parameters that you can modify as needed.
Before making changes, ensure that you fully understand the function of each parameter to prevent unexpected errors or data quality issues.
-
Click advanced settings in the upper-right corner of the page to open the advanced settings page.
-
On the advanced settings page, modify the parameter values as needed.
6. Configure DDL capabilities
DDL operations may be performed on the source. You can click Configure DDL Capability in the upper-right corner of the page to configure rules to process DDL messages from the source based on your business requirements.
For more information, see Configure rules to process DDL messages.
7. Configure the resource group
You can click Configure Resource Group in the upper-right corner to view and switch the task's current resource group.
8. Run a simulation
After you configure the task, click Dry Run in the upper-right corner. This feature simulates the entire task on a small data sample and allows you to preview the results in the target table. If there are configuration errors, runtime exceptions, or dirty data, you will receive real-time error messages. This helps you quickly verify that the task is configured correctly and produces the expected results.
-
In the dialog box, set the sampling parameters: Start Time and Number of Sample Records.
-
Click Start Sampling to collect the sample data.
-
Click Preview to simulate the entire task processing using the sampled data.
9. Run the sync task
-
After completing all settings, click Complete at the bottom of the page.
-
On the page, find the task you created and click Start in the Operations column.
-
Click the Name/ID of the corresponding task in the Task List to view its detailed execution process.
Manage the sync task
View task status
The synchronization task page lists all your tasks and their basic information.

In the Actions column, you can Start or Stop a synchronization task. The More menu offers additional options, such as Edit and View.
For a running task, you can check the Execution Overview to see its operational status. You can also click the overview area to view detailed execution information.
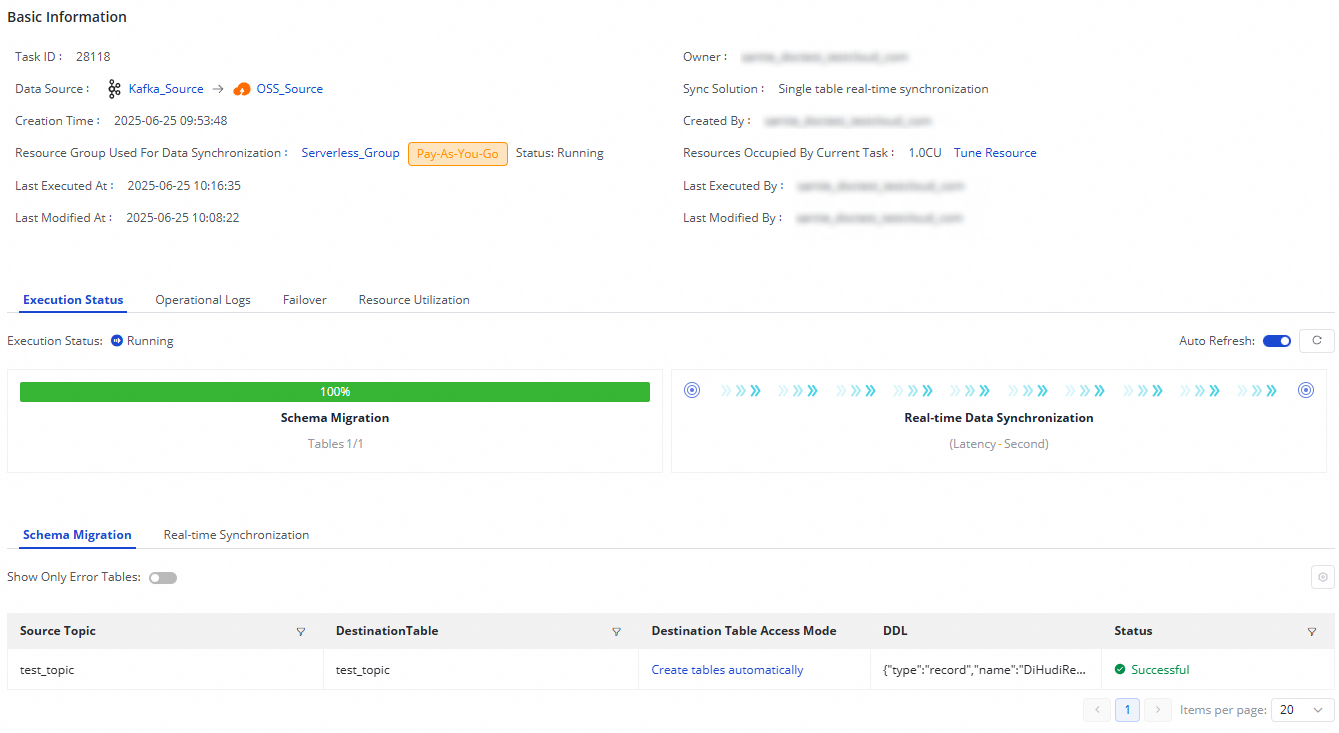
The single-table real-time synchronization task from Kafka to OSS consists of two steps:
Schema Migration: This step includes the method for creating the destination table (using an existing table or automatic table creation). If you choose automatic table creation, the system displays the DDL statement used for table creation.
Real-time Data Synchronization: This step includes statistics for real-time data synchronization, such as real-time operational information, DDL records, and alert information.
Rerun a task
In special cases, such as when you need to modify synchronized fields or adjust target table information, you can click Rerun in the Operations column of the synchronization task. This action synchronizes the adjusted fields and other changes to the target. The process skips unchanged, previously synchronized tables.
-
To run the task again without any changes, click Rerun.
-
If you edit the task, click Complete after making your changes. The task's action changes to Apply Updates. Clicking Apply Updates reruns the task with the new configuration.