You can only view details for published assets. This topic describes the asset details for Dataphin tables and tables from other systems.
Prerequisites
You have purchased the asset operation value-added service and enabled the asset operation module for the current tenant.
Limitations
You cannot apply for consumption permissions for data source tables, or the custom metrics they contain, if the data source is PolarDB-X (formerly DRDS), SAP HANA, IBM DB2, or OceanBase (in MySQL or Oracle tenant mode).
To use the data preview feature for data source tables, you must first configure a data source code. For more information about how to configure a data source code, see Data source management.
For a list of data sources that support the data preview and data profiling features, see Operations supported by different types of collection sources.
Table asset details
In the top navigation bar of the Dataphin homepage, choose Assets > Asset Catalog.
On the Table Assets tab, click the name of an asset to open its details page.
The asset details page is similar for Dataphin tables and tables from other systems. The following figure uses a Dataphin data table as an example.
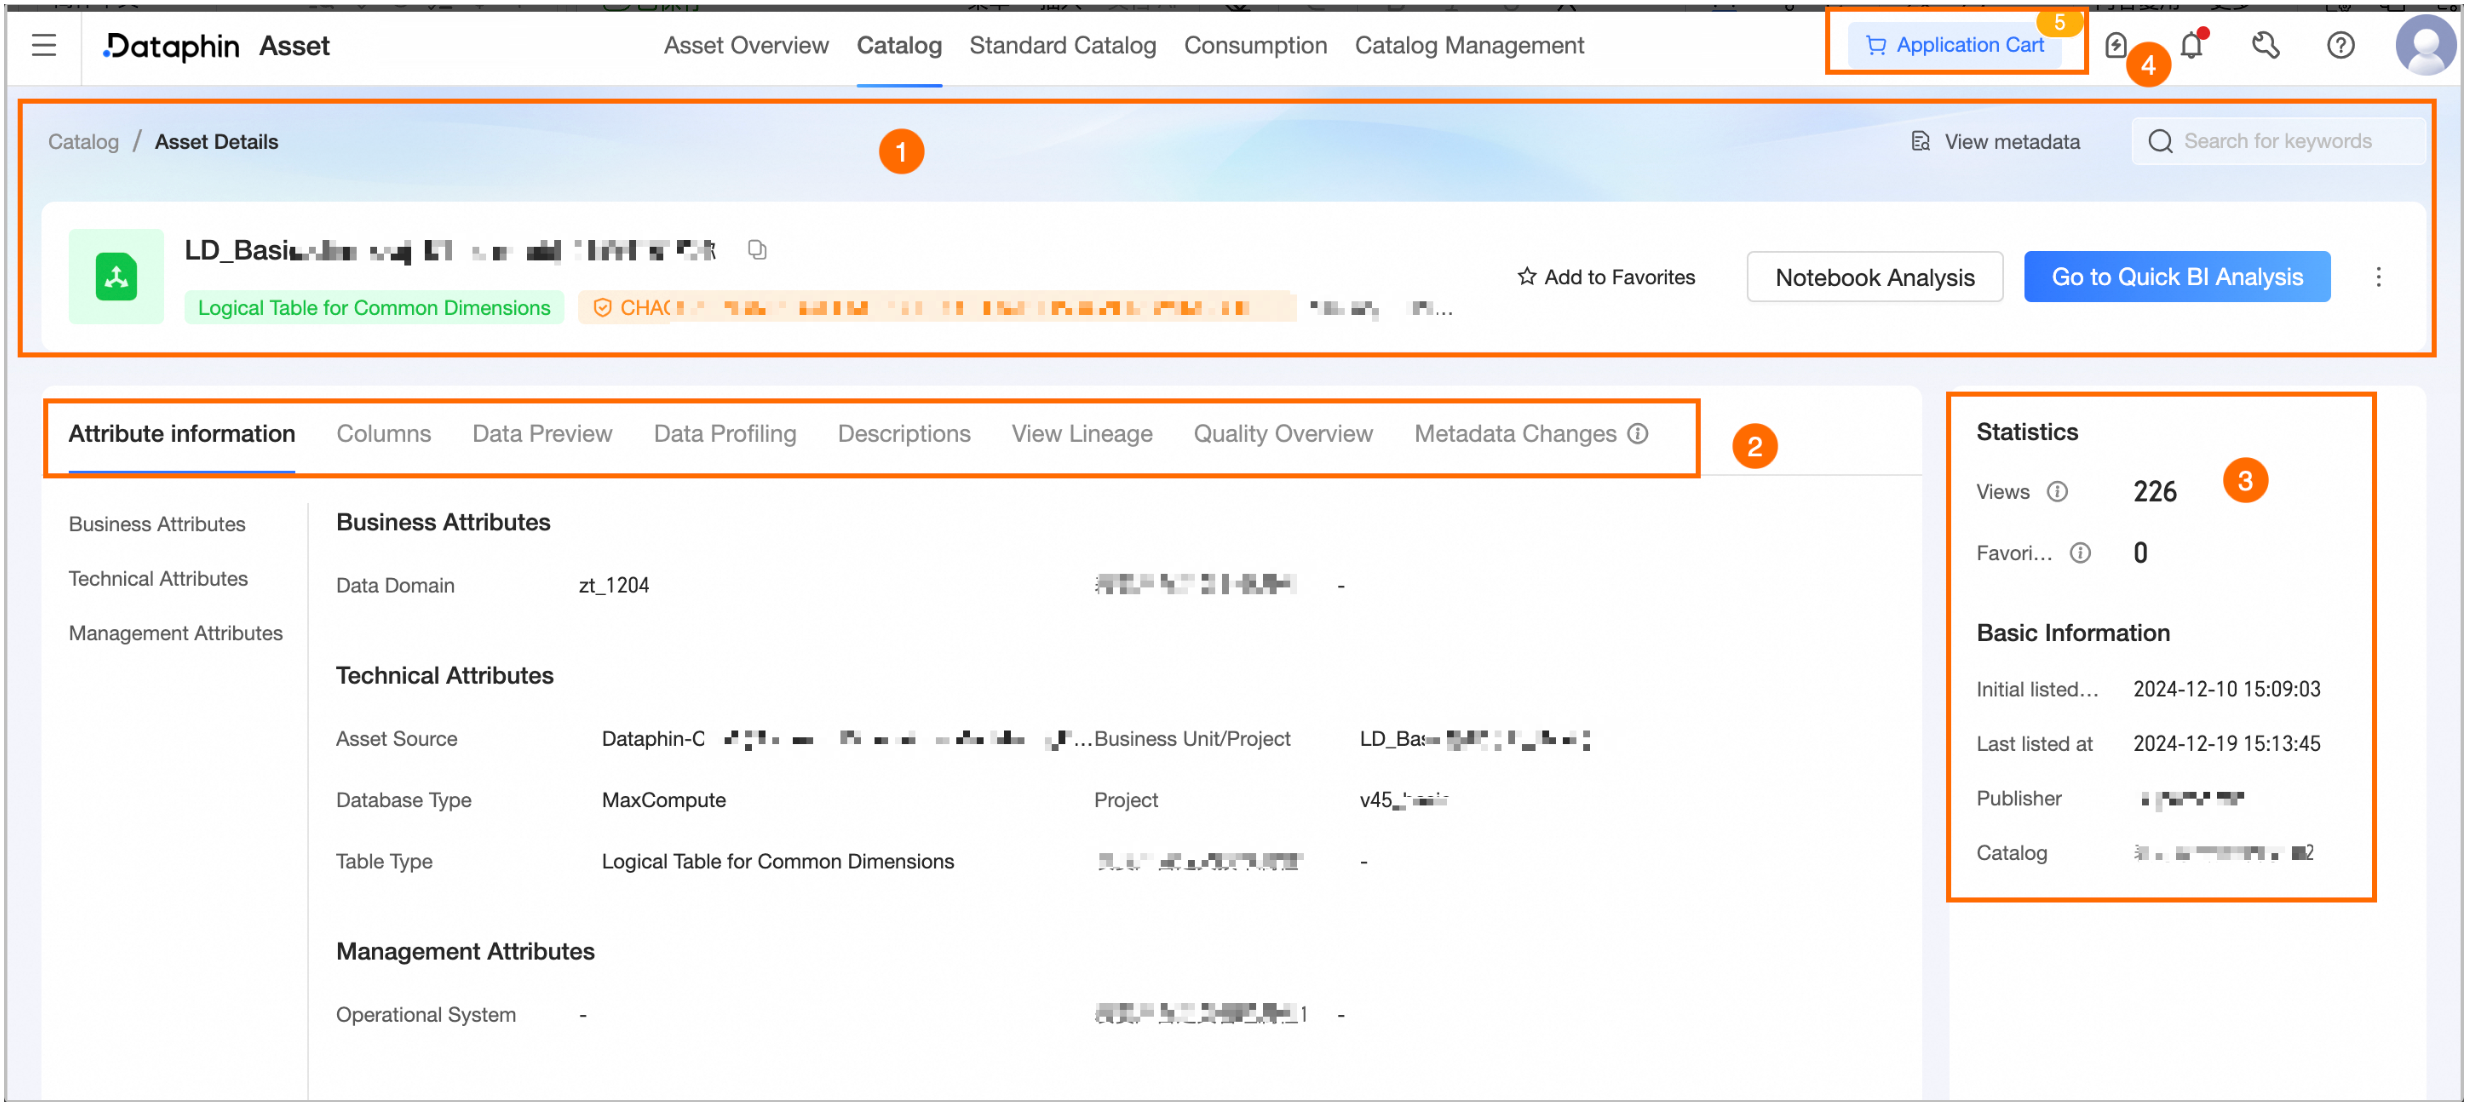
Area
Description
① Summary
This section displays the name, type, maximum confidentiality level (requires the Data Security feature), tags, statistical granularity, and description of the data table. You can also perform these operations:
View Metadata: Click to open the table's asset details page in the asset inventory.
Search for assets: Quickly search for other data tables. Select a data table to go to its asset details page.
Statistical Granularity: This section appears if the table is a summary logical table that contains dimension fields. You can view the details of each statistical granularity, including its name, code, description, owning business segment, and subject area. You can also perform the following operations:
View Details: Click to go to the business entity tab under Planning > Data Architecture to view detailed information.
View ER Diagram: Click to open the ER Diagram panel and view the entity-relationship diagram centered on the business entity.
Favorite: Click to add or remove the asset from your favorites. After you favorite an asset, you can find it in the Personal Data Center. For more information, see View and manage my favorite assets.
Analyze in Notebook: Click to open the Notebook page, where a corresponding task is automatically created for visual analysis. For more information, see Create a Notebook.
NoteAfter you apply for consumption permissions, you can create Notebook tasks for Dataphin tables of type MaxCompute, Hive, AnalyticDB for PostgreSQL, Doris, and StarRocks, as well as for some data source tables. For a list of supported data sources, see Operations supported by different types of assets.
Analyze in Quick BI: Click to open the My BI Analysis panel, where you can view BI analysis tasks created by using the current asset as a dataset. For more information, see My BI Analysis.
NoteAfter you apply for consumption permissions, you can create Quick BI analysis tasks for Dataphin tables of type MaxCompute, Hive, AnalyticDB for PostgreSQL, Doris, and StarRocks, as well as for some data source tables. For a list of supported data sources, see Operations supported by different types of assets.
You cannot create Quick BI analysis tasks if the Hive data source is CDH 5.x Hive 1.1.0 or the MySQL data source is MySQL 5.1.43.
Listing Management: Click to open the asset's edit page in Catalog Management, where you can modify its attributes, instructions, and more. For more information, see Edit asset information.
Report Quality Issue: Report data quality issues you encounter, such as unstable output or inaccurate content, to the quality owner. Reporting issues helps drive timely remediation and improves the asset's availability and health. For configuration details, see Add and manage an issue list.
You must activate the data quality module to use the Report Quality Issue feature. You can then view the processing flow and results of reported issues in the issue list of the data quality module.
View DDL Statement: For a Dataphin table, you can view the table's corresponding DDL statement in the tenant's compute engine. You can also select a Data Source Type and click Generate DDL Statement to generate a DDL statement for creating a table with the same structure in the specified data source type. If you select Automatically add escape characters, the generated DDL statement includes the appropriate escape characters for the selected source type to prevent issues such as keyword misinterpretation. Some data source tables also support viewing DDL statements. For more information, see Operations supported by different types of assets.
Export Fields: Export the table's field information as a local CSV file for quick analysis and use by developers or business personnel.
Apply for Permissions: To apply for consumption permissions, you must first enable data consumption for the published asset on its edit page. For more information, see Apply for consumption permissions.
Add to request basket: To apply for consumption permissions in bulk, first enable data consumption for the published asset on its edit page, then add the asset to the request basket. For more information, see Apply for consumption permissions.
② Basic information
Attribute information: Displays the data table's business, management, and technical attributes.
Business attributes: Displays information about the subject area.
Management attributes: Includes the owning system, the DataWorks workspace it belongs to, and the DataWorks table owner.
Owning system:
Data source table: The source system of the collection task.
Dataphin table: Displayed as -.
Technical attributes: Includes asset source, owning module/project space/data source type, database type, owning project, table type/subtype, asset import name, collection adapter type, and collection adapter information.
Asset source:
Data source table: The source path is Source System > Data Source > Schema of the table. For a DataWorks asset, the source path is Source System > DataWorks Application System > DataWorks workspace > Data Source.
Dataphin table: The source path is Dataphin > Project Space Type (logical tables are marked as Intermediate Layer) > Owning Project/Module (modules contain only logical tables).
Asset import name:
Data source table: The name of the collection task for the data source table. For a DataWorks asset, this is the name of the DataWorks collection task.
Dataphin table: Displayed as -.
Custom attributes: Displays attributes that are created in Planning > Attribute Management and are visible in the asset catalog. Custom attributes can be business, management, or technical attributes.
Field information: Displays the sequence number, name, data type, description/remarks, business type/associated entity (only associated entities are shown for dimension logical tables and fact logical tables), associated standard (requires the Data Standard module), sample data (if Data Sampling is enabled), quality score (if the data quality module and the Quality Profile setting are enabled), data category (requires the Data Security module), data classification (requires the Data Security module), and custom attribute information for each field.
Search and filter: You can search for a field by its name, display name, description, or remarks. You can also filter fields by data category or data classification (requires the Data Security feature).
Associated entity: For dimension logical tables and fact logical tables, this section displays the associated entities configured for the table on the Develop > Development page. Click the View icon next to an associated entity to view its information, including role name (such as buyer or seller), entity name (code), description, owning module, and subject area. You can also perform the following operations:
View Details: Click to go to the business entity tab under Planning > Data Architecture to view detailed information.
View ER Diagram: Click to open the ER Diagram panel and view the entity-relationship diagram centered on this business entity.
Business type: If a modeled metric has been published, you can click the metric name to go to the Catalog Management > Manual Listing > Technical Metrics page to view its details.
Quality score: Click the View icon next to the quality score to view the evaluation dimensions and quality score for the current field. Click View More to go to the Quality Profile tab for the current asset to see an overview of the quality score.
Data preview: If sample data is available, it appears by default. You can also manually trigger a query for the latest data. If no sample data exists, a data preview is automatically triggered.
After filtering the data, you can search or filter by field, view single-row details, and use features like adaptive column width and row-column transpose. You can also click the sort icon next to a field to sort the data in no particular order, ascending order, or descending order. Double-click a field value to copy it. You can view both sample data and preview data.
Sample data: This is available when both the data sampling switch and the data preview switch in the settings are turned on. It queries only the sample data for fields for which you have column-level permissions and that do not require masking. The sample data for each field is stored and displayed independently, so the integrity of a complete row record is not guaranteed.
If you have permission to query the current table, you can use the data preview feature. It queries only the fields for which you have
SELECTpermissions (including field- and row-level permissions) and previews up to 50 rows of the result. For information about how to apply for query permissions (if the asset consumption feature is enabled, see Apply for consumption permissions), see Apply for, renew, and return table permissions or Apply for consumption permissions. For a list of data sources that support data preview, see Profiling partitions and scopes supported by different data sources.NoteFor some compute or data sources, if the collected table is a lakehouse table, the Spark SQL query engine is used by default. In this case, you must enable the Spark configuration for the compute or data source where the table is located to query data.
Data profiling: If you have activated the data quality feature, you can configure data profiling tasks for data source tables to quickly understand the data profile and assess its usability and potential risks in advance. To enable automatic profiling, go to Governance > Metadata Center > Profiling and Analysis and enable the relevant settings. For more information about how to configure a profiling task, see Create a data profiling task. For supported data source types, see Profiling partitions and scopes supported by different data sources.
Instructions: After enabling Instructions on the asset's edit page, this section displays guidance for data browsers and users.
Data lineage: You must enable data lineage on the edit page of the manually published table asset. This section displays the data lineage graphs for systems, tables, and fields.
System lineage: Includes the system lineage relationship of the module, project, or source system to which the current asset belongs.
If a related table in the source system or its collection task is deleted, the system is displayed as an unknown source system. For more information, see System lineage.
Table- and field-level lineage: Displays the direct data lineage, centered on the current asset. This includes assets that are unpublished or for which you lack view permissions; you cannot view their details. For more information, see Table-level lineage and Field-level lineage.
NoteYou must purchase DataWorks Standard Edition or a higher edition to view data lineage.
DataWorks OpenAPI returns data lineage based on the last successful task instance. API calls consume QPS. For more information, see Use DataWorks OpenAPI .
The table-level and field-level lineage for DataWorks data source tables is displayed based on lineage registered via Dataphin OpenAPI (based on the last successfully run instance) and real-time lineage queried from DataWorks. By default, one level of direct upstream and downstream lineage is displayed. You can explore deeper levels of lineage layer by layer in the lineage graph.
Real-time query results are cached for one day. If you view the lineage again within the cache period, the cached results are displayed. The lineage cache for a table is automatically invalidated after its collection task is re-executed. To get the latest lineage, click Sync Latest Lineage. This clears the cache and re-queries one level of direct upstream and downstream lineage.
Quality Profile: You must enable Quality Profile on the edit page of the manually published table asset and have the data quality module purchased. This section displays an overview of the quality score and rule check details for the current data table and its fields. For more information, see Quality Profile. You can view the quality profile only for data tables monitored by data quality. For a list of supported data sources, see Data sources supported by Dataphin.
Metadata change: You must enable metadata change on both the Metadata > Metadata Change Records page and the edit page of the manually published table asset. You can view the change records for the last two versions. For information on how metadata versions are generated for different data sources, see Metadata versions.
Version comparison: You can switch to view historical version records, which show basic information, changed fields, and all fields. For more information, see Version Comparison.
Downstream impact: You can view the downstream impact only for the most recent change. This is available for changes such as adding or deleting fields, or modifying data types, field key types, or nullability.
③ Asset information
Displays detailed information about the data table, such as Usage Statistics and Basic Information.
Usage statistics: Includes the table's page views and number of favorites.
Page views: Displays the page views (PV) for the current data table. The count increases by one each time the page is refreshed and is updated in real time. This count includes only visits to the asset catalog details page.
Favorites: Displays the number of times the current data table has been favorited by users. The count is updated in real time.
Basic information: Includes the initial publish time, latest publish time, publisher, and owning catalog.
④ Request basket
The request basket helps you apply for consumption permissions for multiple assets in a batch, improving efficiency. For more information, see Apply for consumption permissions.
System lineage
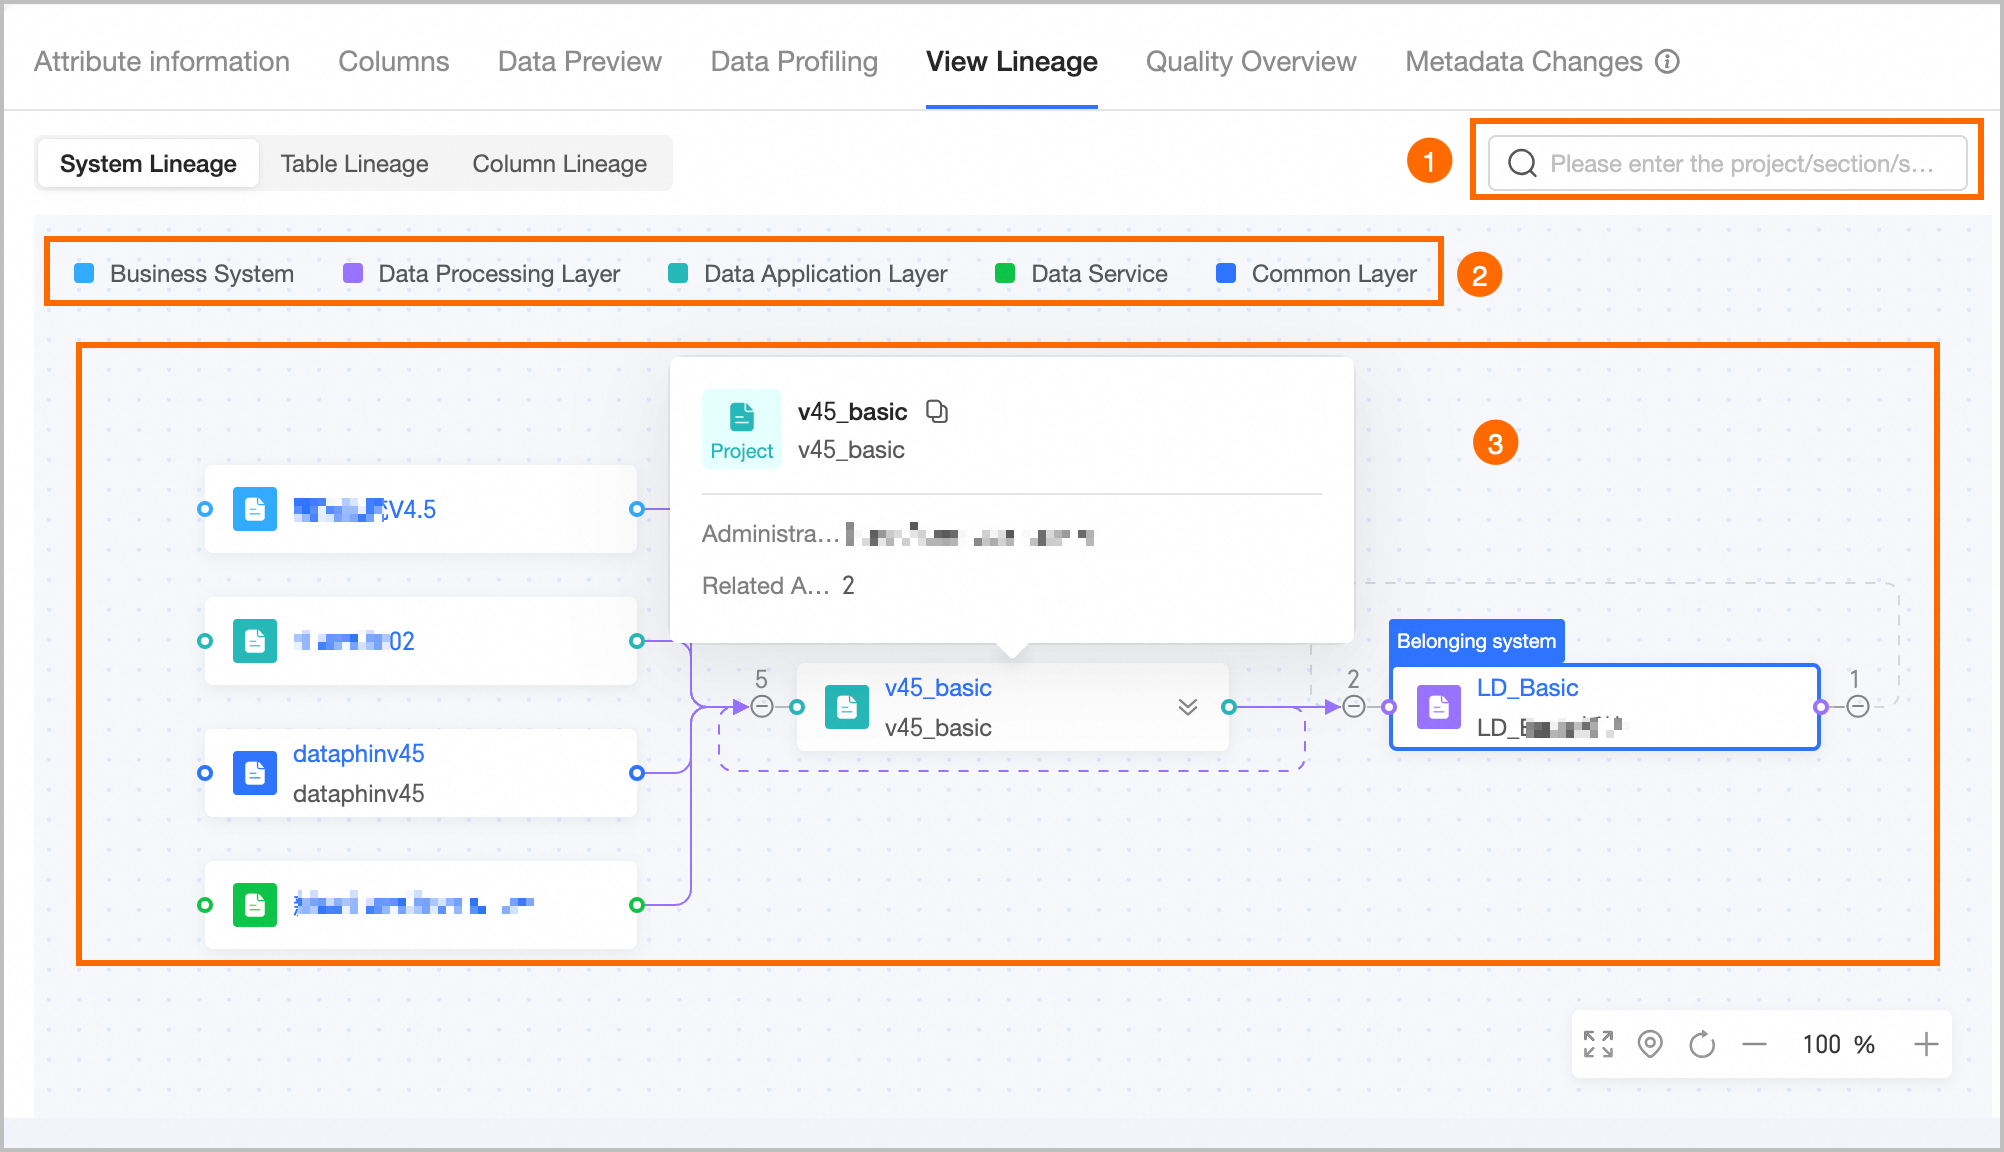
Area | Description |
① Search | Search for expanded nodes by project, module, or source system name. You can click the left/right arrows next to the search box or use the arrow keys to switch between selected nodes. The system automatically locates the first matching node. |
② Legend | Displays the layer to which the current asset belongs, including Business System (systems for data source tables and custom metrics), Data Collection Layer (raw data layer), Data Processing Layer (intermediate layer and systems for logical tables/modeled metrics), Data Application Layer (application layer), Data Service, Report Application Layer, and Common Layer. |
③ Lineage graph | Displays the complete data lineage graph for the current asset, which is aggregated by system. You can manually expand upstream and downstream nodes. The graph includes the direct table-level lineage of the current table and the table to which the current metric belongs.
|
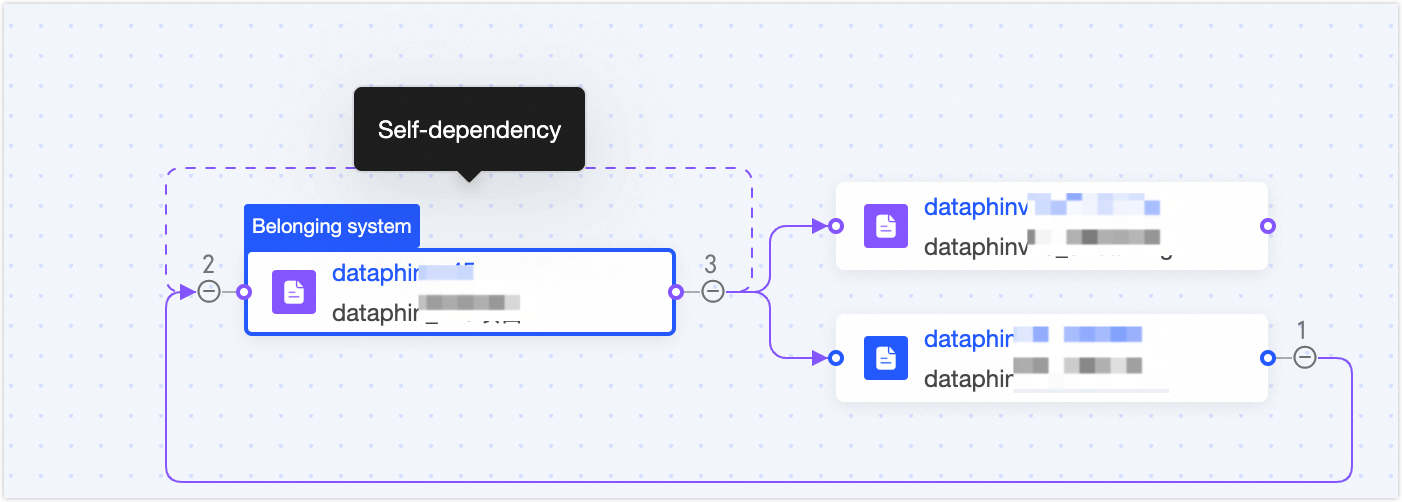
Table-level lineage
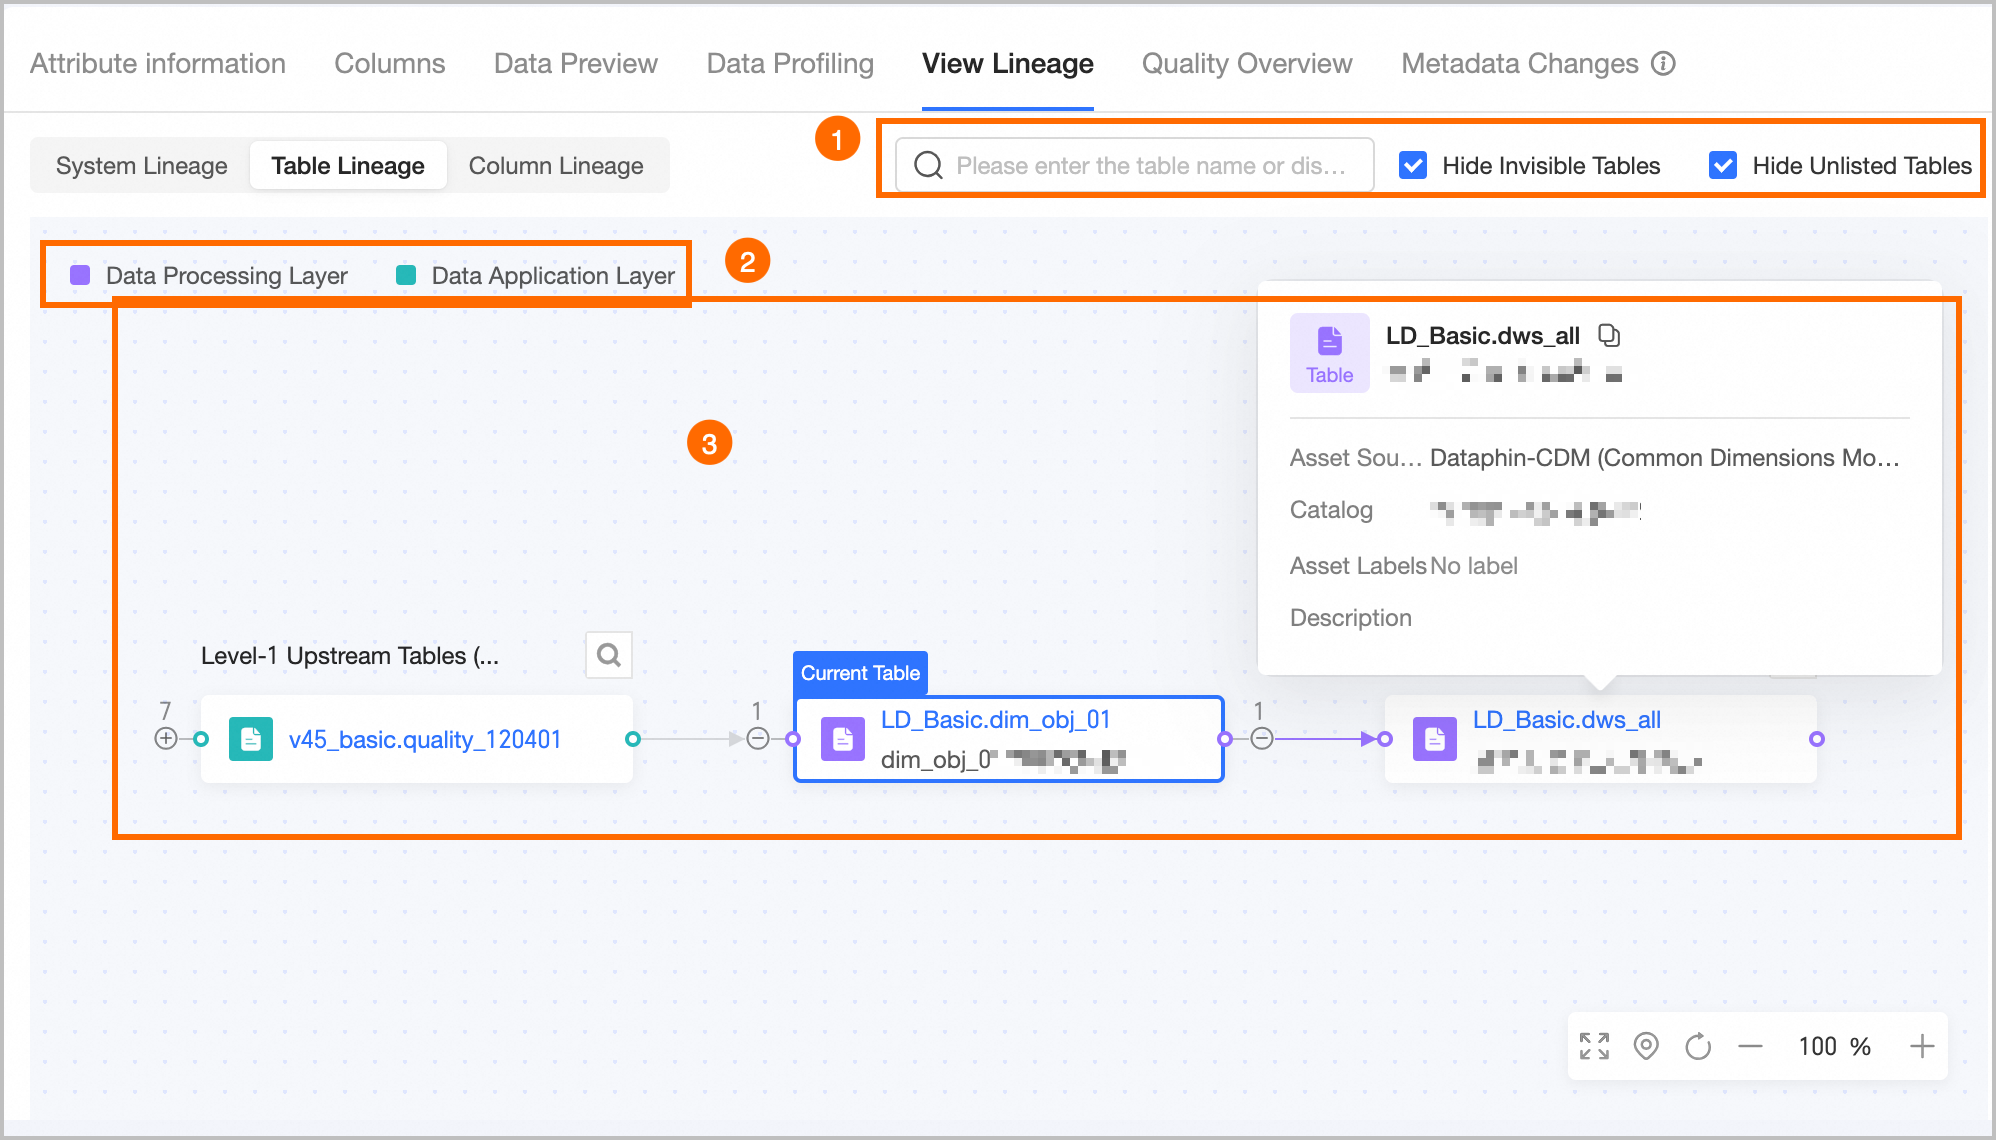
Area | Description |
① Search and quick filters |
|
② Legend | Displays the layer to which the current asset belongs, including Business System (systems for data source tables and custom metrics), Data Collection Layer (raw data layer), Data Processing Layer (intermediate layer and systems for logical tables/modeled metrics), Data Application Layer (application layer), Data Service, Report Application Layer, and Common Layer. |
③ Lineage graph | Displays the complete data lineage graph for the current asset. You can manually expand upstream and downstream nodes.
|
Field-level lineage
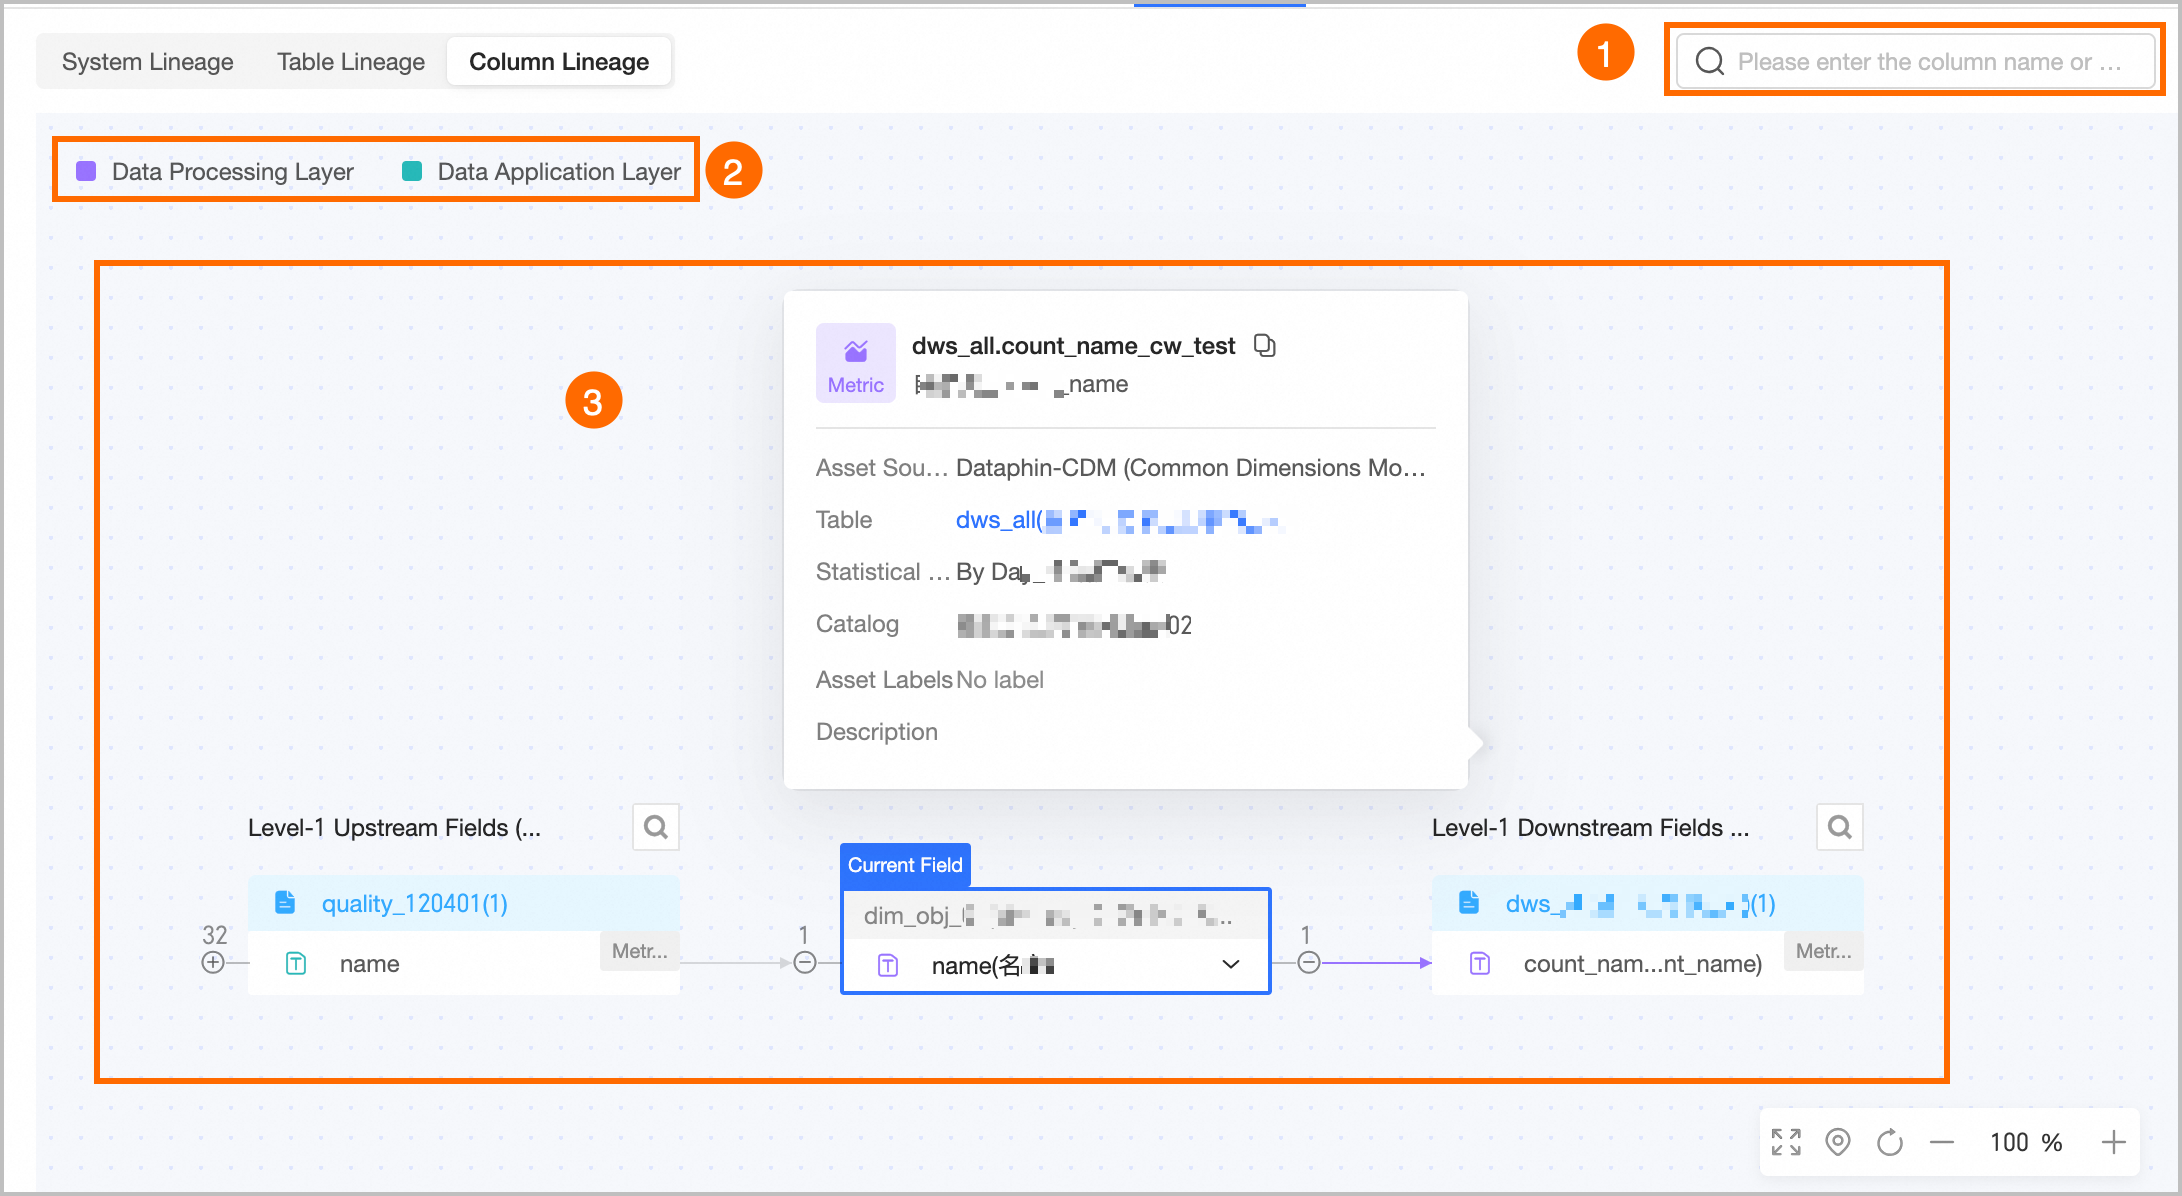
Area | Description |
① Search | Search for expanded nodes on the current page by field name keywords. You can click the left/right arrows next to the search box or use the arrow keys to switch between selected nodes. The system automatically locates the first matching node. |
② Legend | Displays the layer to which the current asset belongs, including Business System (systems for data source tables and custom metrics), Data Collection Layer (raw data layer), Data Processing Layer (intermediate layer and systems for logical tables/modeled metrics), Data Application Layer (application layer), Data Service, Report Application Layer, and Common Layer. |
③ Lineage graph | Displays the complete data lineage graph. You can expand multiple upstream or downstream levels and perform a fuzzy search by field name. If a circular dependency exists, you cannot expand the node further; instead, view the downstream lineage from the starting node.
|
Quality Profile
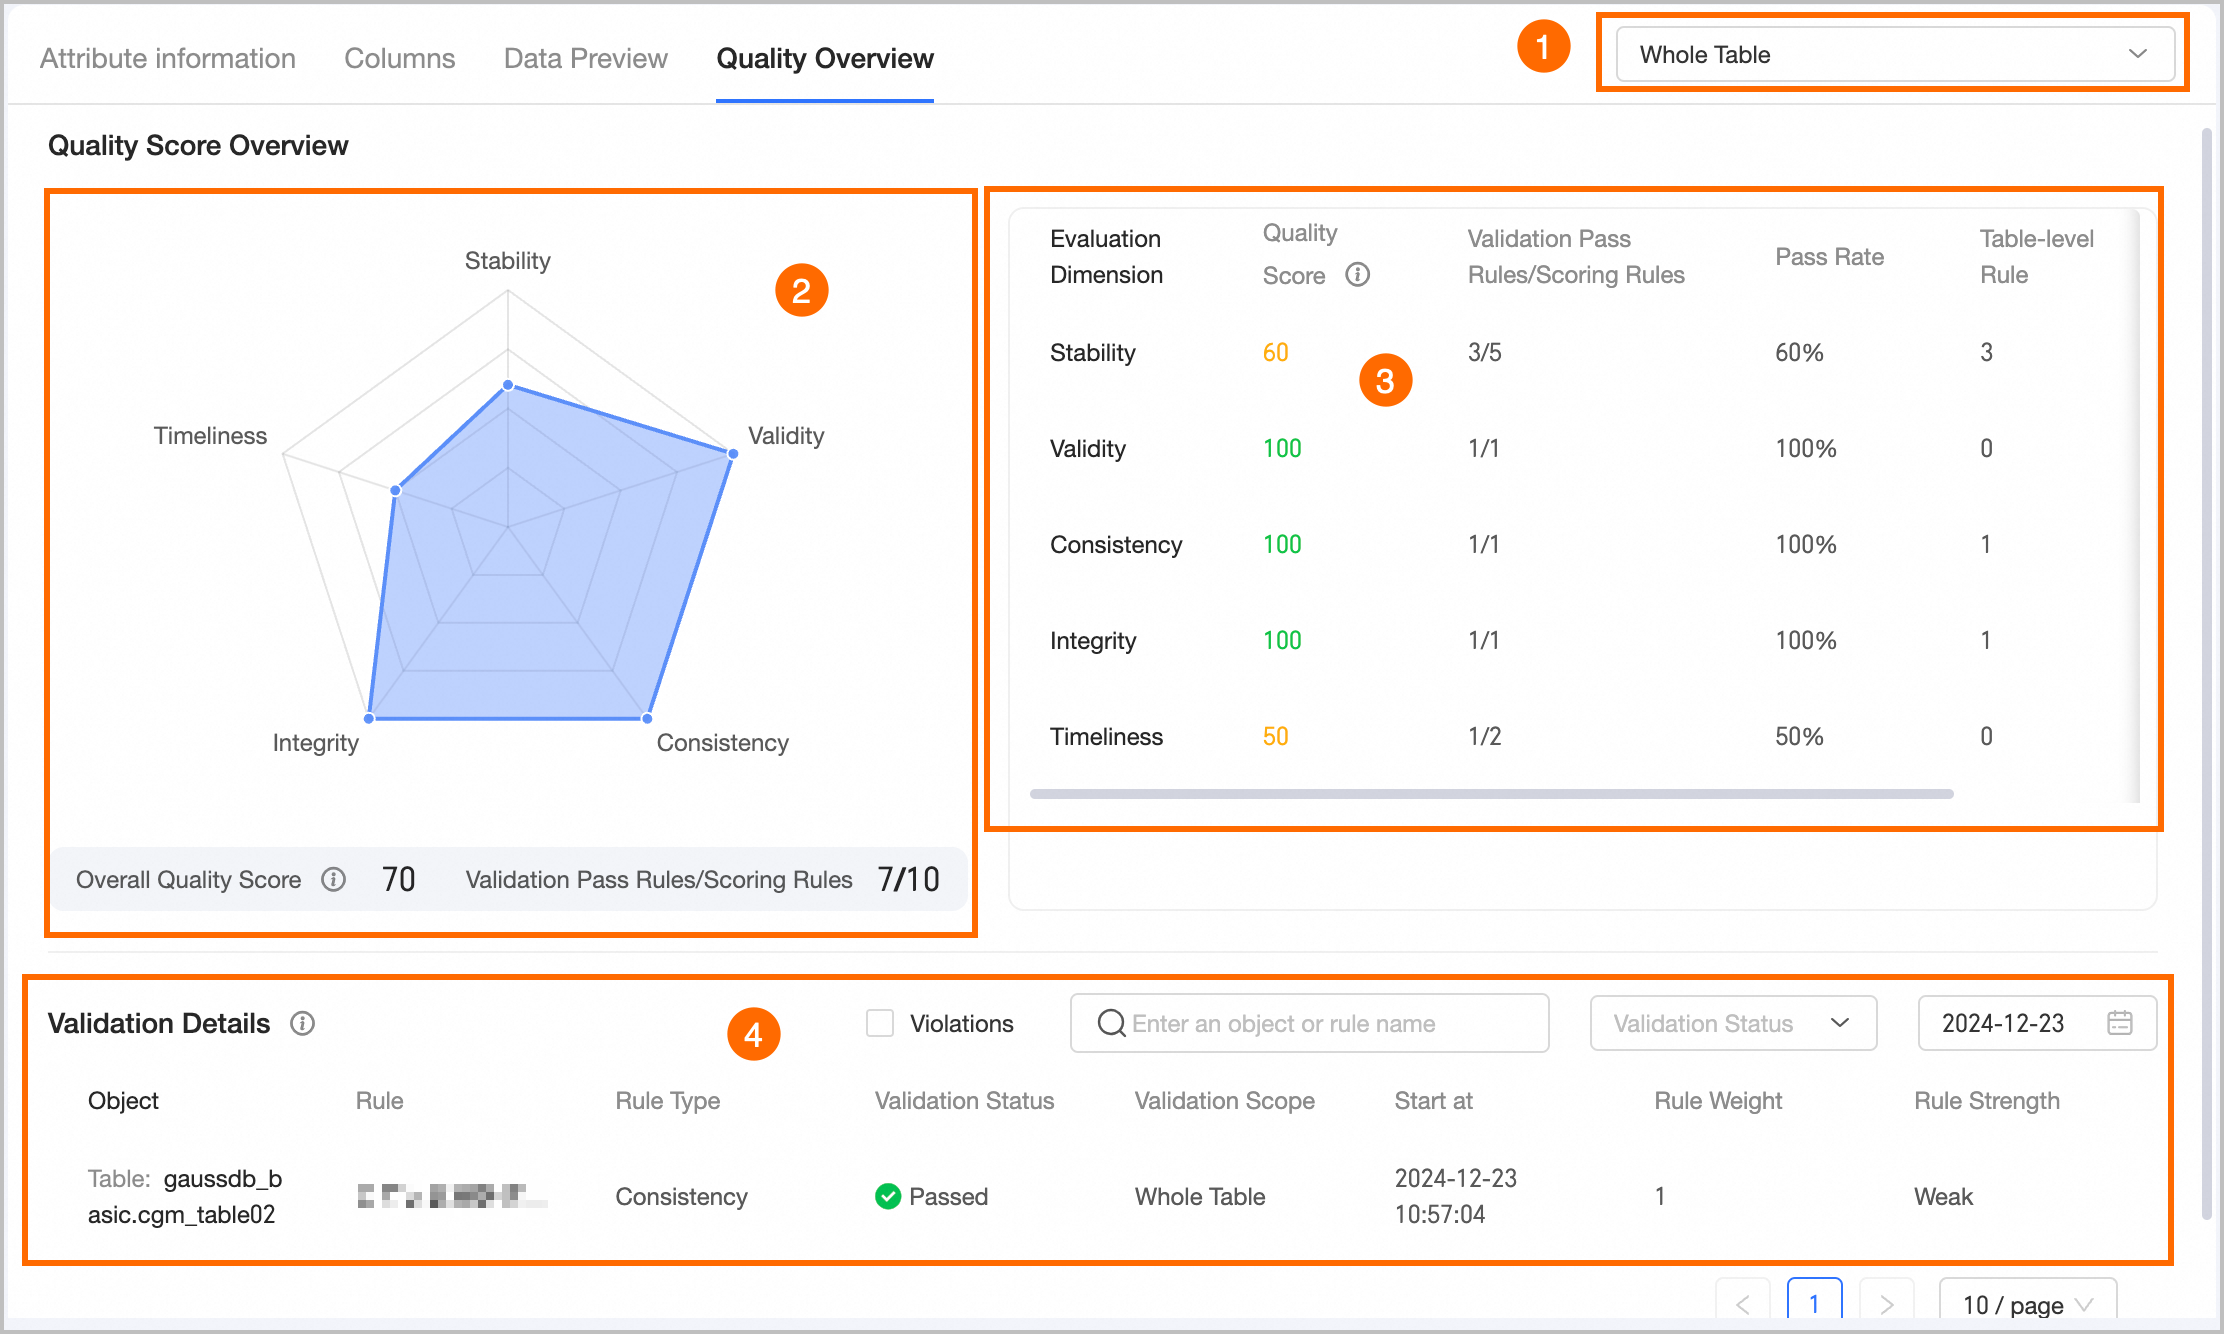
Area | Description |
① Filter | Allows you to filter the quality score overview and rule check details for a specified object (the entire table or a specific field). |
② Quality score radar chart | Displays the quality radar chart, overall quality score, and the pass rate (passed rules vs. scored rules) for the selected object (table or field).
|
③ Score list | Displays the quality characteristic evaluation details for the selected object, including evaluation dimension, quality score, passed/scored rules, pass rate, and the number of table-level and field-level rules.
|
④ Rule check details | You must enable Rule Check Details on the edit page of the manually published table asset. This section shows check statistics from the last 30 days for the table's monitoring rules, categorized by scoring method and result. You can view rule check details for a specific date, quickly filter for Abnormal Results, filter by check status, or search by object or rule name keywords. |