This topic describes how to create a Flink SQL task using the open-source Flink real-time engine.
Prerequisites
Enable the real-time engine for your project and configure Flink as a compute source. For more information, see Create a general-purpose project.
Permissions
Only a super administrator, project administrator, or developer can create a Flink SQL task.
Step 1: Create a Flink SQL task
-
In the top menu bar of the Dataphin homepage, choose Development > Data Development.
-
In the top menu bar, select a Project. If your project is in Dev-Prod mode, you also need to select an Environment.
-
In the left-side navigation pane, choose Data Processing > Compute Task. In the compute task list on the right, click the
 icon and select Flink SQL.
 -
In the New Flink SQL Task dialog box, configure the task parameters.
Parameter
Description
Task name
The task name must follow these rules:
-
Contain only lowercase letters, digits, and underscores (_).
-
Be 4 to 63 characters long.
-
Be unique within the project.
-
Start with a letter.
Production environment resource queue/Development environment resource queue
-
If the Flink compute source bound to the project uses a deployment mode of Kubernetes, you can select any resource group configured for real-time tasks, including those in externally registered clusters.
-
If the Flink compute source bound to the project uses a deployment mode of YARN, the drop-down list includes all resource queues and session clusters managed by the Flink compute source.
NoteIf your project space is in Basic mode, you can configure only the production environment resource queue.
Production environment engine version/Development environment engine version
Select the Flink engine version for the task. Dataphin supports the following engine versions:
-
1.20.1-java17
-
1.20.1
-
1.15.3
-
1.14.2
-
1.13.1
Note-
Selecting a session cluster for the resource queue in either the production or development environment restricts the engine version to 1.20.1.
-
If your project space is in Basic mode, you can configure only the production environment engine version.
-
By default, all versions use Java 8, except for 1.20.1-java17, which uses Java 17.
-
Flink 1.20.1-java17 uses Oracle-cdc 3.6 and supports reading both partitioned and non-partitioned tables. Flink 1.20.1 uses Oracle-cdc 3.5 and supports reading only non-partitioned tables.
Storage directory
Select the directory where the task is stored.
If no directory exists, create one as follows:
-
Click the
 icon above the compute task list on the left to open the New Folder dialog box.
 -
In the New Folder dialog box, enter a Name for the folder and select its location from the Select Directory list.
-
Click OK.
Creation method
You can select Create Blank, From Sample Code, or Use Template.
-
Create Blank: Creates an empty Flink SQL task.
-
From Sample Code: Creates a task using built-in sample code.
-
Use Template: Creates a task based on a real-time compute task template.
Description
Enter a brief description of the Flink SQL task, up to 1,000 characters.
-
-
Click OK.
Step 2: Develop and pre-compile the task
-
On the Flink SQL task code page, write the code for your task.
Dataphin supports using native DDL statements to quickly create meta tables. When Dataphin recognizes a native
create table/create temporary tablestatement, click the prompt icon in the editor to create a meta table. For more information, see Flink SQL task development methods.
After you finish writing the code, click Format in the top menu bar to automatically format the SQL code.
-
Click Pre-compile in the top menu bar to check the code for syntax errors and permission issues.
If pre-compilation is successful, a Pre-compilation successful message appears. If it fails, a Pre-compilation failed message appears. You can click Console at the bottom of the page to view the pre-compilation failure logs.
Step 3: Configure the Flink task
-
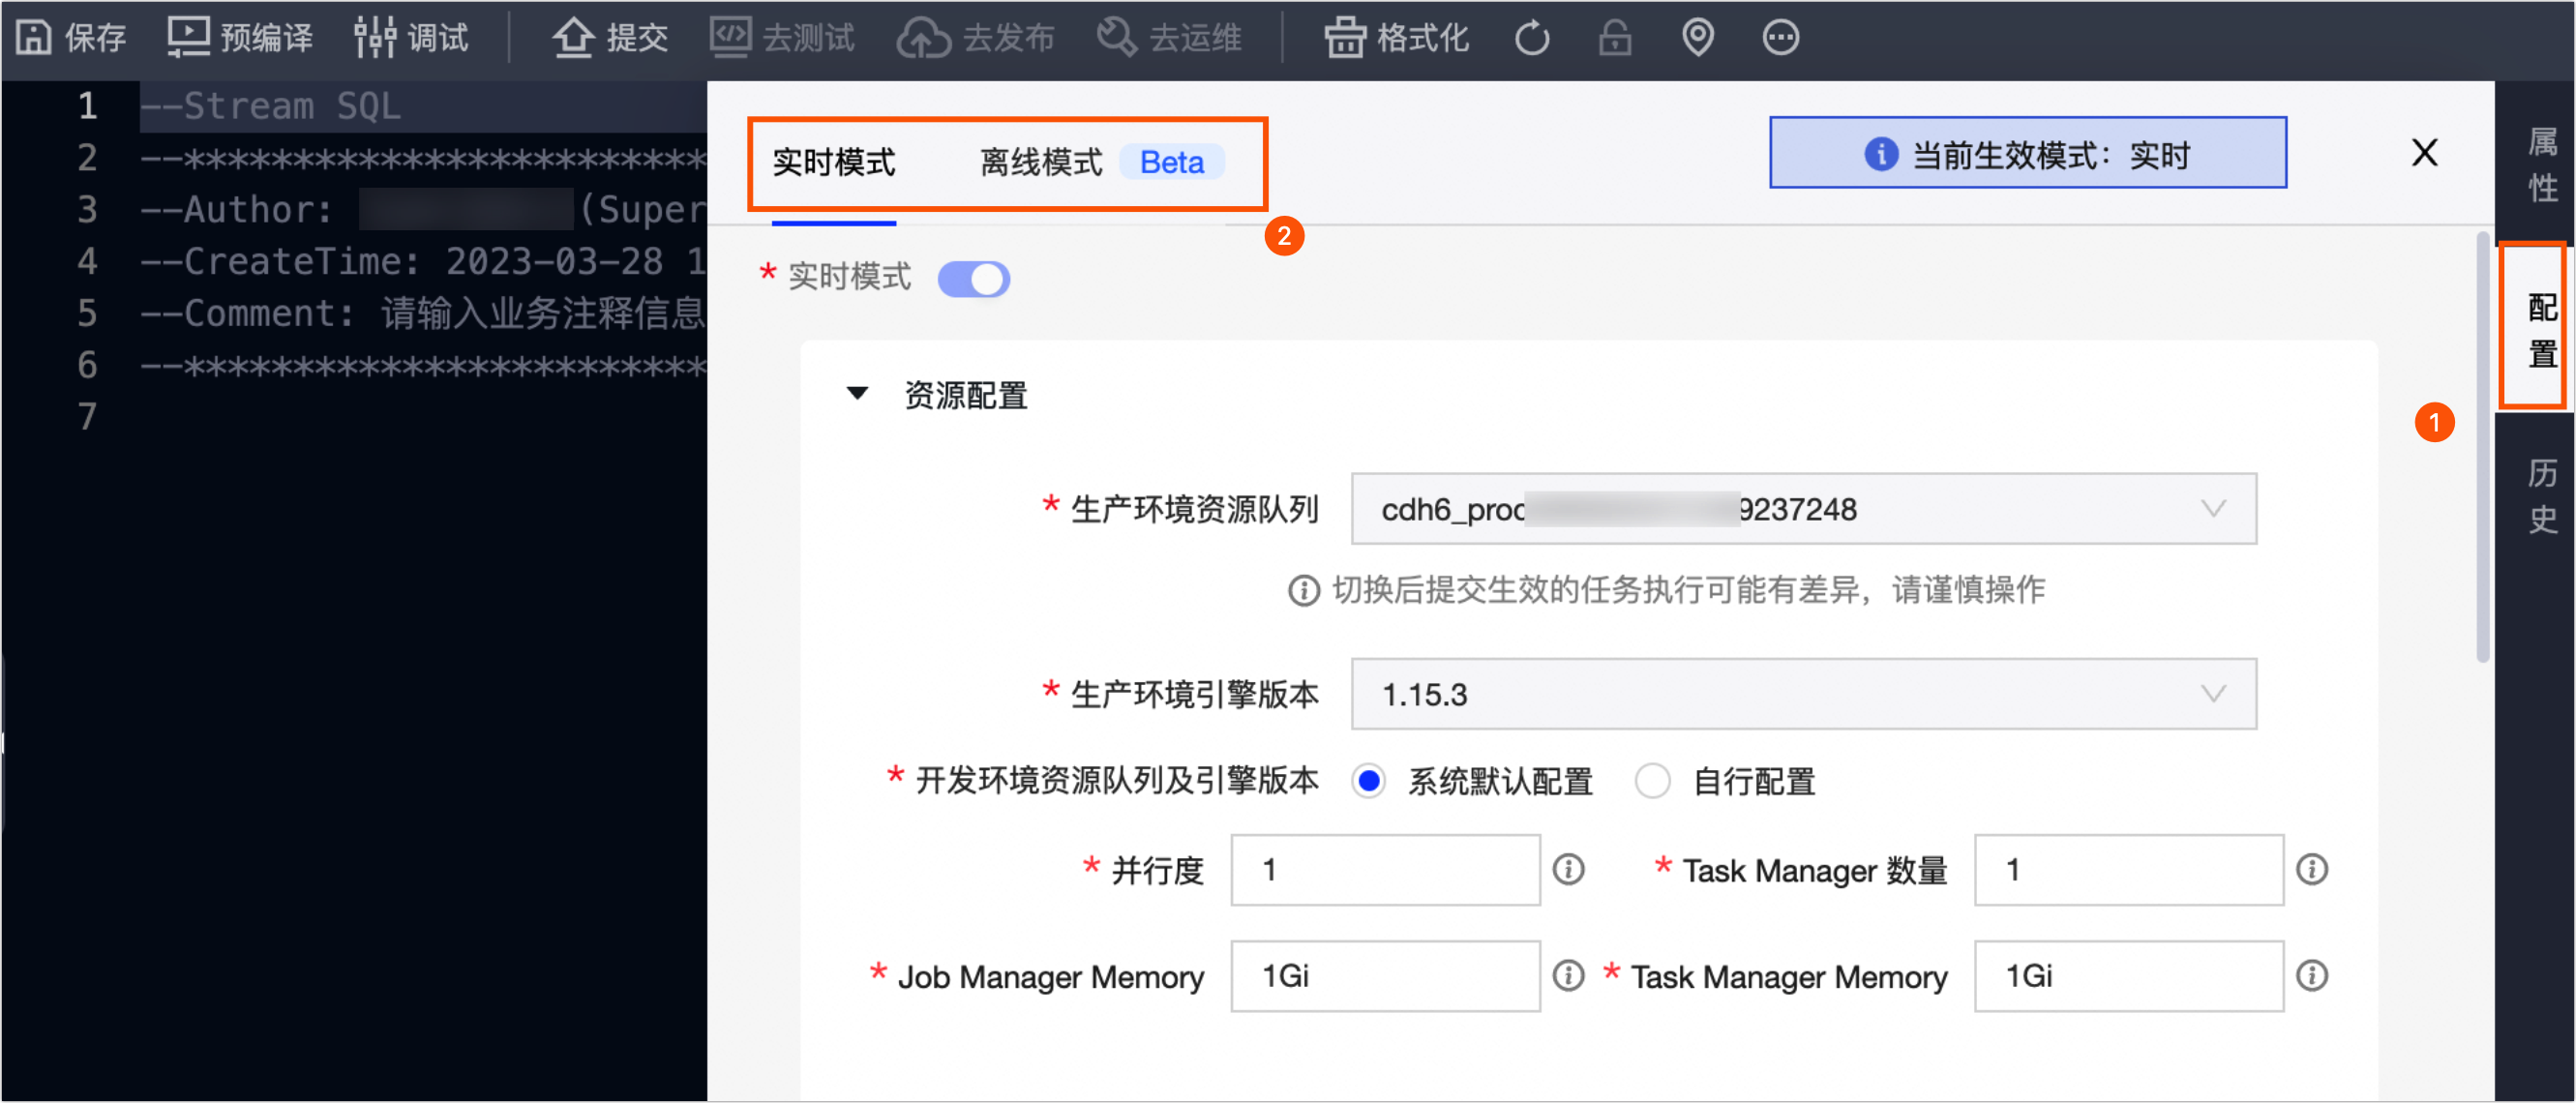
In the editor sidebar, click Configuration.
-
In the configuration dialog box, configure settings for the Flink task's real-time mode and batch mode.
NoteDataphin real-time computing supports unified stream and batch tasks. Its unified computing engine allows you to configure both stream and batch settings for a single piece of code, which generates a separate instance for each mode. To enable batch processing, you must enable batch mode on the task configuration page and configure the relevant resources, scheduling dependencies, and other settings.
-
Real-time mode
-
Resource configuration (required): Configure the resource queue, engine version, parallelism, number of TaskManagers, JobManager memory, and TaskManager memory for the production and development environments. For more information, see Configure Ververica Flink real-time mode resources.
-
Variable configuration: Assign values to variables used in the compute task code. This allows variables to be automatically replaced with their corresponding values. For more information, see Real-time mode variable configuration.
-
Checkpoint configuration: Configure a checkpoint for the Flink SQL task. This helps restore the program to its pre-crash state if it terminates unexpectedly. For more information, see Real-time mode checkpoint configuration.
-
State configuration: Configure the automatic cleanup period for data in the state. For more information, see Real-time mode state configuration.
-
Runtime parameters: Configure runtime parameters to control the execution behavior and performance of the Flink application. For more information, see Real-time mode runtime parameter configuration.
-
Dependency files: Configure resource files that the task depends on. For more information, see Real-time mode dependency file configuration.
-
Dependencies: Configure dependencies to help you understand the upstream and downstream tasks during debugging. For more information, see Real-time mode dependency configuration.
-
-
Batch mode (Beta)
ImportantBatch mode is not supported if the project's real-time compute source is open-source Flink with a deployment mode of k8s (Kubernetes).
-
Resource configuration (required): Configure the resource queue, engine version, parallelism, number of TaskManagers, JobManager memory, and TaskManager memory for the production and development environments. For more information, see Configure open-source Flink batch mode resources.
-
Variable configuration: Assign values to variables used in the compute task code. This allows variables to be automatically replaced with their corresponding values. For more information, see Batch mode variable configuration.
-
Runtime parameters: Configure runtime parameters to control the execution behavior and performance of the Flink application. For more information, see Batch mode runtime parameter configuration.
-
Dependency files: Configure resource files that the Flink SQL task depends on. For more information, see Batch mode dependency file configuration.
-
Scheduling configuration (required): Define the node's periodic schedule for the production environment. You can configure the scheduling cycle and effective date in the scheduling properties. For more information, see Batch mode scheduling configuration.
-
Dependencies (required): Configure dependencies to help you understand the upstream and downstream tasks during debugging. For more information, see Batch mode dependency configuration.
-
-
-
Click OK.
Step 4: Debug the Flink task code
-
Dataphin lets you debug your Flink code. Click the Debug button in the top menu bar to sample data and run a local debug session to ensure that your code is correct.
-
In the debug configuration dialog box, select Real-time Mode - FLINK Stream Task (real-time mode debugging) or Batch Mode - FLINK Batch Task (batch mode debugging).
-
Real-time mode debugging: Samples the corresponding real-time physical data. After the sampling is complete, local debugging starts in Flink Stream mode. For more information, see Real-time mode debugging.
-
Batch mode debugging: Samples the corresponding offline physical table data. After the sampling is complete, local debugging starts in Flink Batch mode. For more information, see Batch mode debugging.
-
Currently, you can debug only one mode at a time. After selecting a mode, sample its corresponding table data to start a debugging session.
Step 5: Submit the Flink SQL task
-
Click the Submit button in the top menu bar.
-
In the Submit dialog box, review the Submission Content and Pre-check information, and enter a commit message.
-
Click OK and Submit.
If your project is in Dev-Prod mode, you must publish the Flink SQL task to the production environment. For more information, see Manage release tasks.
Next steps
After the task is submitted, view and manage it in the O&M Center to ensure it runs properly. For more information, see View and manage real-time tasks.