Page access
On the Dataphin homepage, in the top navigation bar, choose Develop > Task O&M.
In the navigation pane on the left, choose Task O&M > Real-time Tasks to open the Real-time Tasks page.
In the top navigation bar, select the production or development environment.
Page overview
Area | Description |
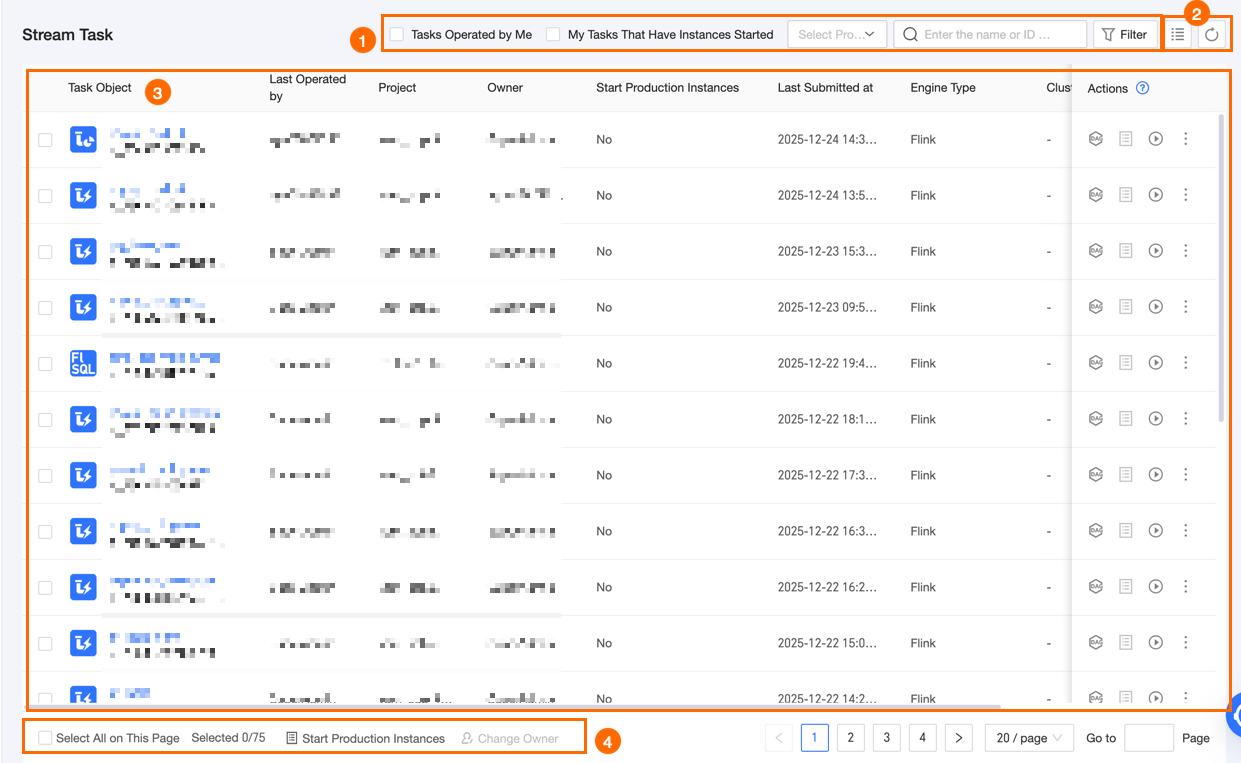
① Search and filter | You can quickly search for a real-time task by entering its name or ID. Tasks operated by me: Filters for tasks owned by the current user. My started instance tasks: Filters for started tasks owned by the current user. Project: Filters tasks by project. You can select multiple projects for which you have the O&M-Access directory permission. Filter: Click Filter to expand all filter options. The options include: Subtype: Available subtypes vary by engine type. The UI displays the applicable options. Last operator: Filters tasks by their last operator. Owner: Filters tasks based on the owner. If 'Tasks handled by me' is selected, this filter defaults to the currently logged-in account. Engine type: Filters tasks by engine type. Options include Ververica Flink, Blink, open-source Flink, and FusionInsight Flink. Resource queue: When the engine type is Blink or open-source Flink, you can filter tasks by the resource queue they run on. Cluster: For the Ververica Flink engine type, you can filter tasks by the cluster they use. Engine version: The engine version used by the task. Production instance started: Filters by whether a production instance is running. This applies only to Prod and Basic projects. Test instance started: Filters by whether a test instance is running. This applies only to Dev projects.
Reset: After expanding the filter options, click Reset to clear all filter conditions. Refresh: Click the Refresh icon to refresh the current real-time task list.
|
② List operations | |
③ Real-time task list | The Real-time Tasks page lists all real-time tasks. The list shows information such as the task object, last operator, owner, whether a production instance has started, last commit time, engine type, and engine version. You can adjust the width of each column. Your settings are saved in your browser but are lost if you clear its history and cookies. Task object: The real-time task submitted to the O&M center, which includes the script name and script ID. Last operator: The user who last operated on the task. Owner: The task's owner. Production instance started: The running status of the production instance for the real-time task. Project: The project to which the task belongs, displayed in the format ProjectEnglishName (ProjectChineseName). Last commit time: The time when the real-time task was last submitted to the O&M center. Engine type: The engine type used by the real-time task. Cluster: This field is displayed only when the engine type is Ververica Flink and shows the production environment cluster for the task. For other engine types, this field is empty. Resource queue: This field appears only for the Blink or open-source Flink engine type and shows the resource queue the task uses. For other engine types, this field is empty. Engine version: The engine version used by the task.
The Actions column in the list displays the available O&M operations for each real-time task. For more information about individual operations, see Individual operations. |
④ Batch operations | In the batch operations area, you can perform actions like changing the owner or starting production instances on multiple tasks at once to improve O&M efficiency. For more information about the batch operations supported for real-time tasks, see Batch operations. |
Manage real-time tasks
Individual operations
Operation | Description |
DAG | Click the  icon in the Actions column for the target real-time task to view its DAG. For more information, see Operations supported on the real-time task DAG. icon in the Actions column for the target real-time task to view its DAG. For more information, see Operations supported on the real-time task DAG. |
View instances | Click the  icon in the Actions column for the target real-time task to view the instances generated by its operation. icon in the Actions column for the target real-time task to view the instances generated by its operation.
Note This operation is available only for real-time tasks that have started and generated instances. |
Start instance | Click the  icon in the Actions column of the target real-time task to start the instance. For more information, see Start a real-time instance. icon in the Actions column of the target real-time task to start the instance. For more information, see Start a real-time instance.
Note You can only start an instance that is not started. |
View task code | Click the  icon in the Actions column of the target real-time task and select View Task Code. icon in the Actions column of the target real-time task and select View Task Code. |
View task parameters | Click the icon in the Actions column of the target real-time task and select View Task Parameters to view the parameters defined for the real-time task node. |
Change owner | In the production environment, click the icon in the Actions column of the target real-time task, select Change Owner, and in the Change Owner dialog box, select the new owner.
Note You can only select a member who is in the project and has O&M permissions. |
Modify resource configuration | Click the icon in the Actions column of the target real-time task and select Modify Resource Configuration to modify the resource parameters for the real-time task, such as Core and Memory.
Note You can modify the resource configuration only for tasks in Prod and Basic projects. The FusionInsight Flink engine does not support modifying the resource configuration. |
Batch operations
Operation | Description |
Start production instance | You can start multiple real-time integration instances or real-time development instances at the same time.
Note This feature applies only to Prod and Basic projects, and all selected real-time tasks must be not started. Start real-time integration instance: Select one or more real-time integration tasks that are not started, or click Select All on Page. Then, click Start Production Instance and choose Start Real-time Integration Instance. In the Batch Start Real-time Integration Instances dialog box, configure the startup settings. Start n instances: Displays the number and names of the instances to be started. Multiple instance names are separated by commas (,). Start Scope: Select Incremental + Full (available only for full and incremental real-time integration tasks) or Incremental Only. Full Synchronization: This section is configurable only when you set Start Scope to Incremental + Full. Rerun Method: You can choose Initialize or Resume. Initialize: Starts temporary full synchronization tasks for all sync objects. After all temporary tasks are complete, the real-time incremental synchronization task starts. Resume: Starts temporary full synchronization tasks for all sync objects that are not synchronized (excluding those that are completed, stopped, or ignored). After all temporary tasks are complete, the real-time incremental synchronization task starts.
Memory (Optional): Decimals and negative numbers are not allowed. The maximum memory is 8,192 MB (8 GB). Rate Limit (Optional): Sets a speed limit based on data volume. Decimals and negative numbers are not supported. The default value is 10 MB/s. If left empty, no rate limiting is applied. Concurrency (Optional): Sets the maximum expected concurrency for the full synchronization task. Decimals and negative numbers are not supported. The default value is 10. If left empty, the concurrency is set to 3.
Note You can configure the scheduling resource group, memory, rate limiting, and concurrency only in the production environment. Incremental Synchronization: This section is configurable only when you set Start Scope to Incremental Only. Start Mode: Only Start Without State is supported. Data Read Timestamp: Setting a specific start time causes all source tables that support the startTime parameter (such as Log Service, Kafka, MySQL, MongoDB, and OceanBase) to begin reading data from that point in time.
Note Parameter settings in the SQL task code take precedence over this specified start time.
Click OK to start the instances.
Start real-time development instance: Select one or more real-time development tasks that are not started, or click Select All on Page. Then, click Start Production Instance and choose Start Real-time Development Instance. In the Batch Start Real-time Development Instances dialog box, configure the startup settings. Start n instances: Displays the number and names of the instances to be started. Multiple instance names are separated by commas (,). Start Mode: You can choose to start without state or from a valid state. Start Without State: Starts the task without any initial state. Start from Last Valid State: Starts the task from an existing, valid state.
Note If any of the selected instances are stateless, you can only choose the Start Without State option for the batch operation.
Data Read Timestamp: Setting a specific start time causes all source tables that support the startTime parameter (such as Log Service, Kafka, MySQL, MongoDB, and OceanBase) to begin reading data from that point in time.
Note Parameter settings in the SQL task code take precedence over this specified start time. Business Date: You can assign values to time variables by setting a business date. Time-related variables are calculated based on this date, which defaults to the current day.
Note Parameter settings in the SQL task code take precedence over this specified business date.
Click OK to start the instances.
|
Change owner | You can change the owner for multiple real-time tasks at the same time. Select multiple real-time tasks, or click Select All on Page, and then click Change Owner. In the Change Owner dialog box, select a new owner. Click OK.
|
DAG operations
When you hover over a node in the DAG, you can view its name, type, scheduling cycle, owner, and description. The following table describes the O&M operations available for real-time tasks in the DAG view.
Operation | Description |
Expand parent nodes | Expands the DAG to show the parent or child nodes of the selected node. |
Expand child nodes |
Start real-time instance | To run a real-time instance, you need to click  to manually start the instance and configure its startup information. For more information, see Start a real-time instance. to manually start the instance and configure its startup information. For more information, see Start a real-time instance. |
View real-time instance | Opens the real-time instance page, where you can view the instances generated by the current task. |
View node code | View the code of the real-time task node. |
View task parameters | View the task parameters of the real-time task node. |
View operation log | View the operation logs for the real-time task node. |
Edit dev node | Opens the edit page for the current task in the Dev project to edit the task. This operation applies only to the Dev-Prod development model. |
Edit node | Opens the edit page for the current task to edit it. This operation applies only to Basic mode. |
View production node | View the configuration of the current task in the Prod project. |
View task parameters | View the task's parameters. |
View topology | View the topology of the real-time task's resource group nodes and component nodes. |
Modify resource configuration | Modify the resource parameters for running the real-time task, such as Core and Memory.
Important You can modify the resource configuration only for tasks in Prod and Basic projects. The FusionInsight Flink engine does not support modifying the resource configuration. |