Cloud Firewall provides a built-in threat detection engine that blocks malicious traffic and common internet attacks in real time and delivers virtual patching. On the Mitigation Settings page, you can configure the engine operating mode and enable modules such as threat intelligence, basic protection, intelligent defense, and virtual patching to block intrusions.
IPS capabilities for the Internet border
Threat detection engine operating modes
After you enable Cloud Firewall, the threat detection engine runs in Block Mode by default. Cloud Firewall automatically selects the block mode level based on your traffic. Basic protection and virtual patching block threats only when Block Mode is enabled. If Block Mode is disabled, the intrusion prevention feature monitors threats and malicious traffic without blocking them.
For operating mode details, see IPS capabilities overview.
Log on to the Cloud Firewall console. In the left navigation pane, choose .
On the Internet Border tab, set the Threat Engine Mode on the far right.
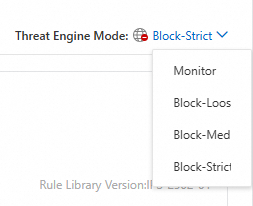
Select one of the following modes for the threat detection engine:
Monitor: Cloud Firewall logs and alerts on attacks but does not block them. Threat intelligence, basic protection, and virtual patching all operate in Monitor mode.
Block: Cloud Firewall blocks malicious traffic to prevent intrusions.
Select a block mode level:
Block - Loose: Coarse-grained protection with low false positive rates. Suitable for false-positive-sensitive scenarios.
Block - Medium: Balanced protection between Loose and Strict. Suitable for routine O&M.
Block - Strict: Fine-grained protection covering nearly all rules. May have a higher false positive rate than Medium. Suitable for false-negative-sensitive scenarios such as major event support.
IPS features
Internet border IPS supports Basic protection, Virtual patching, Threat intelligence, Intelligent defense, Data leak detection, and IPS Private IP Tracing. Use the switches on the left to enable or disable each feature.
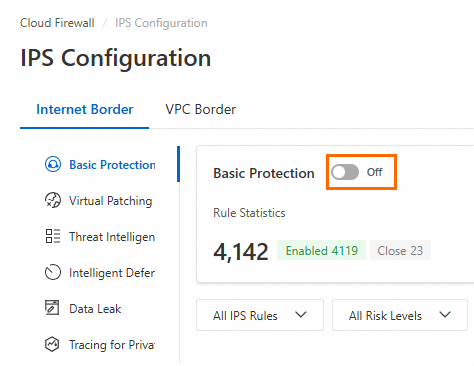
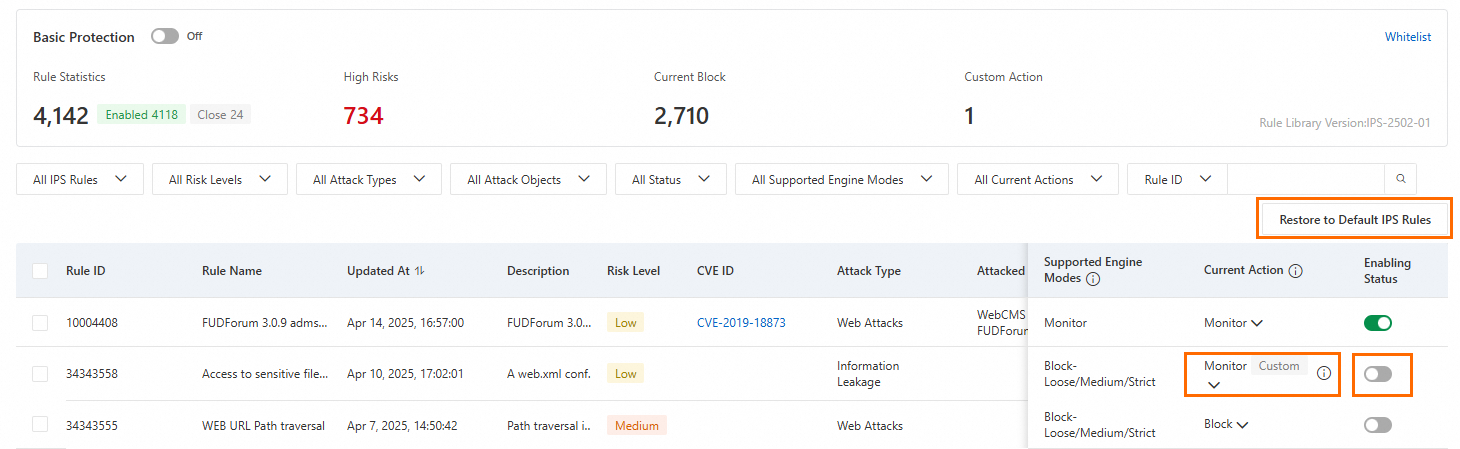
Basic protection
Basic Protection is enabled by default. Cloud Firewall activates detection rules for common threats, including command execution vulnerabilities and command-and-control (C&C) server connections.
Modify a protection rule: Change the value in the Current Action column. Modified rules are marked as custom rules.
Restore default protection rules: Click Restore to Default IPS Rules, then click OK.
Enable or disable a rule: Click the switch in the Status column.
Enabled: The rule is active. Custom protection rules take precedence over default rules.
Disabled: The rule is inactive.
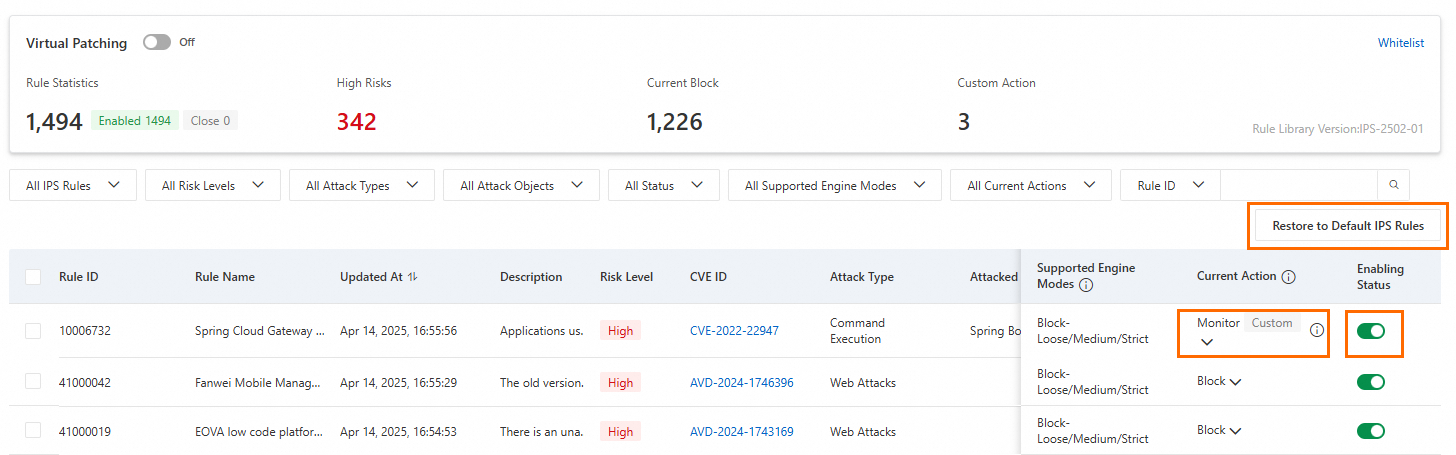
Virtual patching
Virtual Patching is enabled by default. Cloud Firewall applies network-layer hot patches to block attacks that exploit important and emergency vulnerabilities in real time, without requiring server-side patch installation. Keep virtual patching enabled for automatic real-time updates.
Modify a protection rule: Change the value in the Current Action column. Modified rules are marked as custom rules.
Restore default protection rules: Click Restore to Default IPS Rules, then click OK.
Enable or disable a rule: Click the switch in the Status column.
Enabled: The rule is active. Custom protection rules take precedence over default rules.
Disabled: The rule is inactive.
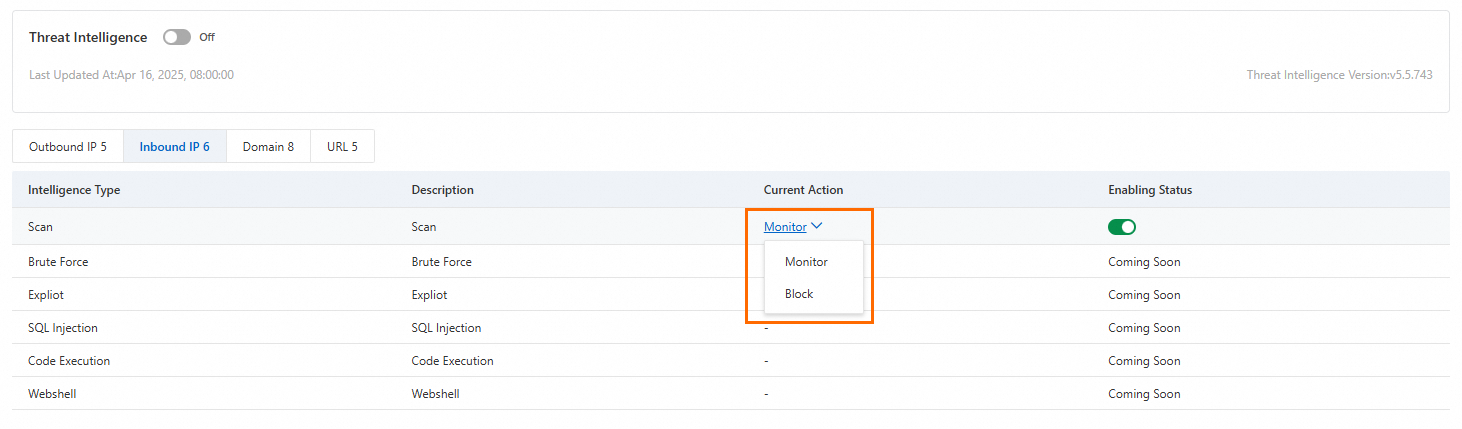
Threat intelligence
Threat Intelligence is enabled by default. Cloud Firewall synchronizes malicious IP addresses detected across the Alibaba Cloud network—including malicious access sources, scan sources, and brute-force attack origins—and applies Monitor or Block actions to enable precise threat blocking.
Intelligent defense
Intelligent Defense is enabled by default. Cloud Firewall learns from cloud-wide attack data to improve threat detection accuracy. Intelligent defense is currently supported only in Monitor mode.
To enable Intelligent Defense, first enable Basic Protection.

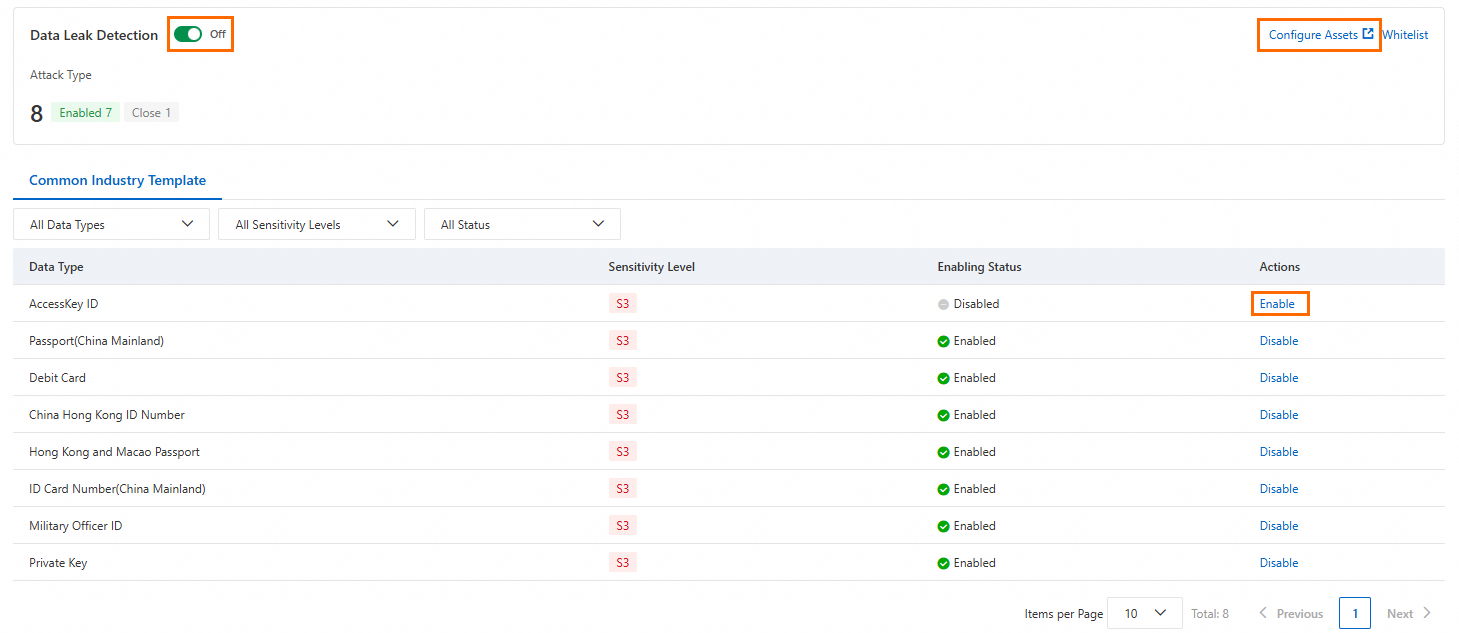
Data breach
Cloud Firewall inspects outbound traffic from your assets to the internet for sensitive data to identify data leakage risks.
Enable data leak detection for your assets.
In the General Industry Template list, review detectable data types and enable detection as needed.
Click Apply to Assets, locate the target public asset, and click Enable Data Leak Detection in the Actions column.
The Data Loss Prevention page displays a dashboard of asset information, leak events, and risk payloads. Data Leak Detection.
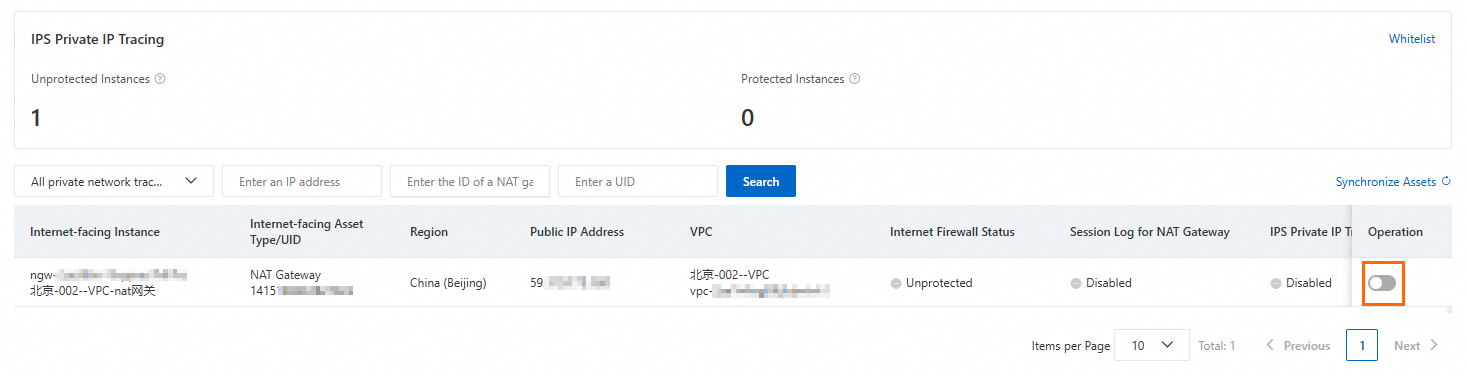
IPS Private IP Tracing
In NAT Gateway and Server Load Balancer deployments where real service instance IP addresses are not exposed, identifying the specific instance under attack is challenging. Private IP Traceback automatically correlates NAT gateway session logs to display the corresponding private IP address, enabling attack attribution and rapid identification of risky assets.
This feature currently supports only public assets of the NAT Gateway type.
Enabling IPS Private IP Tracing incurs no additional Cloud Firewall charges. However, the system creates an index for your session logs of NAT gateways and performs queries, which generates Simple Log Service (SLS) fees. SLS billing standards.
When IPS Private IP Tracing is enabled, if the NAT gateway session log index is not enabled or is missing required fields, the system automatically recreates the index or adds the missing fields.
The Private IP Traceback page lists public assets that support tracing. For each NAT Gateway, enable Internet Firewall Status and NAT Gateway Session Logs before Cloud Firewall can perform tracing. Click the switch in the Actions column and follow the prompt to enable these features. Alternatively, refer to:
Enable Internet Firewall Protection: Enable the firewall
Enable NAT Session Log: NAT session log configuration flow
NoteNAT session logs are not required if you use only DNAT.
After both Internet Firewall Protection and NAT Session Log are enabled, click OK to enable Private IP Traceback. When the Private IP Traceback shows Enabled, the tracing feature is active for this public asset.
NoteIPS Private IP Tracing relies on the NAT Gateway session log feature. Due to data latency in capturing and delivering NAT Gateway logs, private IP tracing results may be delayed by approximately 20 minutes.
Protection whitelist
To allow trusted bidirectional traffic for specific IPv4 and IPv6 destination or source IP addresses, add them to the protection whitelist. Whitelisted traffic bypasses basic protection, intelligent defense, and virtual patching rules. The custom destination and source IP whitelists each support up to 50 entries.
Click Allowlist on the right side of the page to configure it.

The protection whitelist applies only to basic protection, intelligent defense, and virtual patching.
IPS capabilities for the VPC border
Configure IPS for the VPC border only after enabling the VPC firewall.
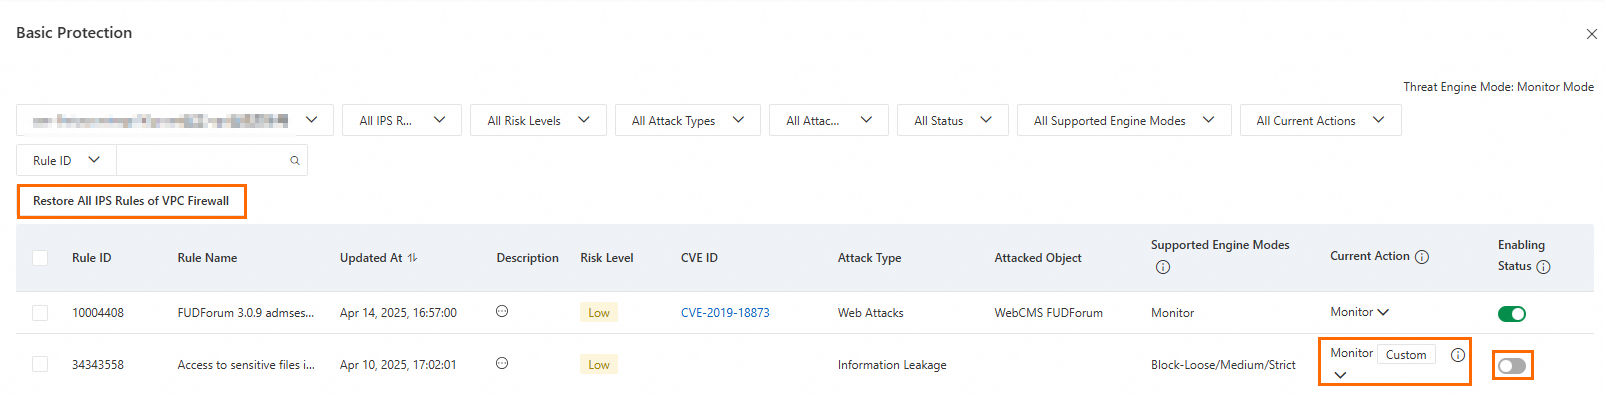
Configure basic protection policies
Basic protection provides fundamental intrusion prevention, including blocking command execution vulnerabilities and managing C&C server connections.
Click .
In the Basic Protection panel, configure the Current Action and Status for the rules.
Modify a protection rule: Change the value in the Current Action column. Modified rules are marked as custom rules.
Restore default protection rules: Click Restore All IPS Rules of VPC Firewall, then click OK.
Enable or disable a rule: Click the switch in the Status column.
Enabled: The rule is active. Custom protection rules take precedence over default rules.
Disabled: The rule is inactive.
Enabled protection rules apply to all VPC firewalls in your services.
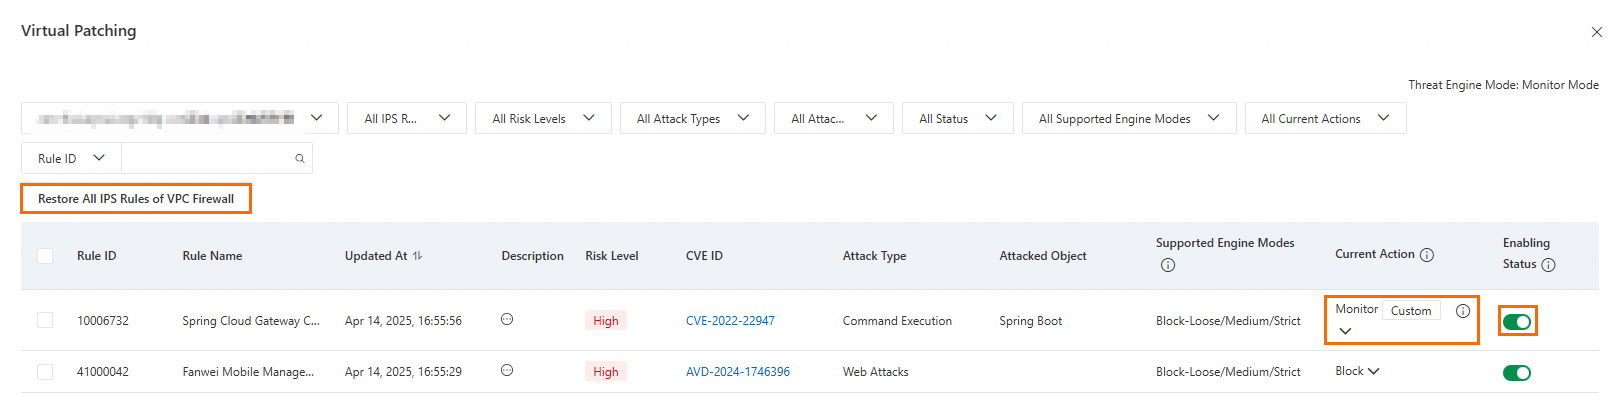
Configure virtual patching rules
Cloud Firewall applies network-layer hot patches to block attacks that exploit important and emergency vulnerabilities in real time, without requiring server-side installation. Keep virtual patching enabled for automatic real-time updates.
Click View Virtual Patching Policies.
In the Virtual Patching panel, configure the Current Action and Status for the rules.
Modify a protection rule: Change the value in the Current Action column. Modified rules are marked as custom rules.
Restore default protection rules: Click Restore All IPS Rules of VPC Firewall, then click OK.
Enable or disable a rule: Click the switch in the Status column.
Enabled: The rule is active. Custom protection rules take precedence over default rules.
Disabled: The rule is inactive.
Enabled virtual patching rules apply to all VPC firewalls in your services.
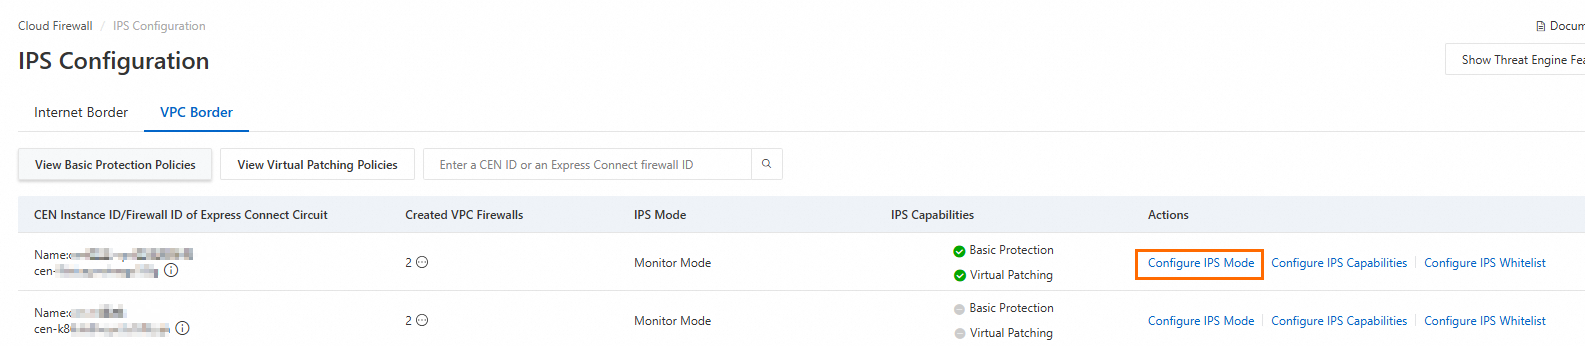
Configure the IPS protection mode
Click Configure IPS Mode.
In the Configure IPS Mode dialog box, select a protection mode and click OK.
Select one of the following IPS protection modes:
-
monitor mode: In this mode, Cloud Firewall monitors malicious traffic and generates alerts.
-
block mode: In this mode, Cloud Firewall blocks malicious traffic and stops intrusion activities. You can select different levels of block mode based on your protection requirements.
-
Loose: blocks attacks in a loose manner by using rules that prevent a high rate of false positives. This level is suitable for business that requires the false positive rate to be minimized.
-
Medium: blocks attacks in a standard manner by using common rules. This level is suitable for daily O&M.
-
Strict: blocks attacks in a strict manner by using all rules. This level is suitable for business that requires the false negative rate to be minimized, such as major events or cybersecurity protection activities launched by public service sectors. The activities are rehearsals for network attack and defense. This level may cause a higher false positive rate than the Medium level.
-
-
Configure IPS mitigation capabilities
Configure basic protection and virtual patching. Cloud Firewall then inspects traffic according to the enabled rules.
Locate the target CEN instance ID or Express Connect firewall ID. In the Actions column, click Configure IPS Capabilities to configure the settings.
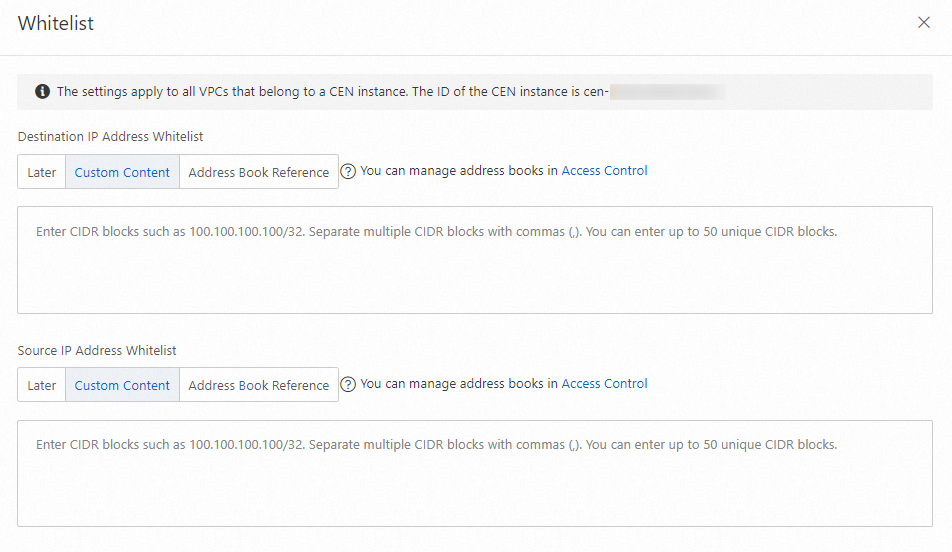
Configure the IPS whitelist
To allow trusted destination or source IP addresses, add them to the protection whitelist. Whitelisted traffic bypasses basic protection, intelligent defense, and virtual patching rules. The custom destination and source IP whitelists each support up to 50 entries.
Locate the target CEN instance ID or Express Connect firewall ID. In the Actions column, click Configure IPS Whitelist to configure the settings.
References
After enabling Basic Protection, go to Intrusion Prevention to view blocked abnormal inbound/outbound traffic from the internet and between VPCs.
After enabling Cloud Firewall, go to Vulnerability Prevention to view network-exploitable vulnerabilities detected by Security Center and synced to Cloud Firewall, along with attack prevention capabilities.
After enabling Cloud Firewall, go to Threat Detection to view intrusion activity details detected by the threat detection engine.
FAQ: