First, let's see why a job is required. A pod is the minimum scheduling unit in Kubernetes. You can use pods to run any tasks. In this case, you may have the following questions:
A job in Kubernetes provides the following features:
The following example shows how the job works.
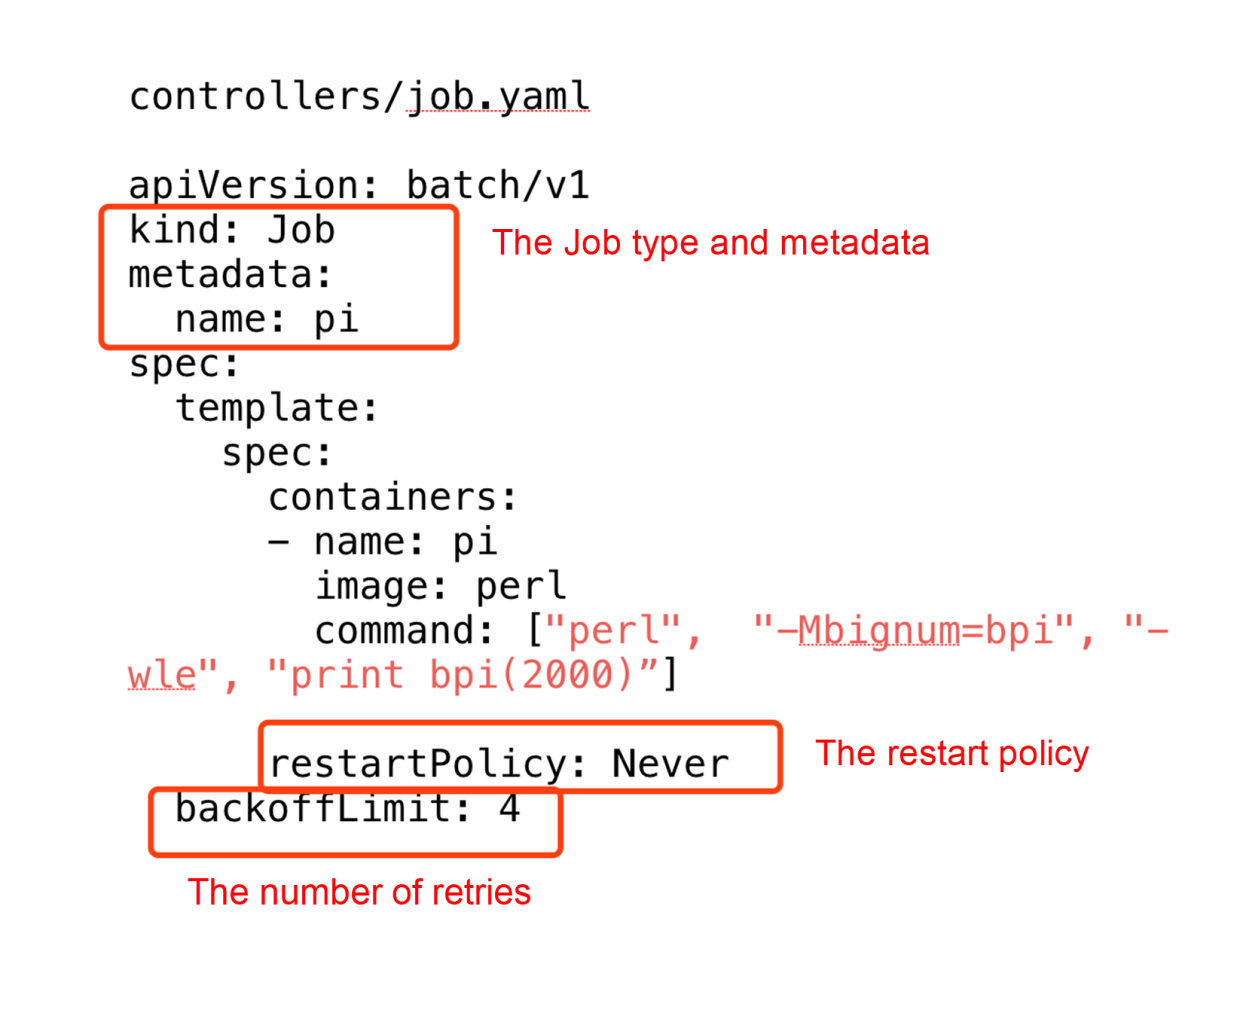
The preceding figure shows the simplest job in YAML format. This job is actually a type of job controller. The name field in metadata specifies the job name and the spec.template field indicates the specification of a pod.
The content here is the same, except for two more items:
Therefore, focus on the restartPolicy and backoffLimit parameters in the job.
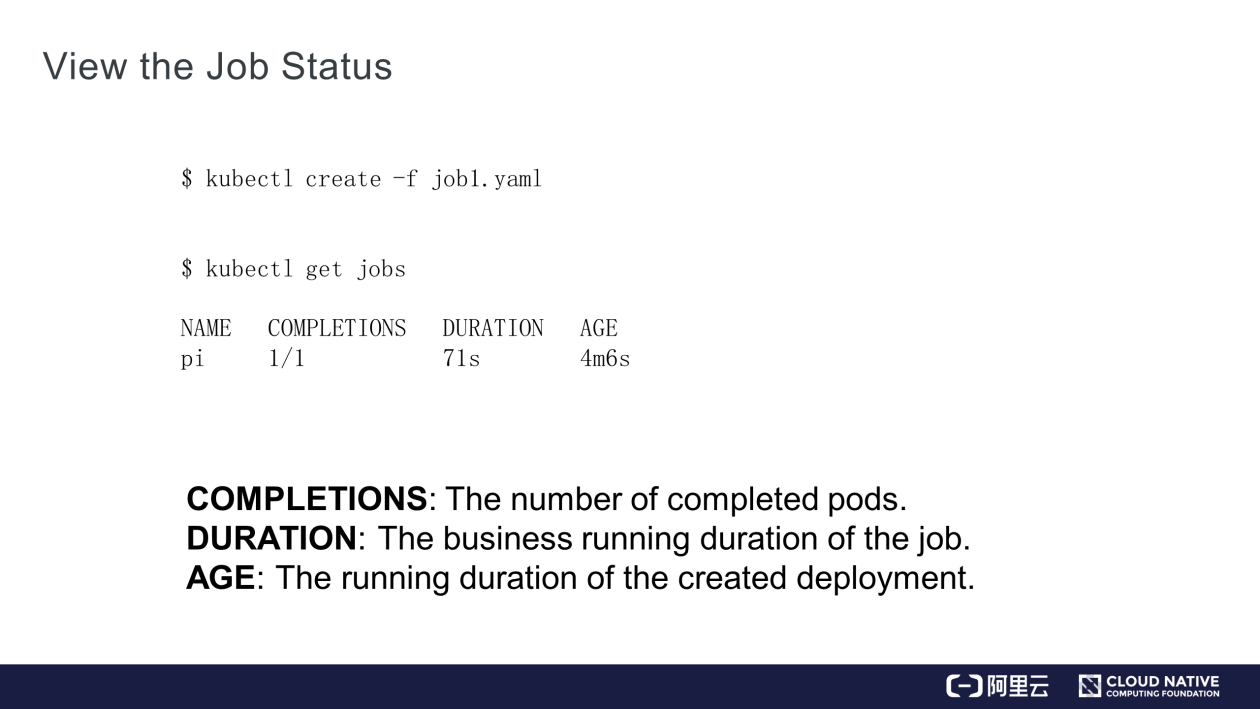
After creating a job, run the kubectl get jobs command to check the status of the job. The command output contains NAME (job name), COMPLETIONS (completed pods), DURATION (running duration), and AGE.
A job is executed based on pods. The job that has been just initiated creates a pod named pi and calculates the pi. The pod is named in the format of ${job-name}-${random-suffix}. The following figure shows the pod in YAML format.
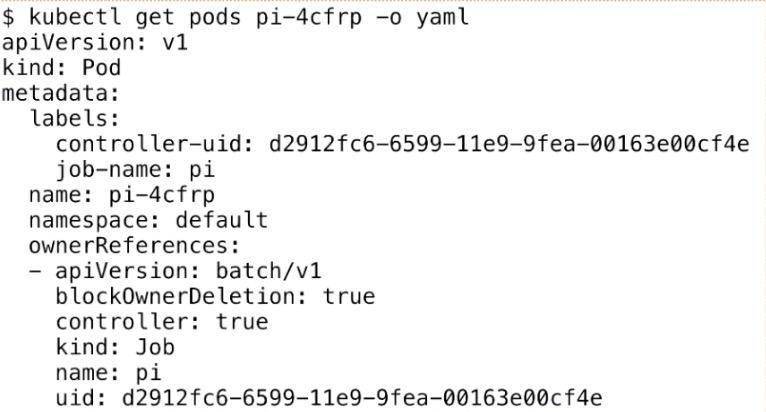
Compared to a common pod, this pod contains ownerReferences, which declares the upper-layer controller that manages the pod. As shown in the figure, the ownerReferences parameter indicates that the pod is managed by the previous job, batch/v1. Then, check the controller of the pod as well as the pods that belong to the job.
Sometimes, you may want n pods to run in parallel for quick execution of a job. Meanwhile, you may not want too many pods to run in parallel due to limited nodes. With the concept of pipeline in mind, the job can help you control the maximum parallelism.
It is implemented based on the completions and parallelism parameters.
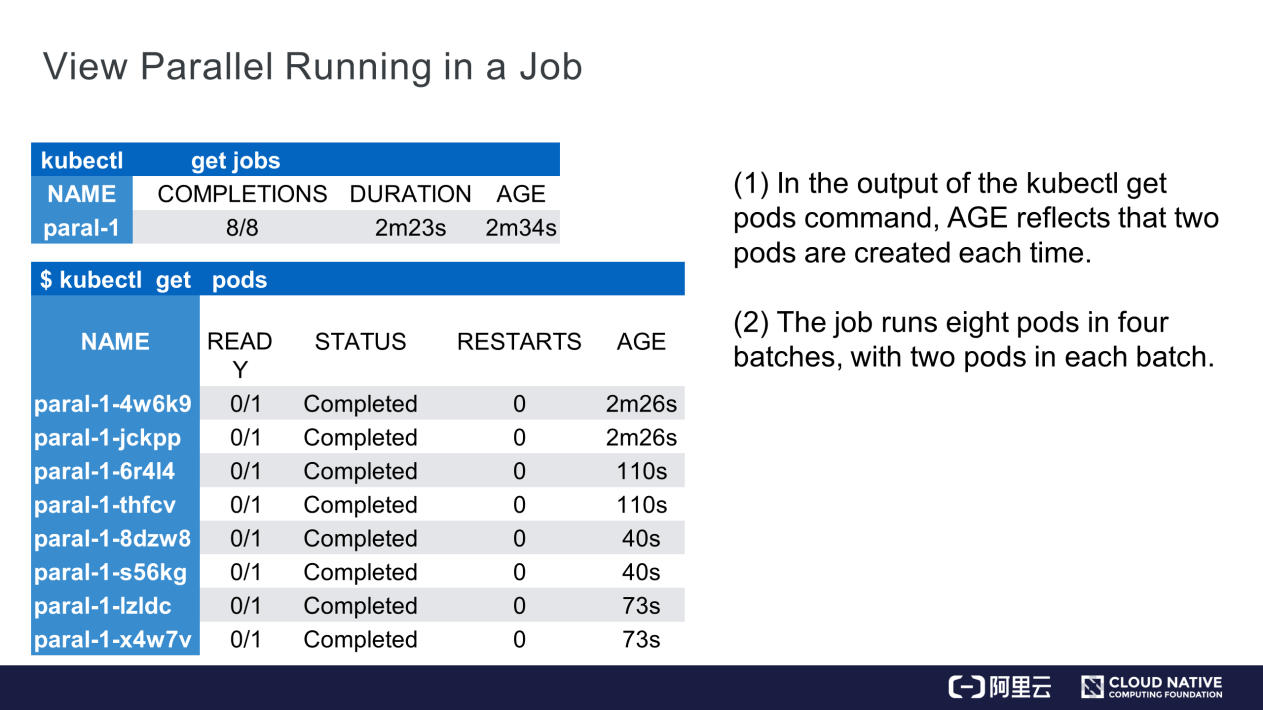
The preceding figure shows the effect of running the job. In this figure, you can see the job name, 8 created pods, and the running duration of the business in the job, that is, 2 minutes and 23 seconds.
In addition, see eight pods, all of which are in the Completed state with respective AGE values. From the bottom up, the AGE values are 73s, 40s, 110s, and 2m 26s. Each group has two pods with the same duration. The pods with the duration 40s were last created, and the pods with the duration 2m26s were created first. In other words, two pods were created at the same time, and then run and completed parallelly.
For example, use the parallelism parameter to control the number of pods that run parallelly in the job, from which you see the function of the buffer queue size in the pipeline or buffer.
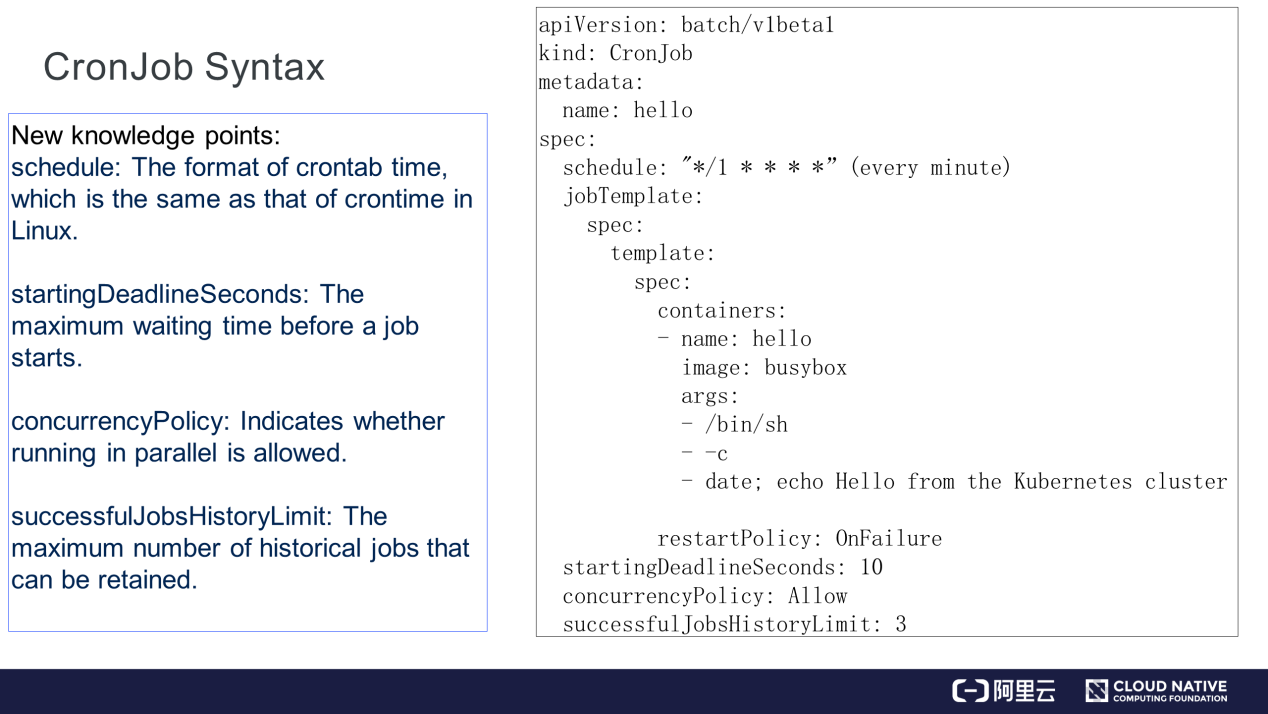
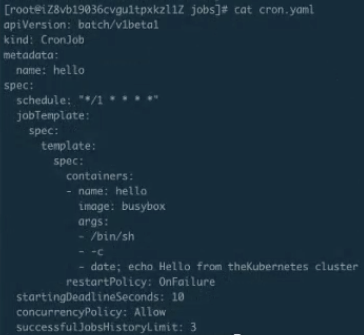
This section introduces another type of job that is called CronJob or a scheduled job. CronJobs are very similar to common jobs, except that they support scheduling. For example, CronJob may be executed at a specified time, especially for cleaning at night. CronJob is executed every n minutes or hours, and therefore it is also called a scheduled job.
Compared to a common job, CronJob has more fields:
This section describes how to use the job.
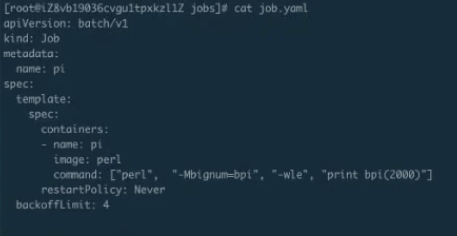
The job.yaml job is a simple job for calculating the pi. Run the kubectl creat-f job.yaml command to submit the job. By running the kubectl get jobs command, you can see that the job is running. By running the kubectl get pods command, you can see that the pod running is completed. Then, check the job and pod logs. The following figure shows the pi.

The following figure shows another example.
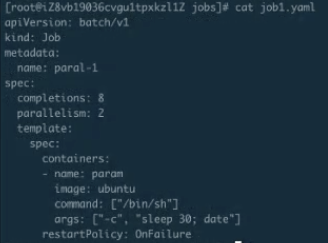
After a parallel job is created in the previous step, see another parallel job.

Two pods have been running for about 30 seconds.
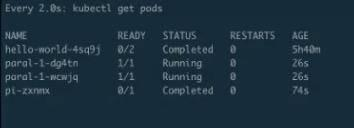
After 30 seconds, another two pods will start to run.
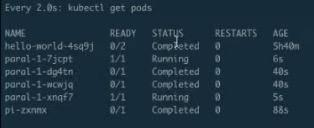
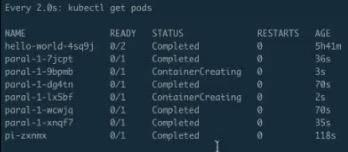
The running of the first two pods is completed and the other two pods are running. That is, two pods will run in parallel at an interval of about 40 seconds, and a total of 4 batches of execution will occur, with 8 pods in total. After the running of all the pods is completed, the buffer queue feature for parallel execution is implemented.
After a period, observe that the second batch is completed and the third batch starts.
The third example is about CronJob running. A CronJob runs a job once every minute.
Running the kubectl get cronjobs command shows that a CronJob is available. Since the CronJob runs a job every minute, wait for a moment.
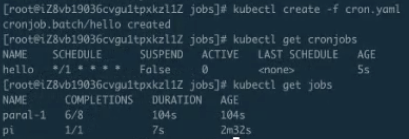
Also, note that the last job has been running for 2 minutes and 12 seconds, with completion progress of 7/8 or 6/8. When the completion progress approaches 7/8 or 8/8, the most recent job is about to complete. In this case, two jobs are running each time. The parallel running of two jobs facilitates the running of certain large workflows or work tasks.

In the preceding figure, see the hello-1559206860 job, which is a CronJob. One minute later, a job is automatically created. If the CronJob is not terminated, it creates such a job every minute.
CronJob is used to run certain cleanup tasks or scheduled tasks. For example, CronJob effectively runs tasks such as Jenkins creation.
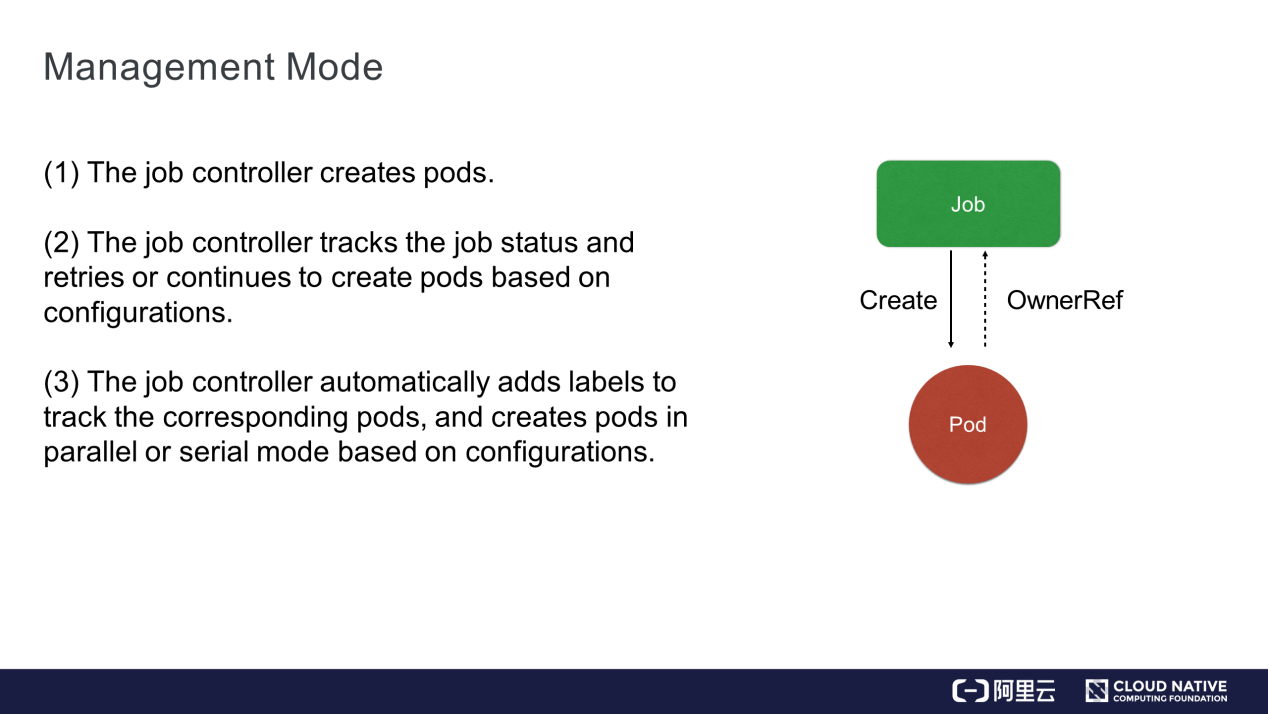
This section describes the job architecture design. The job controller creates related pods, tracks job statuses, and retries or continues to create pods according to the updated configurations. Each pod has its own label. The job controller adds labels to track the corresponding pods and creates pods in parallel or in sequence.
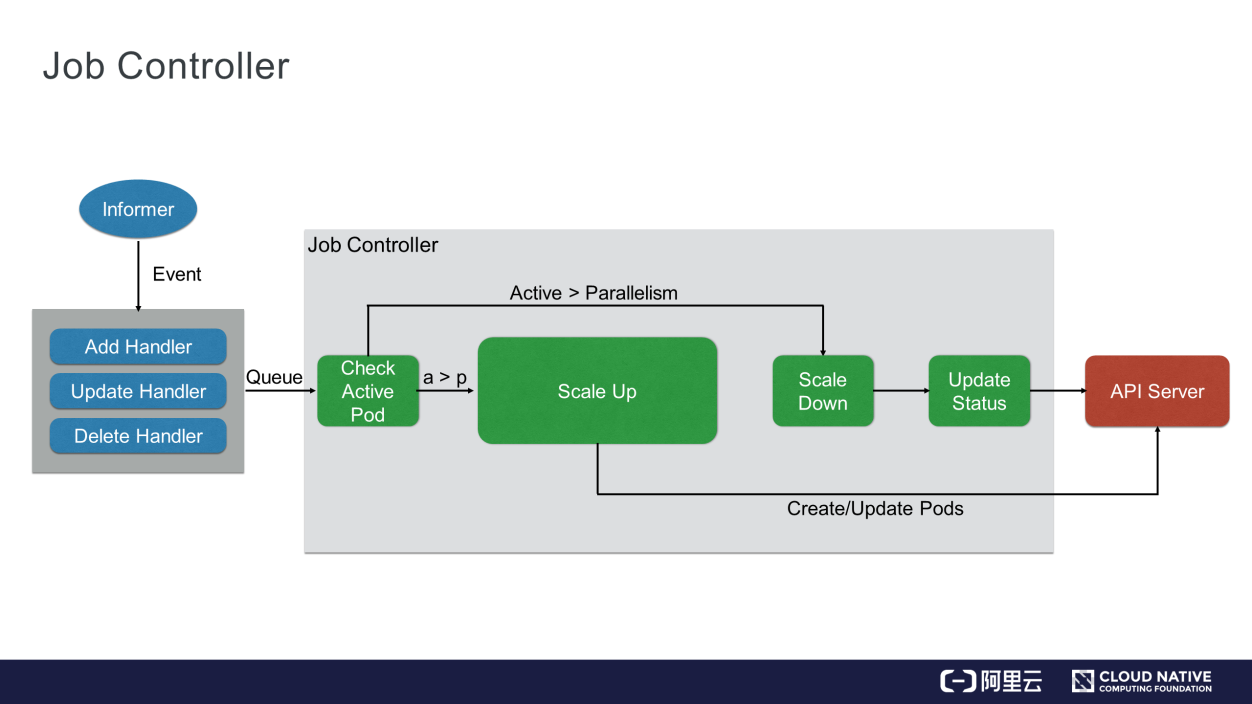
The preceding figure shows the workflow of a job controller. All jobs constitute a controller, which watches the API server. Each time you submit the YAML file of a job, the job controller transfers the file to etcd through the API server. Then, the job controller registers several handlers, which send the requests of operations such as addition, update, and deletion to the job controller through a memory-level message queue.
The job controller checks whether a pod is running. If not, it scales up to create the pod. If yes or the number of running pods exceeds the threshold, the job controller scales down to reduce the pods. When the pods change, the job controller updates their statuses in a timely manner.
The job controller also checks whether the job is parallel or serial, and determines the number of pods based on the specified parallelism or serialism. Finally, the job controller updates the overall status of the job to the API server. Then, you can view the final effect of the entire workflow.
This section introduces another controller, DaemonSet. What if DaemonSet is not available? You may have the following questions:
DaemonSet, a default controller provided by Kubernetes, is a daemon process controller that is able to fulfill the following purposes:
The following figure shows an example of DaemonSet syntax. The DaemonSet.yaml file contains more items than the job.yaml file.
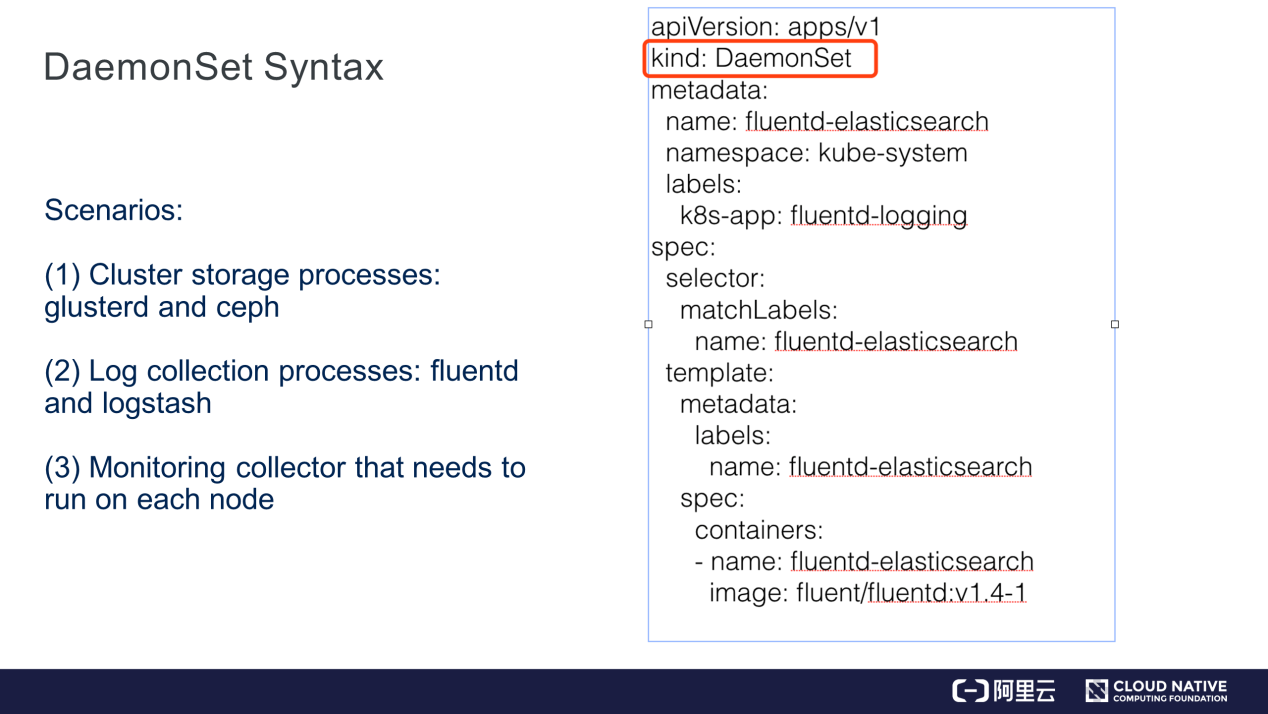
First, the kind named DaemonSet is introduced. It is easy to understand the YAML file if you already have some knowledge about the deployment controller. For example, matchLabels is used in this case to manage the corresponding pods. The DaemonSet controller finds a certain pod based on the label selector only when the pod label matches the DaemonSet controller label. The content of the spec.container field is the same as that in the job.yaml file.
Here, fluentd is used as an example. DaemonSet is commonly used in the following scenarios:
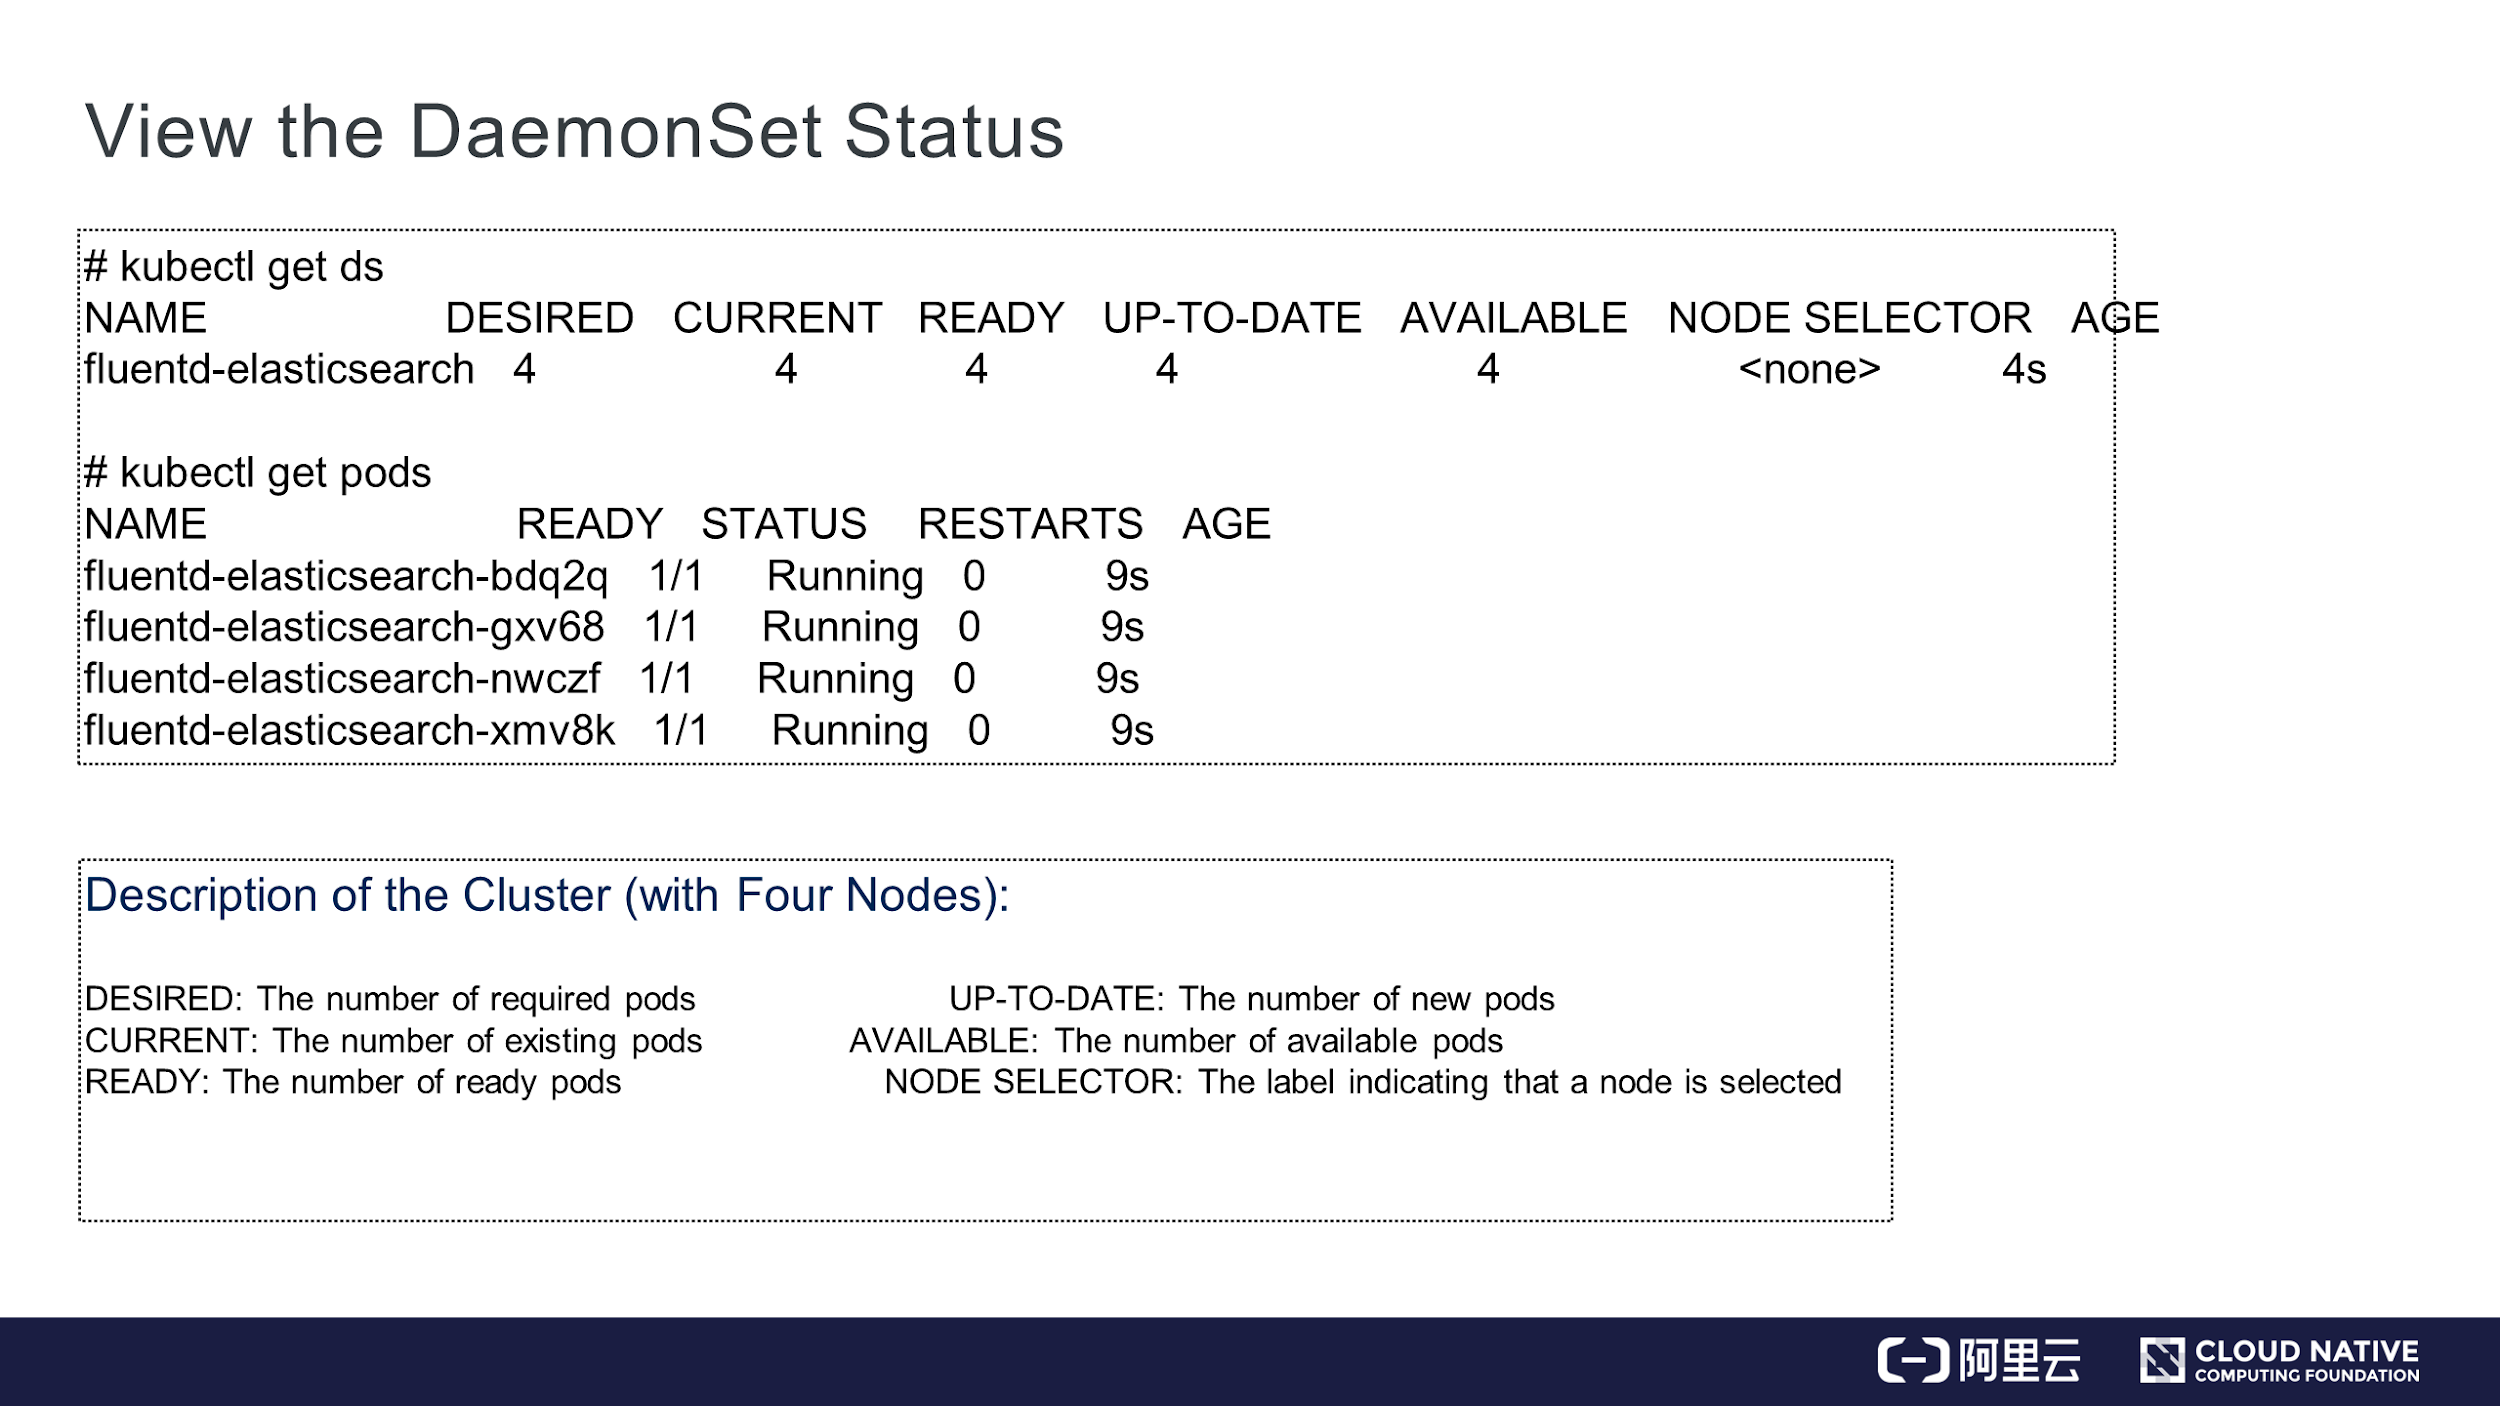
After creating a DaemonSet, run the kubectl get ds command, where ds is short for DaemonSet. Values in the command output are quite similar to those of deployment, including DESIRED, CURRENT, and READY. In this case, only pods are in the READY state. Therefore, only pods are created.
The involved parameters include DESIRED, CURRENT, READY, UP-TO-DATE, AVAILABLE, and NODE SELECTOR. Among them, NODE SELECTOR is very useful for DaemonSet. If you only want some nodes to run the pod, add labels to these nodes so that DaemonSet runs only on these nodes. For example, if you only want the master node or the worker node to run some pods, use NODE SELECTOR to add a label to the node.
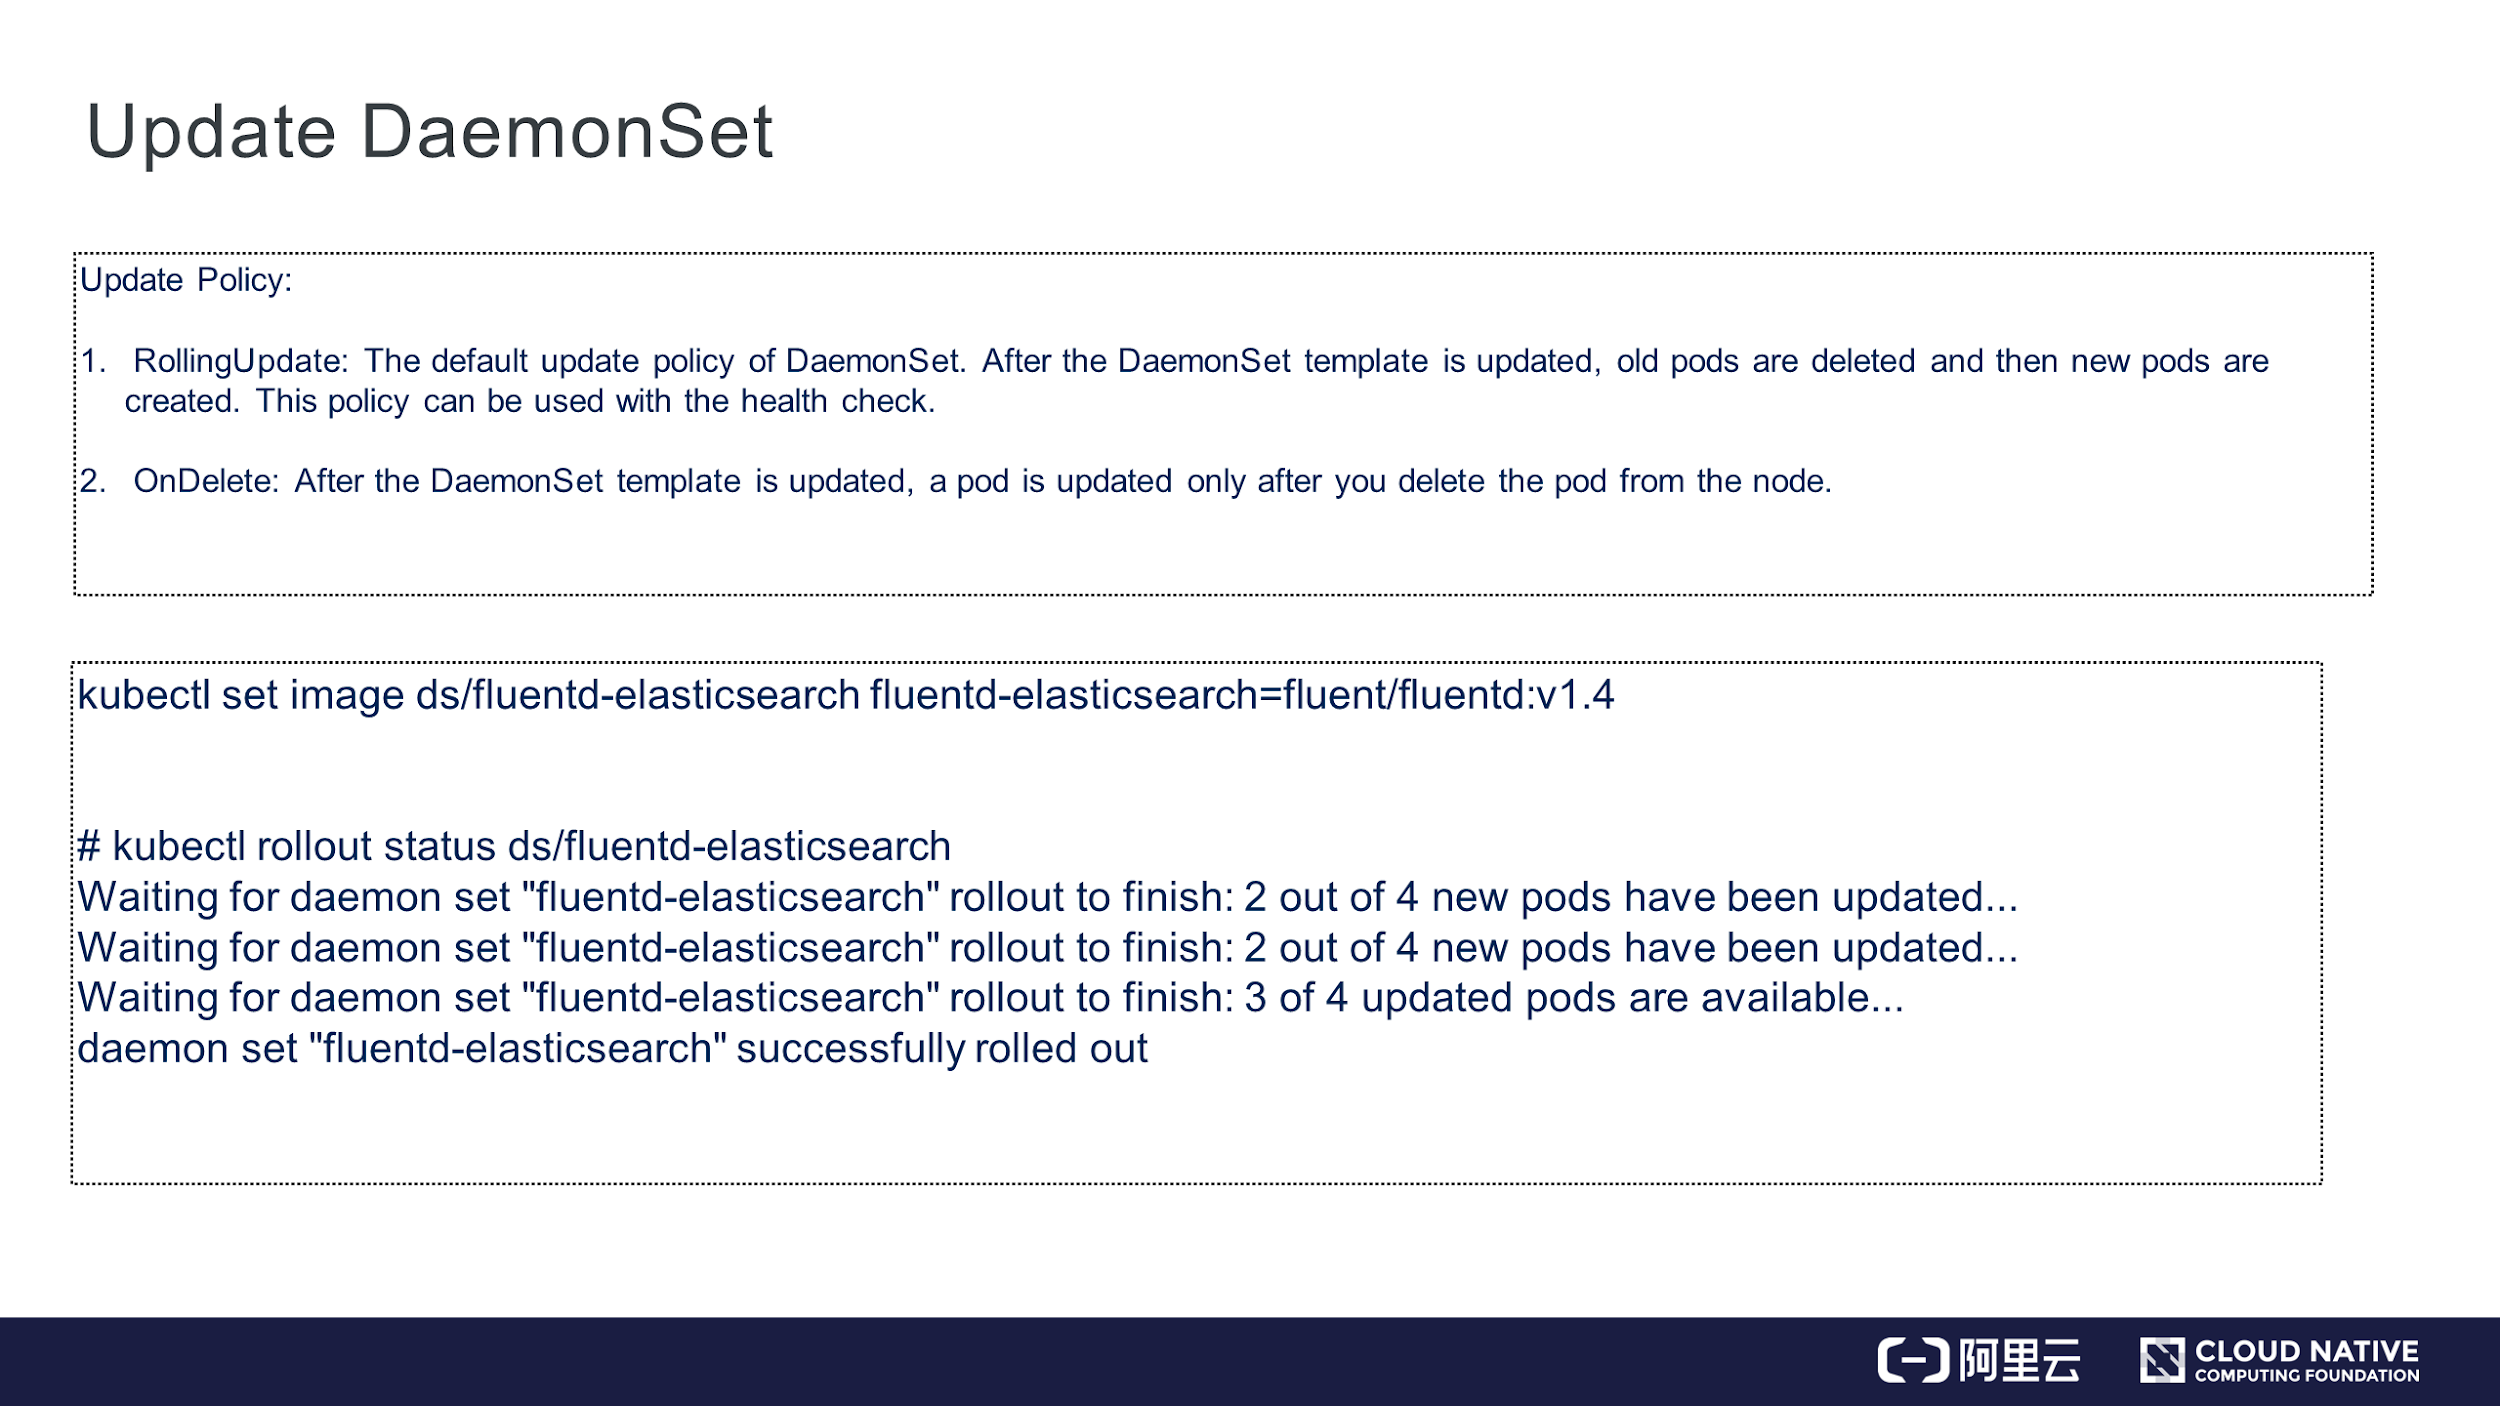
Similar to deployment, DaemonSet has two update policies, which are RollingUpdate and OnDelete.
For example, if you modify some images of DaemonSet, they will be updated one by one according to the DaemonSet status.
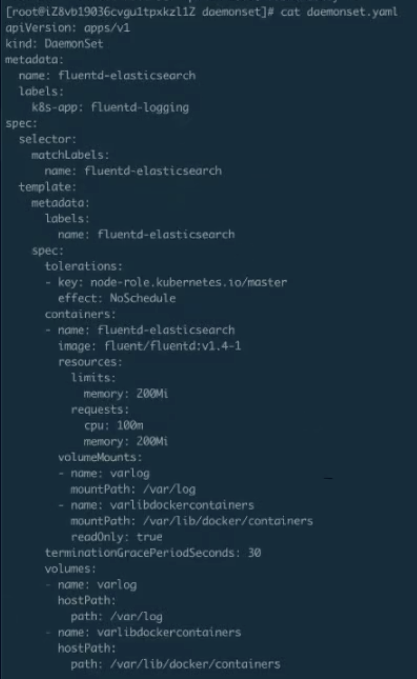
The preceding figure shows the YAML file of DaemonSet, which contains more items than the previous example file.
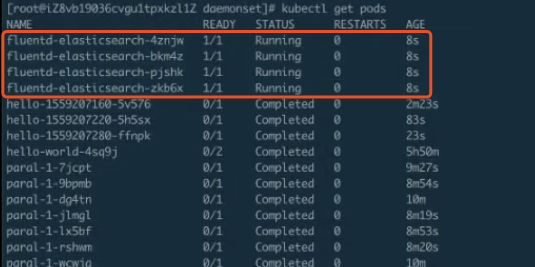
Create a DaemonSet and view its status. The following figure shows the DaemonSet in the ready state.

As shown in the figure, four pods are created because four nodes exist and each of them runs a pod.
Run the kubectl apply -f command to update the DaemonSet. After the DaemonSet is updated, view its status.

As shown in the preceding figure, the DaemonSet uses the RollingUpdate mode by default. Before the update starts, "0 out of 4 new pods have been updated" appears. Now, "1 out of 4 new pods have been updated" appears. After the first pod is updated, the second pod follows, and then the third and the fourth, which is exactly the implementation of RollingUpdate mode. The RollingUpdate mode implements automatic updates. This facilitates the onsite release and other operations.
Still, as shown in the preceding figure, the information at the end indicates that the DaemonSet update in the RollingUpdate mode is successful.
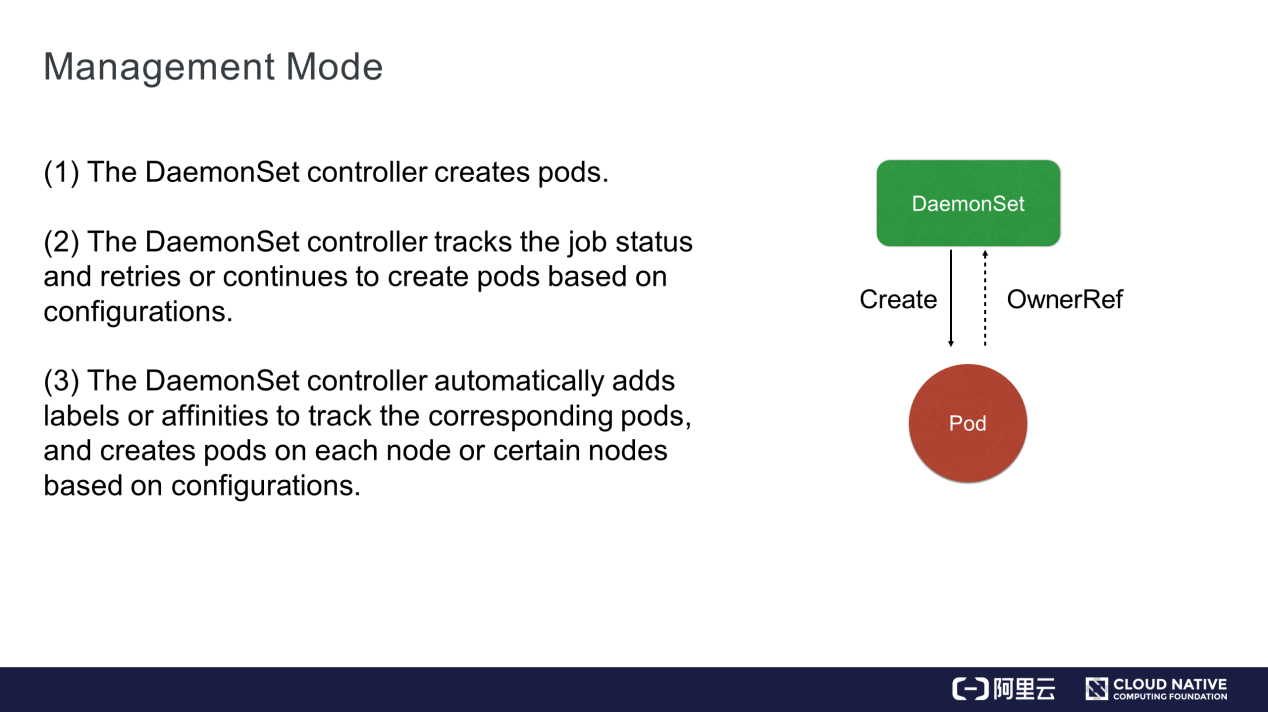
This section describes DaemonSet architecture design. DaemonSet is also a controller with pods. Similar to the job controller, the DaemonSet controller watches the status of the API server and adds pods in a timely manner. The only difference between them is that the DaemonSet controller monitors the node status, creates pods on new nodes, and selects the corresponding nodes based on configured affinities or labels.
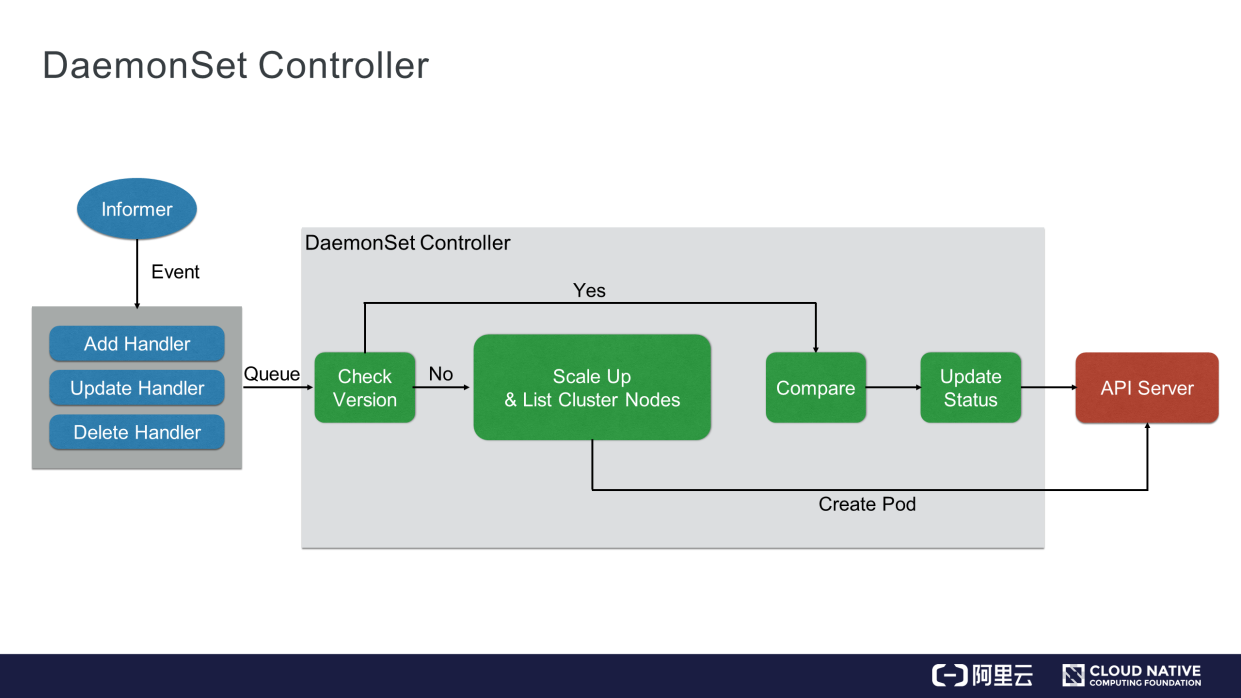
This section describes the DaemonSet controller in detail. Similar to the job controller, the DaemonSet controller watches the status of the API server. The only difference between them is that the DaemonSet controller needs to watch the node status, which is transferred to etcd through the API server.
When the node status changes, a message is sent to the DaemonSet controller through a memory-level message queue, and then the DaemonSet controller checks whether each node contains a pod. If yes, the DaemonSet controller compares the versions and then determines whether to update the pods in RollingUpdate mode. If no, the DaemonSet controller recreates the pod. In OnDelete mode, the DaemonSet controller also checks the pods and determines whether to update or create corresponding pods.
After the update is completed, the DaemonSet status is updated to the API server.
This article describes the concepts of job and CronJob, uses two examples to introduce how to use a job and CronJob, and demonstrates all the functional labels of a job and CronJob. Additionally, it also describes the workflow and the related operations of the DaemonSet controller through the comparison with the deployment controller. It also introduces the RollingUpdate mode of DaemonSet.
Get to Know Kubernetes | Application Orchestration and Management
Get to Know Kubernetes | Application Configuration Management

480 posts | 48 followers
FollowAlibaba Container Service - October 13, 2022
Alibaba Cloud Community - July 15, 2022
Alibaba Developer - February 26, 2020
Alibaba Cloud Storage - June 4, 2019
Alibaba Cloud Native Community - March 11, 2024
Alibaba Cloud Native - June 9, 2022

480 posts | 48 followers
Follow Container Service for Kubernetes
Alibaba Cloud Container Service for Kubernetes is a fully managed cloud container management service that supports native Kubernetes and integrates with other Alibaba Cloud products.
Learn More ACK One
Provides a control plane to allow users to manage Kubernetes clusters that run based on different infrastructure resources
Learn More CloudOps Orchestration Service
CloudOps Orchestration Service is an automated operations and maintenance (O&M) service provided by Alibaba Cloud.
Learn More Cloud-Native Applications Management Solution
Accelerate and secure the development, deployment, and management of containerized applications cost-effectively.
Learn MoreMore Posts by Alibaba Cloud Native Community