By Chen Xi (Liangming), a technical expert at Alibaba. Mr. Chen is a member of the app container and service framework team and a member of the Spring Cloud Alibaba project, committed to optimizing Alibaba Cloud for Java developers.
start.spring.io often helps to initialize Spring Boot projects. This tool provides developers with a wide range of optional components and packaging methods, which greatly facilitates software development. Recently, Alibaba's Nacos and Sentinel have been added to start.spring.io, which simplify the use of Alibaba Cloud's products.
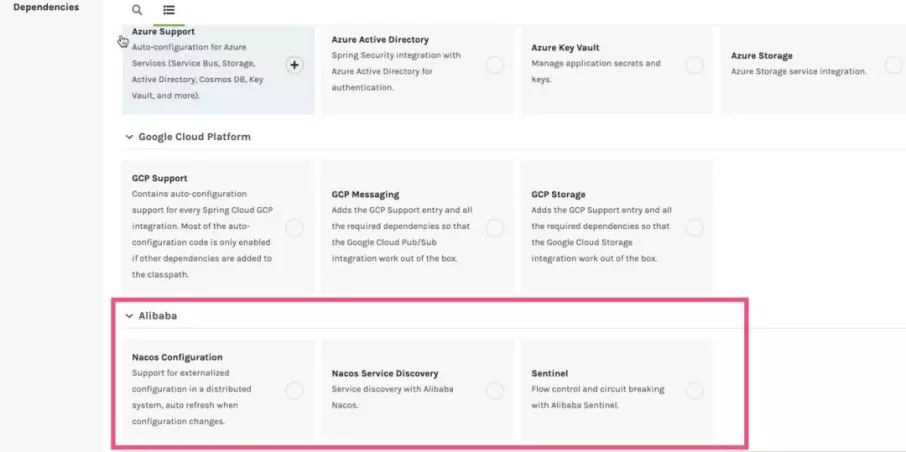
However, the project skeleton only includes the component coordinate information, with no demo code or usage methods. Therefore, developers have to refer to relevant tutorials or sample code. In the case of inappropriate references or version mismatch, developers have to spend a lot of time troubleshooting, significantly increasing the development workload.
Software engineering abstraction is usually divided into various layers from the top-down, including industry, solution, application, function, and component. Currently, start.spring.io only supports the component layer. The component layer contains a lifecycle that runs through component introduction, component configuration, and function development to online O&M. start.spring.io only implements component introduction.
Our goal is to optimize Alibaba Cloud for Java developers. To achieve this goal, we need to enable support for the component introduction and add the sample code as well as the methods and instructions for using components to projects.
Based on this approach, we launched our own bootstrap website: https://start.aliyun.com/bootstrap.html
To avoid reinventing the wheel, we implement component introduction through Spring Initializr rather than creating a project to build the underlying framework followed by developing new features to help developers.
Spring Initializr: https://github.com/spring-io/initializr
start.aliyun.com provides the following features to developers:
start.spring.io updates so that everyone uses the latest features of Spring https://start.aliyun.com/bootstrap.html
In the future, we will provide more support to developers, enabling them to better integrate components, access more features and services, and quickly build applications.
This article uses start.spring.io as an example to describe how to use and extend the Spring Initializr framework.
Spring Initializr offers flexible scalability and a variety of default implementations. It can be used in many ways. This article uses start.spring.io as an example to explain how Spring uses Spring Initializr.
The basic goal is to write as little code as possible or even no code at all. It's possible to create a Spring Initializr project through configuration alone.
We must introduce Spring Initializr before using it. Thus, directly introduce the BOM dependency, which ensures that there is no need to worry about internal component versions.
<dependencyManagement>
    <dependencies>
        <dependency>
            <groupId>io.spring.initializr</groupId>
            <artifactId>initializr-bom</artifactId>
            <version>0.9.0.BUILD-SNAPSHOT</version>
            <type>pom</type>
            <scope>import</scope>
        </dependency>
    </dependencies>
</dependencyManagement>
Generally, we also need to introduce specific components.
<dependency>
            <groupId>io.spring.initializr</groupId>
            <artifactId>initializr-generator-spring</artifactId>
        </dependency>
        <dependency>
            <groupId>io.spring.initializr</groupId>
            <artifactId>initializr-version-resolver</artifactId>
        </dependency>
        <dependency>
            <groupId>io.spring.initializr</groupId>
            <artifactId>initializr-web</artifactId>
        </dependency>
The following submodules are available:
After introducing Spring Initializr, we need to complete the basic configuration.
Add the preceding information to the application.yml file as follows:
initializr:
    packagings:
    - name: Jar
      id: jar
      default: true
    - name: War
      id: war
      default: false
  javaVersions:
    - id: 13
      default: false
    - id: 11
      default: false
    - id: 1.8
      name: 8
      default: true
  languages:
    - name: Java
      id: java
      default: true
    - name: Kotlin
      id: kotlin
      default: false
    - name: Groovy
      id: groovy
      default: false
"name" is optional and "id" is required.
To assign a default value to each configuration item, set "default" to "true". In addition to the basic configuration items, define the supported project types.
initializr:
    types:
    - name: Maven Project
      id: maven-project
      description: Generate a Maven based project archive.
      tags:
        build: maven
        format: project
      default: true
      action: /starter.zip
    - name: Maven POM
      id: maven-build
      description: Generate a Maven pom.xml.
      tags:
        build: maven
        format: build
      default: false
      action: /pom.xml
    - name: Gradle Project
      id: gradle-project
      description: Generate a Gradle based project archive.
      tags:
        build: gradle
        format: project
      default: false
      action: /starter.zip
    - name: Gradle Config
      id: gradle-build
      description: Generate a Gradle build file.
      tags:
        build: gradle
        format: build
      default: false
      action: /build.gradle
By default, Spring Initializr supports four project types:
/pom.xml creates a Maven configuration file named pom.xml./build.gradle creates the Gradle configuration file./starter.zip creates a project file compressed in ZIP format./starter.tgz creates a project file compressed as a TGZ file.Use tags to define different compilation methods (builds) and packaging formats.
After completing the basic configuration, let's configure optional dependent components.
For dependency configuration, the key is dependency. The same configuration exists in the initializr part of the application.yml file. Here is a simple example.
initializr:
  dependencies:
    - name: Web
      content:
        - name: Web
          id: web
          description: Full-stack web development with Tomcat and Spring MVC
        - name: Developer Tools
      content:
        - name: Spring Boot DevTools
          id: devtools
          groupId: org.springframework.boot
          artifactId: spring-boot-devtools
          description: Provides fast application restarts, LiveReload, and configurations for enhanced development experience.
        - name: Lombok
          id: lombok
          groupId: org.projectlombok
          artifactId: lombok
          description: Java annotation library which helps to reduce boilerplate code.
Define groups in the dependencies part. Define groups for easy display and quick search. To set a group, we only require the "name" attribute, and the "id" attribute is not required. The "content" attribute specifies the content of a group or the definitions of components in this group. It's possible to define multiple groups in the form of a list. Also, set common configurations for the components in each group.
Each dependency includes the following basic information:
If groupId & artifactId is set, the created project uses the configured coordinates to locate the component. If groupId & artifactId is not set, Spring Initializr determines that the component is a standard Spring Boot component and automatically adds spring-boot-starter-{id} as the created dependent coordinates.
If "version" is directly set for a component, Spring Initializr uses the set value as the component-dependent version. However, in many cases, the component version is affected by the Spring Boot version. Hence, there is a need to define and manage versions in a special way.
First, let's take a look at the version naming rules. A version includes information such as major version, minor version, revised version, and version qualifier.
The version range has upper and lower bounds, which are expressed by brackets [] or parentheses (). Brackets represent a closed interval between the upper and lower bounds, and parentheses represent an open interval between the upper and lower bounds.
For example, "[1.1.6.RELEASE,1.3.0.M1)" specifies all versions from 1.1.6.RELEASE to 1.3.0.M1, including 1.1.6.RELEASE but not 1.3.0.M1.
The version range can also be set to a single version, such as 1.2.0.RELEASE. In this case, the version range covers the set version and all later versions.
To use the concept of "the latest release", enter the letter x to specify a version.
For example, 1.4.x.BUILD-SNAPSHOT specifies the latest snapshot version of 1.4.x.
To specify all versions from 1.1.0.RELEASE to 1.3.x, enter [1.1.0.RELEASE,1.3.x.RELEASE].
Version qualifiers are sorted in ascending order:
BUILD-SNAPSHOT takes precedence over other version qualifiers. For example, to apply the latest Spring Boot version to a component, enter 1.5.x.BUILD-SNAPSHOT, assuming 1.5 is the latest Spring Boot version.
The version range applies to the Spring Boot version, not the component version.
As mentioned earlier, define a component version through the "version" attribute. If the component version is associated with the Spring Boot version, set the dependent version range through compatibilityRange.
compatibilityRange is defined in two ways:
Using this method, the component only supports Spring Boot versions within a certain range. See the following configuration:
initializr:
  dependencies:
    - name: Stuff
      content:
        - name: Foo
          id: foo
          ...
          compatibilityRange: 1.2.0.M1
        - name: Bar
          id: bar
          ...
          compatibilityRange: "[1.5.0.RC1,2.0.0.M1)"
Foo supports all versions later than Spring Boot 1.2.0. Bar supports versions from Spring Boot 1.5.0 to 2.0.0, excluding 2.0.0.
Set a component in a different way under each Spring Boot version and reset all or some attributes of the component. The following example specifically defines artifactId.
initializr:
  dependencies:
    - name: Stuff
      content:
        - name: Foo
          id: foo
          groupId: org.acme.foo
          artifactId: foo-spring-boot-starter
          compatibilityRange: 1.3.0.RELEASE
          mappings:
            - compatibilityRange: "[1.3.0.RELEASE,1.3.x.RELEASE]"
              artifactId: foo-starter
            - compatibilityRange: "1.4.0.RELEASE"
In this example, artifactId is set to foo-starter for Foo's coordinates in Spring Boot 1.3. In Spring Boot 1.4.0.RELEASE and later, artifactId is still set to foo-spring-boot-starter.
Version Management Through BOM
No need to set the component version while using BOM to manage component versions
To use BOM, define BOM as follows:
initializr:
  env:
    boms:
      my-api-bom:
        groupId: org.acme
        artifactId: my-api-dependencies
        version: 1.0.0.RELEASE
        repositories: my-api-repo-1
Note: Define BOM under initializr.env.boms.
The attributes of BOM are basically the same as those of dependent components, including the coordinates and version. BOM supports version range management.
After defining BOM, reference BOM in components as follows:
initializr:
  dependencies:
    - name: Other
      content:
        - name: My API
          id : my-api
          groupId: org.acme
          artifactId: my-api
          bom: my-api-bom
When the my-api is selected, Spring Initializr automatically adds the BOM dependency my-api-dependencies to the created project.
If start.spring.io was started before, "Fetching boot metadata from spring.io/project_metadata/spring-boot" is logged. We recommend using Spring Initializr with caching to avoid frequent checking of the Spring Boot version.
First, introduce the cache framework:
<dependency>
    <groupId>javax.cache</groupId>
    <artifactId>cache-api</artifactId>
</dependency>
<dependency>
    <groupId>org.ehcache</groupId>
    <artifactId>ehcache</artifactId>
</dependency>
Add the @EnableCaching annotation to the SpringBootApplication class:

To define a custom cache, adjust the following cache settings:
| Cache key | Description |
|---|---|
| initializr.metadata | Contains complete service metadata. If the metadata cache expires, all data is refreshed, including the latest Spring Boot version information. |
| nitializr.dependency-metadata | Provides the metadata on which the cache component depends. |
| initializr.templates | Provides a template file when a cache project is created. |
Add demo code: Different components have different functions, so add demo code to the project if necessary.
Add independent configuration (spring.factories) to different components: To add configuration items, add an extension entry specific to the sample code of different components.
io.spring.initializr.generator.project.ProjectGenerationConfiguration=\
com.alibaba.alicloud.initializr.extension.dependency.springboot.SpringCloudProjectGenerationConfiguration
Add the ConditionalOnRequestedDependency annotation to SpringCloudProjectGenerationConfiguration to differentiate components.
@ProjectGenerationConfiguration
public class SpringCloudAlibabaProjectGenerationConfiguration {
    private final InitializrMetadata metadata;
    private final ProjectDescription description;
    private final IndentingWriterFactory indentingWriterFactory;
    private final TemplateRenderer templateRenderer;
    public SpringCloudAlibabaProjectGenerationConfiguration(InitializrMetadata metadata,
                                                            ProjectDescription description,
                                                            IndentingWriterFactory indentingWriterFactory,
                                                            TemplateRenderer templateRenderer) {
        this.metadata = metadata;
        this.description = description;
        this.indentingWriterFactory = indentingWriterFactory;
        this.templateRenderer = templateRenderer;
    }
    @Bean
    @ConditionalOnRequestedDependency("sca-oss")
    public OSSDemoCodeContributor ossContributor() {
        return new OSSDemoCodeContributor(description, templateRenderer);
    }
    ......
}
The preceding code creates an OSSDemoCodeContributor used to generate the demo code of the selected sca-oss component.
Generate the demo code: OSSDemoCodeContributor is a ProjectContributor that is created and called in the project file space. Add the required metadata (such as ProjectDescription) to generate the demo code when OSSDemoCodeContributor is instantiated.
It is easy to generate code by using the mstache template engine provided by Spring Initializr.
Put the demo code in the resources folder in the form of a template.
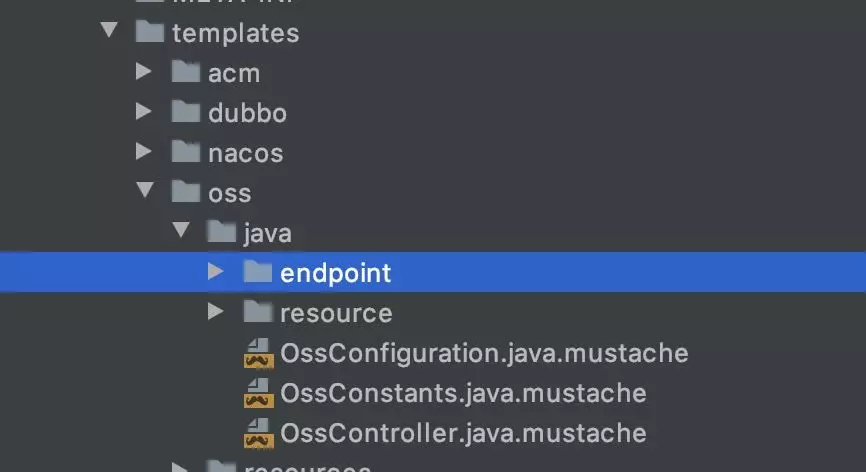
Parse the template files by using the template engine and copy the template files to the project directory.
private void writeCodeFile(TemplateRenderer templateRenderer, Language langeuage,
                               Map<String, Object> params, Path path, String temp) throws IOException {
        ......
        Path pkgPath = 生成包路径
        Path filePath = 成成代码文件路径
        // 渲染模板
        String code = templateRenderer.render(temp, params);
        // demo 文件写入
        Files.createDirectories(pkgPath);
        Files.write(filePath, code.getBytes("UTF-8"));
    }
In addition to the template code, write the template configuration to the application.properties file.
Generate code to create a template, parse the template, and append files. The specific code is not provided here.
The preceding sections describe how to use Spring Initializr to build a project and what extension capabilities are provided by Spring Initializr.
The following sections describe two phases of implementing Spring Initializr: the startup phase and the creation phase.
Let's take a look at the extension system of Spring Initializr before proceeding to the startup phase.
The extension system of Spring Initializr uses many of Spring's SPIs, with the following spring.factories:
initializr-generator/src/main/resources/META-INF/spring.factoriesinitializr-generator-spring/src/main/resources/META-INF/spring.factoriesinitializr-web/src/main/resources/META-INF/spring.factoriesinitializr-actuator/src/main/resources/META-INF/spring.factoriesstart-site/src/main/resources/META-INF/spring.factoriesOne spring.factories is located in start.spring.io, and the other four spring.factories are located in the Spring Initializr project. For more information about spring.factories, see the "References" section.
The definitions of spring.factories only indicate the extensions of each SPI. The phases of creating and implementing a project vary depending on different SPIs.
In the application startup phase, only the io.spring.initializr.web.autoconfigure.InitializrAutoConfiguration SPI is loaded (actuator is not considered for the moment).
@Configuration
@EnableConfigurationProperties(InitializrProperties.class)
public class InitializrAutoConfiguration {
    @Bean
    @ConditionalOnMissingBean
    public ProjectDirectoryFactory projectDirectoryFactory()
    @Bean
    @ConditionalOnMissingBean
    public IndentingWriterFactory indentingWriterFactory()
    @Bean
    @ConditionalOnMissingBean(TemplateRenderer.class)
    public MustacheTemplateRenderer templateRenderer(Environment environment, ObjectProvider<CacheManager> cacheManager)
    @Bean
    @ConditionalOnMissingBean
    public InitializrMetadataUpdateStrategy initializrMetadataUpdateStrategy(RestTemplateBuilder restTemplateBuilder,
            ObjectMapper objectMapper)
    @Bean
    @ConditionalOnMissingBean(InitializrMetadataProvider.class)
    public InitializrMetadataProvider initializrMetadataProvider(InitializrProperties properties,
            InitializrMetadataUpdateStrategy initializrMetadataUpdateStrategy)
    @Bean
    @ConditionalOnMissingBean
    public DependencyMetadataProvider dependencyMetadataProvider()
    @Configuration
    @ConditionalOnWebApplication
    static class InitializrWebConfiguration {
        @Bean
        InitializrWebConfig initializrWebConfig()
        @Bean
        @ConditionalOnMissingBean
        ProjectGenerationController<ProjectRequest> projectGenerationController(
                InitializrMetadataProvider metadataProvider, ApplicationContext applicationContext)
        @Bean
        @ConditionalOnMissingBean
        ProjectMetadataController projectMetadataController(InitializrMetadataProvider metadataProvider,
                DependencyMetadataProvider dependencyMetadataProvider)
        @Bean
        @ConditionalOnMissingBean
        CommandLineMetadataController commandLineMetadataController(InitializrMetadataProvider metadataProvider,
                TemplateRenderer templateRenderer)
        @Bean
        @ConditionalOnMissingBean
        SpringCliDistributionController cliDistributionController(InitializrMetadataProvider metadataProvider)
    }
}
The following steps will execute:
The key step is metadata loading. The Spring environment configuration is written to InitializrProperties by using the EnableConfigurationProperties annotation.
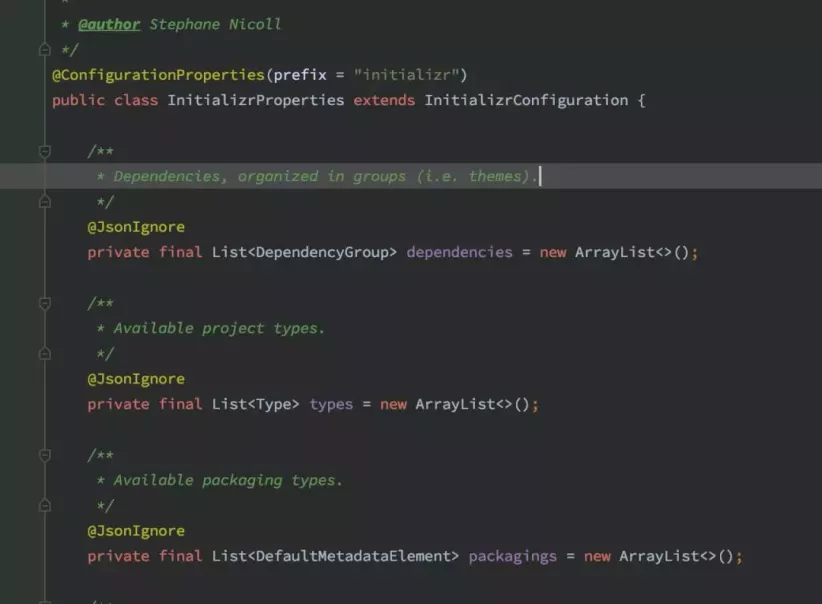
The application.yml file contains the following configuration information, which stores the actual project dependency metadata:
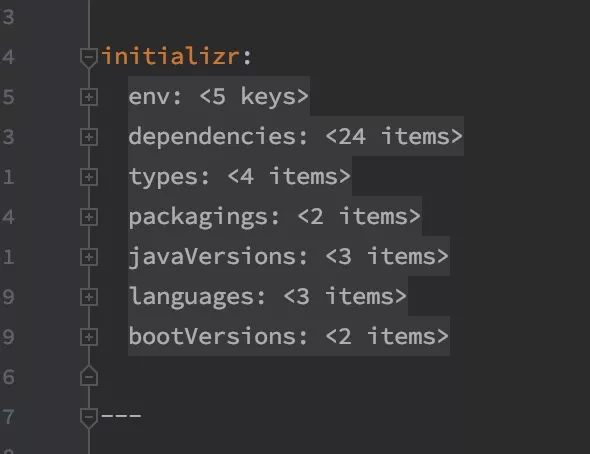
The actions in the startup phase are simple, so it only takes a few seconds to start start.spring.io.
More logic is implemented in the project creation phase.
In the creation phase, Spring Initializr creates an independent context to store the beans required to create a project.
The following figure shows the process flowchart.
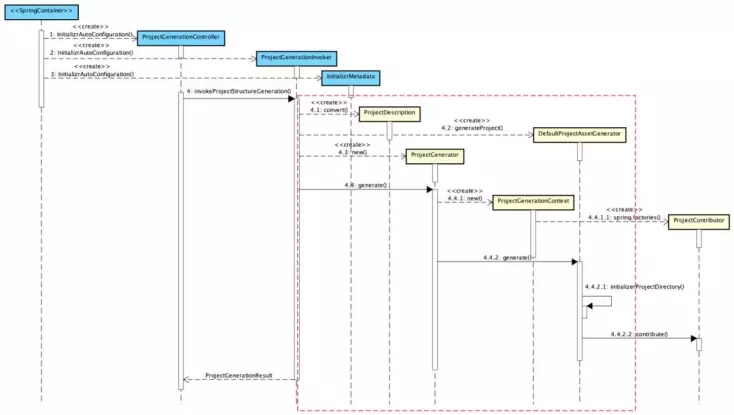
The sequence diagram shows a typical creation behavior, in which ProjectGenerationController receives a project creation request from the web, the request is converted by ProjectGenerationInvoker, and the request enters ProjectGenerator, which implements the core build process.
The following figure shows the core build process of ProjectGenerator.
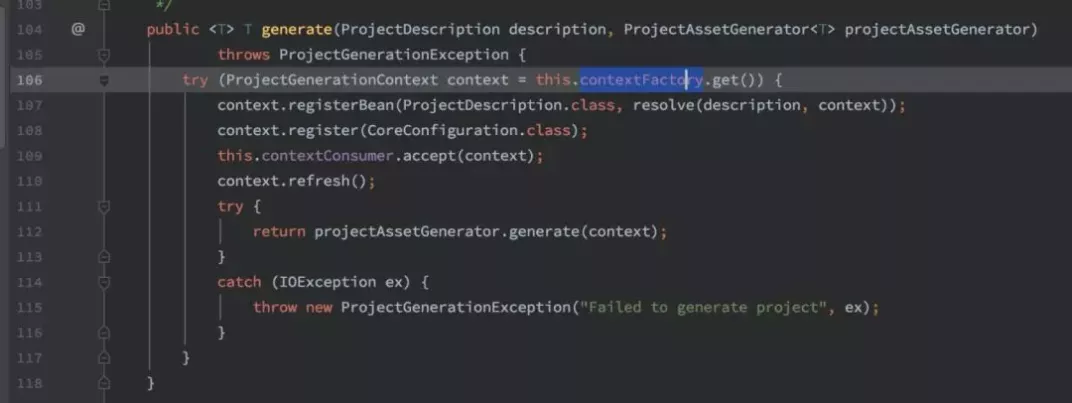
In line 106, a new ProjectGenerationContext is built through contextFactory.
Let's take a look at the context inheritance. It comes from AnnotationConfigApplicationContext provided by Spring.
Based on the refresh() method in line 110, see the refresh process of ApplicationContext in Spring.

In line 107, the resolve method injects a provider named ProjectDescription into the context. The code is as follows:
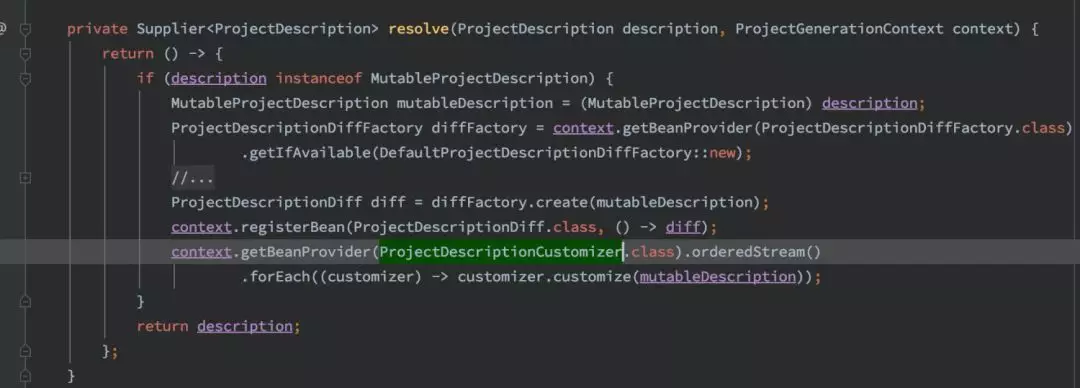
The provider is registered, so the logic is implemented when the context executes the refresh action.
ProjectDescriptionCustomizer is an extension of ProjectDescription and used to adjust the input ProjectDescription. Changes are made to mandatory dependencies, such as the language version.
In line 108, a configuration is registered to the context.
The following code shows the configuration content.
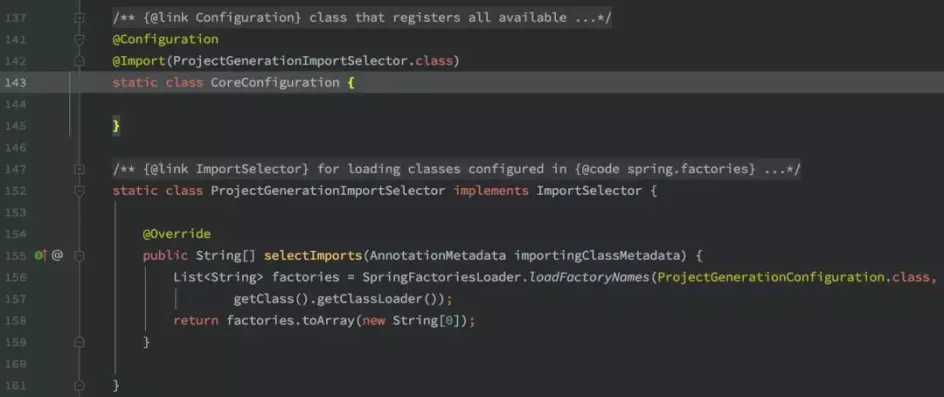
The configuration includes ProjectGenerationConfiguration, an SPI implemented in spring.factories many times. For more information, see the "References" section.
In the extension system of Spring Initializr, an instance is created only at this point.
In line 109 of ProjectGenerator, the accept action is executed on the consumer by calling the following code:

setParent is used to set the primary context of the application as the parent node of this ProjectGenerationContext.
A metadata object is registered to this ProjectGenerationContext.
In line 112 of ProjectGenerator, the generate method of projectAssetGenerator is called. The code is as follows:

The preceding code builds a project by using multiple ProjectContributors.
This completes the main process.
In the main process, no files are written, and only the root folder is created. The main process only defines the mechanisms and processes of loading data and extensions, with all implementations as parts of extensions.
Spring Initializr supports two extensions: ProjectContributor and xxxxxCustomizer.
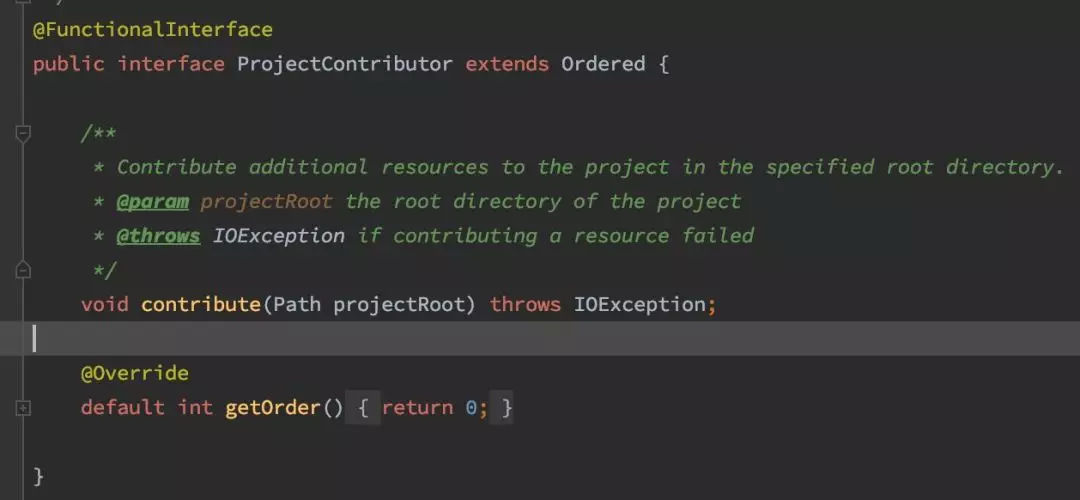
According to the method signature, the only input parameter specifies the project's root path to where project files are saved. This extension point is flexible and supports the writing of any code and configuration files.
Related dependencies are obtained by ProjectGenerationContext, and files are created by custom logic.
Spring Initializr and start.spring.io provide the following ProjectContributors:
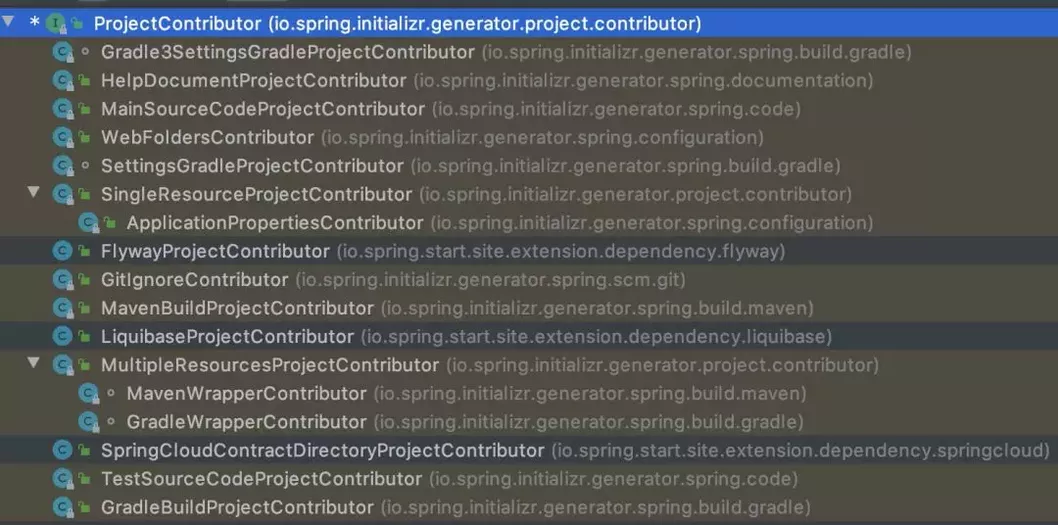
The main ProjectContributors are as follows:
Unlike ProjectContributor, xxxxxCustomizer is not a unified interface. It is a concept that specifies a naming convention. Each Customizer has a specific name and corresponds to trigger logic and responsibility boundaries.
Spring Initializr provides the following Customizers:
initializr-generator/src/main/resources/META-INF/spring.factoriesio.spring.initializr.generator.buildsystem.BuildSystemFactory=\
io.spring.initializr.generator.buildsystem.gradle.GradleBuildSystemFactory,\
io.spring.initializr.generator.buildsystem.maven.MavenBuildSystemFactory
io.spring.initializr.generator.language.LanguageFactory=\
io.spring.initializr.generator.language.groovy.GroovyLanguageFactory,\
io.spring.initializr.generator.language.java.JavaLanguageFactory,\
io.spring.initializr.generator.language.kotlin.KotlinLanguageFactory
io.spring.initializr.generator.packaging.PackagingFactory=\
io.spring.initializr.generator.packaging.jar.JarPackagingFactory,\
io.spring.initializr.generator.packaging.war.WarPackagingFactory
initializr-generator-spring/src/main/resources/META-INF/spring.factories:
io.spring.initializr.generator.project.ProjectGenerationConfiguration=\
io.spring.initializr.generator.spring.build.BuildProjectGenerationConfiguration,\
io.spring.initializr.generator.spring.build.gradle.GradleProjectGenerationConfiguration,\
io.spring.initializr.generator.spring.build.maven.MavenProjectGenerationConfiguration,\
io.spring.initializr.generator.spring.code.SourceCodeProjectGenerationConfiguration,\
io.spring.initializr.generator.spring.code.groovy.GroovyProjectGenerationConfiguration,\
io.spring.initializr.generator.spring.code.java.JavaProjectGenerationConfiguration,\
io.spring.initializr.generator.spring.code.kotlin.KotlinProjectGenerationConfiguration,\
io.spring.initializr.generator.spring.configuration.ApplicationConfigurationProjectGenerationConfiguration,\
io.spring.initializr.generator.spring.documentation.HelpDocumentProjectGenerationConfiguration,\
io.spring.initializr.generator.spring.scm.git.GitProjectGenerationConfiguration
initializr-web/src/main/resources/META-INF/spring.factories
org.springframework.boot.autoconfigure.EnableAutoConfiguration=\
io.spring.initializr.web.autoconfigure.InitializrAutoConfiguration
org.springframework.boot.env.EnvironmentPostProcessor=\
io.spring.initializr.web.autoconfigure.CloudfoundryEnvironmentPostProcessor
initializr-actuator/src/main/resources/META-INF/spring.factories:
org.springframework.boot.autoconfigure.EnableAutoConfiguration=\
io.spring.initializr.actuate.autoconfigure.InitializrActuatorEndpointsAutoConfiguration,\
io.spring.initializr.actuate.autoconfigure.InitializrStatsAutoConfiguration
start-site/src/main/resources/META-INF/spring.factories:
io.spring.initializr.generator.project.ProjectGenerationConfiguration=\
io.spring.start.site.extension.build.gradle.GradleProjectGenerationConfiguration,\
io.spring.start.site.extension.build.maven.MavenProjectGenerationConfiguration,\
io.spring.start.site.extension.dependency.DependencyProjectGenerationConfiguration,\
io.spring.start.site.extension.dependency.springamqp.SpringAmqpProjectGenerationConfiguration,\
io.spring.start.site.extension.dependency.springboot.SpringBootProjectGenerationConfiguration,\
io.spring.start.site.extension.dependency.springcloud.SpringCloudProjectGenerationConfiguration,\
io.spring.start.site.extension.dependency.springdata.SpringDataProjectGenerationConfiguration,\
io.spring.start.site.extension.dependency.springintegration.SpringIntegrationProjectGenerationConfiguration,\
io.spring.start.site.extension.dependency.springrestdocs.SpringRestDocsProjectGenerationConfiguration,\
io.spring.start.site.extension.description.DescriptionProjectGenerationConfiguration,\
io.spring.start.site.extension.code.kotin.KotlinProjectGenerationConfigurationHow to Locate Bottlenecks During Performance Tests and Address Occasional Timeouts?
Interview with Christian Posta: Istio 1.7 Will Be the Most Stable Version for Production

639 posts | 55 followers
FollowAlibaba Tech - January 10, 2020
Alibaba Developer - January 29, 2021
Alibaba Clouder - August 26, 2021
Alibaba Cloud Storage - June 4, 2019
Alibaba Cloud Native Community - March 11, 2024
Alibaba Cloud Community - November 7, 2024

639 posts | 55 followers
Follow ACK One
Provides a control plane to allow users to manage Kubernetes clusters that run based on different infrastructure resources
Learn More Container Service for Kubernetes
Alibaba Cloud Container Service for Kubernetes is a fully managed cloud container management service that supports native Kubernetes and integrates with other Alibaba Cloud products.
Learn More Container Registry
A secure image hosting platform providing containerized image lifecycle management
Learn More Cloud-Native Applications Management Solution
Accelerate and secure the development, deployment, and management of containerized applications cost-effectively.
Learn MoreMore Posts by Alibaba Cloud Native Community