By Jun Liu
Spring Cloud is a set of microservice ecosystems built atop Spring Boot, encompassing service discovery, configuration management, rate limiting with fallbacks, distributed transactions, and asynchronous messaging. Thus, by simply adding dependencies and annotations in just four straightforward steps, you can upgrade your Spring Boot applications to Spring Cloud.
Officially launched on the Spring Cloud Alibaba (SCA) official website: sca.aliyun.com
The following are the complete steps to upgrade a Spring Boot application to Spring Cloud.
First, add Spring Cloud and Spring Cloud Alibaba dependencies to the application. Select an appropriate Spring Cloud version based on the Spring Boot version of the current application. For more information, see the version mapping table[1].
<properties>
    <spring-cloud-alibaba.version>2022.0.0.0</spring-cloud-alibaba.version>
    <spring-cloud.version>2022.0.0</spring-cloud.version>
</properties>
<dependencyManagement>
    <dependencies>
        <dependency>
            <groupId>org.springframework.cloud</groupId>
            <artifactId>spring-cloud-dependencies</artifactId>
            <version>${spring-cloud.version}</version>
            <type>pom</type>
            <scope>import</scope>
        </dependency>
        <dependency>
            <groupId>com.alibaba.cloud</groupId>
            <artifactId>spring-cloud-alibaba-dependencies</artifactId>
            <version>${spring-cloud-alibaba.version}</version>
            <type>pom</type>
            <scope>import</scope>
        </dependency>
    </dependencies>
</dependencyManagement>
<dependencies>
    <!-- Nacos service discovery -->
    <dependency>
        <groupId>com.alibaba.cloud</groupId>
        <artifactId>spring-cloud-starter-alibaba-nacos-discovery</artifactId>
    </dependency>
    <!-- service discovery:OpenFeign service calls-->
    <dependency>
        <groupId>org.springframework.cloud</groupId>
        <artifactId>spring-cloud-starter-openfeign</artifactId>
    </dependency>
  <!-- service discovery:OpenFeign service calls -->
    <dependency>
        <groupId>org.springframework.cloud</groupId>
        <artifactId>spring-cloud-starter-loadbalancer</artifactId>
    </dependency>
</dependencies>
In the preceding example, dependencies such as service registration and discovery and OpenFeign are added.
Add the following configuration items to the application.yml or application.properties file to set the application name and registry address.
application.yml:
spring:
  application:
    #The project name is required and is unique in the registry.
    #Better be consistent with the previous domain name specification and Kubernetes service name, because it will be used as the call and load balancing basis.
    name: service-provider
  cloud:
    nacos:
      discovery: #Enable Spring Cloud Nacos Discovery.
        server-addr: 127.0.0.1:8848
application.properties:
#The project name is required and is unique in the registry.
# Better be consistent with the previous domain name specification and Kubernetes service name, because it will be used as the call and load balancing basis.
spring.application.name=service-provider
 #Enable spring cloud nacos discovery
spring.cloud.nacos.discovery.server-addr=127.0.0.1:8848Add EnableDiscoveryClient and EnableFeignClients annotations to the startup class to start the automatic registration and discovery of service addresses.
@SpringBootApplication@EnableDiscoveryClient@EnableFeignClientspublic class ProviderApplication { public static void main(String[] args) { SpringApplication.run(ProviderApplication.class, args); }}Note:
Add the @LoadBlanced annotation to the previous RestTemplate bean to enable RestTemplate to access service discovery and loading balance:
@Bean
@LoadBalanced
public RestTemplate restTemplate() {
    return new RestTemplate();
}
Keep other code used to call RestTemplate unchanged, and change only the hostname, as shown in the following figure.
@RestController
 public class TestController {

    @Autowired
    private RestTemplate restTemplate;

    @GetMapping(value = "/echo-rest/{str}")
    public String rest(@PathVariable String str) {
        return restTemplate.getForObject("http://service-provider/echo/" + str, String.class);
    }
}Use the @FeignClient annotation to package the EchoService interface into a FeignClient. The attribute name corresponds to the peer application name spring.name=service-provider.
//@FeignClient(name = "service-provider", url="http://service.example.com/")
@FeignClient(name = "service-provider")
public interface EchoService {
    @GetMapping(value = "/echo/{str}")
    String echo(@PathVariable("str") String str);
}
Inject the EchoService as a standard bean to initiate a request to the remote service.
@RestController
 public class TestController {

    @Autowired
    private EchoService echoService;

    @GetMapping(value = "/echo-feign/{str}")
    public String feign(@PathVariable String str) {
        return echoService.echo(str);
    }
}If you use HttpClient or self-encapsulated HTTP calling tools, we recommend that you transform to the RestTemplate mode or the FeignClient mode.
The architecture of applications built based on Spring Boot varies. For example, they may be any of the following common architectures, but the general transformation method of upgrading to Spring Cloud is similar. All can be converted to address discovery and loading balance based on the Nacos registry.
• Customize domain names based on DNS, and implement loading balance between services through domain name calls.
• Centralized traffic forwarding based on SLB. Calls are directly forwarded to SLB, and SLB implements traffic forwarding between services.
• Implement loading balance and call forwarding based on the Kubernetes Service microservice system and relying on Kubernetes ClusterIP.
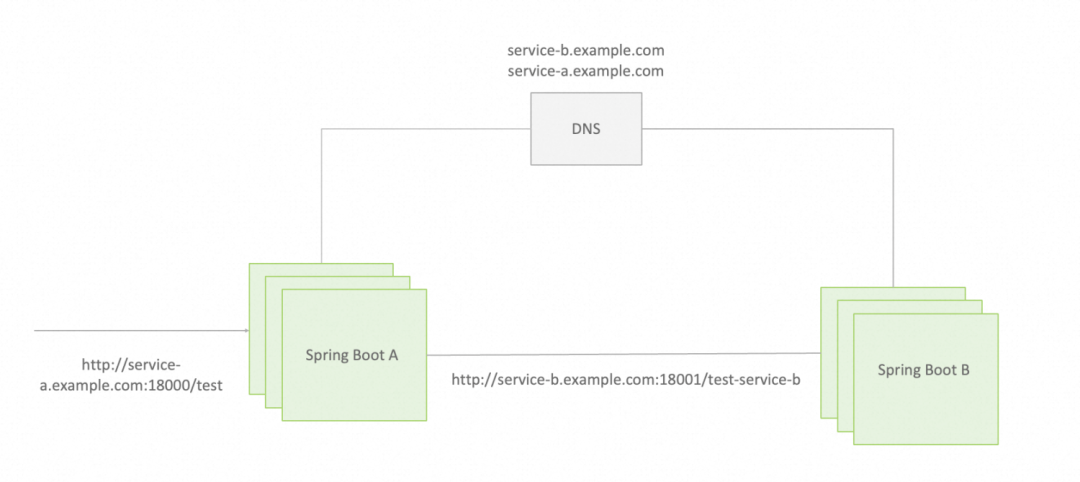
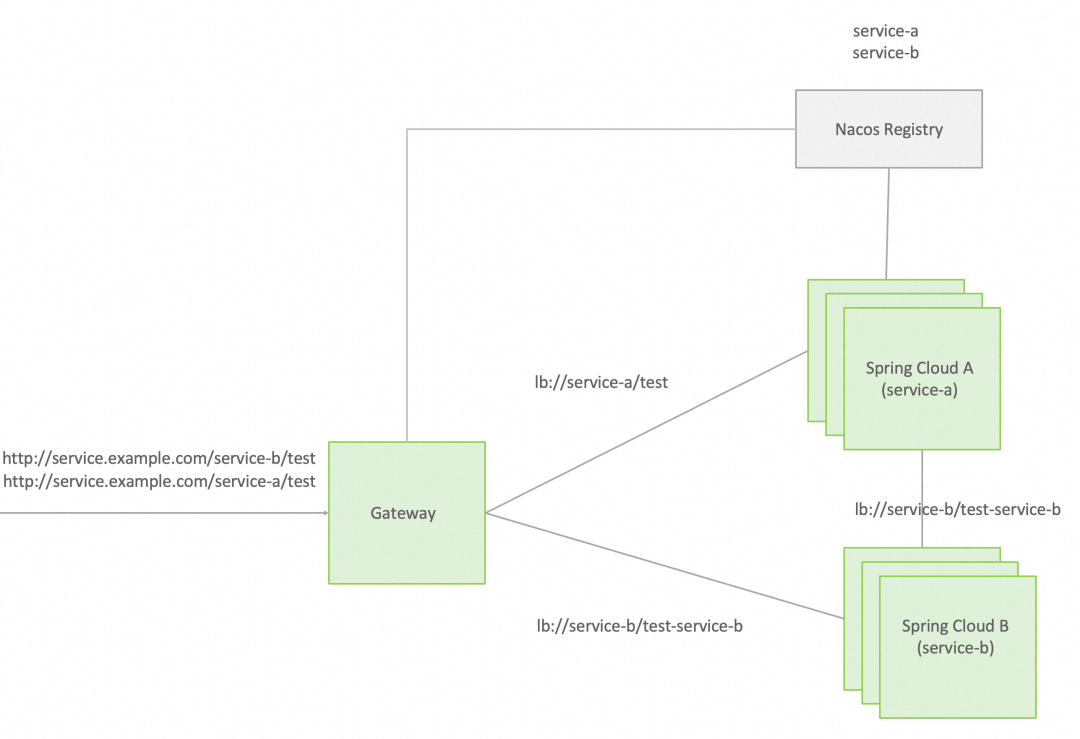
In this example, we adopt a DNS custom domain name architecture to upgrade from Spring Boot to Spring Cloud. The following figure shows the application architecture before and after the upgrade. For more information, see Github source code[2].

Spring Boot architecture before upgrade👆

Spring Cloud architecture after upgrade👆
Select a compatible Spring Cloud Alibaba version based on the Spring Boot version you are using:
| Spring Boot Version | Spring Cloud Alibaba Version | Spring Cloud Version |
| 3.0.2 | 2022.0.0.0 | Spring Cloud 2022.0.0 |
| 3.0.2 | 2022.0.0.0-RC2 | Spring Cloud 2022.0.0 |
| 3.0.0 | 2022.0.0.0-RC1 | Spring Cloud 2022.0.0 |
| 2.6.13 | 2021.0.5.0 | Spring Cloud 2021.0.5 |
| 2.6.11 | 2021.0.4.0 | Spring Cloud 2021.0.4 |
| 2.6.3 | 2021.0.1.0 | Spring Cloud 2021.0.1 |
| 2.4.2 | 2021.1 | Spring Cloud 2020.0.1 |
| 2.3.12.RELEASE | 2.2.10-RC1 | Spring Cloud Hoxton.SR12 |
| 2.3.12.RELEASE | 2.2.9.RELEASE | Spring Cloud Hoxton.SR12 |
| 2.3.12.RELEASE | 2.2.8.RELEASE | Spring Cloud Hoxton.SR12 |
| 2.3.12.RELEASE | 2.2.7.RELEASE | Spring Cloud Hoxton.SR12 |
| 2.3.2.RELEASE | 2.2.6.RELEASE | Spring Cloud Hoxton.SR9 |
| 2.2.5.RELEASE | 2.2.1.RELEASE | Spring Cloud Hoxton.SR3 |
| 2.2.X.RELEASE | 2.2.0.RELEASE | Spring Cloud Hoxton.RELEASE |
| 2.1.13.RELEASE | 2.1.4.RELEASE | Spring Cloud Greenwich.SR6 |
| 2.1.X.RELEASE | 2.1.2.RELEASE | Spring Cloud Greenwich |
| 2.0.X.RELEASE | 2.0.4.RELEASE (End of support. We recommend that you upgrade to the latest version.) | Spring Cloud Finchley |
| 1.5.X.RELEASE | 1.5.1.RELEASE (End of support. We recommend that you upgrade to the latest version.) | Spring Cloud Edgware |
• spring-cloud-starter-alibaba-nacos-discovery[3]
• spring-cloud-starter-alibaba-nacos-config[4]
• spring-cloud-starter-alibaba-nacos-sentinel[5]
• spring-cloud-starter-alibaba-nacos-rocketmq[6]
• spring-cloud-starter-alibaba-nacos-seata[7]
The following table shows each Spring Cloud Alibaba version and its corresponding components:
| Spring Cloud Alibaba Version | Sentinel Version | Nacos Version | RocketMQ Version | Dubbo Version | Seata Version |
| 2022.0.0.0 | 1.8.6 | 2.2.1 | 4.9.4 | ~ | 1.7.0 |
| 2022.0.0.0-RC2 | 1.8.6 | 2.2.1 | 4.9.4 | ~ | 1.7.0-native-rc2 |
| 2021.0.5.0 | 1.8.6 | 2.2.0 | 4.9.4 | ~ | 1.6.1 |
| 2.2.10-RC1 | 1.8.6 | 2.2.0 | 4.9.4 | ~ | 1.6.1 |
| 2022.0.0.0-RC1 | 1.8.6 | 2.2.1-RC | 4.9.4 | ~ | 1.6.1 |
| 2.2.9.RELEASE | 1.8.5 | 2.1.0 | 4.9.4 | ~ | 1.5.2 |
| 2021.0.4.0 | 1.8.5 | 2.0.4 | 4.9.4 | ~ | 1.5.2 |
| 2.2.8.RELEASE | 1.8.4 | 2.1.0 | 4.9.3 | ~ | 1.5.1 |
| 2021.0.1.0 | 1.8.3 | 1.4.2 | 4.9.2 | ~ | 1.4.2 |
| 2.2.7.RELEASE | 1.8.1 | 2.0.3 | 4.6.1 | 2.7.13 | 1.3.0 |
| 2.2.6.RELEASE | 1.8.1 | 1.4.2 | 4.4.0 | 2.7.8 | 1.3.0 |
| 2021.1 or 2.2.5.RELEASE or 2.1.4.RELEASE or 2.0.4.RELEASE | 1.8.0 | 1.4.1 | 4.4.0 | 2.7.8 | 1.3.0 |
| 2.2.3.RELEASE or 2.1.3.RELEASE or 2.0.3.RELEASE | 1.8.0 | 1.3.3 | 4.4.0 | 2.7.8 | 1.3.0 |
| 2.2.1.RELEASE or 2.1.2.RELEASE or 2.0.2.RELEASE | 1.7.1 | 1.2.1 | 4.4.0 | 2.7.6 | 1.2.0 |
| 2.2.0.RELEASE | 1.7.1 | 1.1.4 | 4.4.0 | 2.7.4.1 | 1.0.0 |
| 2.1.1.RELEASE or 2.0.1.RELEASE or 1.5.1.RELEASE | 1.7.0 | 1.1.4 | 4.4.0 | 2.7.3 | 0.9.0 |
| 2.1.0.RELEASE or 2.0.0.RELEASE or 1.5.0.RELEASE | 1.6.3 | 1.1.1 | 4.4.0 | 2.7.3 | 0.7.1 |
[1] Version mapping table
https://sca.aliyun.com/en-us/docs/next/best-practice/spring-boot-to-spring-cloud/
[2] Github source code
https://github.com/spring-cloud-alibaba-group/springboot-transfer-to-springcloud
[3] spring-cloud-starter-alibaba-nacos-discovery
https://sca.aliyun.com/en-us/docs/next/user-guide/nacos/quick-start/#%E6%8E%A5%E5%85%A5-nacos-%E6%9C%8D%E5%8A%A1%E6%B3%A8%E5%86%8C%E4%B8%8E%E5%8F%91%E7%8E%B0
[4] spring-cloud-starter-alibaba-nacos-config
https://sca.aliyun.com/en-us/docs/next/user-guide/nacos/quick-start/#%E6%8E%A5%E5%85%A5-nacos-%E9%85%8D%E7%BD%AE%E4%B8%AD%E5%BF%83
[5] spring-cloud-starter-alibaba-nacos-sentinel
https://sca.aliyun.com/en-us/docs/next/user-guide/sentinel/quick-start/
[6] spring-cloud-starter-alibaba-nacos-rocketmq
https://sca.aliyun.com/en-us/docs/next/user-guide/rocketmq/quick-start/
[7] spring-cloud-starter-alibaba-nacos-seata
https://sca.aliyun.com/en-us/docs/next/user-guide/seata/quick-start/
Practice of End-to-end Canary Release by Using Kruise Rollout

634 posts | 55 followers
FollowAlibaba Cloud Storage - June 4, 2019
Alibaba Cloud Native Community - January 26, 2024
Alibaba Cloud Community - August 20, 2024
Alibaba Cloud Native Community - April 6, 2023
Alibaba Cloud Community - June 14, 2024
Alibaba Cloud Community - May 6, 2024

634 posts | 55 followers
Follow Managed Service for Prometheus
Multi-source metrics are aggregated to monitor the status of your business and services in real time.
Learn More Microservices Engine (MSE)
MSE provides a fully managed registration and configuration center, and gateway and microservices governance capabilities.
Learn More Cloud-Native Applications Management Solution
Accelerate and secure the development, deployment, and management of containerized applications cost-effectively.
Learn More Function Compute
Alibaba Cloud Function Compute is a fully-managed event-driven compute service. It allows you to focus on writing and uploading code without the need to manage infrastructure such as servers.
Learn MoreMore Posts by Alibaba Cloud Native Community