Alibaba Cloud Smart Access Gateway (SAG) uses a Software-Defined Wide Area Network (SD-WAN) architecture to route on-premises terminal traffic to cloud resources over a private network path, without traversing the public internet. This topic describes how to configure the SAG app so that end users on computers or mobile phones can connect to Elastic Desktop Service (EDS) Enterprise cloud computers over a virtual private cloud (VPC).
Traffic path: on-premises terminal → SAG app → Cloud Connect Network (CCN) → Cloud Enterprise Network (CEN) → VPC → cloud computer.
Background information
SAG is an SD-WAN solution offered by Alibaba Cloud, typically used in conjunction with Cloud Connect Network (CCN). For more information, see What is SAG?
SAG provides three service types: SAG customer-premises equipment (CPE), SAG vCPE, and SAG app. This topic guides you through the network configuration for connecting to cloud services by using the SAG app.
Prerequisites
Before you begin, make sure you have:
A CEN instance. See Create a CEN instance.
A CCN instance (bridges the SAG app to CEN). See Create a CCN instance.
An office network with its VPC attached to the CEN instance (required for cloud computers to be reachable). See Create and manage convenience office networks and Create and manage an enterprise Active Directory (AD) office network.
Cloud computers created and assigned to user accounts. See Create cloud computers and Assign cloud computers to users.
The SAG app and WUYING Workspace client installed on the same device. See Install the SAG app and Download WUYING Workspace client.
Before creating an office network, plan its IPv4 CIDR block to avoid conflicts with the CEN instance or your data center. See Plan a CIDR block. The following considerations also apply:
If you already have an office network, attach the convenience office network to the CEN instance.
If your AD system runs on an Elastic Compute Service (ECS) instance, attach the VPC of the AD server to the CEN instance. If your AD system runs on an on-premises server, connect the on-premises network to the cloud, create an enterprise AD office network, and configure the AD domain.
For account creation, see Create a convenience account or Create and manage enterprise AD accounts.
The WUYING Workspace desktop and mobile clients both support the SAG solution.
Step 1: Purchase and configure the SAG app
This step builds the network chain: SAG app instance → CCN instance → CEN instance. It also creates a client account for end users to log on to the SAG app.
Purchase an SAG app instance. See Purchase an SAG app instance.
Associate the SAG app instance with the CCN instance. See Set up network connections. After association, devices with the SAG app can connect to gateways in the CCN instance. See Introduction to CCN.
You can configure Domain Name System (DNS) either during this step or directly on the on-premises computer or mobile device. See Step 2: Configure an enterprise VPC IP address or a cloud service route.
Associate the CCN instance with the CEN instance. See Associate a CCN instance with a CEN instance. After association, gateways in the CCN instance can access resources in the CEN instance.
ImportantMake sure the VPC of the target office network is attached to the same CEN instance.
Create a client account so end users can log on to the SAG app and access cloud services. See Create a client account.
Result: The SAG app instance is connected to the CCN and CEN instances, and end users have accounts to log on to the SAG app.
Step 2: Configure an enterprise VPC IP address or a cloud service route
Choose one of the following solutions based on your requirements:
| Solution | Best for |
|---|---|
| Solution 1: Static IP address | End users do not need to configure anything manually. Requires a CNAME record on the enterprise DNS server. |
| Solution 2: Custom IP address | End users enter the private gateway address manually in the WUYING Workspace client. No DNS configuration required. |
| Solution 3: Cloud service route + DNS | Traffic is routed through CEN cloud services. Use this if you want centralized network control or need multi-region access. |
Solution 1: Configure a static IP address for an enterprise VPC
Get the private gateway address of the office network.
Log on to the EDS Enterprise console.
In the left-side navigation pane, choose Networks & Storage > Office Networks.
On the Office Networks page, find the target office network and click its network ID.
In the Network Information section, find Private Gateway Address and copy the value.
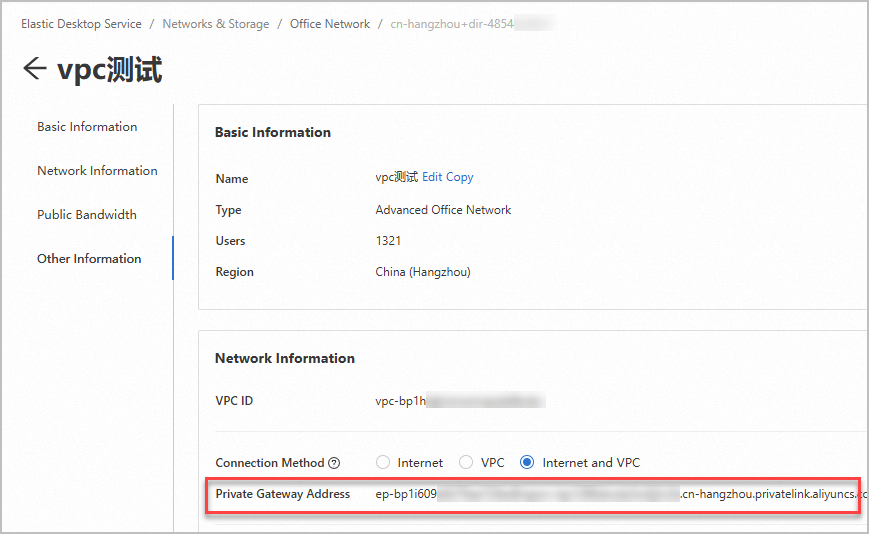
On your enterprise DNS server, add a CNAME record that points
private.wuying.comto the private gateway address copied in the previous step.On the end user's WUYING Workspace Windows client, configure the network access mode.
ImportantThe Windows client must be version 7.7 or later to configure an enterprise VPC IP address.
Open the Windows client.
In the upper-right corner of the logon page, click the settings icon, then click Connection Configuration.
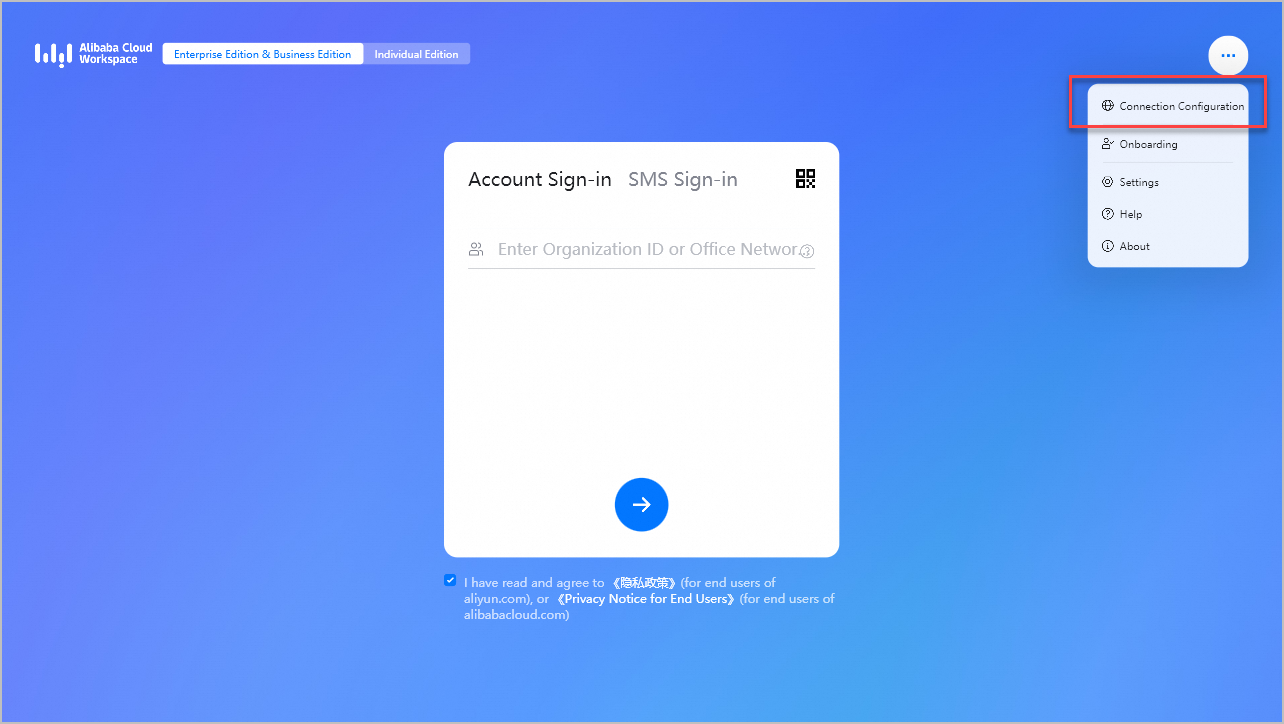
In the Connection Configuration dialog box, set the following parameters:
Connection Type: Select Alibaba Cloud VPC.
Alibaba Cloud VPC Address: Select Default Address.
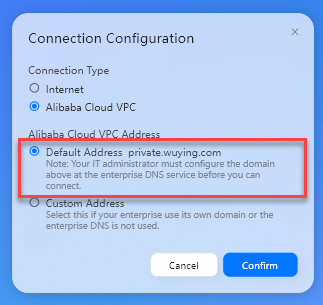
Click Confirm.
Result: The client resolves private.wuying.com to the private gateway address automatically. End users do not need to enter an IP address.
Solution 2: Configure a custom IP address for an enterprise VPC
Get the private gateway address of the office network.
Log on to the EDS Enterprise console.
In the left-side navigation pane, choose Networks & Storage > Office Networks.
On the Office Networks page, find the target office network and click its network ID.
In the Network Information section, find Private Gateway Address and copy the value.
On the end user's WUYING Workspace Windows client, configure the network access mode.
ImportantThe Windows client must be version 7.7 or later to configure an enterprise VPC IP address.
Open the Windows client.
In the upper-right corner of the logon page, click the settings icon, then click Connection Configuration.
In the Connection Configuration dialog box, set the following parameters:
Connection Type: Select Alibaba Cloud VPC.
Alibaba Cloud VPC Address: Select Custom Address.
Custom Address: Enter the private gateway address copied in the previous step.
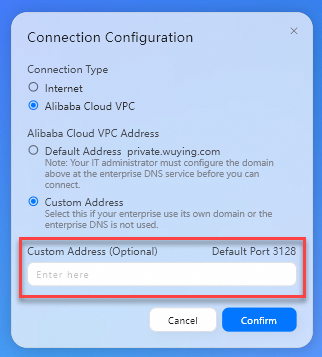
Click Confirm.
Result: The client connects to the cloud computer through the private gateway address entered by the end user.
Solution 3: Configure routing and DNS for cloud services
Configure cloud services for the CEN instance to allow CCN access to EDS Enterprise. See Manage access to cloud services. Use a Basic Edition or Enterprise Edition transit router.
For multi-region cloud computer access, set the EDS Enterprise CIDR block to
100.96.0.0/11. For more granular settings, see Port overview. The IP address of a domain name associated with a VPC service matches the IP address of the cloud service.(Optional) Test whether DNS resolution is already working:
nslookup ecd-vpc.cn-hangzhou.aliyuncs.comIf the command returns an IP address, DNS is working — skip to the verification step. If no IP address is returned, continue to the next step.
Configure DNS on the on-premises computer. The following example uses Windows 10.
Open the Start menu, search for Control Panel, and open it.
Under Network and Internet, click Network and Sharing Center.
In the left-side navigation pane, click Change adapter settings.
Right-click the network adapter that corresponds to OpenVPN and select Properties.
In the This connection uses the following items section, double-click Internet Protocol Version 4 (TCP/IPv4).
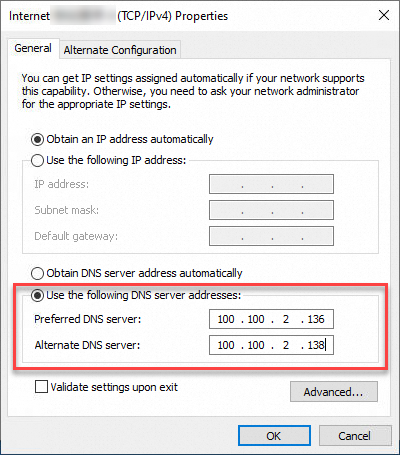
Enter the DNS server addresses:
Preferred DNS server:
100.100.2.136Alternate DNS server:
100.100.2.138
Verify the DNS settings took effect:
nslookup ecd-vpc.cn-hangzhou.aliyuncs.comA returned IP address confirms that the DNS configuration is correct.
Result: The on-premises computer can resolve cloud service domain names through the CEN cloud service route.
Step 3: Verify the connection
Open the WUYING Workspace Windows client.
In the upper-right corner of the logon page, click the settings icon, then click Connection Configuration.
In the Connection Configuration dialog box, set Connection Type to Alibaba Cloud VPC.
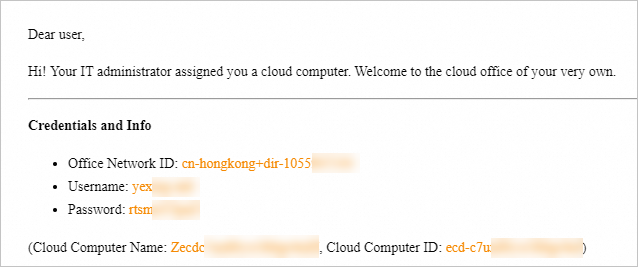
Enter the logon credentials sent to your email address — office network ID or organization ID, username, and password — then click the Next icon.
Find the cloud computer in the resource list, then start and connect to it.
If you see a network request timeout error, network connectivity is not established. Check that all network settings in Steps 1 and 2 are correctly configured, then log on again and reconnect.