This topic describes how to use Smart Access Gateway (SAG) to create a standby connection for an Express Connect circuit between an on-premises network and Alibaba Cloud. This helps you build a highly available hybrid cloud environment.
Prerequisites
A virtual private cloud (VPC) is created in the China (Beijing) region. For more information, see Create and manage a VPC.
A Cloud Enterprise Network (CEN) instance is created and associated with the VPC in the China (Beijing) region. For more information, see Create a CEN instance.
The Express Connect circuit is connected to the on-premises network in the China (Beijing) region, and a virtual border router (VBR) is created. For more information, see Create and manage a dedicated connection over an Express Connect circuit or Overview of hosted connections.
Background information
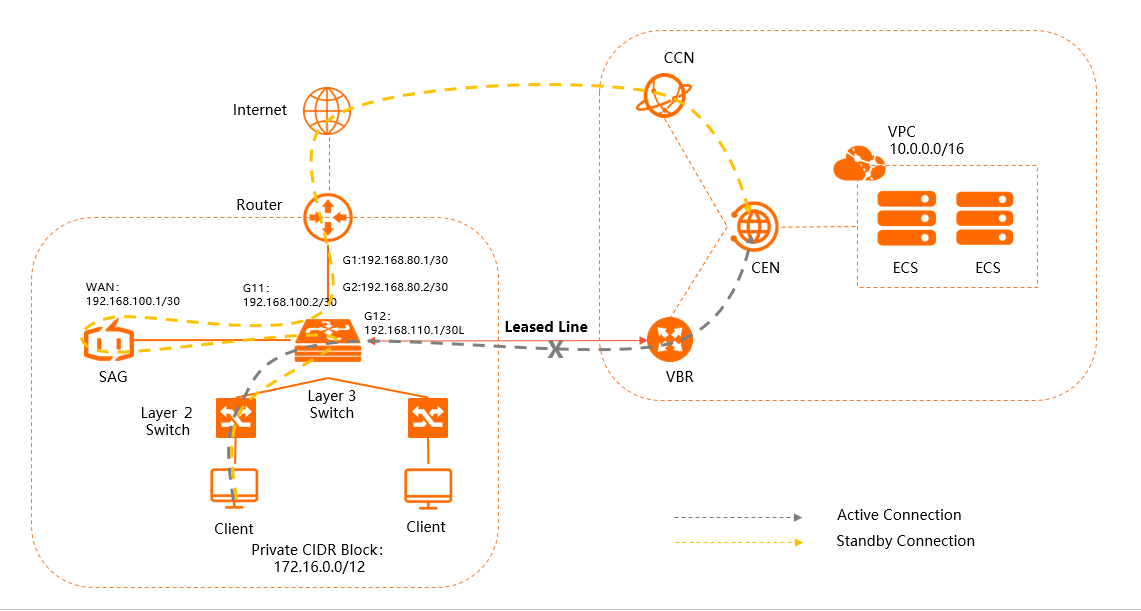
The following figure shows the network topology used in this topic. For example, an enterprise has deployed services in the VPC in the China (Beijing) region and an Express Connect circuit is connected to the on-premises network. To build a highly available environment between the on-premises network and Alibaba Cloud, the enterprise plans to use an SAG device to create standby connections, while the Express Connect circuit serves as the active connection.
To avoid changes in network topology, an SAG-1000 device is deployed in one-arm mode to connect the on-premises network to Alibaba Cloud.
The on-premises network, SAG device, and VBR learn routes through BGP. This facilitates network management and maintenance.
The SAG instance is associated with a Cloud Connect Network (CCN) instance and the VBR. The VBR and CCN instance are associated with the same CEN instance. The SAG device is connected to the VPC through the CEN instance.
In this example, network traffic is transmitted in the following directions:
When the SAG device is associated with the CCN instance and VBR, CEN chooses the connection over the Express Connect circuit by default. CEN preferably learns and advertises routes through the Express Connect circuit. When the Express Connect circuit is down, CEN learns and advertises routes through CCN. This means that both inbound and outbound traffic is preferably transmitted through the Express Connect circuit. When the Express Connect circuit is down, inbound and outbound traffic is transmitted through CCN.
Subnetting
The following table describes the subnetting in this example. We recommend that you plan the subnetting based on your business requirements and ensure that the CIDR blocks do not overlap with each other.
Item | CIDR block |
On-premises network | Private CIDR block: 172.16.0.0/12 |
| |
Port G1 of the egress router: 192.168.80.1/30 | |
SAG | WAN port (port 5): 192.168.100.1/30. IP address of the gateway: 192.168.100.2. |
BGP:
| |
VBR |
|
VPC in China (Beijing) | VPC CIDR block: 10.0.0.0/16 |
Procedure

Step 1: Purchase an SAG device
After you purchase SAG devices in the SAG console, Alibaba Cloud delivers the devices to the specified address and creates SAG instances to help you facilitate network management.
To use SAG devices in areas outside the Chinese mainland, you must purchase SAG devices from third-party vendors. For more information, see Purchase SAG devices.
Log on to the SAG console.
In the left-side navigation pane, click Smart Access Gateway.
On the Smart Access Gateway page, choose .
On the Smart Access Gateway page, set the following parameters and click Buy Now:
Area: Select the area where the SAG device will be deployed. Mainland China is selected in this example.
Device Spec: Select the model of the SAG device. SAG-1000 is selected in this example.
Have SAG Devices Already: Select whether you already have an SAG device. In this example, No is selected.
Edition: Select the edition of the SAG device. Standard is selected in this example.
Quantity: Select the number of SAG devices that you want to purchase. 1 is selected in this example.
Area: Select the area where the SAG bandwidth will be used. This area is the same as that of the SAG device and cannot be modified.
Instance Name: Enter a name for the SAG instance.
The name must be 2 to 128 characters in length, and can contain letters, digits, periods (.), hyphens (-), and underscores (_). It must start with a letter.
Peak Bandwidth: Select a maximum bandwidth value for network connections. 50 Mbps is selected in this example.
Subscription Duration: Select a subscription duration.
Confirm the order information, select the terms of service, and then click Buy Now.
In the Shipping Address dialog box, enter a recipient address and click Buy Now.
On the Pay page, select a payment method and complete the payment.
- You can check whether the order has been placed on the Smart Access Gateway page. SAG devices will be shipped within two business days after you place the order. To check the shipping updates, perform the following steps:
- On the Smart Access Gateway page, find the SAG instance.
- Choose
 View Shipping Update in the Actions column.
 - In the Order Updates panel, view the shipping updates.

Step 2: Activate the SAG device
After you receive an SAG-1000 device, check whether you have received all the accessories. For more information, see SAG-1000 device specifications.
Then, you must activate the SAG device and connect it to your on-premises network.
Log on to the SAG console.
In the top navigation bar, select the area where the SAG device is deployed.
On the Smart Access Gateway page, find the SAG instance that you want to activate. Associate the SAG device with the SAG instance. For more information, see Add a device.
After you associate the SAG device with the SAG instance, return to the Smart Access Gateway page. Find the SAG instance and choose
 > Activate in the Actions column.
 In the Activate message, click OK.
After the SAG device is activated, connect it to the on-premises network based on the preceding network topology.
Use a network cable to connect the WAN port of the SAG device to port G11 of the Layer 3 switch.
In this example, the WAN port is port 5. If you do not want port 5 to be the WAN port, you can modify the port roles. For more information, see Assign a role to a port.
NoteOnly version 2.0 of SAG-1000 devices allows you to modify port roles.
Before you assign port roles, make sure that the SAG device is activated, the 4G network works as expected, and the device is connected to Alibaba Cloud.
Step 3: Configure the SAG device
After the SAG devices are connected to your on-premises network, you can configure the device ports in the SAG console.
Before you begin, make sure that the SAG device is started, the 4G network works as expected, and the SAG device is connected to Alibaba Cloud.
Log on to the SAG console.
Configure a WAN port
Log on to the SAG console.
In the top navigation bar, select the region.
On the Smart Access Gateway page, click the ID of the SAG instance.
On the instance details page, click the Device Management tab.
In the left-side navigation tree, click Manage WAN Ports.
In the WAN (Port 5) section, click Edit.
In the Configure WAN (Port 5) dialog box, set the following parameters and click OK.
Link Type: Select Static.
IP: Enter the IP address of the WAN port. 192.168.100.1 is used in this example.
Subnet Mask: Enter the subnet mask of the WAN port IP address. 255.255.255.252 is used in this example.
Gateway: Enter the IP address of the gateway. 192.168.100.2 is used in this example.
NoteAfter the preceding parameters are configured, the SAG device generates a default route.
Configure BGP.
NoteSAG-1000 devices whose software version is 1.0 do not provide a dedicated port for Express Connect circuits. Do not set the AS number of the BGP peer to the AS number of the Express Connect circuit when you configure BGP routing in the SAG console. Otherwise, your SAG device cannot learn VPC routes through CEN. The BGP peer AS number indicates the attribute of the port to be connected to the Express Connect circuit.
On the Device Management tab, click Manage Routes in the left-side management pane.
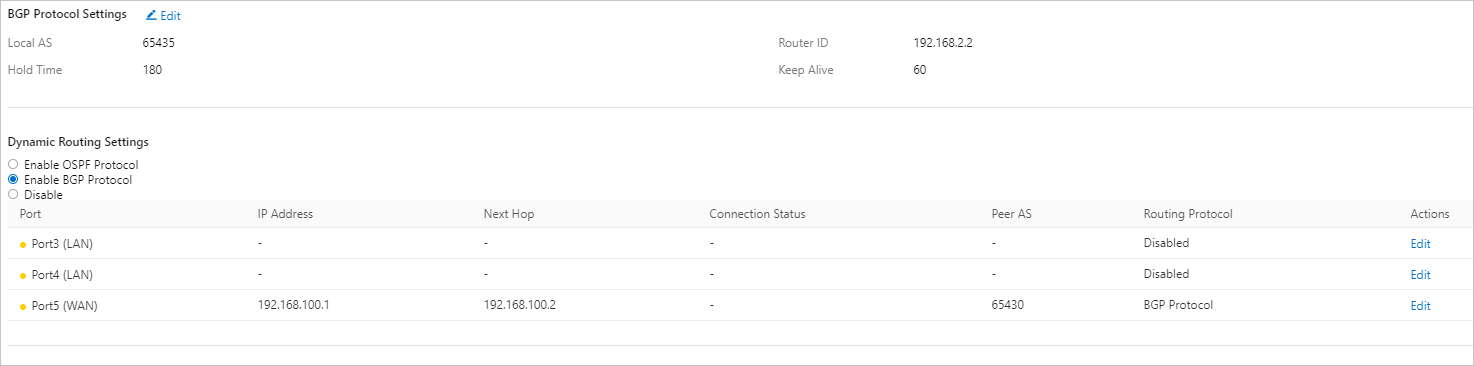
In the BGP Protocol Settings section, click Edit.
In the Configure BGP dialog box, set the parameters and click OK.
Local AS: 65435 is used in this example.
Router ID: 192.168.2.2 is used in this example.
Hold Time: 180 is used in this example.
Keep Alive: 60 is used in this example.
Enable BGP for the WAN port.
In the Dynamic Routing Settings section, select Enable BGP Protocol.
In the Change Routing Protocol message, click OK.
Find Port5 (WAN) in the Dynamic Routing Settings section, and click Edit in the Actions column.
In the Modify BGP Dynamic Routing Settings dialog box, select Enable BGP, specify the peer IP address and peer AS, and then click OK.
Set the peer IP address and peer AS to the IP address of port G11 and the BGP AS number of the peer switch.
Peer AS: 65430 is used in this example.
Peer IP: 192.168.100.2 is used in this example.
Select a method to advertise routes to Alibaba Cloud.
On the SAG instance details page, click the Network Configuration tab.
In the left-side management pane, click Methods to Synchronize with On-premises Routes.
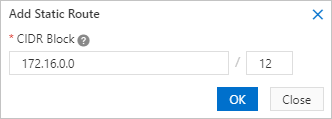
Select Static Routing, click Add Static Route to add a CIDR block, and then click OK.
Enter the CIDR block that is used to route network traffic from the on-premises network to Alibaba Cloud. 172.16.0.0/12 is used in this example.
Step 4: Configure the VBR
In this step, you need to configure a VBR in the Express Connect console to establish a BGP peer relationship between the VBR and the Layer 3 switch.
Configure a BGP group
Log on to the Express Connect console.
In the top navigation bar, select a region.
In the left-side navigation pane, click Virtual Border Routers (VBRs).
On the Virtual Border Routers (VBRs) page, click the ID of the VBR.
On the details page, click the BGP Groups tab.
On the BGP Groups tab, click Create BGP Group and set the following parameters:
Name: Enter a name for the BGP group. In this example, test is used.
Peer ASN: Enter the AS number of the Layer 3 switch. 65430 is used in this example.
BGP Key: Enter the key of the BGP group. This parameter is ignored in this example.
Description: Enter a description for the BGP group. SAGtest is used in this example.
Click OK.
Configure the BGP peer.
On the VBR details page, click the BGP Peers tab.
On the BGP Peers tab, click Create BGP Peer.
In the Create BGP Peer panel, set the following parameters and click OK.
BGP Group: Specify the BGP group to which you want to add the VBR and SAG device. The BGP group test is used in this example.
BGP Peer IP: Enter the IP address of the BGP peer. 192.168.110.1 is used in this example, which is the IP address of port G12 of the Layer 3 switch.

Step 5: Configure the switch and router
You also need to create routes for the peer switch and Internet-facing router of the SAG device. Switches and routers used in this example may be different from yours. For more information, see the manuals provided by your providers.
Configure routes for the Layer 3 switch.
interface GigabitEthernet 0/11 no switchport ip address 192.168.100.2 255.255.255.252 #The IP address of the peer switch of the SAG device interface GigabitEthernet 0/12 no switchport ip address 192.168.110.1 255.255.255.252 #The IP address of the peer switch of the VBR router bgp 65430 bgp router-id 192.168.1.1 network 172.16.0.0 mask 255.240.0.0 #Advertise the private CIDR block of the on-premises network neighbor 192.168.100.1 remote-as 65435 #Establish the neighbor relationship with the SAG device neighbor 192.168.100.1 timers 60 180 #Set the keepalive time interval and hold time for BGP neighbor 192.168.110.2 remote-as 45104 #Establish the neighbor relationship with the VBR exitImportantYou only need to advertise the private CIDR block of the on-premises network that needs to communicate with the VPC. We recommend that you sort out the routes that you want to advertise and those you do not want to advertise, for example, routes of VPCs, other SAG instances, and other VBRs. Otherwise, routing loops may occur.
Configure routes for the egress router. The following example provides sample configurations.
ip route 192.168.100.0 255.255.255.252 192.168.80.2 #The route to the SAG device
Step 6: Set up network connections
After you configure the SAG device, you must set up network connections to connect the on-premises network to Alibaba Cloud.
Connect the SAG instance to a CCN instance.
Log on to the SAG console.
In the top navigation bar, select Mainland China.
The CCN instance and SAG instance must be deployed in the same area.
In the left-side navigation pane, click CCN.
On the CCN page, click Create CCN Instance.
In the Create CCN Instance panel, specify a name for the CCN instance and click OK.
Associate the SAG instance with the CCN instance.
In the left-side navigation pane, click Smart Access Gateway.
On the Smart Access Gateway page, find the SAG instance and click Network Configuration in the Actions column.
In the left-side management pane, click Network Instance Details.
On the Network Instance Details tab, click Attach Network, select the CCN instance that you created, and then click OK.
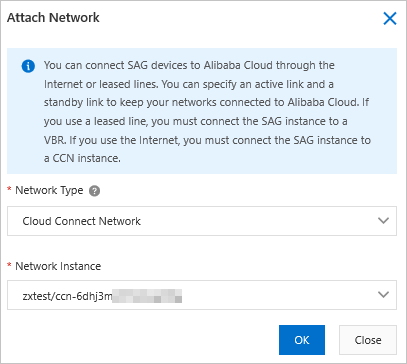
Repeat the preceding steps to associate the VBR with the SAG instance. For more information, see Attach a network instance.
If the SAG instance is associated with the CCN instance and the VBR, the on-premises network is connected to the Alibaba Cloud through the Express Connect circuit by default. If the Express Connect circuit is down, the on-premises network is connected to Alibaba Cloud through CCN. In this case, the connection is encrypted and established over the Internet.
Attach the CCN instance and VBR to the CEN instance. For more information, see Attach a network instance.
Then, the on-premises network can communicate with the VPC that is attached to the CEN instance.
NoteIf the on-premises network, VBR, and VPC are not in the same region, you must purchase a bandwidth plan for the CEN instance and allocate inter-region bandwidth. This way, the on-premises network, VBR, and VPC can communicate with each other. For more information, see Use a bandwidth plan and Manage bandwidth for cross-region connections.
Configure security group rules.
You must create a security group rule for the ECS instance in the VPC to allow access from the private CIDR block 172.16.0.0/12 to resources deployed on the ECS instance. For more information, see Add security group rules.
Step 7: Add a routing policy to the CEN instance
Add a routing policy to the CEN instance to make sure that the CCN instance can learn VPC routes from both the CEN instance and VBR.
In this example, after the CCN instance learns VPC routes from the VBR, the CEN instance no longer advertises the VPC routes to the SAG device. This ensures that network traffic between the on-premises network and VPC is preferably transmitted through the Express Connect circuit. If the Express Connect circuit is down, the CCN instance can no longer learn VPC routes from the VBR and automatically advertises the VPC routes that are learned from the CEN instance to the SAG device. Then, network traffic between the on-premises network and VPC is transmitted through the SAG device.
- Log on to the CEN console.
On the Instances page, click the ID of the CEN instance that you want to manage.
On the Basic Settings tab, click the Transit Router tab and click the ID of the transit router that you want to manage.
On the details page of the transit router, click the Route Table tab.
On the Route Table tab, click the Route Maps tab.
On the Route Maps tab, click Add Route Map.
On the Add Route Map page, set the parameters and click OK.
Parameter
Description
Routing Policy Priority
Enter a priority for the routing policy.
Description
Enter a description for the routing policy.
Region
Chinese Mainland CCN is selected by default and cannot be modified.
Policy Direction
Select Export from Regional Gateway.
Match Condition
Select a network type. Select Source Instance Type from the drop-down list.
Then, select VBR.
Action Policy
Select Allow.
Step 8: Test connection failovers and network connectivity
After you complete the preceding steps, close the Express Connect port on the Layer 3 switch and test whether the route that points to the VPC is switched. If the Express Connect circuit encounters an error, the destination of the next hop changes from the VPC to the SAG device. For more information about the commands used to view routes, see the manuals issued by your provider.
You can access the cloud resources in the connected VPC from an on-premises client to test the connectivity.