Network Load Balancer (NLB) delivers higher-performance Layer 4 load balancing than Classic Load Balancer (CLB), with support for 100 million concurrent connections, 100 Gbit/s of bandwidth, SSL offloading for TCP traffic, and connection throttling. If your business requires higher throughput, automatic scaling, or advanced IPv6 support, migrate your CLB Layer 4 listeners to NLB.
Why migrate to NLB
The following table compares CLB and NLB capabilities to help you confirm that NLB meets your requirements.
| Capability | CLB | NLB |
|---|---|---|
| Concurrent connections | Limited | Up to 100 million per instance |
| Bandwidth | Fixed by instance spec | Up to 100 Gbit/s; scales automatically |
| Instance scaling | Manual spec changes required | Automatic — no spec changes needed |
| Multi-port listening | Not supported | Supported — one listener handles a port range |
| IPv6 | Basic | Dual-stack, IPv6-to-IPv4, and IPv6-to-IPv6 forwarding |
| SSL offloading | HTTPS only | TCP/SSL (one-way and mutual authentication) |
| Access control | ACL-based per listener | Security groups (by protocol, port, and IP) + whitelist/blacklist |
Use cases
Migrate CLB Layer 4 listeners to NLB when your workloads involve:
High concurrent connections — instant messaging, Internet of Things (IoT) device management, and similar services
Bursty traffic — e-commerce promotions or other scenarios with large, unpredictable traffic spikes
Dynamic port ranges — online games, video conferencing, and online education platforms that require many ports
IPv4-to-IPv6 migration — network resource scale-out using dual-stack or IPv6 forwarding
Example scenario
A company runs an Internet-facing CLB instance in the China (Hangzhou) region with a TCP listener on port 80. The CLB instance serves traffic for www.example.cn via an A record and forwards requests to ECS01 and ECS02.

As IoT traffic grows, the company needs to migrate to NLB without changing backend server IP addresses or the service domain name. The plan: create an NLB instance in the same region with identical configurations, then use DNS weight-based routing to shift traffic gradually from CLB to NLB.

The following table shows the parameter settings for this example.
| Parameter | CLB | NLB |
|---|---|---|
| Network type | Internet-facing — Service IP: 112.XX.XX.26 | Internet-facing — Domain: nlb-h8z2851bv87*******.cn-hangzhou.nlb.aliyuncs.com |
| Domain names mapped by DNS records | www.example.cn | www.example.cn |
| Listener protocol | TCP (port 80) | TCP (port 80) |
| Backend servers | ECS01 and ECS02 | ECS01 and ECS02 |
Usage notes
Billing: CLB and NLB both use the pay-as-you-go billing method, but billable items and rates differ. Review billing details before migrating: Pay-as-you-go CLB and NLB billing rules.
Network: The NLB instance must be in the same virtual private cloud (VPC) as the CLB backend servers. Both instances must share the same backend servers.
IP version: IPv4 CLB instances can migrate to IPv4 or dual-stack NLB instances. IPv6 CLB instances can only migrate to dual-stack NLB instances.
Prerequisites
Before you begin, ensure that you have:
A CLB instance configured with a TCP listener and backend servers, and an A record pointing the service domain name to the CLB instance. For details, see Overview.
Two Elastic Compute Service (ECS) instances (ECS01 and ECS02) with applications deployed. For details on creating ECS instances, see Create an instance on the Custom Launch tab.
If the CLB instance uses a UDP listener, configure a UDP listener on the NLB instance during migration. Prepare two test servers — one for pre-migration traffic testing and one for in-migration testing. You can use existing servers. In this example, servers run 64-bit Alibaba Cloud Linux 3.2104 64.
Step 1: Create an NLB instance
Log on to the NLB console.
In the top navigation bar, select the region where you want to deploy the NLB instance.
On the Instances page, click Create NLB.
On the NLB (Pay-As-You-Go) International Site page, configure the parameters and click NLB (Pay-As-You-Go) International SiteBuy Now. The following table describes the key parameters. Other parameters use the default values.
Parameter Description Region Select the region for the NLB instance. In this example, China (Hangzhou) is selected. Network type In this example, Internet is selected. > NoteIf you select Intranet, an NLB instance with two virtual IP addresses (VIPs) supports 10 Gbit/s bandwidth, 100,000 new connections, and 1.5 million concurrent connections, with automatic scaling up to 50 Gbit/s.
IP Version
Select an IP version for the ALB instance. In this example, IPv4 is selected.
IP version Select an IP version. In this example, IPv4 is selected. VPC Select the VPC where the NLB instance will be deployed. Zone Select zones and vSwitches. In this example, Hangzhou Zone H, Hangzhou Zone I, and a vSwitch in each zone are selected. Associate with EIP Bandwidth Plan In this example, Associate with EIP Bandwidth Plan is selected and an Internet Shared Bandwidth instance is chosen. If you don't have one, click Purchase EIP Bandwidth Plan and complete the purchase. > NoteFor high-volume Internet traffic: associate the NLB instance with an Internet Shared Bandwidth instance — the maximum bandwidth is determined by the plan. Without a plan, the NLB instance uses a pay-as-you-go elastic IP address (EIP) with a maximum of 400 Mbit/s (not a guaranteed value). To associate a plan after purchase, see Increase the maximum bandwidth for an Internet-facing NLB instance.
Step 2: Create a server group
Log on to the NLB console.
In the top navigation bar, select the region where the NLB instance is deployed.
Log on to the NLB console.
In the left-side navigation pane, choose NLB > Server Groups.
On the Server Groups page, click Create Server Group.
In the Create Server Group dialog box, configure the parameters and click Create. The following table describes the key parameters. Other parameters use the default values.
Parameter Description Server group type In this example, Server is selected. Server group name Enter a name for the server group. VPC Select the VPC of the NLB instance. Only servers in this VPC can be added to the server group. Backend server protocol In this example, TCP is selected. Configure health check Health checks are enabled by default. In this example, the default setting is used. Click the ID of the server group to open the Backend Servers tab.
Click Add Backend Server. In the Add Backend Server panel, select ECS01 and ECS02, then click Next.
In the Ports/Weights step, enter port
80, keep the default weight, and click OK.
Step 3: Create a TCP listener
Log on to the NLB console.
In the top navigation bar, select the region where the NLB instance is deployed.
On the Instances page, click the ID of the NLB instance.
Click the Listener tab, then click Quick Create Listener.
In the Quick Create Listener dialog box, configure the parameters and click OK.
Parameter Description Listener protocol In this example, TCP is selected. Listener port In this example, port 80is specified.Server group In this example, Server Type is selected and the server group created in step 2 is selected.
Step 4: Test network traffic
Before shifting traffic, verify that the NLB instance can receive and forward requests correctly.
Log on to the Internet-facing Linux server used for pre-migration traffic testing.
Modify the hosts file to map the domain name to the NLB instance's EIP:
This step maps
www.example.cnto the NLB instance's EIP (47.XX.XX.101) and overrides the current DNS record locally. Use this to verify that requests reach the NLB instance before starting the migration.sudo vi /etc/hostsPress
Ito enter edit mode, then add the following line:47.XX.XX.101 www.example.cnPress
Esc, type:wq, and press Enter to save and exit.Test TCP connectivity to the NLB instance. If Telnet is not installed, run
yum install -y telnetfirst.telnet www.example.cn 80 # TCP listener port 80A response containing Connected to nlb-... confirms that requests are forwarded to the backend servers.

Verify the operation log in the NLB console:
Log on to the NLB console.
In the left-side navigation pane, choose NLB > Operation Log.
On the Operation Log page, find the event with Event Name set to GetLoadBalancerAttribute and click View Details.
In the View Details panel, select an event in the Event List section and click Event Record. Confirm the target NLB instance by checking the
LoadBalancerIdfield underrequestParameters.
Step 5: Migrate workloads to the NLB instance
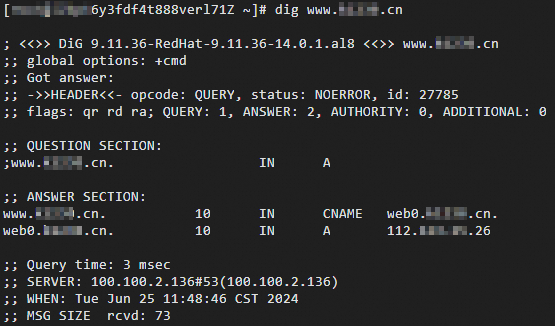
The following figure shows the current state: a TCP listener on the CLB instance handles requests for example.cn.

Compare CLB and NLB configurations before migrating. Make sure configurations match and are fully tested. Perform the migration during off-peak hours.
An A record currently maps www.example.cn to the CLB instance's IP address.

The NLB instance configuration is tested. This example uses Alibaba Cloud DNS to describe the migration. For more information about Alibaba Cloud DNS, see Public Authoritative DNS Resolution.

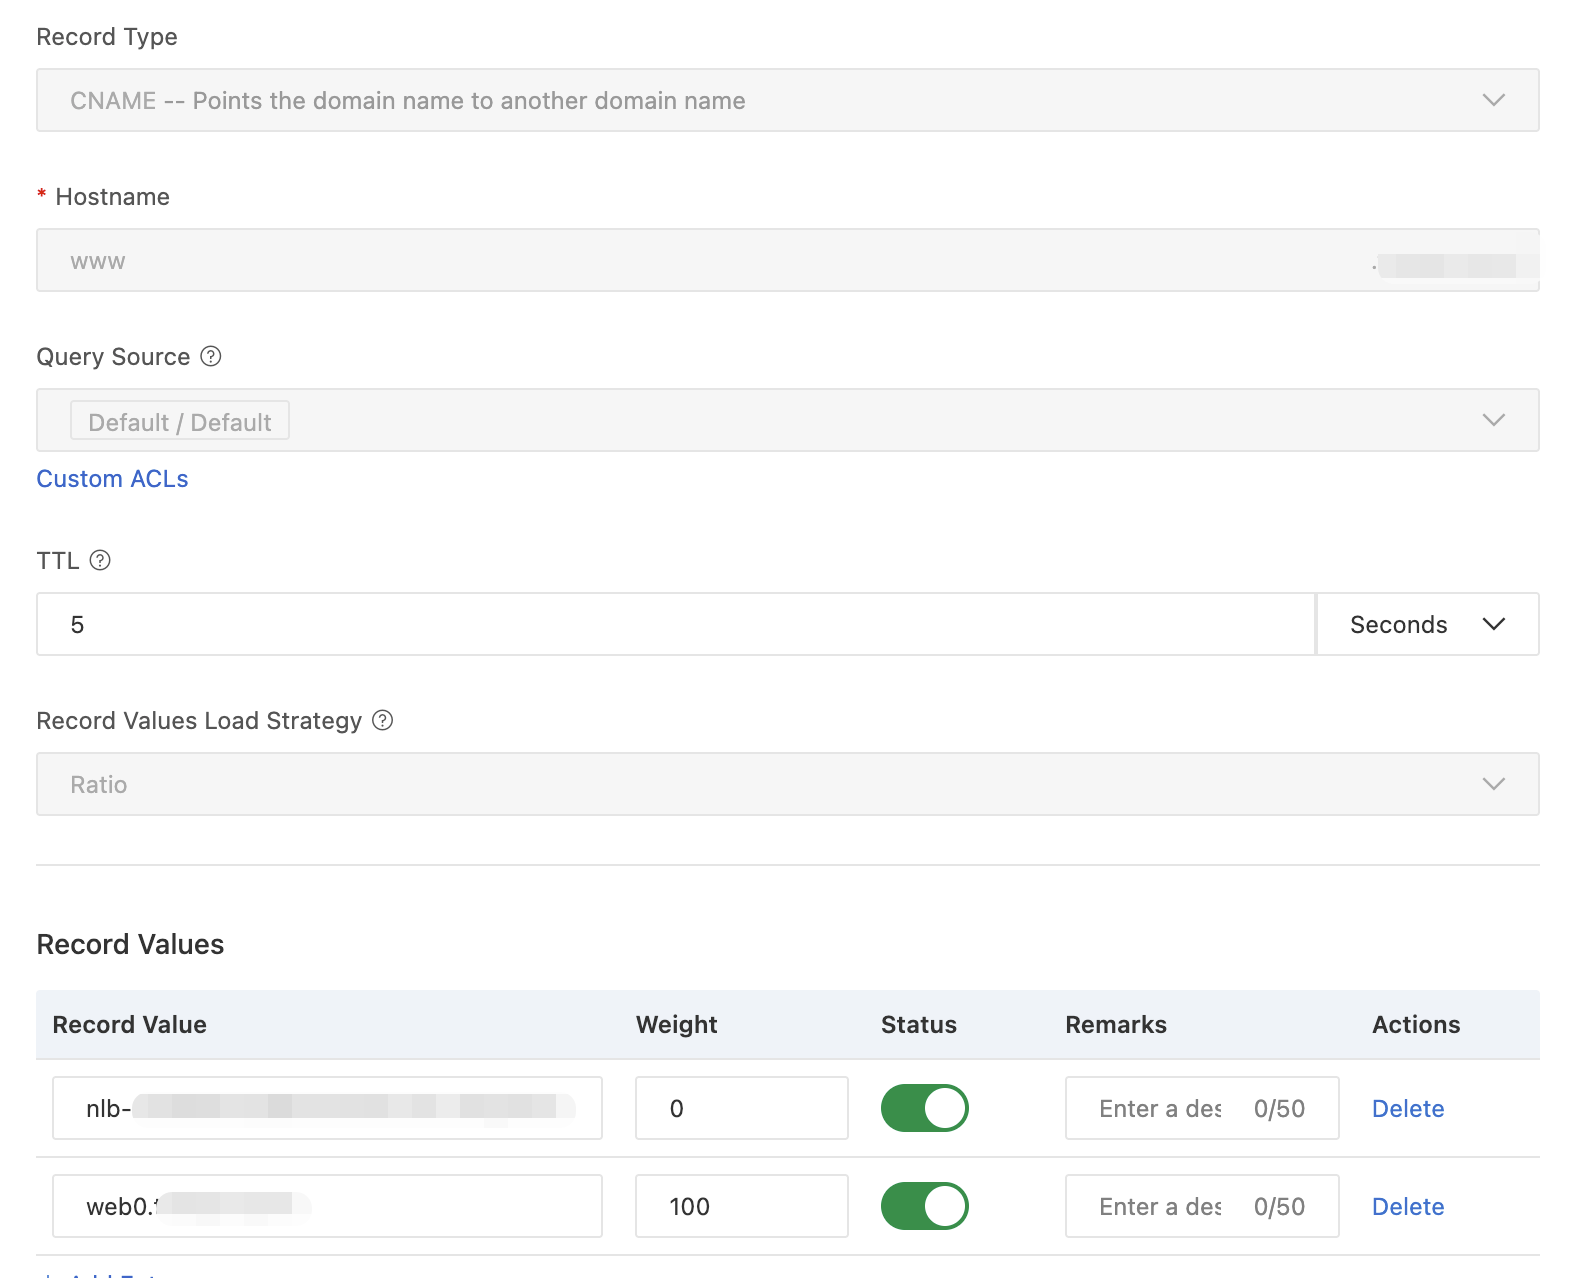
Step 5.1: Configure a temporary domain name and add a CNAME record for the CLB instance
Use CNAME records for DNS-based weight routing. Start by creating a temporary domain name that maps to the CLB instance's IP address.
To assign different weights to DNS records for the same domain name, the records must be the same type (A, CNAME, or AAAA) and share the same hostname and ISP line.
Log on to the Alibaba Cloud DNS console.
On the Public Zone page, click the domain name
example.cn.On the Settings tab, find the A record pointing to the CLB instance and click Edit.
In the Edit Record dialog box, change Hostname to
web0and click OK. This creates the temporary domainweb0.example.cn.On the Settings tab, click Add Record and configure the following parameters, then click OK.
Parameter Description Record type Select CNAME. Hostname Enter www.Query source Select Default. TTL Set to 5 seconds to minimize propagation delay during migration. Record value Enter web0.example.cn(the temporary domain pointing to the CLB instance).
Step 5.2: Add a CNAME record for the NLB instance
On the Settings tab, click Add Record and configure the following parameters, then click OK.
| Parameter | Description |
|---|---|
| Record type | Select CNAME. |
| Hostname | Enter www. |
| Query source | Select Default. |
| TTL | Set to 5 seconds. |
| Record value | Enter the domain name of the NLB instance. |
Step 5.3: Set initial weights and start a canary release
On the Public Zone page, find the CNAME record created in step 5.2. Click the down arrow next to Edit and choose Edit Record Set.
In the Edit Record panel, under Record Values, set the initial weights: Click OK.
CLB instance weight:
100NLB instance weight:
0
Gradually reduce the weight of the DNS record for the CLB instance and gradually increase the weight of the DNS record for the NLB instance. Make sure that your services are not affected.
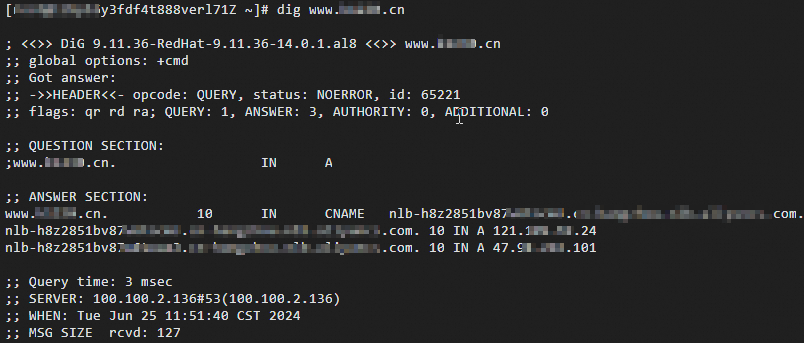
Run
digon the Linux client to verify traffic distribution:dig www.example.cnRun the command multiple times. Results show requests resolving to either the CLB or NLB instance based on the current weights.
Step 5.4: Complete the migration
Gradually shift all traffic to NLB by continuing to reduce the CLB weight and increase the NLB weight until CLB is at 0 and NLB is at 100. After all persistent connections on the CLB instance are closed and no requests are sent to it, release the CLB instance. For details, see Release a CLB instance.
The following figure shows the final state after migration.

If your DNS provider does not support weight-based CNAME routing, use A records instead. Add a second A record for www.example.cn pointing to the NLB instance's EIP, then update or remove the original A record pointing to the CLB instance once migration is complete.

Advanced features
NLB provides stronger Layer 4 load balancing capabilities than CLB. Some features work differently between the two products. The following table describes the key differences.
| Feature | CLB | NLB |
|---|---|---|
| Server group management | Default server groups, vServer groups, and primary/secondary server groups | Server groups |
| One-way authentication | Certificates from Alibaba Cloud and third parties. See Configure one-way authentication for HTTPS requests. | Deploy NLB as an ingress, configure an SSL certificate, and the TCP/SSL listener decrypts traffic before forwarding to backend servers. See Use NLB to enable SSL offloading over TCP (one-way authentication). |
| Mutual authentication | Certificates from Alibaba Cloud and third parties. See Configure mutual authentication on an HTTPS listener. | Deploy NLB as an ingress with an SSL certificate and CA certificate. The TCP/SSL listener authenticates both sides before establishing communication. See Use NLB to enable SSL offloading over TCP (mutual authentication). |
| Multi-port listening | Not supported | A single listener handles traffic across a port range, simplifying configuration and reducing security risks. See Enable multi-port listening and forwarding for NLB. |
| Security | Whitelist and blacklist access control. See Access control. | Security group-based access control by listener and port, plus whitelist and blacklist support. See Use security groups to control access based on ports and Use security groups as blacklists or whitelists. |
For more information about NLB, quotas, limits, DDoS mitigation, and getting started, see:
Use NLB to balance loads for IPv4 services and Use NLB to implement load balancing for IPv6 services
What is Anti-DDoS Origin? — NLB includes basic DDoS mitigation by default
FAQ
Which configurations must remain the same before and after migration?
The region, network type, listener protocol, and backend servers must stay the same. The NLB instance must be in the same VPC as the CLB instance. The two instances can be in different zones.
What are the differences in certificate handling between CLB and NLB?
CLB supports encrypted transmission over HTTPS using certificates from Alibaba Cloud or third parties. NLB supports SSL-encrypted TCP connections; certificates are managed by Alibaba Cloud Certificate Management Service.
To upload certificates for CLB, see Upload certificates.
To upload certificates for NLB, see Purchase an official certificate and Upload an SSL certificate.
How does access control differ between CLB and NLB?
CLB uses access control lists (ACLs) configured per listener. NLB uses security groups to control access by protocol, port, and IP address. For details, see Add an NLB instance to a security group.
How does DNS resolution differ between CLB and NLB?
CLB uses A records to map domain names to CLB instance IP addresses. For NLB, use CNAME records to map domain names to the NLB instance's domain name (recommended for easier management). If you need a specific IP address, use an A record pointing to the NLB instance's IP.
What should I do if the migration fails partway through?
The DNS weight-based migration approach is designed to be safe: CLB continues handling traffic while NLB weight is low. If problems occur after shifting traffic:
Immediately set the NLB weight back to
0and the CLB weight back to100to restore all traffic to CLB.Check the NLB instance configuration, health check status, and backend server status in the NLB console.
Use the pre-migration test procedure (step 4) to re-verify the NLB instance before retrying the migration.
Do not release the CLB instance until all persistent connections have closed and all traffic has confirmed to route through NLB successfully.
What's next
For a full comparison of features, billing, and benefits between CLB and NLB, see What is SLB?
For CLB and NLB product details:
CLB NLB What is CLB? What is NLB? Benefits Benefits Limits Limits Overview Use NLB to serve IPv4 services CLB billing Use NLB to serve IPv6 services NLB billing