Image updates and resets
Deploy an OpenClaw image on an existing server
Log in to the Simple Application Server console, select the target instance, and click Server Resetting.
Select Reset to Other Image, and then select the
OpenClaw 2026.5.19image.Reconfigure OpenClaw. After you reset the system, the previously configured API key and token are invalid. Go to Application Details to reconfigure the API key.
Resetting the system reinstalls the operating system, clearing all data on the system disk, including saved configurations, logs, and databases, and stopping all applications running on the Simple Application Server. You must back up critical data before you proceed. You can create a snapshot or export data to your local device. To preserve your OpenClaw workspace data, such as memory, identity configuration, and Skills, see Back up and restore data for OpenClaw upgrades.
Reset the application image
Server Resetting reinstalls the operating system and erases all data on the system disk, including saved configurations, logs, and databases. You must back up important data before you proceed. Create a snapshot or export the data to a local device. To preserve your OpenClaw workspace data, such as memory, identity configuration, and Skills, see Back up and restore data for OpenClaw upgrades.
If your current application image is not version OpenClaw 2026.5.19, reset the system to update the image and access the latest OpenClaw features.Log in to the Simple Application Server console, select the target instance, and click Server Resetting.
Select Reset to Other Image, and then select version
OpenClaw 2026.5.19.Reconfigure OpenClaw. Resetting the system invalidates your API key and token. Go to Application Details to reconfigure the API key.
Check the OpenClaw image version
You can check the image version of your OpenClaw instance in two ways:
From the console: Log in to the Simple Application Server console. Go to the details page of the target OpenClaw instance and navigate to Basic Information > Images to view the instance's current image version.
Using a terminal command: In the Simple Application Server console, click Remote Connection > Log on Now to open the terminal. Run the following command to check the version:
openclaw --version
The version numbers from these two methods have different meanings:
Console image version: This is the version of the image used to create the instance.
The version returned by
openclaw --version: This is the version of the running OpenClaw application, which changes with application updates.
It is normal for these version numbers to differ, as they come from different sources.
Troubleshoot system reset errors
If an error occurs when you reset the system, stop the Simple Application Server instance first. You can reset the system only when the instance is in the stopped state.
Log in to the Simple Application Server console. In the instance list, click the target instance.
In the upper-right corner of the instance details page, click Stop. Wait until the instance status changes to stopped.
When the instance has stopped, Server Resetting again.
A system reset erases all data from the system disk of your Simple Application Server instance. Back up your data before you proceed. Create a snapshot before you reset the system so you can restore data later. To preserve your OpenClaw workspace data, such as memories, identity configurations, and Skills, see Back up and restore data for OpenClaw upgrades.
OpenClaw configuration issues
OpenClaw firewall command failure
When using the "One-click Firewall Passthrough" feature for an OpenClaw application in the Simple Application Server console, a pop-up may appear with the error "Failed to retrieve the port passthrough command." The pop-up also displays a warning: "Your firewall will open an unspecified port for traffic from source 0.0.0.0/0. Assess the security risks and then click Confirm."
Cause: A missing OpenClaw port in the configuration file prevents the system from retrieving the port passthrough command.
Affected versions: This issue affects only OpenClaw versions earlier than 2026.3.28. Version 2026.3.28 and later include the fix.
Solution: Reset the current application image to the latest version.
Troubleshoot "API rate limit reached" in OpenClaw
To troubleshoot this error, check the following items in order:
Incorrect OpenClaw configuration.
If the base URL or model provider is misconfigured, your requests may be routed to a general API endpoint instead of the dedicated Coding Plan channel, triggering the rate limit.
If you are using a Coding Plan, check your OpenClaw configuration file to ensure that the
models,agents, andgatewayparameters, including any nested fields, are configured correctly. For example, the model provider must be structured as follows:{ "models": { "providers": { "Model Studio": {...} } } }.If you are not currently using a Coding Plan, consider switching to one to get a dedicated quota.
Plan quota exceeded: Check your plan usage on the Coding Plan page.
Try resetting the API key: If the issue persists after the preceding checks, go to the Coding Plan page to reset it.
General troubleshooting for rate limits (applies to all model providers)
If you receive an API rate limit reached error when calling a model, it may also be caused by the following issues:
Excessive calling frequency: Sending too many requests in a short period can trigger the model provider's rate limit. Reduce the calling frequency and try again after a brief wait.
Excessive concurrent requests: A large number of concurrent requests sent in a short period can cause this error. Review the
maxConcurrentparameter in your application's configuration and consider lowering the concurrency limit.Free quota exhausted: If you are using a free quota, this error may indicate that your free quota is exhausted. Some providers return a 403 or a rate limit error when the free quota is exhausted, instead of automatically switching to paid billing.
Third-party model support
Yes. Configuration depends on your OpenClaw image version. Switch between the tabs below to view the supported providers and integration methods for your version.
If you use only Alibaba Cloud Model Studio models, you do not need to configure third-party models. On the Application Details page in the console, the model configuration section displays only Alibaba Cloud Model Studio options, such as Model Studio Coding Plan and Alibaba Cloud Model Studio. This is expected behavior, and no further action is required. Third-party models are integrated by using a separate configuration path and are not added from this drop-down menu.
OpenClaw 2026.5.19 and later (Console configuration)
In the Simple Application Server console, go to the Application Details tab of the instance. In the Models card, click Add Model, select one of the following options from the provider dropdown list, and enter the API Key and model ID to connect. You do not need to log on to the server or modify the configuration file.
Provider | Plan | Supported models |
Alibaba Cloud Model Studio | Alibaba Cloud Model Studio | qwen3.7-max, qwen3.6-plus, deepseek-v4-pro, kimi-k2.6, glm-5.1, MiniMax-M2.7 |
Alibaba Cloud Model Studio Coding Plan | qwen3-coder-plus, qwen3-coder-next, qwen3-max-2026-01-23, qwen3.6-plus, kimi-k2.5, glm-5 | |
Alibaba Cloud Model Studio Token Plan (Team Edition) | qwen3.7-max, kimi-k2.6, glm-5.1, deepseek-v4-pro, qwen-image-2.0-pro, wan2.7-image-pro, and 15 other models | |
DeepSeek | DeepSeek | deepseek-v4-pro, deepseek-v4-flash |
Kimi | Kimi | kimi-k2.6, kimi-k2.5, kimi-k2-thinking, kimi-k2-thinking-turbo, moonshot-v1-128k |
Kimi Code | kimi-for-coding | |
Zhipu | Zhipu | GLM-5V-Turbo, GLM-5.1, GLM-5-Turbo, glm-5, glm-4.7, glm-4.6 |
GLM Coding Plan | GLM-5.1, GLM-5-Turbo, glm-5, glm-4.7, glm-4.6, glm-4.5 | |
MiniMax | MiniMax | MiniMax-M2.7, MiniMax-M2.5, MiniMax-M2.1, MiniMax-M2.1-lightning |
MiniMax Token Plan | MiniMax-M2.7, MiniMax-M2.7-highspeed, MiniMax-M2.5, MiniMax-M2.5-highspeed, MiniMax-M2.1 | |
Volcano Ark | Volcano Ark | doubao-seed-2-0-pro-260215, doubao-seed-1-8-251228, glm-4-7-251222, doubao-seed-code-preview-251028 |
Volcano Ark Agent Plan | doubao-seed-2.0-pro/code/lite/mini, deepseek-v4-pro, minimax-2.7, kimi-k2.6, glm-5.1 | |
Volcano Ark Coding Plan | doubao-seed-2.0-code, ark-code-latest, doubao-seed-code, kimi-k2.6, glm-5.1, deepseek-v4-pro | |
Tencent Cloud | Tencent Cloud TokenHub | hy3-preview, glm-5.1, glm-5v-turbo, kimi-k2.6, minimax-m2.7, deepseek-v4-pro, hunyuan-2.0-thinking |
Tencent Cloud Coding Plan | tc-code-latest, hunyuan-2.0-instruct, hunyuan-2.0-thinking, minimax-m2.5, glm-5 | |
Tencent Cloud Hunyuan Token Plan (Personal Edition) | hy3-preview | |
Tencent Cloud General Token Plan (Personal Edition) | tc-code-latest, hunyuan-2.0-instruct, hunyuan-2.0-thinking, kimi-k2.5, glm-5, glm-5.1 | |
Tencent Cloud Token Plan Enterprise Edition Lite | auto | |
Tencent Cloud Token Plan Enterprise Edition Professional | auto, deepseek-v4-pro, glm-5.1, kimi-k2.6, minimax-m2.7 | |
Xiaomi MiMo | Xiaomi MiMo | mimo-v2.5-pro, mimo-v2.5, mimo-v2-pro, mimo-v2-omni, mimo-v2-flash |
Xiaomi MiMo Token Plan | mimo-v2.5-pro, mimo-v2.5, mimo-v2-pro, mimo-v2-omni | |
Baidu Qianfan | Baidu Qianfan | ernie-5.0-thinking-preview, DeepSeek-V3.2, ERNIE-X1.1-Preview, ernie-4.5-turbo-128k |
Baidu Qianfan Coding Plan | kimi-k2.5, deepseek-v3.2, glm-5, minimax-m2.5 |
The models in the table are only examples. For a complete list of supported model IDs, regions, and base URLs, refer to the integration documentation for each provider.
OpenClaw before 2026.5.19 (Manual configuration)
You must log on to the server via SSH and modify the configuration file ~/.openclaw/openclaw.json. The following third-party providers are supported:
Alibaba Cloud Model Studio Token Plan (Team Edition): Integrates via a shared token quota, supporting 11 models, including qwen3.7-max, qwen3.6-plus, deepseek-v4-pro, kimi-k2.6, and glm-5.1.
MiniMax: Uses the MiniMax Token Plan.
Zhipu: Uses the GLM Coding Plan.
Tencent Cloud: Uses either the Token Plan or the Coding Plan.
DeepSeek: Uses an API key from the DeepSeek Open Platform.
Volcano Engine: Uses the Volcano Engine Agent Plan.
The Application Details page in this version of the console only supports configuring Alibaba Cloud Model Studio models, and third-party model options will not appear in the drop-down menu. The configuration for third-party models is determined by the ~/.openclaw/openclaw.json file on the server.
WebUI issues with third-party models
If you configured a third-party model, such as DeepSeek or MiniMax, but it doesn't appear in the WebUI drop-down menu or if it reverts to the default model (for example, Qwen) after you switch, follow these steps:
Check configuration integrity: Confirm that you have added the model to
models.providers, added a reference to the model inagents.defaults.modelsin theprovider-id/model-idformat, and specified the default model inagents.defaults.model.primary. If you only configuremodels.providerswithout adding the reference, the WebUI will not recognize the new model.Restart the service to apply changes: After you modify the configuration file, run the following command:
openclaw gateway restartConsole limitations: The "Application Details" page in the Simple Application Server console only supports displaying and modifying models from Model Studio. It does not support displaying or modifying third-party models. Configuration for third-party models is defined only in the
~/.openclaw/openclaw.jsonfile on the server. Therefore, it is normal for the console to show a Model Studio model even when a third-party model is active.Switching models:
To switch models in a WebUI chat, send the command:
/model provider-id/model-idTo switch models from the terminal, run:
openclaw models set provider-id/model-idTo list available models, run:
openclaw models list
The
agents.defaults.modelslist in the~/.openclaw/openclaw.jsonconfiguration file defines which models are available for switching with the commands above. To add a new switchable model, first add its configuration tomodels.providersand then add its reference toagents.defaults.models.Before switching models, create an instance snapshot or back up the configuration file (
cp ~/.openclaw/openclaw.json ~/.openclaw/openclaw.json.bak). This ensures you can quickly restore your settings if a configuration error occurs.Check for fallback model activation: If the configuration is correct but a different model is still being used, check the OpenClaw logs to see if a rate limit or an error has activated the fallback model.
Model switch does not take effect
After switching models in the console, such as from Qwen-Plus to Qwen-Max, conversations may still use the old model even though the configuration is updated. This is because the change only takes effect after you restart the gateway service and refresh the page.
Procedure
Verify that the
agents.defaults.model.primaryfield in the configuration file~/.openclaw/openclaw.jsonis updated to the target model. This field determines the active model.Run the following command to restart the gateway and apply the new configuration:
openclaw gateway restartRefresh your browser page or regenerate the access URL, then confirm that the conversation is using the new model.
Feishu stops replying after a model switch
Switching the large model invalidates the Feishu channel configuration, which prevents the Feishu bot from responding to messages. To resolve this, go to the application details page in the Simple Application Server console and re-enter the App ID and App Secret for the Feishu channel.
Procedure
Log in to the Simple Application Server console and click the target instance in the server list.
Go to the Application Details page and find the Feishu channel configuration.
Re-enter the Feishu App ID and App Secret. After you save the changes, the Feishu bot resumes normal operation.
Http 401 errors (Incorrect API key / Invalid access token)
An HTTP 401 error typically indicates an incorrect API Key or a mismatch between the Base URL and the key. Review the following scenarios:
Scenario 1: Alibaba Cloud Model Studio general-purpose models (pay-as-you-go)
API Key format: Verify that your API Key starts with
sk-.Region match: Ensure the API Key's region matches the region of the Base URL. For example, a key for the China (Beijing) region requires the corresponding URL.
Base URL: The standard Base URL is
https://dashscope.aliyuncs.com/compatible-mode/v1.Note: API Keys for the Coding Plan and pay-as-you-go services are not interchangeable.
Scenario 2: Alibaba Cloud Model Studio Token Plan
API Key format: Ensure your API Key starts with
sk-sp-.Base URL: You must use the Base URL
https://token-plan.cn-beijing.maas.aliyuncs.com/compatible-mode/v1.Note: The Token Plan does not support one-click setup in the console. You must edit the configuration file manually.
Scenario 3: Third-party models (MiniMax, DeepSeek, Tencent Cloud, etc.)
Ensure you are using the API Key provided by the third-party platform, not an Alibaba Cloud Model Studio key.
Check the key for any leading or trailing whitespace or newline characters.
Verify that the Base URL is correct. For example, the Base URL for DeepSeek is
https://api.deepseek.com/v1.Some models, such as MiniMax, may require you to select a specific Auth Method, like MiniMax CN or MiniMax Global.
General troubleshooting steps
Regenerate the API Key in the third-party provider's console and replace the old one in your configuration.
Check the
~/.openclaw/openclaw.jsonconfiguration file to ensure theapiKeyfield contains the correct value.Run
openclaw gateway restartto restart the service.
Local model support
Currently, OpenClaw deployed in the cloud (for example, from a Simple Application Server image) does not support calling large models that run on a local machine or in a local area network. OpenClaw requires access to a publicly accessible API endpoint.
To use a local model, you must meet the following conditions:
Ensure your local model service is exposed to the public network and accessible by the cloud server.
Configure your public Base URL in
~/.openclaw/openclaw.jsonundermodels.providers, as described in the "General Third-Party Model Integration Guide."
Impact of changing the model provider
Changing the model provider for OpenClaw only affects the OpenClaw application itself and typically does not affect other applications deployed on the server, such as Hermes.
If a configuration error occurs, you can roll back using an instance snapshot from the Simple Application Server console. Before each change, create a snapshot or back up the configuration file (cp ~/.openclaw/openclaw.json ~/.openclaw/openclaw.json.bak).
Multi-model support
Yes. OpenClaw can connect to multiple large models from different providers simultaneously. In the Simple Application Server console, go to the Application Details page for your OpenClaw instance. The Model Configuration section has two modes:
Model Studio Coding Plan: Supports Alibaba Cloud's Qwen series and models from third-party providers such as MiniMax, GLM, and Kimi.
Model Studio: Supports the Qwen series, including vision models such as qwen3-vl-plus and qwen3-vl-flash.
Select a provider and a specific model from the drop-down lists, and then click Apply to complete the configuration. Model Studio integrates third-party models, so you do not need to manually enter a base URL or an API key.
View the OpenClaw port number
To prevent malicious scans and targeted attacks, OpenClaw generates a random port number on initialization. To view the port number, go to and click View.
Controlling local applications with OpenClaw
No. A Simple Application Server instance runs in a cloud network that is isolated from your local network. This isolation prevents OpenClaw from directly controlling applications on your computer.
Why is web search unavailable after an update?
Go to the Simple Application Server console. In the Image Information section, ensure your application image is version OpenClaw 2026.2.3 or later. If you are using an earlier version, update it as described in How to reset the current application image to the latest version?. This application image provides a web search feature by default in all regions through the built-in SearXNG Skill. This feature requires no additional configuration and incurs no extra fees. You can instruct OpenClaw to use the SearXNG Skill to search the web. If your server is in the China (Hong Kong) region or a region outside the Chinese mainland, see How to configure the Brave Search feature for OpenClaw to configure the Brave Search API for web search.
How to change the OpenClaw model?
You can switch between different models for OpenClaw in the console. The procedure varies depending on your image version:
-
For OpenClaw 2026.5.19 and later: Go to the application details page. In the Models card, find the configured model and click Switch Model to select a different one, or click Add Model to connect to a new model provider. This version supports multiple providers, including AI coding plan, Alibaba Cloud Model Studio Token Plan, Alibaba Cloud Model Studio, deepseek, Kimi, GLM Coding Plan, and Zhipu.
-
For versions earlier than OpenClaw 2026.5.19: Go to , delete the default model, and then select a different Alibaba Cloud Model Studio model from the drop-down list.
Pre-installed skills
By default, application images for OpenClaw 2026.2.3 and later include only the built-in SearXNG web search Skill. To use other Skills, you must install them manually using one of the following methods:
Install in chat: Tell OpenClaw in chat to install the Skill you need, and it will be installed automatically.
Install by URL: Send the Skill's URL to OpenClaw, and it will be installed automatically.
Install from ClawHub: Run the
clawhub install <skill-name>command to install a Skill from the skill marketplace.
For detailed installation steps, see How to install or add Skills in OpenClaw.
Add or install skills in OpenClaw
You can add skills to OpenClaw in three ways: interactive creation, installation from a URL, and installation from a mirrored source.
Interactive creation (for new skills)
OpenClaw has a built-in Skill Creator component. You can chat with the Skill Creator, describe your requirements, and it will automatically create a new skill.
Install from a URL (for reusing existing skills)
To install an existing skill, send its URL to OpenClaw for automatic installation. For example, to install the Web Artifacts Builder from Anthropic, simply tell the agent to install the skill during your conversation.
Install from a mirrored source (for network-restricted scenarios)
If your server environment cannot access external code repositories like GitHub due to network restrictions, you can use the mirroring method:
Download the files to a local machine.
Upload the code to an accessible storage space (for example, upload to OSS).
Obtain the new download link and send it to OpenClaw for installation, following the same procedure as installing from a URL.
Custom skill loading and priority
Yes. In ~/.openclaw/openclaw.json, use skills.load.extraDirs to add extra directories with the lowest loading priority.
OpenClaw loads skills in the following order of priority, from highest to lowest: <workspace>/skills > ~/.openclaw/skills > built-in > skills.load.extraDirs.
By default, clawhub installs to ./skills, which OpenClaw treats as <workspace>/skills.
Install skills from ClawHub
ClawHub is a dedicated skill marketplace for searching, installing, and managing third-party skills.
Search a skill (e.g., weather):
clawhub search weatherInstall a skill:
clawhub install weatherView more commands:
clawhub --help
ClawHub offers an official China mirror. This mirror provides faster access to reusable agent skills by continuously indexing and accelerating high-quality community skills. For details and usage instructions, see the ClawHub China mirror.
ClawHub China mirror site
ClawHub offers an official China mirror site that curates and mirrors high-quality community Skills. This site provides faster access to reusable Agent Skills for users in the Chinese mainland.
Use cases: If your Simple Application Server is deployed in a Chinese mainland region, you might experience high latency or slow downloads when downloading Skills from the default source. Use the ClawHub China mirror site to accelerate downloads.
Procedure:
Go to the ClawHub China mirror site to browse or search for a Skill.
Find the desired Skill and copy its installation URL from the mirror site.
In an OpenClaw chat, send the installation URL to an Agent. The Agent automatically installs the Skill.
The ClawHub China mirror site contains the same content as the default ClawHub source. The only difference is that its download nodes are located in the Chinese mainland to provide faster network access. Users outside the Chinese mainland can use the default source.
Troubleshoot slow Skill downloads
Installing Skills on a Simple Application Server instance in the Chinese mainland region can be slow or time out. This is because default Skill resources are hosted on overseas nodes, which causes high network latency.
Solutions:
Use the ClawHub China mirror site: Visit the ClawHub China mirror site to get a Skill's mirror URL and download it faster from a domestic node. For details, see How to use the ClawHub China mirror site.
Use an intermediate source for installation: If you cannot access external code repositories like GitHub, download the Skill files, upload them to an accessible storage space (such as OSS), and then use the new URL to install the Skill in OpenClaw. For details, see the intermediate source installation section in Add or install Skills.
Restart OpenClaw Gateway
OpenClaw 2026.2.9 and later
To restart the service from the console, go to and click Restart.
Versions before OpenClaw 2026.2.9
Restart OpenClaw Gateway manually from the command line: connect to your Simple Application Server instance and run the following command:
openclaw gateway restartConfigure Brave Search
The Brave Search web search feature is available only for Simple Application Server instances in regions outside the Chinese mainland, including China (Hong Kong).
OpenClaw application images, version 2026.2.3 and later, include the SearXNG-based web search Skill by default.
Go to the Brave Search official website to create a Brave Search API account and generate an API key.
To configure this in the image, go to the OpenClaw page. In the left navigation pane, click to open the configuration file. Change
BRAVE_API_KEYto your Brave Search API key, copy the following code block, and paste it to thetools.web.searchconfiguration location."tools": { "web": { "search": { "provider": "brave", "apiKey": "BRAVE_API_KEY", "maxResults": 5, "timeoutSeconds": 30 } } },In the left navigation pane, go to Config > All Settings > Raw and paste the code block into the
tools.web.searchsection. Click Save in the upper-right corner.
Search coverage for Chinese platforms
Yes, but search coverage varies depending on the platform.
The web search feature in OpenClaw depends on its underlying search engine. By default, OpenClaw uses SearXNG, an open-source metasearch engine that pulls results from multiple sources. You can also configure Brave Search. The coverage of your search results depends on what content the underlying search engine has indexed:
Public web content indexed by Baidu: Generally searchable.
Content within closed platforms, such as WeChat Official Account articles or Zhihu answers: Search engine coverage may be incomplete, and some content might not be directly accessible.
For broader search coverage, you can also configure Brave Search. For instructions, see How to configure the Brave Search web search feature for OpenClaw.
Run tools in a Docker container
OpenClaw lets you run tools in a Docker container to mitigate security risks. This is an optional feature. When enabled, OpenClaw executes tools in an isolated sandbox environment. For configuration instructions, see the OpenClaw sandboxing feature guide.
OpenClaw CLI
If you created your instance before January 30, 2026, these commands might not work due to an outdated version. First, upgrade the image by following the instructions in How do I reset the current application image to the latest version?. The new application image includes all required CLI tools.
Log in to the server terminal and switch to the root user to run the following commands.
Core management tool: OpenClaw
OpenClaw is the system's core CLI. To view installed skills:
openclaw skills listPlugin and channel management
Use the
openclaw pluginscommand to manage plugins.View help for plugin commands: Lists all commands for installing and configuring plugins.
openclaw plugins -h
Effects of console initialization
No. Initializing in the console or reconfiguring an API key does not clear installed Skills, memory, conversation history, or training data. This operation only resets the model connection configuration.
Data persistence on restart
No. A restart does not cause data loss. Your configurations and skills are stored in the ~/.openclaw directory and remain intact unless you reset the system or delete this directory.
Multiple sessions after integration
Yes, this is expected. Integrating a channel like Lark or DingTalk automatically creates a corresponding session. You can manually delete these sessions from the web UI. However, deleting a session prevents you from receiving messages from that channel.
Cluster deployment
OpenClaw is deployed on Simple Application Server using an application image. Each instance runs as a standalone service and cannot be clustered for centralized management.
To scale your service, you can purchase multiple Simple Application Server instances and deploy OpenClaw on each one. Each instance runs and is managed independently.
Purchasing and billing
Using OpenClaw in Model Studio in Singapore with only the free quota
By default, you are charged for model usage in Model Studio (Singapore) after your free quota is exhausted. To prevent these charges, go to the Model Studio platform and enable Stop when free quota is exhausted. After you enable this feature, the model becomes unavailable once its free quota is depleted. You can then switch to another model that has a free quota.
Configure the Free Quota Only feature
By default, you are charged for any usage that exceeds your free quota. When the Free Quota Only feature is enabled, API calls fail with an AllocationQuota.FreeTierOnly error after the free quota is exhausted, preventing unexpected charges.
Method 1: Enable on the model usage page
Enable for a single model:
In the console, go to the model usage page and click the Free Quota tab.
Find the model in the list. In the Actions column, turn on the Free Quota Only switch. The switch only appears if the model has an available free quota.
Enable in bulk:
In the console, go to the model usage page and click the Free Quota tab.
Click Free Quota Only Batch Operation and select Batch Enable from the drop-down menu.
Select the models and click Batch Enable. To enable this feature for all eligible models, click Enable for All Models.
In the confirmation dialog, click Enable Free Quota Only.

Method 2: Enable on the Model Market page
For example, on the Qwen3-Coder-Plus model details page (Asia Pacific SE 1 (Singapore)), turn on the Free Quota Only switch.
The switch does not appear if the model's free quota is exhausted, has expired, or is not offered.
Configure a Model Studio Coding Plan
Copy and save your API key and base URL from Step 2: Get the plan-exclusive API key and base URL.
Replace the YOUR_API_KEY placeholder in the appropriate code block below with the API key you obtained in Step 2: Get the plan-exclusive API key and base URL.
"models": {"mode": "merge","providers": {"bailian": {"baseUrl": "https://coding.dashscope.aliyuncs.com/v1","apiKey": "YOUR_API_KEY","api": "openai-completions","models": [{"id": "qwen3-max-2026-01-23","name": "qwen3-max-thinking","reasoning": false,"input": ["text"],"cost": {"input": 0,"output": 0,"cacheRead": 0,"cacheWrite": 0},"contextWindow": 262144,"maxTokens": 65536}]}}},"agents": {"defaults": {"model": {"primary": "bailian/qwen3-max-2026-01-23"},"models": {"bailian/qwen3-max-2026-01-23": {"alias": "qwen3-max-thinking"}},"maxConcurrent": 4,"subagents": {"maxConcurrent": 8}}},"models": {"mode": "merge","providers": {"bailian": {"baseUrl": "https://coding-intl.dashscope.aliyuncs.com/v1","apiKey": "YOUR_API_KEY","api": "openai-completions","models": [{"id": "qwen3-max-2026-01-23","name": "qwen3-max-thinking","reasoning": false,"input": ["text"],"cost": {"input": 0,"output": 0,"cacheRead": 0,"cacheWrite": 0},"contextWindow": 262144,"maxTokens": 65536}]}}},"agents": {"defaults": {"model": {"primary": "bailian/qwen3-max-2026-01-23"},"models": {"bailian/qwen3-max-2026-01-23": {"alias": "qwen3-max-thinking"}},"maxConcurrent": 4,"subagents": {"maxConcurrent": 8}}},On the Simple Application Server console - Servers page, click the instance ID on the OpenClaw server card to open the Server Overview page.
Click the Application Details tab. On the Access Control page, click Run Command next to the website URL. In the pop-up window, click the URL to open the OpenClaw chat page.
Click to open the configuration file. Copy the code block with the modified
"apiKey"parameter, replace the original"agents"{...}content in your configuration code, and save your changes.
Change the default model to qwen3.6-plus
The Lite plan does not support qwen3.6-plus.
In OpenClaw 2026.4.14 images and later, you can select qwen3.6-plus directly from the model drop-down menu on the application details page in the console. For earlier images, configure the model manually:
In the OpenClaw web UI, select Configuration > RAW from the left menu bar.
In the
models.providers.dashscope-coding.modelssection, add the following model configuration for qwen3.6-plus:{ "id": "qwen3.6-plus", "name": "Qwen3.6-Plus", "api": "openai-completions", "reasoning": false, "input": ["text", "image"], "cost": { "input": 0, "output": 0, "cacheRead": 0, "cacheWrite": 0 }, "contextWindow": 1000000, "maxTokens": 65536 }Change the
agents.defaults.model.primaryparameter todashscope-coding/qwen3.6-plus.Click Save and then Update.
Server configuration requirements
To ensure service performance, your server must have at least 2 vCPUs and 2 GB of memory.
Additional fees
If you use a Model Studio API key for model invocation on your instance, you will be charged based on token usage. For billing details, see Model Invocation Billing.
OpenClaw API billing
Simple Application Server uses package-based billing. Your package fee includes compute, storage, and bandwidth resources. Calling Simple Application Server OpenAPI operations, such as querying instance information or managing firewall rules, incurs no additional charges.
Calling a large model, such as one from the Model Studio platform, through OpenClaw incurs model invocation fees. These fees are based on token usage and billed separately from your Simple Application Server package fee.
Check model free quota in Singapore using Model Studio
Log in to the Model Studio console. In the Free Quota section, you can view your model's remaining quota.
Model invocation statistics
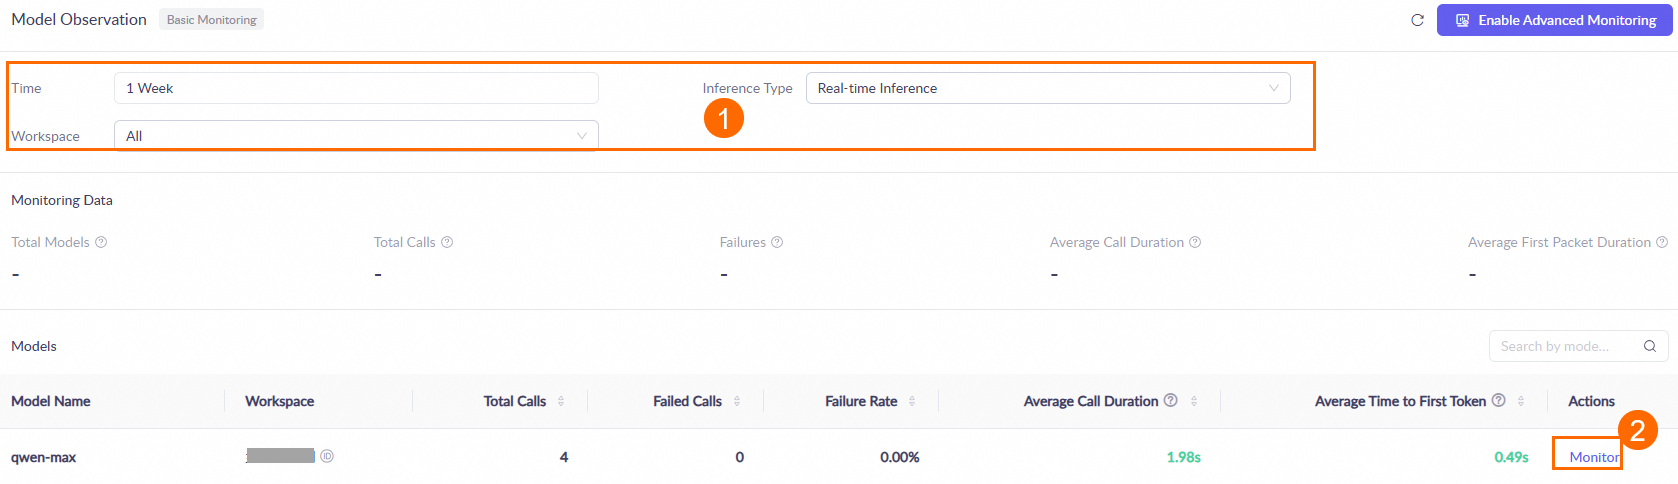
One hour after you call a model, go to the Monitoring (Singapore or Beijing) page. Set the query conditions, such as the time range and workspace. Then, in the Models area, find the target model and click Monitor in the Actions column to view the model's call statistics. For more information, see the Monitoring document.
Data is updated hourly. During peak periods, there may be an hour-level latency.
What are the differences between the Model Studio Singapore, US (Virginia), and China (Beijing) regions?
Alibaba Cloud Model Studio is available in the Singapore, US (Virginia), and China (Beijing) regions. Choose a nearby region to reduce network latency. Service endpoints (Endpoint/Base URL) and API keys are region-specific. Supported models, platform features, and pricing also vary by region. For details, see Select a model.
Cross-region API usage
Yes. A Simple Application Server in an overseas region can call the Model Studio model service in the China (Beijing) region. However, cross-region network latency will significantly increase response times.
Cross-region use
Yes. A Coding Plan subscription takes effect globally and is not restricted by the region of your Simple Application Server. For example, if you purchase a Coding Plan in the North China region, Simple Application Servers in other regions, such as the United States and Singapore, can use the plan's exclusive API key to call the model. You do not need to repurchase the plan for each server region.
Manage files
When you use OpenClaw, the agent stores generated files—such as code, reports, or images—in the /home/admin/.openclaw/ directory by default.
Finding generated files:
In the terminal, use the
lscommand to list the files in the current directory.Use the
find / -name "filename"command to search the entire instance for a file.You can also ask the agent in the OpenClaw chat for the file's path.
Uploading and downloading files:
You can upload and download files using the file management feature in Workbench. For details, see Upload or Download Files via Workbench.
Troubleshooting
Troubleshoot unresponsive OpenClaw chat
Verify your API key configuration: Connect remotely to your Simple Application Server instance. In the following code block, replace the placeholders with your API key and the base URL for your region. Run the command in your terminal to test the API call. If you get an error, find it in the error code documentation and follow the recommended solution. Base URLs are region-specific and cannot be used interchangeably:
China (Beijing):
https://dashscope.aliyuncs.com/compatible-mode/v1/chat/completionsUS (Virginia):
https://dashscope-us.aliyuncs.com/compatible-mode/v1/chat/completionsSingapore:
https://dashscope-intl.aliyuncs.com/compatible-mode/v1/chat/completionsCoding Plan:
https://coding-intl.dashscope.aliyuncs.com/v1/chat/completions
curl -X POST YOUR_BASE_URL \
-H "Authorization: Bearer YOUR_API_KEY" \
-H "Content-Type: application/json" \
-d '{
    "model": "qwen3-max-2026-01-23",
    "messages": [
        {
            "role": "user",
            "content": "Who are you?"
        }
    ]
}'
Check for overdue payments or rate limiting.
Coding Plan: This plan has 5-hour, weekly, and monthly request limits. You can check your quota usage in the Coding Plan console. Exceeding a limit triggers an
hour/week/month allocated quota exceedederror.Solution: Wait for the quota to reset automatically.
For pay-as-you-go Model Studio API keys:
To check your free quota, log in to the Model Studio console. The Free Quota section shows the remaining quota for the model.
To check for overdue payments, visit the Expenses and Costs center and confirm that your account has no outstanding balance.
Check the error logs: Go to the OpenClaw Chat page. In the left navigation pane, click Logs, and then select the
WARNandERRORcheckboxes to view the error logs. Look up the error in the OpenClaw FAQ for a solution.If the logs show no errors, restart the gateway from the console.
Reset the image
If the server contains no important data, you can reset the Simple Application Server image to the latest OpenClaw application image and reconfigure the service.
ImportantThe Reset System operation reinstalls the operating system and erases all data from the system disk, including saved configurations, logs, and databases. Before you proceed, you must back up important data. We recommend creating a snapshot or exporting the data to a local device. To preserve your OpenClaw workspace data, such as memory, identity configuration, and Skills, see Back up and restore data for OpenClaw upgrades.
OpenClaw: HTTP 400 input length error
This error occurs when the accumulated context in a conversation exceeds the model's input limit. To resolve this, run the /new command on the OpenClaw conversation page to start a new conversation.
The /new command clears all short-term memory of the current conversation. Before running the command, save any necessary content from the current conversation.
'openclaw skills list' fails to list installed skills
If running openclaw skills list returns an empty list or fails to list the expected skills, this is usually due to one of the following reasons:
Current directory is outside the workspace: The
openclaw skills listcommand only scans theskillsdirectory within the current workspace and the~/.openclaw/skillsdirectory. If you run the command from any other directory, it cannot detect installed skills. Change to the OpenClaw workspace root directory and run the command again.Skills installed to a different path: By default,
clawhub installinstalls skills to a./skillsdirectory within the current directory. If you ran the installation from a directory other than your OpenClaw workspace,openclaw skills listcannot find these skills. Ensure the installation path is your OpenClaw workspace, or copy the skill directories to the~/.openclaw/skillsdirectory.Outdated image version: Instances created before January 30, 2026, may not have the
clawhubCLI tool or theopenclaw skillssubcommand pre-installed. In this case, you must reset the current application image to the latest version.
Verification Steps:
Change to the OpenClaw workspace root directory:
cd ~/.openclawVerify that the
skillsdirectory exists and contains your skills:ls skills/Rerun the skills list command:
openclaw skills list
To install new skills from the skill marketplace, use clawhub search to find new skills and clawhub install to install them. For detailed instructions, see Install skills from ClawHub.
Restart the OpenClaw gateway
If a connection is interrupted or the service becomes unavailable, restart the OpenClaw gateway on the console. Go to and click Restart Server.
HTTP 401 error in OpenClaw
This error usually occurs if the initialization steps on the application details page failed, you did not enter an API Key, you entered a third-party (non-Model Studio) API Key, or the region you selected does not match the region of the API Key.
Solution:
In the Simple Application Server console, go to the Application Details page for the instance and reconfigure the Model Studio API Key or Coding Plan in the initialization step.
Access the latest WebUI address and confirm that the error is resolved.
Configuration save failures
If you cannot save changes or see outdated values after modifying an API key or model configuration on the application details page in the console, use the following scenarios to troubleshoot.
Scenario 1: Third-party model configuration shows outdated values in the console
The application details page in the Simple Application Server console can only display and modify models from Alibaba Cloud Model Studio. It does not display or allow changes to third-party models, such as DeepSeek or MiniMax. If you have integrated a third-party model by using the ~/.openclaw/openclaw.json configuration file on the server, this is expected, and the console will continue to display the Model Studio configuration.
To modify the API key for a third-party model, directly edit the configuration file on the server. After saving your changes, run openclaw gateway restart to apply the new configuration.
Scenario 2: Error when saving a Model Studio API key in the console
If an error occurs when you save a Model Studio API key in the console, follow these steps to troubleshoot the issue:
Verify the API key format: An API key for Model Studio typically starts with
sk-, while a Coding Plan API key starts withsk-sp-. When pasting the key, ensure it has no leading or trailing whitespace or newline characters.Ensure the correct region is selected: The API key must match the selected region. For example, a key for the Beijing region can only be used in Beijing, not in the Singapore or Virginia regions.
Check your network connectivity: If you see request timeouts or network errors in your browser developer tools, try refreshing the page and saving the configuration again.
Verify that the API key is valid: Go to the Coding Plan page to confirm the key is still valid.
Scenario 3: Changes to the configuration file do not take effect
After modifying the ~/.openclaw/openclaw.json file, you must restart the gateway to apply the changes:
openclaw gateway restartAfter the gateway restarts, run the following command to verify that the new configuration is loaded:
openclaw models listIf the list displays the updated model configuration, the changes have been applied successfully.
OpenClaw browser tool issues
The error message is:
error [tools] browser failed: timed out. Restart the OpenClaw gateway (OpenClaw.app menubar, or 'openclaw gateway'). Do NOT retry the browser tool — it will keep failing. Use an alternative approach or inform the user that the browser is currently unavailable.To resolve this error, restart the OpenClaw gateway.
Blocked skill installation
The OpenClaw management interface provides one-click installation for some skills. However, most skills depend on Homebrew, so they do not support one-click installation. To use these skills, install Homebrew on your server, and then install and configure them.
"Disconnected (1008): unauthorized" error
This error indicates that the authentication token is missing from your access URL. The OpenClaw web console prohibits direct access by IP address and requires a URL that contains a valid authentication token. To get the correct access URL, go to the server console and click the instance ID on the server card to open the server overview page. Click the Application Details tab. On the access control page, click Run Command to retrieve the correct access URL.
Resolve the "control ui requires device identity" error
Log in to the server and modify the dangerouslyDisableDeviceAuth parameter in the OpenClaw configuration file to disable device identity verification.
Log in to the Simple Application Server console. On the Servers page, find the target server card and click Remote Connection. In the Connect with One-click on Workbench section, click Log on Now.
Run the following command to edit the OpenClaw configuration file.
vim ~/.openclaw/openclaw.jsonIn the
gatewayconfiguration, find"dangerouslyDisableDeviceAuth": falseand changefalsetotrue. Then, save the file and exit.Run the following command to restart the Gateway service for the changes to take effect.
openclaw gateway restart
Resolve the "disconnected (1006): no reason" error
Follow these steps to troubleshoot the issue:
Regenerate the token: Log in to the Alibaba Cloud Simple Application Server console, find the instance, and navigate to the application details page to regenerate the token.
Use the new token to access the application: Append the new token to the access URL in the format
http://<public IP address>:<port>/?token=<newly-generated-token>(use the port from the access URL shown in the console), and test the URL in an incognito window.Confirm the service status: Connect to the server using SSH and verify that the OpenClaw service is running.
Check the firewall rules: Ensure that the firewall for your Simple Application Server instance allows inbound TCP traffic on the listening port.
A WebSocket connection can also fail due to an incorrect public IP address binding or a misconfigured reverse proxy. First, test connectivity from your local machine using curl or telnet.
Resolve the "origin not allowed" error
Using a custom domain name instead of an IP address to access the OpenClaw Web UI can cause the following error: origin not allowed (open the Control UI from the gateway host or allow it in gateway.controlUi.allowedOrigins).
Cause: By default, the OpenClaw gateway only allows Web UI access from the server's IP address. When you access the UI using a domain name, the gateway blocks the request because the origin is not on the allowlist.
Log on to the server to modify the OpenClaw configuration file, openclaw.json, and add the domain name to the allowedOrigins parameter.
Log on to the Simple Application Server console. In the server list, find the target server and click Remote Connection on its card. In the Connect with One-click on Workbench section, click Log on Now.
In the OpenClaw configuration file, find the
allowedOriginsfield and add your domain name's full access URL."allowedOrigins": [ "http://47.**.**.59:15386", "http://openclaw-us.hewushui.cn:15386" ]Replace the example address with your actual protocol, domain name or IP address, and port.
After saving the file, restart the OpenClaw gateway to apply the changes.
Troubleshoot OpenClaw web UI access
If you cannot access the OpenClaw Web UI, log in to the Simple Application Server console and check the following:
Open the port for OpenClaw: In the server list, find the target server and click Manage OpenClaw. In the OpenClaw Usage Steps section, on the Allow Port Access tab, click One-Click Enable.
If you have reset the image, you must re-initialize the server to obtain a new Web UI URL.
Verify the configuration file: Go back to the server list and click Remote Connection on the target server. In the Connect with One-click on Workbench section, click Log on Now. Run the following command:
openclaw doctor --fixThis command automatically removes unsupported fields, such as
allowlist, fromopenclaw.json.After the command finishes, restart the OpenClaw gateway to apply the new configuration.
Resolve the "401 Unauthorized" error
When you use a model from Alibaba Cloud Model Studio, you may receive the error: Failed to discover Alibaba Cloud models: 401 Unauthorized.
Possible causes: A 401 error typically results from an incorrect API key, a mismatch between the API key's region and the request's base URL, or insufficient invocation permissions for the workspace or account.
Troubleshooting and solutions:
Step 1: Verify the API key and region
API keys for Chinese mainland accounts are typically for the China (Beijing) region, and the default base URL also corresponds to this region. A region mismatch will cause a 401 error.
Check the console: On the Simple Application Server console, ensure you select the correct region for Model Studio when configuring an API key. An API key for the China (Beijing) region is only valid in that region. Do not select Singapore or US (Virginia).
Check the configuration file: Log on to the server and check the configuration file to verify the region configured for the API key.
Run the following command to view the configuration:
cat /home/admin/.openclaw/agents/main/agent/auth-profiles.json{ "providers": { "alibaba-cloud-us:default": { "type": "api_key", "provider": "alibaba-cloud-us", "key": "xxx" }, "alibaba-cloud-international:default": { "type": "api_key", "provider": "alibaba-cloud-international", "key": "sk-69861xxx" }, "alibaba-cloud:default": { "type": "api_key", "provider": "alibaba-cloud", "key": "sk-sp-c78bbxxx" } } }Configuration file field descriptions:
alibaba-cloud: The default configuration for the China (Beijing) region. API keys for the China (Beijing) region must be configured under this node.alibaba-cloud-international: The configuration for the Singapore region.alibaba-cloud-us: The configuration for the US (Virginia) region.
Step 2: Check model invocation permissions
If your API key belongs to a non-default workspace, verify that the workspace has permission to invoke the target model.
Log on to the Model Studio console and check which workspace your API key belongs to.
By default, model invocation permissions are disabled for a non-default workspace. Go to the workspace settings and manually enable permissions for the required model (such as
qwen3-max-2026-01-23).
Step 3: Verify the API key status
If the preceding configurations are correct, check for other issues, such as an incorrectly entered API key, an overdue account balance, or an invalid key. You can test this using curl.
Run the following curl command in your local terminal to perform a connectivity test. Replace DASHSCOPE_API_KEY with your actual API key.
To obtain an API key, see the Get API Key documentation. The following command uses the URL for the China (Beijing) region. If you are using a model in the Singapore region, replace the request URL with https://dashscope-intl.aliyuncs.com/compatible-mode/v1/chat/completions.Test command:
curl -X POST https://dashscope.aliyuncs.com/compatible-mode/v1/chat/completions \

- H "Authorization: Bearer DASHSCOPE_API_KEY" \

- H "Content-Type: application/json" \

- d '{

    "model": "qwen3-max-2026-01-23",
    "messages": [
        {
            "role": "system",
            "content": "You are a helpful assistant."
        },
        {
            "role": "user",
            "content": "Who are you?"
        }
    ]
}'
If this command also returns a 401 error, your API key is invalid or your account has an overdue balance. Go to the Alibaba Cloud Model Studio console to regenerate your key or check your account balance.
"openclaw: command not found" error
Run the following command to create a symbolic link:
ln -sf /home/clawdbot/dist/entry.js /usr/bin/openclaw
openclaw --help
Unable to retrieve token after enabling Tailscale
This issue occurs because Tailscale modifies the routing policy. To retrieve the token, run the following command:
Log in to the OpenClaw server terminal.
Run the following command:
echo $(sed -z 's/.*"token": "\([^"]*\)".*/\1/' /root/.clawdbot/clawdbot.json | tr -d '\0')The command output is the token.
OpenClaw public network inaccessibility
The OpenClaw service is inaccessible from the public network because port 18789 is listening on 127.0.0.1.
Possible cause: The bind parameter in the OpenClaw configuration file was likely modified. By default, this parameter is set to lan, which allows public network access. If this parameter is changed to loopback and the service is restarted, the port will listen only on the local loopback address 127.0.0.1.
Solution:
Log on to the server and check the configuration. Log on to your Simple Application Server as the
adminuser and run the following command to check the current configuration of thebindparameter:cat /home/admin/.openclaw/openclaw.json | grep bindModify the configuration file. Check the command output. If the result is
"bind": "loopback", edit the configuration file and change the parameter back to the default,"lan".Restart the gateway service. After modifying and saving the configuration file, run the following command to restart the gateway service:
openclaw gateway restartAfter the restart, the service will be accessible from the public network.
Error on openclaw gateway restart
When you try to restart the gateway service, the openclaw gateway restart command reports an error, and the service fails to restart.
Solution: If the restart command fails, you can restore the service by manually stopping the process and then restarting it. Follow these steps:
Log in to the server. Use the
adminuser to log in to the Simple Application Server.Terminate the current process. To terminate the openclaw-gateway process, run the following command:
killall openclaw-gatewayRestart the service. Then, run the following command to restart the gateway service:
openclaw gateway startNote: You can safely ignore any error messages from this command.
Verify the service status. After you run the start command, run the
ps aux | grep gatecommand to check if the openclaw-gateway process has started successfully, and run thenetstat -nltpcommand to confirm that the relevant ports are in a listening state.
Frequent downtime, memory exhaustion, or OOM Killer triggers
Upgrade the instance configuration
We recommend you upgrade the instance configuration to at least 2 vCPUs and 2 GB of memory to improve OpenClaw stability and reduce issues such as server downtime, website inaccessibility, and memory exhaustion.Check and add a swap partition
By default, OpenClaw application images released on or after February 26, 2026, include a swap partition. If your instance uses an earlier application image, you can either configure a swap partition manually or reset the current application image to the latest version. A swap partition acts as a buffer when memory is low, reducing OOM Killer triggers and downtime.
Switch from Coding Plan to Token Plan
Steps:
Go to the Model Studio console and subscribe to the Token Plan team edition.
Follow the instructions in How to integrate the Model Studio Token Plan team edition with OpenClaw to configure your Token Plan.
Once the configuration is complete, OpenClaw automatically uses Token Plan models for conversations.
Integrate Model Studio Token Plan (Team) with OpenClaw
The Token Plan Team Edition is a monthly subscription with a shared token quota that lets teams access a variety of models, such as qwen3.7-max, qwen3.6-plus, deepseek-v4-pro, kimi-k2.6, glm-5.1, and MiniMax-M2.5. Once integrated with OpenClaw, you can use these models in conversations.
Procedure
Ensure you are subscribed to Token Plan Team Edition.
Modify the configuration file:
WebUI (before 2026.4.14)
"models": {
    "mode": "merge",
    "providers": {
      "bailian-token-plan": {
        "baseUrl": "https://token-plan.cn-beijing.maas.aliyuncs.com/compatible-mode/v1",
        "apiKey": "YOUR_API_KEY",
        "api": "openai-completions",
        "models": [
          {
            "id": "qwen3.7-max",
            "name": "qwen3.7-max",
            "reasoning": false,
            "input": ["text"],
            "contextWindow": 1000000,
            "maxTokens": 65536,
            "cost": { "input": 0, "output": 0, "cacheRead": 0, "cacheWrite": 0 },
            "compat": { "thinkingFormat": "qwen" }
          },
          {
            "id": "qwen3.6-plus",
            "name": "qwen3.6-plus",
            "reasoning": false,
            "input": ["text", "image"],
            "contextWindow": 1000000,
            "maxTokens": 65536,
            "cost": { "input": 0, "output": 0, "cacheRead": 0, "cacheWrite": 0 },
            "compat": { "thinkingFormat": "qwen" }
          },
          {
            "id": "qwen3.6-flash",
            "name": "qwen3.6-flash",
            "reasoning": false,
            "input": ["text", "image"],
            "contextWindow": 1000000,
            "maxTokens": 32768,
            "cost": { "input": 0, "output": 0, "cacheRead": 0, "cacheWrite": 0 },
            "compat": { "thinkingFormat": "qwen" }
          },
          {
            "id": "deepseek-v4-pro",
            "name": "deepseek-v4-pro",
            "reasoning": false,
            "input": ["text"],
            "contextWindow": 163840,
            "maxTokens": 32768,
            "cost": { "input": 0, "output": 0, "cacheRead": 0, "cacheWrite": 0 }
          },
          {
            "id": "deepseek-v4-flash",
            "name": "deepseek-v4-flash",
            "reasoning": false,
            "input": ["text"],
            "contextWindow": 163840,
            "maxTokens": 16384,
            "cost": { "input": 0, "output": 0, "cacheRead": 0, "cacheWrite": 0 }
          },
          {
            "id": "deepseek-v3.2",
            "name": "deepseek-v3.2",
            "reasoning": false,
            "input": ["text"],
            "contextWindow": 163840,
            "maxTokens": 16384,
            "cost": { "input": 0, "output": 0, "cacheRead": 0, "cacheWrite": 0 },
            "compat": { "thinkingFormat": "qwen" }
          },
          {
            "id": "kimi-k2.6",
            "name": "kimi-k2.6",
            "reasoning": false,
            "input": ["text", "image"],
            "contextWindow": 262144,
            "maxTokens": 32768,
            "cost": { "input": 0, "output": 0, "cacheRead": 0, "cacheWrite": 0 },
            "compat": { "thinkingFormat": "qwen" }
          },
          {
            "id": "kimi-k2.5",
            "name": "kimi-k2.5",
            "reasoning": false,
            "input": ["text", "image"],
            "contextWindow": 262144,
            "maxTokens": 32768,
            "cost": { "input": 0, "output": 0, "cacheRead": 0, "cacheWrite": 0 },
            "compat": { "thinkingFormat": "qwen" }
          },
          {
            "id": "glm-5.1",
            "name": "glm-5.1",
            "reasoning": false,
            "input": ["text"],
            "contextWindow": 202752,
            "maxTokens": 16384,
            "cost": { "input": 0, "output": 0, "cacheRead": 0, "cacheWrite": 0 },
            "compat": { "thinkingFormat": "qwen" }
          },
          {
            "id": "glm-5",
            "name": "glm-5",
            "reasoning": false,
            "input": ["text"],
            "contextWindow": 202752,
            "maxTokens": 16384,
            "cost": { "input": 0, "output": 0, "cacheRead": 0, "cacheWrite": 0 },
            "compat": { "thinkingFormat": "qwen" }
          },
          {
            "id": "MiniMax-M2.5",
            "name": "MiniMax-M2.5",
            "reasoning": false,
            "input": ["text"],
            "contextWindow": 196608,
            "maxTokens": 32768,
            "cost": { "input": 0, "output": 0, "cacheRead": 0, "cacheWrite": 0 }
          }
        ]
      }
    }
  }
In the
openclaw.jsonconfiguration, modifyagents.defaultsto configure the models. Theprimaryfield defaults toqwen3.6-plus, but you can change it to any supported model in the list."agents": { "defaults": { "model": { "primary": "bailian-token-plan/qwen3.6-plus" }, "models": { "bailian-token-plan/qwen3.7-max": {}, "bailian-token-plan/qwen3.6-plus": {}, "bailian-token-plan/qwen3.6-flash": {}, "bailian-token-plan/deepseek-v4-pro": {}, "bailian-token-plan/deepseek-v4-flash": {}, "bailian-token-plan/deepseek-v3.2": {}, "bailian-token-plan/kimi-k2.6": {}, "bailian-token-plan/kimi-k2.5": {}, "bailian-token-plan/glm-5.1": {}, "bailian-token-plan/glm-5": {}, "bailian-token-plan/MiniMax-M2.5": {} } } }After modifying the configuration, click Save, and then click Update to apply the changes.
Terminal
Log in to the Simple Application Server console. On the server list, find the target server and click Remote Connection. In the Connect with One-click on Workbench section, click Log on Now. Run the following command in the terminal to edit the configuration file.
vim ~/.openclaw/openclaw.jsonIn
models.providers, add the following configuration (replace<YOUR_API_KEY>with your API key):"models": { "mode": "merge", "providers": { "bailian-token-plan": { "baseUrl": "https://token-plan.cn-beijing.maas.aliyuncs.com/compatible-mode/v1", "apiKey": "YOUR_API_KEY", "api": "openai-completions", "models": [ { "id": "qwen3.7-max", "name": "qwen3.7-max", "reasoning": false, "input": ["text"], "contextWindow": 1000000, "maxTokens": 65536, "cost": { "input": 0, "output": 0, "cacheRead": 0, "cacheWrite": 0 }, "compat": { "thinkingFormat": "qwen" } }, { "id": "qwen3.6-plus", "name": "qwen3.6-plus", "reasoning": false, "input": ["text", "image"], "contextWindow": 1000000, "maxTokens": 65536, "cost": { "input": 0, "output": 0, "cacheRead": 0, "cacheWrite": 0 }, "compat": { "thinkingFormat": "qwen" } }, { "id": "qwen3.6-flash", "name": "qwen3.6-flash", "reasoning": false, "input": ["text", "image"], "contextWindow": 1000000, "maxTokens": 32768, "cost": { "input": 0, "output": 0, "cacheRead": 0, "cacheWrite": 0 }, "compat": { "thinkingFormat": "qwen" } }, { "id": "deepseek-v4-pro", "name": "deepseek-v4-pro", "reasoning": false, "input": ["text"], "contextWindow": 163840, "maxTokens": 32768, "cost": { "input": 0, "output": 0, "cacheRead": 0, "cacheWrite": 0 } }, { "id": "deepseek-v4-flash", "name": "deepseek-v4-flash", "reasoning": false, "input": ["text"], "contextWindow": 163840, "maxTokens": 16384, "cost": { "input": 0, "output": 0, "cacheRead": 0, "cacheWrite": 0 } }, { "id": "deepseek-v3.2", "name": "deepseek-v3.2", "reasoning": false, "input": ["text"], "contextWindow": 163840, "maxTokens": 16384, "cost": { "input": 0, "output": 0, "cacheRead": 0, "cacheWrite": 0 }, "compat": { "thinkingFormat": "qwen" } }, { "id": "kimi-k2.6", "name": "kimi-k2.6", "reasoning": false, "input": ["text", "image"], "contextWindow": 262144, "maxTokens": 32768, "cost": { "input": 0, "output": 0, "cacheRead": 0, "cacheWrite": 0 }, "compat": { "thinkingFormat": "qwen" } }, { "id": "kimi-k2.5", "name": "kimi-k2.5", "reasoning": false, "input": ["text", "image"], "contextWindow": 262144, "maxTokens": 32768, "cost": { "input": 0, "output": 0, "cacheRead": 0, "cacheWrite": 0 }, "compat": { "thinkingFormat": "qwen" } }, { "id": "glm-5.1", "name": "glm-5.1", "reasoning": false, "input": ["text"], "contextWindow": 202752, "maxTokens": 16384, "cost": { "input": 0, "output": 0, "cacheRead": 0, "cacheWrite": 0 }, "compat": { "thinkingFormat": "qwen" } }, { "id": "glm-5", "name": "glm-5", "reasoning": false, "input": ["text"], "contextWindow": 202752, "maxTokens": 16384, "cost": { "input": 0, "output": 0, "cacheRead": 0, "cacheWrite": 0 }, "compat": { "thinkingFormat": "qwen" } }, { "id": "MiniMax-M2.5", "name": "MiniMax-M2.5", "reasoning": false, "input": ["text"], "contextWindow": 196608, "maxTokens": 32768, "cost": { "input": 0, "output": 0, "cacheRead": 0, "cacheWrite": 0 } } ] } } }Modify
agents.defaultsto configure the available models (theprimaryfield defaults toqwen3.6-plusbut can be set to any other supported model):"agents": { "defaults": { "model": { "primary": "bailian-token-plan/qwen3.6-plus" }, "models": { "bailian-token-plan/qwen3.7-max": {}, "bailian-token-plan/qwen3.6-plus": {}, "bailian-token-plan/qwen3.6-flash": {}, "bailian-token-plan/deepseek-v4-pro": {}, "bailian-token-plan/deepseek-v4-flash": {}, "bailian-token-plan/deepseek-v3.2": {}, "bailian-token-plan/kimi-k2.6": {}, "bailian-token-plan/kimi-k2.5": {}, "bailian-token-plan/glm-5.1": {}, "bailian-token-plan/glm-5": {}, "bailian-token-plan/MiniMax-M2.5": {} } } }Restart the service to apply the configuration: After saving the file, run the following command to restart OpenClaw.
openclaw gateway restart
Shutting down and chat history
No. Shutting down (stopping) a Simple Application Server instance does not delete the OpenClaw chat history. The chat history is stored on the instance's disk. However, OpenClaw is unavailable while the instance is shut down. You must restart the instance to access OpenClaw and start new conversations.
The following operations will delete the chat history:
Reset system: Resetting the system is equivalent to reinstalling the operating system. This operation erases all data on the system disk, including the OpenClaw chat history, configuration, and database. To preserve OpenClaw workspace data (such as memory, identity configuration, and Skills), see Back up and restore data for OpenClaw upgrades before you reset the system.
Release instance: Releasing a Simple Application Server instance permanently deletes the instance and all of its data, including the chat history.
Resource requirements and coexistence
Resource requirements: To ensure OpenClaw runs stably, your Simple Application Server instance should have at least 2 vCPUs and 2 GB of memory. Insufficient memory in lower-specification instances can trigger the OOM Killer, leading to service interruptions.
Swap partition: Images released on or after February 26, 2026, include a swap partition by default. To alleviate memory pressure on older images, manually configure a swap partition or reset your instance to the latest image.
Coexistence risk: We do not recommend deploying OpenClaw and other agents, such as Hermes, on the same low-specification server. This can lead to resource contention, performance degradation, or functional conflicts. We recommend deploying each agent on a separate instance.
Set up OpenClaw for family or friends
Yes. Each OpenClaw instance requires a dedicated Simple Application Server and cannot be shared by multiple users. To set up OpenClaw for family or friends, you'll need to purchase a new Simple Application Server and go through the entire deployment process again.
Follow these steps:
Purchase a new Simple Application Server and select the OpenClaw image.
Follow the deployment tutorial to complete all steps, including API Key configuration and integration with an IM platform (such as DingTalk, Lark, or WeCom).
Each server is configured independently, so changes to one instance do not affect others.